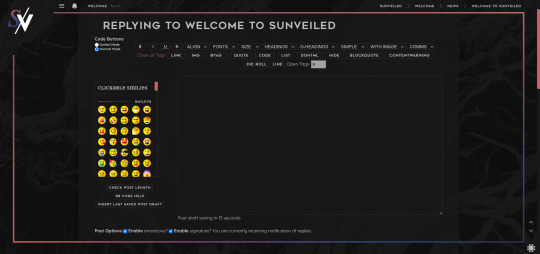
#to be a different size font bold italic
Text
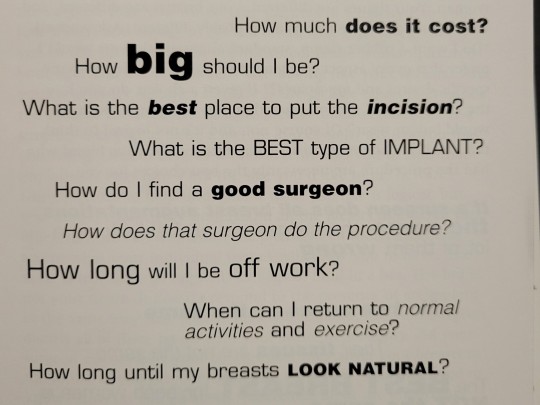
Whichever editor let this sort of stroke inducing shit slide should be fired
#theres like 7 different fonts#4 font sizes#bold italics and normal#im going crazy#who thought this was ok#mine#writing#formatting
0 notes
Note
hi!! would you mind doing a tutorial on how you add subtitles to your gifs?
hey, sure! :)
with the text tool selected, i will draw a box that is as wide as the gif and type my text. i created an action that selects all the right settings for me so it's faster and my subtitles always look the same.
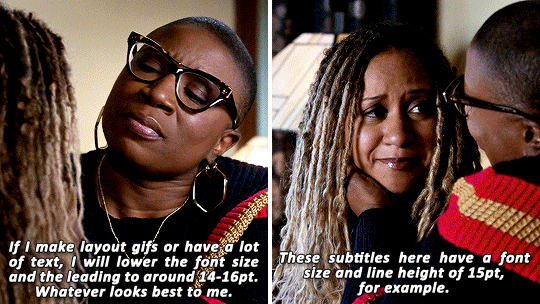
arial rounded bold is a very popular choice for subtitles, and it looks awesome, but i' always've been using the font calibri bold italic for years now. here are my usual settings for a 540px wide gif:

i usually keep the font size and leading value the same, if i change it from 18 pt. and sometimes i'll play around with the anti-aliasing method, whatever looks best for this particular gif. this will help make your text look less crispy or soft, depending on which filtering method you use. the other settings i pretty much always leave like that for subtitles.
as for colors, i always go with white first, and if there's another character talking, i will give their subtitles a different color. i usually try to pick a bright pastel color found in the gif, or even on the character's clothing (just because i like to match things haha).
it's also important to leave a bit of a gap on the sides and bottom, so the text doesn't go all the way to the edges (as shown in the next example). it's definitely harder to read text if it's too close together, or goes from edge to edge. you can push words on another line if it becomes too close to the edge, and you can nudge the text from the bottom with the arrow keys.
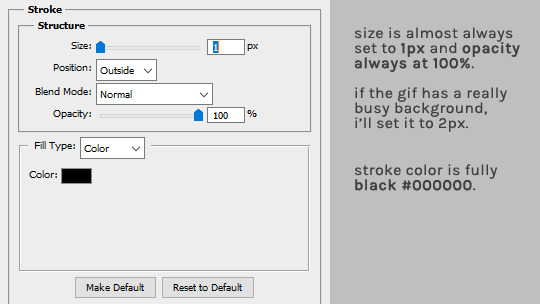
as for the layer style, i'm adding a black stroke and black drop shadow (by double clicking the text layer). the stroke almost never changes, but i'll edit the drop shadow accordingly with the gif. if it's a very busy gif, the drop shadow should be thicker to help with visibility.
and that's it! :D
#alie replies#Anonymous#tutorial#photoshop#resource#*ps help#subtitles#giffing#resourcemarket#completeresources#allresources#usercats#userabs#idk who else to tag
275 notes
·
View notes
Note
Idk how to word this properly , I’m writing a book that is like a lesbian scream (the movie) fanfiction, the main character shares a lot of conversations via text to friends and the anonymous ghost face, how do I make the text conversations sound interesting without going back forth typing “she said “ , “they said” or is that something that would be okay to do in this type of setting
(This is my first time writing ANYTHING bigger than a couple paragraphs)
Writing Text Conversations
Hmm I do not know about the movie you’ve mentioned, so I’ll focus more on writing via-text conversations in this post!
Formatting Texts
How you choose to make your text messages stand out will depend on:
How often you use it
How long these text conversations are going to be.
If text conversations are short and happen only sparingly, use less intrusive methods, including:
Using [Character Name + colons] instead of “said”
Using Italics and bold for character names
Incorporating it into sentences, i.e. Judy picked up her phone and texted back, “How are you?”
When text conversations are lengthy/primary mode of communication:
Use more intrusive formatting methods
Use [Username + Colon] rather than actual names
Left-aligning Character A’s texts and right-aligning Character B’s text
Using [tab] and [double tab] to express replies
Using different fonts and font size
Using [Character Name + 00:00 (time sent)]
Use Internet/Text Slang Carefully
For younger/more Internet-savvy characters, make use of shortened words, emojis and slang.
However, for longer texts, use proper grammar. It’s tiring to read Internet slang constantly.
Have one character use more slang than the other to characterize their “text voice”
Use typos sparingly. Readers don’t like being slowed down with misspelled words, even if they’re intentional.
Generally, emails (even casual ones) should be less funky
Making the Transition/Flow Smooth
Switching to via-text conversation is not too different from starting typical dialogue. Use transition actions like:
Character’s phones pinging
Character picking up their phone, bending over to check, opening their laptops, etc.
It was a message from [Character Name]:
Or just as simple as: She texted her sister.
#writing#writers and poets#creative writing#writers on tumblr#helping writers#let's write#writeblr#creative writers#poets and writers#resources for writers#writing questions#writing quotes#writing problems#writing prompt#writing process#writing progress#writing practice#writers of tumblr#writers block#writers life#writerscommunity#writers community#writer stuff#writer on tumblr#writer things#writer problems#writer community
114 notes
·
View notes
Text
✨ HTML for pretty colors tutorial ✨
Hello silly hamsters in my phone 🫶 I'm lowkey shocked to see blogs gatekeeping this knowledge but yeah. Make your blog pretty! Match your text to dividers or just have it as colorful as you'd like!
First of all, you can not do this on the mobile app! You need to either use a laptop or your phone / tablet's internet browser (in my case safari)
You start by logging into your account and either you make a post or you edit a post. I recommend making the post on the app first because editing is certainly faster & easier!
This is our starting point! For the fancy fonts you can use messletters


I will now log into tumblr on my web browser and click on edit this post.
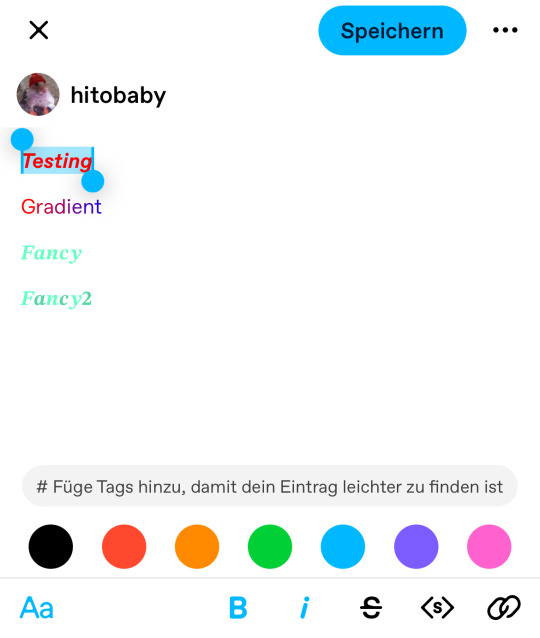
You then have to click on the little gear icon in the top right corner to change the settings on your post.
There you have to click on "rich text" to change it to "HTML"
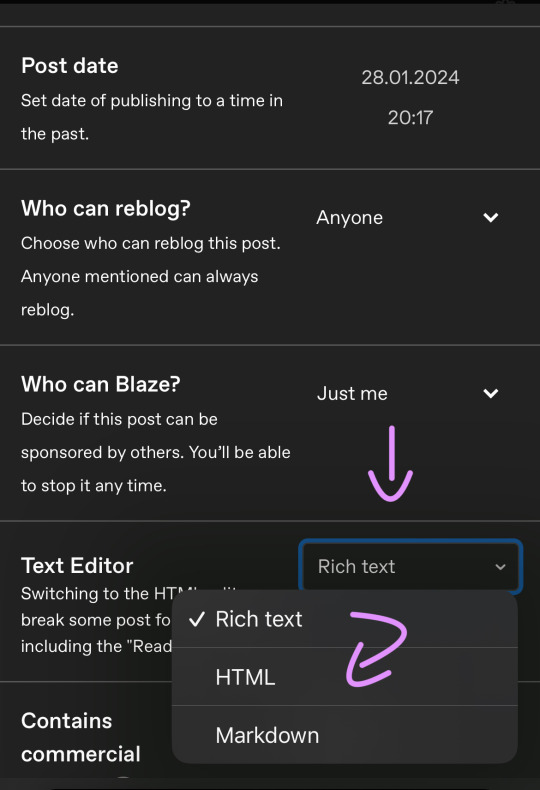
Your post should now look like this:

A quick rundown on html.
You always start with a letter or code in brackets. to end what you're doing it's </>. The slash signals the end.
P= paragraph <p> and to end </p>
I= italics <i> and to end </i>
b= bold <b> and to end </b>
Now tumblr will automatically do this for you if you made a text bold/in italics on your mobile post but to keep this tutorial simple i left that out here. You can always edit your text in the app after! Just not the color.
And as you see, the fancy text is now in coding. But we get to that later!
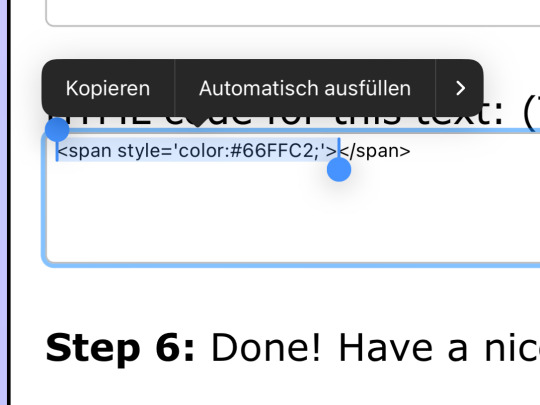
To colorize your text it's easiest to just use this website as it gives you lots of options!


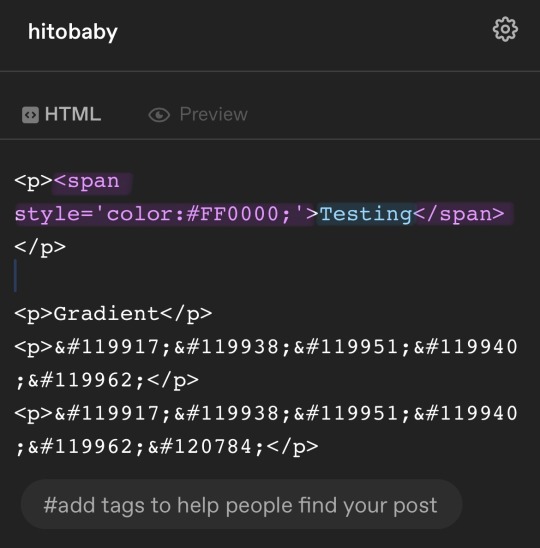
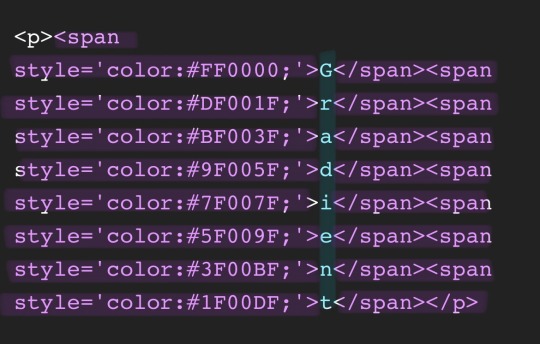
First i will be choosing the option of "solid color" and you can then put in the hex code of your desired color into the color box.
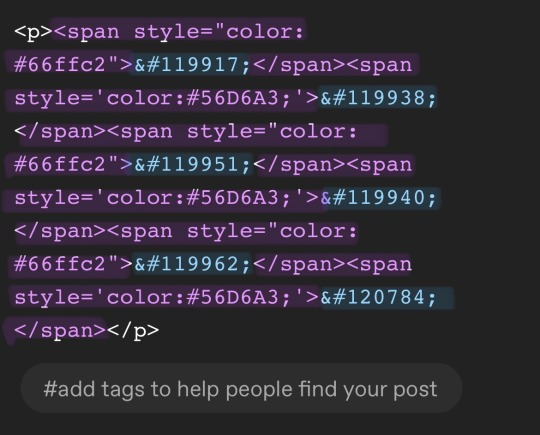
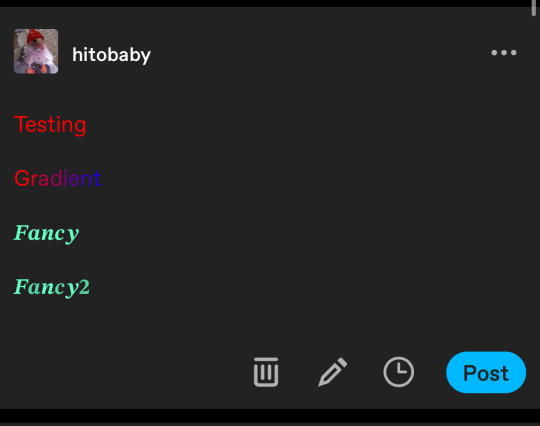
In the top box you will have to put the text you will color - for this tutorial it's "Testing"
Then you copy the box HTML code and paste it into tumblr where your word(s) are. Do not remove the in front and after your word/sentence !
For the sake of this tutorial marked the html code for colors in pink and the words in blue
Your code will now look like this!

For the gradient you can simply choose horizontal gradient or three colored gradient on the website above and copy/paste the html text.
Mind you that every single letter will get its own color code now so the word gradient suddenly looks very long in html.
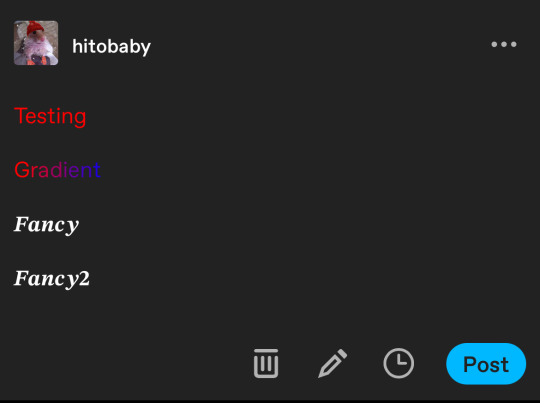
If you save the post it will now look like this!
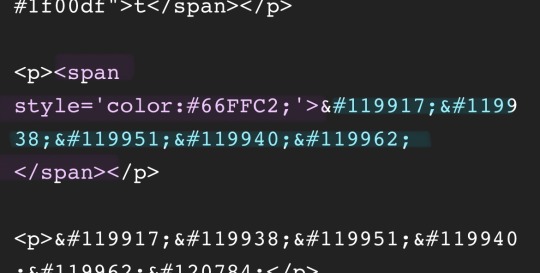
Important to know is that you can color the fancy text only solid as the website can not color it as it is and putting the letter codes in the box above does not work either.
To color the fancy letters you simply copy the color code instead of the whole text - which looks like this:
Don't forget to add </span> behind the word/the codes you're coloring to signal that this is where the color stops! If you forget to add it, nothing will be colored.
If you decide you still want to have the fancy lettering in multiple colors you have to color letter code by letter code manually like this:
(I made a very poor choice on 2 different greens but oh well)
If you'd like to change your text, you can always do that on the mobile app like you usually would. You just can't change the color unless it's into a default color. But you can still change the size or make it bold for example.
Anyhoot, this is the whole magic behind html. It's a lot and might be very complicated at first but you will eventually get the hang of it! Took me weeks and hours until someone sat me down and went through it step by step.
If you have any questions or something doesn't work as you thought it would please don't hesitate to reach out - I'm always happy to help!
#rhy speaks ♡#html template#html tutorial#make tumblr pretty 2024#tumblr tutorial#divider tutorial#writing resources#resources
134 notes
·
View notes
Text
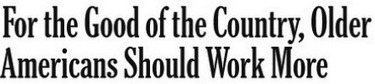


[Image ID: Seven screenshots of text. Each one is in a different font, so it’s possible to tell them apart.
The first one is in big thick black letters on a white background. This is by far the biggest quote. It says “For the Good of the Country, Older Americans Should Work More.”
The second is in white text with a black background. This is the only one with white letters It is smaller, but still bold. It says “Half of Americans lack access to a retirement plan. Here are the worst states.”
The third is medium-size and written in italics. It says, “They’re quitting just so they can get unemployment.”
The fourth is much smaller. Its letters are a little thick. It says “suggested that the country’s current unemployment rate of 3.7% should rise by 40-50% to reduce “arrogance in the employment market.””
The fifth is bigger, italicized, and slimmer. It says “A little work never hurt anyone—including teenagers.”
The sixth is small and slim. It says “Iowa just passed one of the most extreme pro-child labor bills in recent times, leaving employers off the hook if a child worker dies on the job.”
The last is a big headline. It says “Some companies will do just about anything to stop workers from unionizing. /end ID.]
131 notes
·
View notes
Note
coming from one of those "born in mid 2000s and is now suddenly an adult, making everyone feel old," people, do you have any resources to learn how to bullshit your way through getting a job with zero experience. cause i cant even put like "babysitting" or anything since covid prevented literally any teenage-typical jobs and i kinda dont know what to put on a resume beyond the university im currently attending and the high school i graduated from. and they still dont teach you this in school even though we've complained for years 😭
Okay my chilluns, listen up. This is how to bullshit your way into a basic 1-page resume even if you think you have absolutely dum-dum-diddlysquat to put on it. I completely feel you, as it's hard as hell to get a job even in the ordinary course of things, and especially when everything seems to want 10 years of experience and a bachelor's degree (and still pays like shit). But you gotta be persistent anyway. So here follows the step-by-step guide of How To Resume:
Open a new Word (or other word-processing software of your choice) document.
Pick a nice, professional-looking font (for the love of God, no Comic Sans). Times New Roman is fine; you don't have to overthink it. My own CV is currently in Perpetua, because it's a nice serif that looks crisp and a little different, but it is still clean and readable. Garamond or Cambria or other starter typefaces are fine too. Make sure it is the right size, usually around 12pt.
Put your full name at the top, centered, in BOLD CAPITALS. Increase the typeface size a few more points on this, to make it stand out and to make it take up space.
Underneath this, in regular-sized text, put your contact information: mailing address if you're comfortable sharing it, or if not, at least your phone number and email address. Use a school email if you have it, and not some weird/in-jokey personal email.
Start a new paragraph. In a slightly smaller font (italic if you want to make it look classy) write a few words about yourself. This should be something like I am a [Major] student at [University] looking for a part-time, entry-level position in [sales, retail, office, etc]. A [year] graduate of [High School] in [City, State], I am [prompt, reliable, detail-oriented, mature, friendly, etc] and a hard worker who is eager to gain experience and positively contribute to your business.
Start a new paragraph. Change the alignment from Center to Left. Create a new heading in bold underline labeled Education.
Under this, fill in your education (college first, followed by high school). Include the institution name, city, and state, the year you graduated or expect to graduate, any honors or awards, any extracurriculars, any grade-point averages if they're good (i.e. 3.0 and above), and your expected major in college.
Start a new paragraph. Create another heading: Experience.
This is where you put absolutely anything you can think of (in chronological order, most recent first and counting backward). Did you volunteer for something ever in your life? Put it down! (Title of work, dates, location, brief description of work). Did you do yard work for someone for a weekend? Put it down! Were you (or are you) part of a student club or organization in high school or university? Have you organized or taken part in any local initiatives in your community or neighborhood? Put it down! Basically, absolutely any kind of work, paid or unpaid, that might be relevant, regardless of how long it was or when it took place.
Under that, put the new heading/paragraph Skills and Interests.
Have you worked with Microsoft Word, Outlook, PowerPoint, Adobe, Photoshop? Put it down! People love that shit! Do you use social media and/or know how to work it better than the average grandma? Put 'er down! You get the idea. Think of anything in your daily life that can be put in Job Language and then see if you can do that. You are in university; do you have any projects, papers, or other things that you're proud of? Have you successfully managed a (gasp) group project? Do you make any kind of art? Are you a registered voter who has taken part in civic/political organizations, drives, or events? (If not, REGISTER TO VOTE! This is your angry grandmother speaking). All of that can go down. Even if it's not job experience per se, it's life experience and shows that you are someone who is engaged with the world and working to gain more.
Last paragraph and heading: References. Ask a few trusted adults who know you well and aren't related to you, such as a favorite high school teacher or a university faculty member/degree advisor, if they'd be willing to serve as referees. Put down their full names, titles/place of work, email addresses, and phone numbers.
Voila! You have a full page resume, probably even a little more if you're lucky. Proofread, make sure the spacing is even and the alignment is right, it doesn't look weird, the text is a consistent size, it's all the same color, there are no glaring typos or grammatical errors, etc. etc. Save it as a PDF.
Boom. Done. You are now a Job Hunting Maestro.
If you get an interview, you don't need to pretend that you have tons of experience or that you're something you're not, but you can present what you ARE in a positive light anyway. Don't apologize for yourself or play yourself down pre-emptively; be confident about yourself and what you can offer. You're a college kid looking for your first part-time job, COVID prevented you from a lot of normal teenage work experience, you're willing to work hard and learn new things. Here's your resume. What would be a good time to talk again.
Good luck! I believe in you.
194 notes
·
View notes
Note
how do you put a gradient in the lyrics of your posts

ᨳ ׂ tutorial 𓈒 ੭
okay so here’s the tutorial I didn’t realise I had so many asks asking how I do this. I just wanna tell you guys… I’m really bad at explaining things

https://www.stuffbydavid.com/textcolorizer
— step one : write whatever you want on the text box like so

— step two : change the color effect from “horizontal gradient” to “three colored gradient” to have the color change effect

— step three : choose the different colors you want your gradient to have

— step four : change the font style and size, if you want it bold and/or italic (this is optional, I personally don’t do this step)

— step five : copy the HTML code which you can find at the bottom of the website

— step six : open tumblr on a google browser (this won’t work on the actual app) and click on the “⚙️” symbol on the top of the post
— step seven : go to “text editor” and change the setting from “rich text” to “HTML”

— step eight : copy paste the “HTML code”

— step nine : post your gorgeous moodboards <3
102 notes
·
View notes
Text

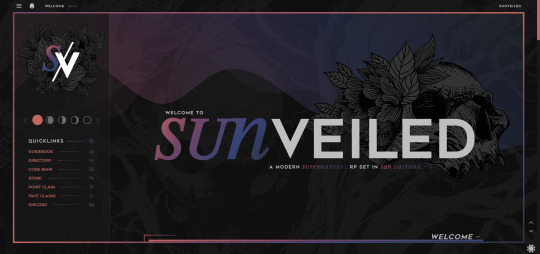
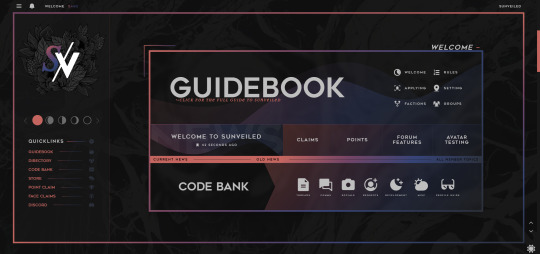
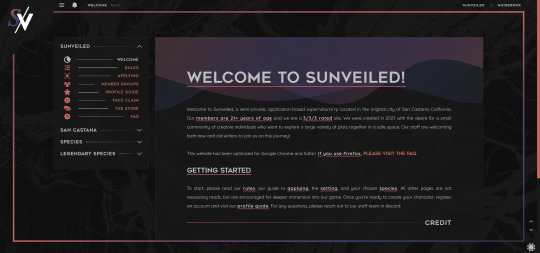
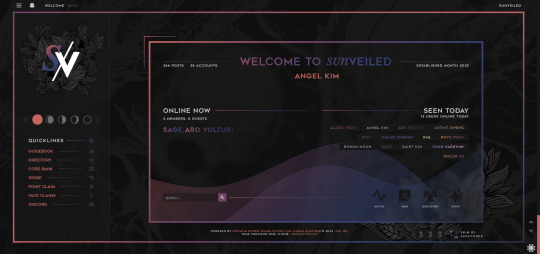
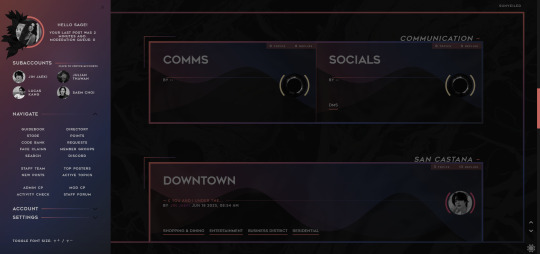
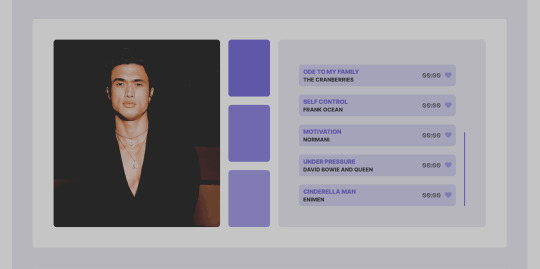
Hey sunlings! We're here with a skin preview!! Our skin was designed by the staff team here at Sunveiled and developed by Sage (@sagecodex). We've been working for months to get it perfect for you, so please bask in its glory as this is the first time we're showing it to the public!
Beneath the cut is the full list of our features. But some of our coolest features can't be captured by static pictures. So stay tuned for a video walkthrough with Sage to see some of our more dynamic details!
Forum features:
light/dark mode toggle;
scroll top/bottom;
adjustable font sizes;
forum colors change with the logged-in membergroup;
alert menu toggle;
popout side navigation;
subaccount switcher (with icons);
automatic thread trackers;
custom emoji;
an ever-growing amount of profile badges;
auto claims;
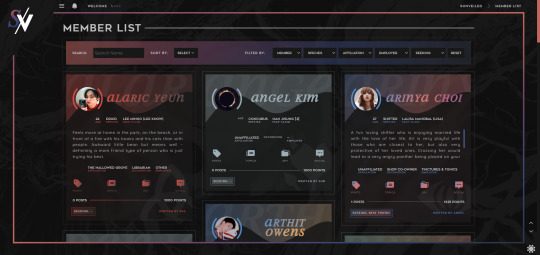
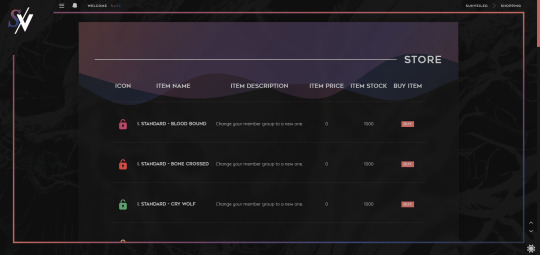
filterable member list;
linkable guidebook tabs;
recently active topics list;
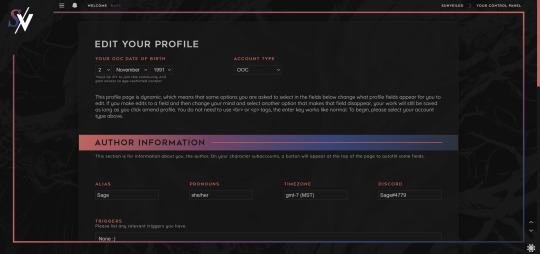
different ic and ooc profiles;
autofill ooc profile fields from parent account;
popout profiles;
dynamic profile fields;
over 70 profile layouts to choose from;
over 110 posting templates to choose from;
over 90 of those templates available in bbcode menus;
topic tags (for cw's, mature content, open threads, rapidfire, etc.);
keyboard shortcuts for bold, italic, and underline;
99.9% mobile-friendly.
We fully expect our members to find bugs while we go through our initial opening, so please be patient as we work to fix any minor functionality issues.
#sunveiled rp#previews#skin preview#jcink#jcink skin#jcink coding#sagecodex#jcink rp#jcink roleplay#semi-private jcink#jcink forum#jcink buzz#jcink premium#site buzz#semi private rp
76 notes
·
View notes
Note
hii, do you have any templates for a multimuse pinned post??
idk if it’s a template, but idk how to make my pinned post pretty yk?
hello there! i don't have any templates for that per se ( because there's no one universal answer for this and i think it's up to each individual how they wanna style it ) but i can give you some markers. also, here's an example of my potential multimuse blog, just to give you an idea of what you can do without overcomplicating it.
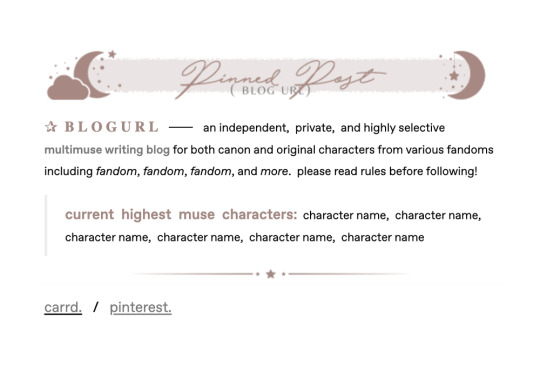
first off, the easiest thing to make it pretty is if you already have a certain color scheme or aesthetic you can use. ( so in the example above, the theme is mostly stars and the color scheme consists of a muted red / brown and grey. ) it basically gives you a basis on what things to use and how to make it fit your theme nicely.
secondly, just play around with various fonts ― personally, i use this site a lot, but there are a lot of similar ones out there, just use whatever you like best ― styles like different sizes, colors, spaces, bold, italic, and links to emphasize certain things ( just note here, that the more excessive you get with all of that, the more difficult it may become to read; so always keep that in mind if you care about readability ) and use symbols / emojis to give it more, for lack of a better word, character.
put some graphics if you have them, use quotes that seem fitting, include a little info on whatever you deem important, list the characters you currently have the most muse for ― the possibilities here are pretty much endless.
honestly, overall i'd just say play around a bit, maybe look at the way other people style their pinned posts ( without downright copying everything they do ) and try until you find something you are happy with. after all, you can always change the look of it at a later time again. i do hope this little guide helped you a little, though! :)
119 notes
·
View notes
Text
we are a mere three - count 'em t h r e e - days away from opening! our team can't wait to share with you the world that we've created and for y'all to join in and build upon it with your own characters, requests, locations, and lore! today we're giving a bit of insight to our application process with our full app preview under the cut. we also have created a gdoc of our application fields so you can get a head start on some of your app prior to being on site. some of you may have caught that we revealed our graphic dimensions in our guidelines preview, but for a quick refresher, these are the image sizes needed to complete a profile:
• one 250px by 400px still image
• two 100px by 100px images
• one 150px by 150px image to be uploaded avatar (max 1024kb)
in addition to the above, our profiles include up to two optional 200px by 250px still images.
without further ado, say hello to the beautiful profile crafted by the talented, brilliant, incredible athena which has over 200 different freeform code options to enjoy!
✨ view more about our app below! ✨
something to note, right off the bat: you don't have to read all of this. i tried to be thorough and go over different options for everything, but if you just want the pictures, go ahead and grab them. the key part is filling out the nifty gdoc chels made with the fields, honestly. the rest is just an explanation at some of our optional additions, as well as how things will look.
first, our freeform section is optional. the way we handle our applications, we just want a good understanding of your character. we get that character applications are often something of a jumping off point, something that can be built off of. as such, if you don't want to do them and want to put the necessary amount of information to get that grasp of your character into your census, by all means that is allowed. if you do this, we just ask that you choose the "profile shipper" option. if you select yes to this dropdown, your census information will also show in your profile. keep in mind, our profile has no word count minimum or maximum, so long as you get that understanding across and have something in all the mandatory fields, we're good. that said, if you choose to do a freeform, here's an overview of the codes available to you to use in it.
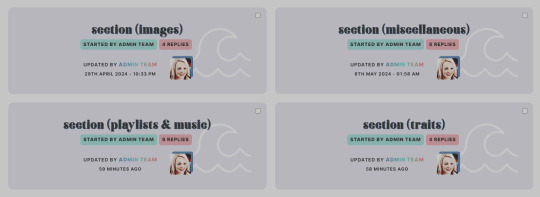
first up, we have what we call our "sections." when using these, they add much larger components to our freeform area, and are their own profile segment codes. here, they add an additional section to your profile, instead of just text and designs inside of text. you can see some of the categories to choose from, but something to note for this part is as follows:
images are full page width, so if you use the long and wide one, we recommend the image being at least 1000px wide. there are smaller choices available.
our playlists & music category include codes where you manually put in the information, ones where you put in a spotify link, or ones that allow for a youtube link.
our other two categories are very development based. there's line breaks, percentage bars, search history, a more in depth interview option, aesthetic options, and more.
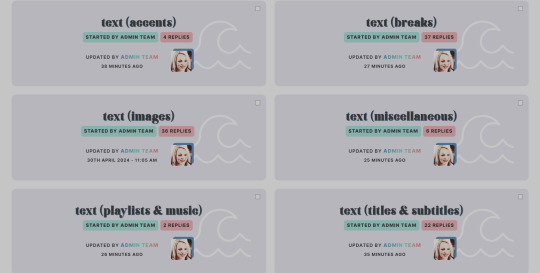
next, we have text. everything in this category is for how you display and style text. the text codes should be placed inside one of our text background codes, though some have been made to be used outside of them. here's quick run through on what we have here:
accents are stylings. we have two options for how you choose to accent font, notably divided by if you choose to utilize a gradient or not. each of these will have a different bold, italic, and underline. also in this section are options for padding text.
text breaks are options to break up text. some of these are lines based on your member group colors, some are roman numerals, some are font icons, and then some. it's just if you choose to have a formal break in the section.
images are image codes you can throw into the text backgrounds. these will have options of 1, 2, 3, or 5 columns, come in different optional color schemes (gradient, non-gradient, background color), and come in three different shapes (circle, square, rectangle).
playlists & music are all manual in this area, just because if you want to utilize a bigger playlist, we have those in the sections above. that said, there is a plan to further develop this section post-opening.
titles and subtitles for text are just, but with options for direct titles and subtitles, options for long text, and more. everything that encompasses your average fancy section division text is in here.
once again, our miscellaneous is some development codes. there are some aesthetic options, some zodiac options, just fun little extras if you choose to use them.
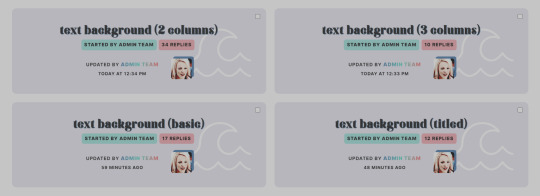
last up, we have our text backgrounds. these are the sections that house text, where you would use the codes in the previous category to style them. these come in eight different color options (two backgrounds, three accents, three gradient directions) and are broken up in a variety of ways, such as:
text background sections with two columns will house codes that allow for two text areas side by side, as well as text that flows into two columns. please note that some of these will have titles built in. additionally, while our coding may show with only two, they allow for any number of additional text areas so long as it's divisible by two. the more you add, the more it'll adjust to include.
similar to the above, text background sections with three columns will just instead add a column to this. same rules apply regarding titles and adding, but this time they should be divisible by three.
our basic background just means there's no columns. in here, you'll find some that are just singular sections you can post around each other, others have text areas that flow together within a section just in a way that stacks. even still, it just means it's all in one column spread entirely across the freeform area. as a note, as mentioned previously, this area is wide.
lastly, our titled backgrounds just mean they are one column text areas with a title somewhere. some of these have titles on a side column, some have a title that fits as a row above the text area. it just has a section for you to give that text area a title, or a question, or a year, or a decade. whatever you want to put there, basically.
whew! [spongebob_huff_meme.gif] all that said, a lot of our codes come in the same eight different coloring options, or a variety of those as well as our text color, mostly so you can choose how you want to do your freeform, if you even choose to do one at all.
when i was originally creating the profile, i put the text box i would want, and the gradient i would want, and i put the image and development codes i would want, and... you see the problem. our mission upon conception of the idea of maybe making this site a reality was always to make a site where people could have creative freedom and see their vision come to life. i added a lot of the exact same option, but in a different color, or without a gradient, or in a different shape, etc because i felt that if we only offered freeform codes to make applications the way i would make mine, that wouldn't be meeting that mission. so... use them how it makes sense to you, the ways you prefer, ignore the ones you don't like. whatever works for you, we support. and, if this somehow doesn't fit your needs, after we're open to taking suggestions and adding to the repository post-opening. i might not be able to get to it immediately or might not be able to add all things, but i can definitely try.
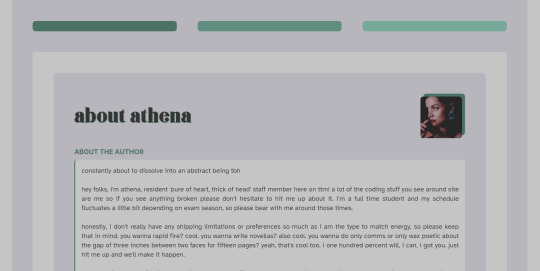
anyway, this isn't what you're here for, is it? some previews of our profile application are below. if you're reading this, remember to remind me in chat to talk about the user control panel so i don't have to make a second long post like this. you have permission to tag me (athena) personally. if no one asks, this will be a special little treat for opening.
✨ give us the pictures already! ✨
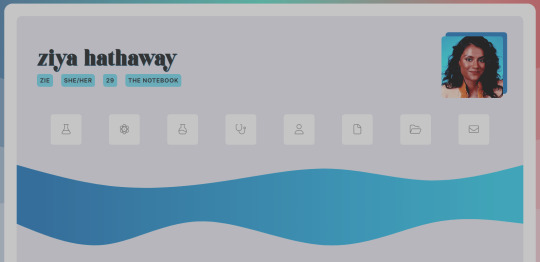
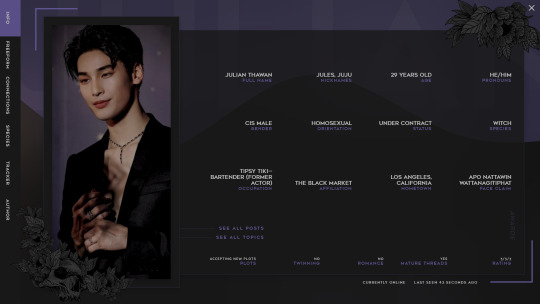
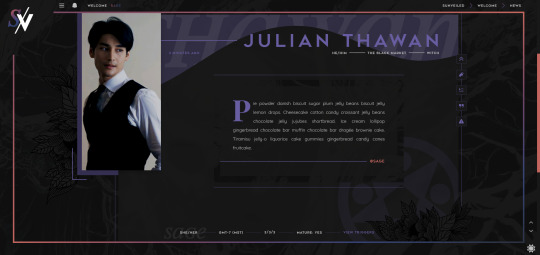
the top of our profiles feature basic character information as well as four custom links and icons.

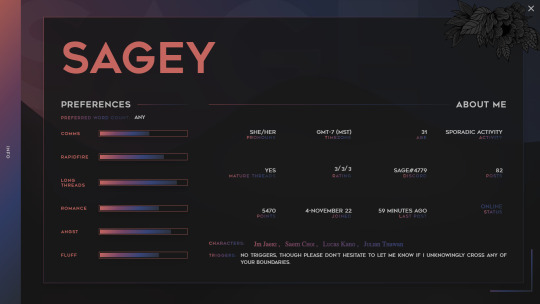
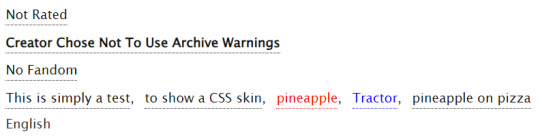
next up is our character basics information. if you have warnings in your app, the trigger warning section will show up. if you don't, it won't. the chosen character rating will display, marking your comfort in this character's interaction with these topics and following the common rpg rating. this has four tabs, and four sections: about the character, about the relationships, about the author, and an automatic tracker.
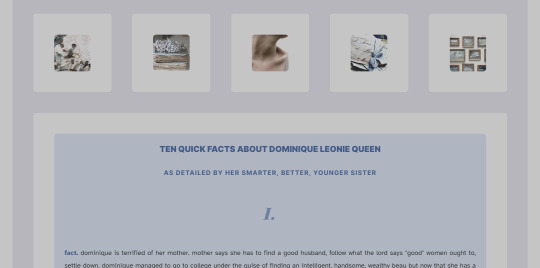
after an aesthetic breaker, we have our freeform area. if you choose to include it, it will show up. if not, it won't. this example uses one of our image sections, and then a text background section with different accents, titles, and breaks.
this is one of our development miscellaneous sections.

here's one with a traits section and a 3 column text background featuring title.
this profile also utilizes one of our other miscellaneous sections, this time for an interview.


a couple different example of some of our trait sections with bars.
an example of one of our two column options, this time utilizing a text header and looking through the code bank to see what numbers correlate to which colors to have them show up different colors throughout. typically this is 1 for main background, 2 for accent 1, 3 for accent 2, 4 for accent 3, 5 and 6 and 7 for different gradient directions, and 8 for our alternative background, as a note to refer back to when you can see these.
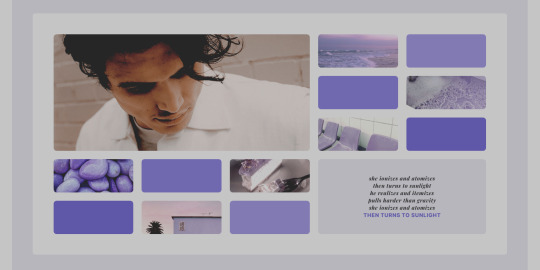
an example of the aesthetic break that sections of the freeform if you have it turned on, as well as our large image option.

another miscellaneous section for development usage.
one of our manual playlist sections, so you can see both how it rests and how it looks scrolled.
if you elect to turn on your profile shipper, it'll start off with a section with your information, followed by a section for your character's information. as you can see, i am wordy. you do not have to write this much. that single first line would have been enough about me. i could have used a meme. unfortunately, i am a blabbermouth, and it is incurable.
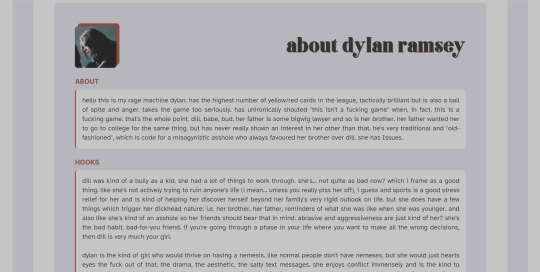
unfortunately for you all, and for the space of this post, my fellow staff also have incurable blabbermouth. i love them for it. here's a preview of how that profile shipper option looks with just text filled in for the about and hooks. i will repeat, you do not have to write this much. we are just very extra, as if the number of codes for this freeform didn't give that away.
okay, i think that about previews a little bit of everything. if there's anything specific you would like to see that i forgot, throw me an @ in the discord. i have to stop typing now or chels is going to go through and make this sound more like a staff member giving an announcement (like how it started, how it was supposed to be) and less like a coder losing all grips with reality while trying to explain this without looking like the conspiracy gif. alas, i think i've fallen into the latter.
have a wonderful day, y'all. i hope you enjoyed this preview, even if it lost the bit somewhere along the way. from all of us behind #thinkrp, we absolutely cannot wait to see you all on the 18th, this saturday, when we open.
7 notes
·
View notes
Text
AO3 Tag highlighting skin
The following is a soft alternative to using the search tag/exclude tag function by coloring/styling tags of your choosing to make them more noticeable when browsing the entire site.
CSS instructions under the cut.
Use the following template in your custom skin's CSS box (here)
a.tag[href*="/█████/" i ] {color: █████;}
The green block is to be replaced with a tag you wish to color.
It is not case sensitive, and all spaces must be replaced by “%20”.
I suggest going to the tag’s page and copying the part between “/tags/” and “/works” of it’s URL to avoid mistakes.
(as in, the yellow part of the example tag URL below)
archiveofourown.org/tags/Hurt%20No%20Comfort/works
The red block is to be replaced with the color you wish to color your tag with. Use any of the color names below.
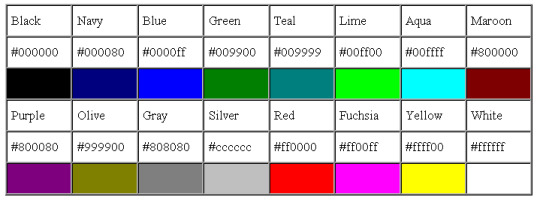
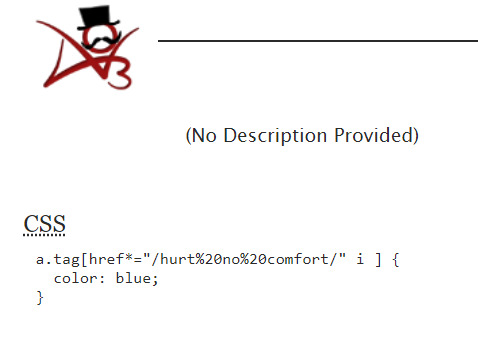
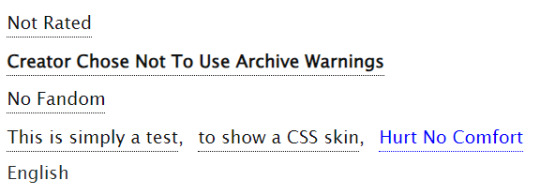
Once you have edited your template, save and turn on your skin. If you did everything right, it should work as intended. (example below)
a.tag[href*="/hurt%20no%20comfort/" i ] { color: blue; }

If you wish to color multiple different tags with the same color, add
, a.tag[href*="/█████/" i ]
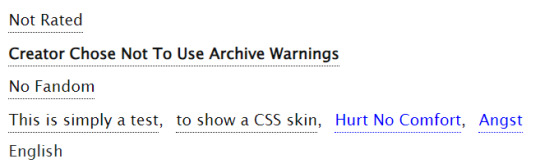
after the closing square bracket "]" of the main template and repeat the new green block's instructions with another tag. You can add as many tags as you like this way. (example below)
a.tag[href*="/hurt%20no%20comfort/" i ], a.tag[href*="/angst/" i ] { color: blue; }
If you want to use multiple colors, use the template again (example below)
a.tag[href*="/hurt%20no%20comfort/" i ] { color: blue; }
a.tag[href*="/angst/" i ] { color: red; }

Other highlighting styles
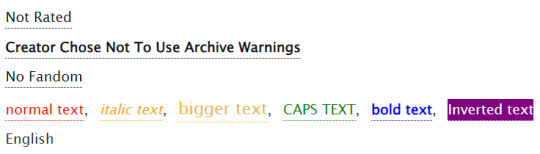
for different styles, use the same template as before but replace "{color: █████;}" with the templates below (same steps for the red blocks as before)
Italic
{color: █████; font-style: italic;}
Bigger
{color: █████; font-size: larger;}
ALL CAPS
{color: █████; text-transform: uppercase;}
Bold
{color: █████; font-weight: bolder;}
Inverted
{color: █████; background-color: █████;}
(use a contrasting color in the pink block)
That's all for now, my ask box is open for questions and requests!
48 notes
·
View notes
Note
2 basics, 2 canon, 2 tumblr
QUESTIONS FOR THE MUN || accepting !
How do you describe writing / rp to others?
i don't <3
...but if i had to, i'd just describe rp as an activity where people write interactions between characters-- simple as that.
What was the first muse that you’ve written?
my old sonic oc i mentioned in a previous ask! i also used to drag canon characters into the email threads, so i wouldn't be surprised if sonic was the first official character i've written. can't say for sure, though.
How far do you go with divergencies when it comes to your canon muse?
i try to keep yuri canon-compliant! it's hard when a lot of vespy's supplementary material isn't translated or readily available online, but i gobble up anything i can find. if making him bi/trans is divergent, then that's about as far as i'll go unless i'm explicitly writing an au (i'd argue bi/gay/aro-coded readings of yuri's character make complete sense, though... a rant for another day lmao).
What is your favorite canon muse?
not yuri, that's for sure (lying).
What are trends when it comes to writing that you dislike?
people making it their personal mission to format as unintelligibly as possible. whenever i see someone using different fonts, text sizes, excessive italics and bold, strikethroughs, and colored text -- all in the same post -- it's an automatic "nope" from me, sorry! if it works for them and their writing partners, that's great, i just don't wanna waste energy deciphering it lol.
What trend would you wish to see on here?
more random asks! speaking as someone who stresses himself out over the slight possibility of annoying others, i think we need to start utilizing the ask box more, even if it's just for our muse to say "'sup loser" for a quick, silly ic interaction.
3 notes
·
View notes
Note
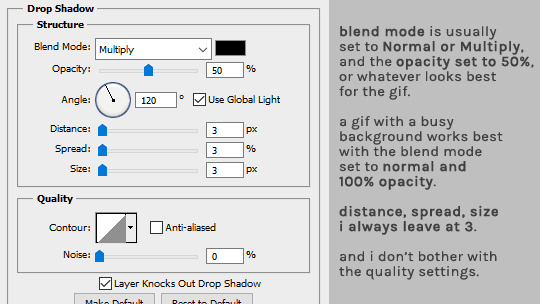
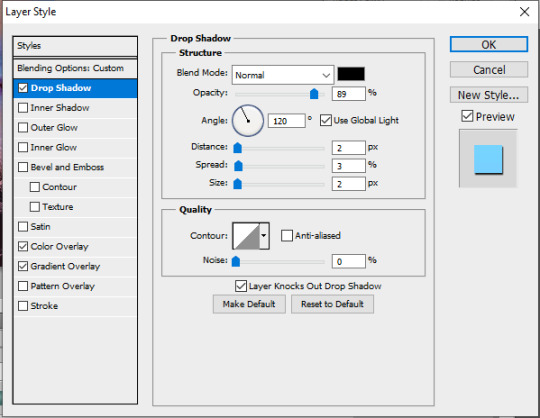
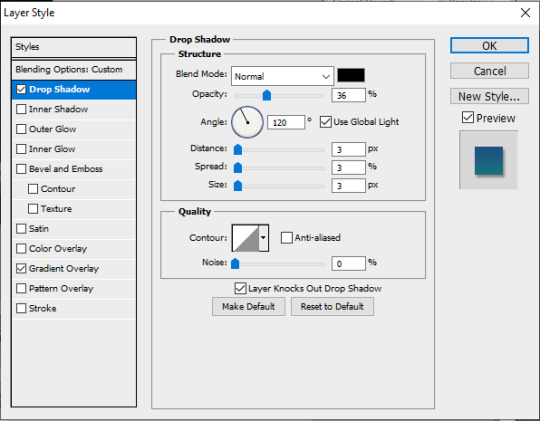
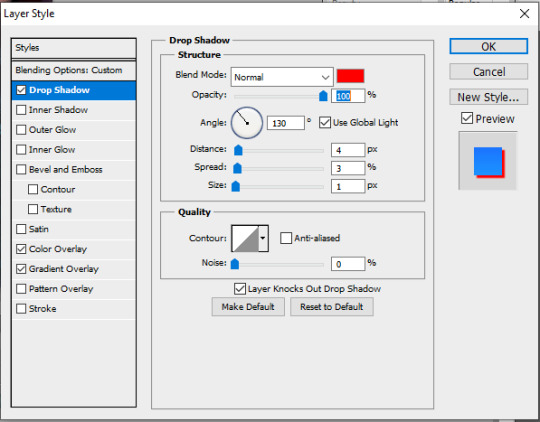
hi! potentially weird question, but do you use the same drop shadow settings on all text? or do you use different settings for say, your captions vs the more stylized typography? if so, would you mind sharing the settings you'd recommend for sans serif text? thanks 💞
hello! not weird at all :) i do use the same style i've saved years ago for my gifs with captions. my drop shadow settings look like that:
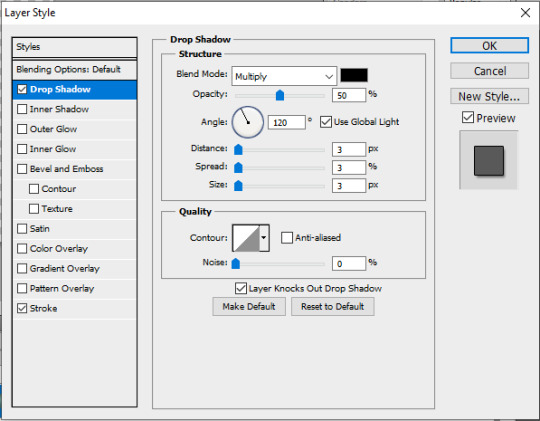
i also use a 1px stroke in black and the font i use is calibri bold italics + faux bold, size 16-22pt. if the background is busy, i will have a stronger drop shadow opacity and put the blend mode to normal.
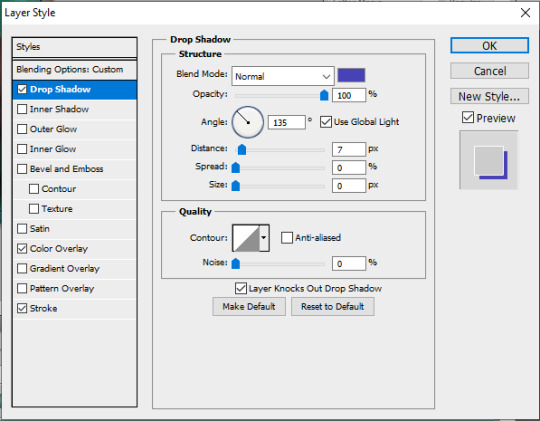
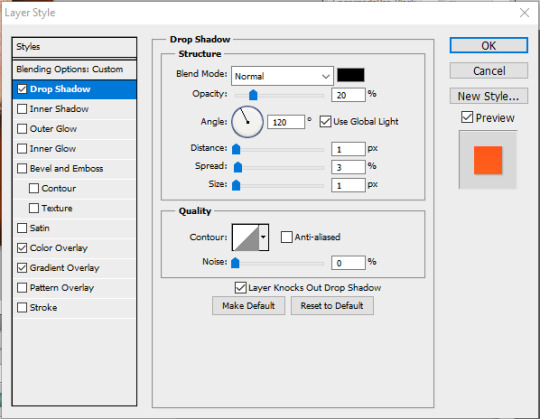
as for more stylized typography it pretty much depends on what i'm going for, so it's different almost every time. i've put a few examples of drop shadows i've done under the cut :)
i hope this helps!


96 notes
·
View notes
Text
A few people now have asked me how I did the TMA transcript formatting for ‘Eye, Me, Myself’. This is (obviously) not a TMA blog but please feel free to share it around that side of the fandom!
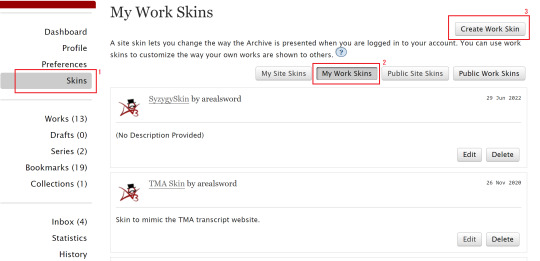
To start with, you’re going to want to go to your AO3 dashboard, click on the tab that says ‘Skins’, ‘My Work Skins’, and then hit ‘Create Work Skin’ in the top right hand corner.
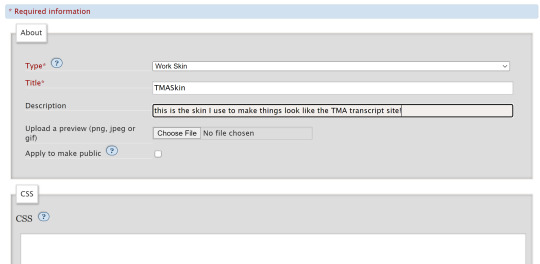
Name it whatever you want, give it a description:
and then copypaste all of the following into the CSS input section. (Note: if you actually know how to use CSS/are a coder, I know a lot of this might be redundant, but I... am very bad at coding. This is the only way I knew how to do it.)
#workskin .names { color: #586e75; text-align: center; font-family: 'LibreBaskerville-Bold'; font-weight: bold; } #workskin .directions { color: #93a1a1; } #workskin .title { color: #657b83; font-family: 'LibreBaskerville-Bold'; } #workskin .notes { color: #839496; background-color: #eee8d5; font-family: 'Courier'; font-size: 18px; height: 100%; padding-left: 250px; padding-right: 250px; } #workskin { background: #fdf6e3; font-family: 'Libre Baskerville'; color: #657b83; padding-left: 250px; padding-right: 250px; font-size: 22px; line-height: 10px; margin-top: 1em; margin-bottom: 1em; } #workskin .title:before { content: "THIS BIT CAN BE REPLACED WITH THE CASE NUMBER\a"; white-space: pre; font-family: SFMono-Regular,Menlo,Monaco,Consolas,"Liberation Mono","Courier New",monospace; font-size: 20px; color: #93a1a1; margin: 14.562px 0 0; } #workskin div.preface { background-color: #eee8d5; margin: 1px -250px 0; } #workskin .preface h3 { font-family: SFMono-Regular,Menlo,Monaco,Consolas,"Liberation Mono","Courier New",monospace; font-weight: bold; font-size: 18px; color: #839496; } #workskin .fixclass { color: #839496; background-color: #eee8d5; font-family: 'Courier'; font-size: 18px; height: 100%; padding-left: -250px; padding-right: -250px; } #workskin div.preface .summary { color: #839496; background-color: #eee8d5; font-family: 'Courier'; font-size: 18px; height: 100%; padding-left: 250px; padding-right: 250px; } #workskin h3.byline.heading { font-family: SFMono-Regular,Menlo,Monaco,Consolas,"Liberation Mono","Courier New",monospace; font-size: 20px; : 14.562px 0 0 font-weight: italic; } #workskin a { color: #93a1a1; text-decoration: none; } #workskin blockquote p:last-child { color: #839496; font-family: 'Courier'; font-size: 18px; } #workskin div.preface .summary { color: #839496; background-color: #eee8d5; font-family: 'Courier'; font-size: 18px; height: 100%; }
The one bit of modification you might want to make at this point is the part that starts with #workskin .title:before - the part that says THIS BIT CAN BE REPLACED WITH THE CASE NUMBER is where this bit at the top will go, above the title.

Replace that with whatever numbers you want, or delete the entire paragraph if you don’t want it at all. Got it? Cool! Now, save the skin, and go open up a new work so you can start formatting everything. Fill in all of the usual tags and titles and summary things as you usually would (obviously), and don’t forget to select your new skin when it asks you to.

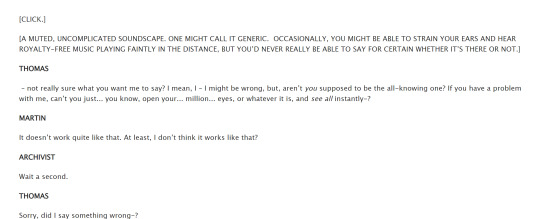
So, here’s the time-consuming bit. You’re going to have to go through your entire fic and manually put class tags around every bit of the dialogue you want to look different. Normal dialogue is the default. There’s not a lot of different tags, so here’s what they are and where to use them.
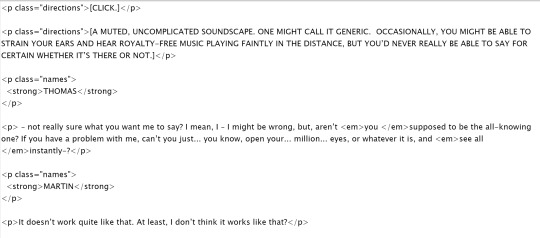
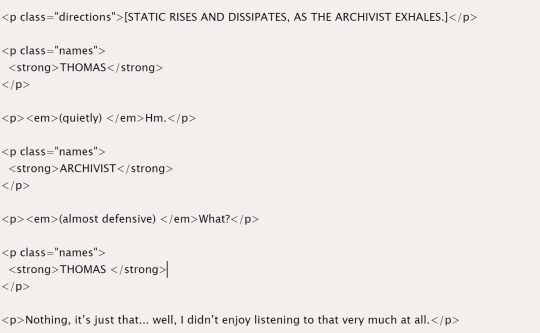
<p class="directions">This is the class you put around ‘stage directions’, like what the characters are doing and what the environment sounds like.</p>
<p class="names"> <strong>This is for character names, like MARTIN and ARCHIVIST</strong></p>
<p class="fixclass">This is what you put around the notes at the beginning and the end of the fic, to make it appear slightly different.</p>
And here’s some examples of how to use those tags, along with the posted end result:
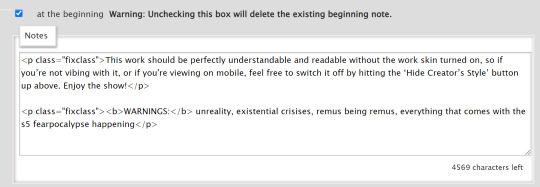
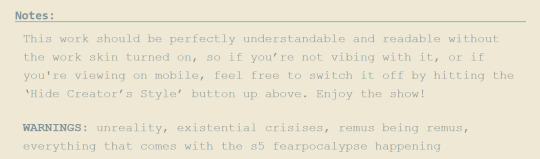
That’s pretty much it. And as a final note, it’s probably best to note in the tags and the opening notes of the story (as I did with mine) that this skin isn’t viewable on mobile, and if mobile users want to read it, they can just hit ‘Hide Creator’s Style’ at the top of the page. The nice thing about this skin is that even if you do turn it off, it remains readable as a transcript-style work, e.g.,
Okay, that’s everything! Enjoy the transcript formatting! And please do let me know if you use it, I’d love to see what you end up creating!
52 notes
·
View notes
Note
You recently shared a great post on transcription tips, and I had a follow-up question:
Any specifics on why bold and italics should not be replicated? E.g. because of how Tumblr interacts with screen readers?
when I did previous transcription work (for Reddit, through Transcribers of Reddit/ToR) the guideline was to preserve simple formatting like bold, italics, and even all caps, based on several years of partnership with subreddits like /r/blind, so this one surprised me and I'm curious if you have more info :)
I could totally see it being "idk, different user base so different preferences" and that's valid, I just really like knowing explanations behind tips!
Thanks for sharing your knowledge <3
For this, it's because there's a lot of people who can read the text on their own without a screenreader, (sometimes via increasing the font size through their device), but can't read text that's italicized or bolded (or all caps). This is also why posts with large text aren't accesible for people who do this to read posts, because then the large text gets blown up so big it starts getting cut off.
5 notes
·
View notes
Text
🌸 — PINNED.
Welcome to KRP 1x1 Finder! We aim to help roleplayers find partners with similar interests in activity, plots, ships, and so on. Please note this blog caters only to KRP. Read the rules / guidelines and suggested submission details below before submitting. Failure to follow the rules will lead to your submission being deleted.
This blog is affiliated with @krpmessages 🌸
* Rules updated 09/03/23.
RULES / GUIDELINES.
We only allow submissions searching for 1x1 partners. No directories, no groups, no servers, as there are already blogs dedicated to those.
Requests may only be submitted through the ask box or submission box. Any requests sent through DMs will be ignored.
We do not accept submissions or blog-follows from users under 18 years of age. By submitting to or following this blog, you agree that you are 18 years of age or older. If your ad states that you allow minors to contact and roleplay with you, it will not be published.
Ads on this blog may potentially contain content or themes you find distasteful or uncomfortable. We do not police fictional content and we highly advise that you block trigger warning tags. The only things we do NOT allow in ads are adult/minor relationships, pedophilia, and requests to roleplay as/with underaged idols.
We allow requests for general/idolverse plots, fandomless/original plots, and AU/fandom-based plots. Please specify what you’re looking for.
Be as clear as possible with what you’re looking for, especially in regard to your preferred dynamics, genres, platforms, ships, etc.
As of 09/23, you are now required to state which Korean celebrities you write as or use as faceclaims. The admin are not versed with every single celebrity in the Korean industry, so it's required that you include what group they're currently in or if they're a soloist, an actor, a model, etc.
For NSFW requests, if you’re sending your ad through the ask box, keep it vague or it will not be posted. If you want to be explicit and/or list kinks, then you must use the submit box so that the admin can place the information under a read-more.
When it comes to requests for dark material, do not censor triggers or your ad will not be posted. Censoring the words interferes with people who have these words blocked. For example, do not write ‘dr*gs’, but instead write the full word ‘drugs.’ If sending your ad through the ask box, keep it vague. If you want to be explicit, then use the submit box.
We delete ads after one month in order to keep things current. If it has been more than a month and your request has been deleted, you are more than welcome to send in another one.
Please do not send your ad in more than once a week. If we recognize your ask/submission and it has been less than a week since your last one, we reserve the right not to post it. We are specifically referring to ads from the same user asking for the same thing. Ads from the same user that are requesting something different are acceptable.
The admin do their best to get ads posted within 24 hours, but some days we may not be able to due to personal commitments away from this blog. If your ad has not been posted within 48 hours, you are welcome to send it again in case it was eaten. Please also read over your ad to make sure you didn't break or miss any rules.
Please stick to the default font size when sending your ad. You can add bold, italics, color, or emoji as long as the ad is still readable, but refrain from using small font for aesthetics so that everyone can comfortably read the ads.
If you are looking for dark or NSFW roleplay, check your account settings to make sure that you can see posts marked mature. You won’t be able to see your own ad if your settings are not set up correctly.
We are not the police. We are not HR. We are not your parents. If you have issues with a roleplay partner, we cannot intervene to solve them for you. Please do not message us with callout posts, warnings for others, or requests for others to block the person you had problems with. Unpleasant things happen online, especially in the roleplay community. Learn to block and move on.
With that last rule being said, we ask that everyone please be respectful toward your fellow roleplayers. We are all here for the same thing and that is to write. Treat others how you want to be treated. Learn how to communicate civilly.
—
SUGGESTED SUBMISSION DETAILS.
If you’re feeling stuck and aren’t sure what to put in your ad, the details below may help you out.
Your age is required. You can either be specific or state 18+, 21+, 30+, etc. You can also state your preference for your partner’s age as 18+, 21+, 25+, etc.
Your pronouns are recommended so that others don’t misgender you upon first interaction.
Platforms you prefer writing on, such as Discord, Twitter, etc. You can list as many platforms as you’re comfortable with.
Your literacy level and expected level of partners, meaning semi-literate or literate. You can also state lengths, such as one-liners, single-para, multi-para, novella, etc. and if you’re comfortable with action-script style or rapid-fire threads.
Expected activity level between you and your partner. Some people are looking for daily responses, some people don’t care if you only reply once a month.
If you’re looking for general/idolverse, fandomless/original, or AU/fandom-based roleplay. You can state you’re looking for all or whichever ones currently appeal to you.
Your preferences for genres and themes. If requesting fandom-based roleplay, include what fandom.
If you're looking for a highly specific plot, you can put it in your ad.
You dynamic preferences, such as mxm, mxf, fxf, etc.
As of 09/23, you are now required to state what actors, idols, etc. from the Korean industry you write as or use as faceclaims. This can be done in one of three ways:
— specific names: Taeyeon (SNSD), Kai (EXO), Jung Hoyeon (actress)
— groups: Stray Kids, Blackpink, WJSN
— generations: I prefer to write third gen idols.
Any triggers you may have, or your comfort level in regard to darker topics and/or NSFW content.
How you prefer to be contacted. You can include your Discord sn or Tumblr url if you’re comfortable in doing so. If you’d prefer to stay anonymous until reaching out, you can tell people to like the post and that you’ll message them.
—
Please check out our tagging system.
8 notes
·
View notes
Last Seen Blogs

rex-salazar
The Blog of Rex Salazar

hildcit
Hi! o/
trcshbirb
TRASH MAMMAL

backpackershru
Backpacker Shru
thwackk
strange things are afoot at the circle k