#astrophotography guide
Text
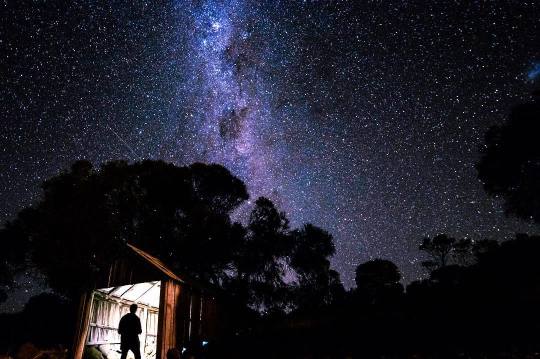
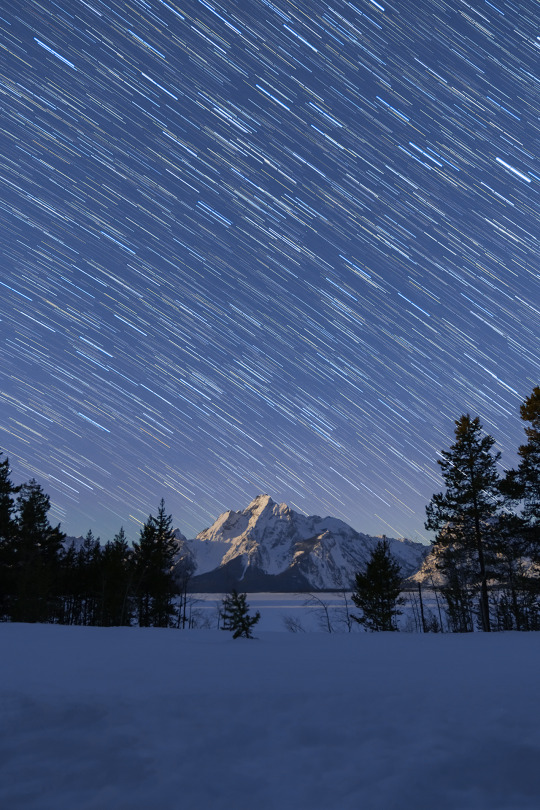
Star Photo Settings for DSLR Cameras
View On WordPress
#adventure photography#aperture settings#astrophotography#astrophotography guide#capturing stars#celestial photography#composition in photography#creative photography#DSLR camera#DSLR settings for stars#exploring the night sky#exposure techniques#focusing at night#ISO settings#landscape photography#light painting#long exposure#low light photography#manual camera settings#manual focus#Milky Way photography#nature photography#night landscape#night photography#night photography essentials#night photography settings#night photography tips#night shooting#night sky#outdoor photography
5 notes
·
View notes
Text


AND SO IT BEGINS…

#42#unreality#ford prefect#h2g2#the hitchhiker's guide to the galaxy#hatsune miku#oc art#oc#oc rp#open rp#30s#50s#astronomy#physics#marine biology#crystals#inspiring quotes#astrophotography#nasa#climate change#biology#rocks#49#zero escape 999#999#russia#book quotes#romance quotes#good omens#angst with a happy ending
4 notes
·
View notes
Text
how i take moon photos, and how you can too using the same method (regular camera version)
long post
ok so this is the first of a 2 part thing, one part (this part) will go over how i shoot moon photos with my regular photography camera and the other part will go over how i make larger mosaics with a telescope.
this is a method i've developed over the past 6 months, mainly for getting the most i can out of just a telephoto lens.
going to start by going over the equipment you need/the equipment i use for this:
a basic dslr/mirrorless camera. i use the nikon Z5, but it doesn’t matter which one really. it helps if it can shoot video at full resolution.
a telephoto lens, on a crop sensor camera it should be at least 200mm (and on a full frame, 300mm is preferable). i use a nikon F/4.5-5.6 70-300mm.
a tripod. this is really basic, any tripod works, it’s pretty much irrelevant as long as you have one.
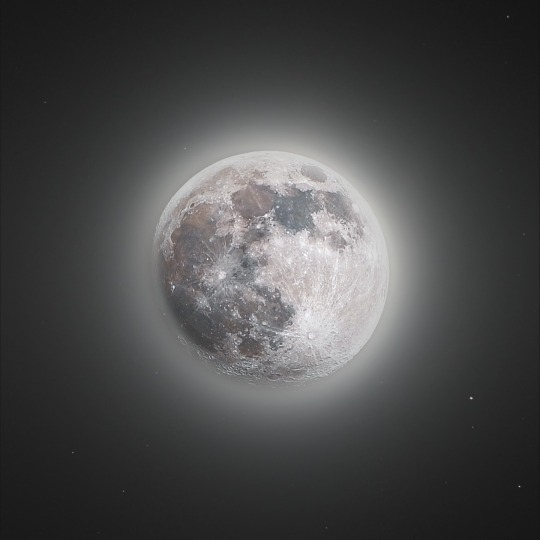
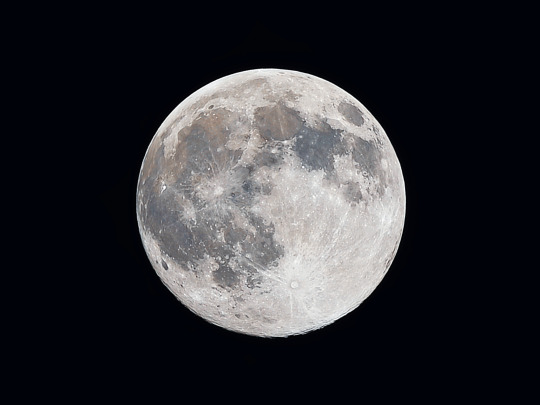
that’s all the equipment you need, to take shots like this:
yes, you can do this with a regular nikon and telephoto lens. i took this with the gear stated above, using the processes i will now describe below.
alright so the first step is what i call gathering data.
this is when you’re actually outside shooting, all the images you’ll need for later processing. assuming the conditions are ok (meaning the moon is out, not blocked by clouds and isn’t right on the horizon), i go out and set up the gear.
during this period of time i’m trying to get 1 thing, but if the moon is full; 2, possibly 3 things.
the first thing is your main moon data. depending on whether you have a camera that can record in higher resolution, this can take the form of either recording a video or snapping a bunch of single shots (if you do the latter, make sure to use an inbuilt intervalometer if the camera has one. or get a regular one if you don't, it's a big help)
i usually do a 10 minute recording, which is about how long it takes the moon to move across my camera frame. at 30fps, this equates to about 18,000 frames.
the point of recording isn't to have a video, but mainly to 𝘯𝘰𝘵 have 18,000 individual photos. a video is just a concise way of producing and containing a TON of images really easily.
so you took a video, or depending on your camera you took a bunch of images, that's the first part done.
remember how i said, if there's a full moon or closer to it, i'm trying to get 2-3 things here? that's for me personally, because i often shoot composites during a full moon. skip this next part if you don't plan on that.
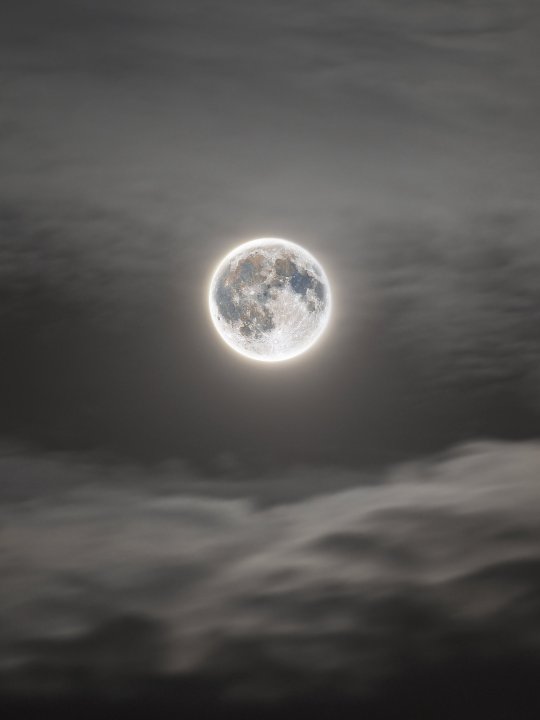
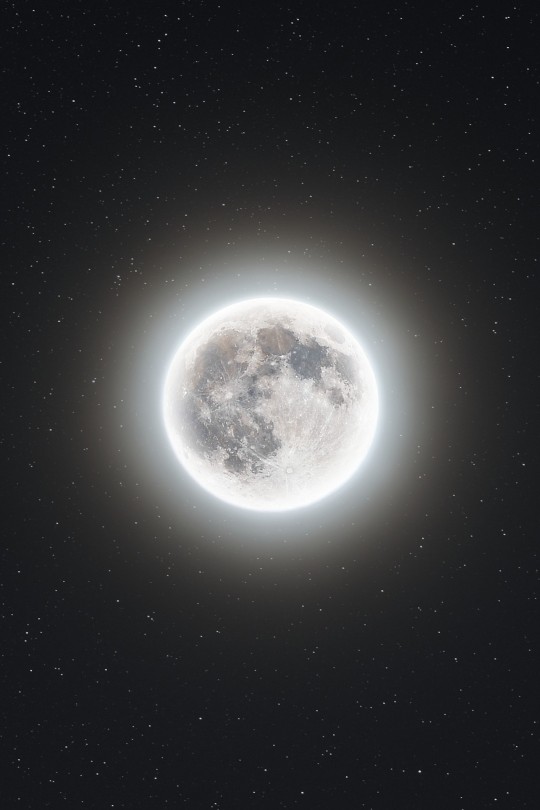
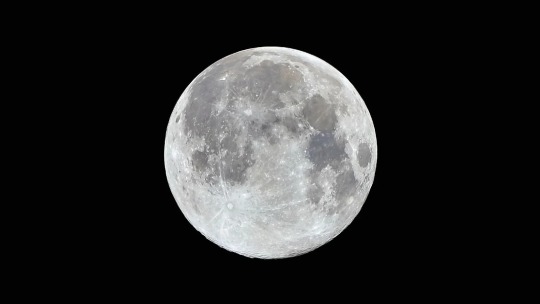
for reference, here's a composited vs non-composited version
now the second thing i want to get is my composite shot. it's only feasible during a close to full moon, because otherwise the edge in shadow will always look weird with the glow added. the composite shot itself is usually a few overexposed images (all at slightly different settings), to show the moon's glow and/or sometimes a few bright stars.
typically i just change the settings around, and shoot like 5-10 different exposures manually, but exposure bracketing could probably work too here. i haven't tried it.
as long as you can't see any features on the moon, and the sky around it is noticeably brightened, you're good in terms of exposure. just make sure the edge of the moon is still visible, that's necessary for compositing later.
if there are any nice clouds out, i also try to wait and get a few shots with those near the moon.
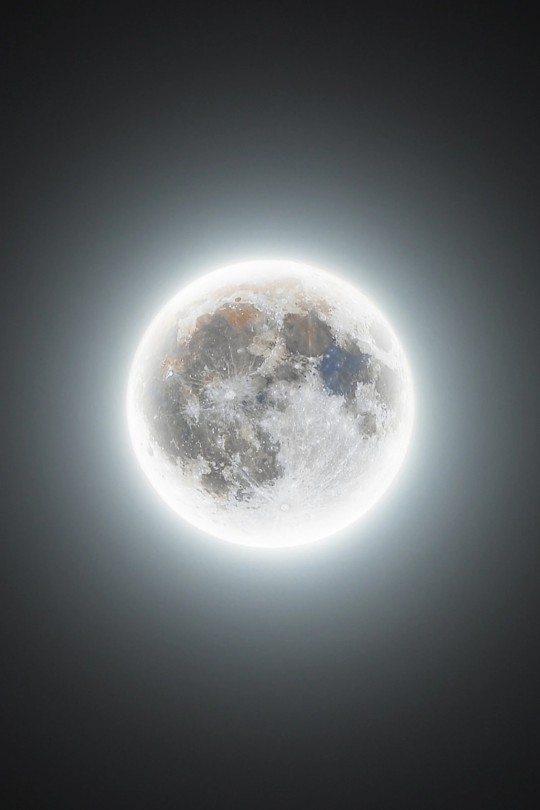
the third optional thing (still under compositing, keep skipping if you aren't) is taking a shot or two of the blank sky with stars, to composite a shot like this:
this is a very quick thing, just point your camera somewhere away from the moon where you see a few stars, and take a couple second exposure to bring them out. you can zoom out more than whatever you're at for the moon shot to get some more stars, or keep it the same. either way works.
alright now we're back to the main part of the guide.
you've got your moon data at this point, your equipment is brought in, now you just have to do the processing.
with this method most of the work is the processing, i'll try to cover it all quickly here
firstly you need to process the main moon data. all i have is a video at this point, i need to turn that into a real finished image
doing this processing requires a couple programs (most of which are windows-only), but are all 100% free. if you intend on doing moon photography often, i would recommend getting a very cheap windows laptop for this purpose. quality doesn't matter whatsoever.
the first program i use is called PIPP (planetary image preprocesser), and this is mainly used to get your video in a state where it can be processed.
i typically upload the video, set it to crop every frame right around the moon (all that black space is extra processing time!), sort the frames by quality and cut out maybe 50% or 75% but this depends on how many frames i took. in my case of 18k, this cuts me down to 9k or 5k or so.
the resulting, processed video (once again using video as an image holding format because it's easy) is then exported to the next program: Autostakkert.
this one is to stack the images, into one really nice image. stacking is why i took so many images in the first place, i won't explain all the logistics of stacking here, but just know that it works and you should do it. stacking is one huge improvement you can make to your shots that's very easy to do.
so in autostakkert, i cull about 50% more of the frames, and stack the remainder of them.
personally i also drizzle 1.5x (drizzling = image upscaling basically) because on a 300mm telephoto lens and full frame camera, the moon is just not that many pixels. you can do whatever on this, if you're at 600mm or 800mm it's probably not as necessary, but it's really helpful at anything below that.
once it stacks, i take the resulting image into a third program: Registax.
this one i use for one sole purpose, wavelets. it's an optional step, and once again i will not explain in any detail how they work, but the result is basically a good sharpening tool. like REALLY good. i recommend trying it.
it's a simple program, i just upload the image and then change the wavelet sliders until it's sharpened to a nice degree.
and lastly, i export that image over to a regular photo editor. photoshop if you have it, lightroom works too only if you aren't compositing, i personally use photopea which is a very nice photoshop clone website that's free. look it up.
what i do here is just basic photo editing stuff first, expand the crop and add black (remember, in my case the stacked image was cropped all the way in), sharpen it a little more, up the saturation maybe for mineral colors, etc.
in here i also usually upscale the image again, this is optional
if you did not intend on compositing, and don't care how i do it, you're done! you should have a very passable moon shot at the moment, or if you're just reading out of curiousity, a very passable understanding of how i take them.
if you do care, here's the process:
so firstly i bring up the final cropped and finished edit of the main moon in the photo editor, and the composite shot on another layer above it. lower the opacity, then line up/resize the glow moon with the regular moon.
next you basically just get a low opacity/low hardness eraser, and erase the center of the glow moon so the regular surface detail shows through in the middle, but the edges stay glowy- and then i increase opacity back to full again.
it can take a few tries and messing around to get this part to look right, but making sure they're lined up perfectly is half the battle.
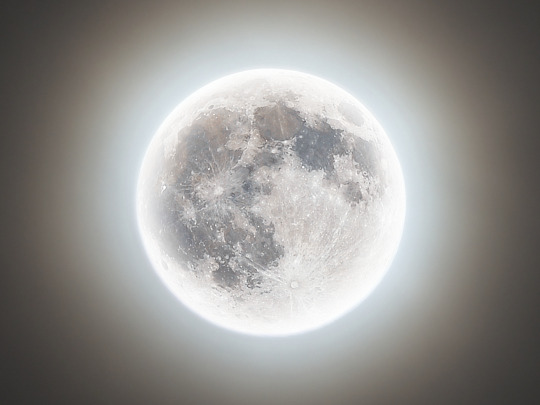
now you have a composited full moon, that looks something like this!
whether you're using it as a guide with your own shots (if so, good luck on them!) or just wanted to know how i take them, i hope you enjoyed the guide; i like to be transparent with how i make stuff, especially with something like this where most people have no idea how the photo is created behind the scenes.
- all the photos in this post were taken solely on my nikon Z5 camera, F/4.5-5.6 70-300mm lens and tripod.
- part 2 for the telescope mosaics will be coming in the near future most likely
#photography#astronomy#astrophotography#space#night sky#moon#photo#photography thoughts#astrophotography thoughts#astronomy thoughts#guide#long post
9 notes
·
View notes
Text
Hi I’m Averie or Ave. I use She/They pronouns but I don’t really mind what you use for me. I’m also sapphic. I don’t have any triggers. My special interests are Sci-Fi, History, and Art. My favorite color is purple and I want to study Biochemistry and Astronomy for college! ♥︎

•Interact•
~Subnautica fans ~Elden Ring fans ~Star wars fans ~Pokémon fans ~HGTTG fans
•DNI•
~Basic DNI criteria ~Anyone creepy ~“The Boys”
*・゜゚・*:.。..。.:*・'*゚*'・*:.。. .。.:*・゜゚・**・゜゚・*:.。..。.:*・'
That’s all! Thank you for reading <3
#astrophotography#space#stars#subnautica#art#mutuals#hitchhiker’s guide to the galaxy#star wars#pokémon#astronomy#biochemistry#subnautica below zero
10 notes
·
View notes
Note
Thanks for your nice page. I do astrophotography, mostly in film, starting in digital, but not as nice as the pictures on here (your page)...
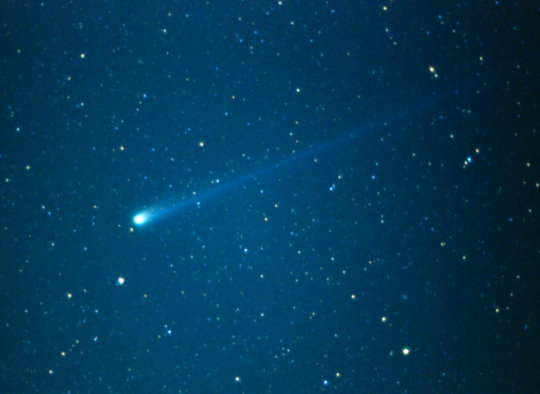
Taken in 1996..Comet Hyakutake is a comet, discovered on 31 January 1996, that passed very close to Earth ... This comet was actually the second Comet Hyakutake; Hyakutake had discovered comet C/1995 Y1
It was a beautiful sight to see when I photographed the comet. I used an Olympus OM1 Camera with a f/1.2 zuiko portrait lens stopped down f/1.8 200 Ektachrome film, guided for 15 second exposure, piggybacked on a 8 inch Celestron C8 Schmidt Cassegrain telescope.. It crossed the sky, and it was as if you could reach out and touch it.
Rating Level: Non-Adult
Thank you for the nice message and photo
134 notes
·
View notes
Text
Would my shitty Astrophotography go here too?
Maybe

Taken on a Google Pixel Pro 7 with a Orion StarBlast II 4.5 Equatorial Reflector Telescope || 25mm eyepiece
Pointed South toward Orion +50 degrees before cloud cover settled in.
Not on a computer guided scope so my exposure is about 6 seconds.
I do accept critiquing! I've been trying to get this damn set up to work for a while.
67 notes
·
View notes
Text
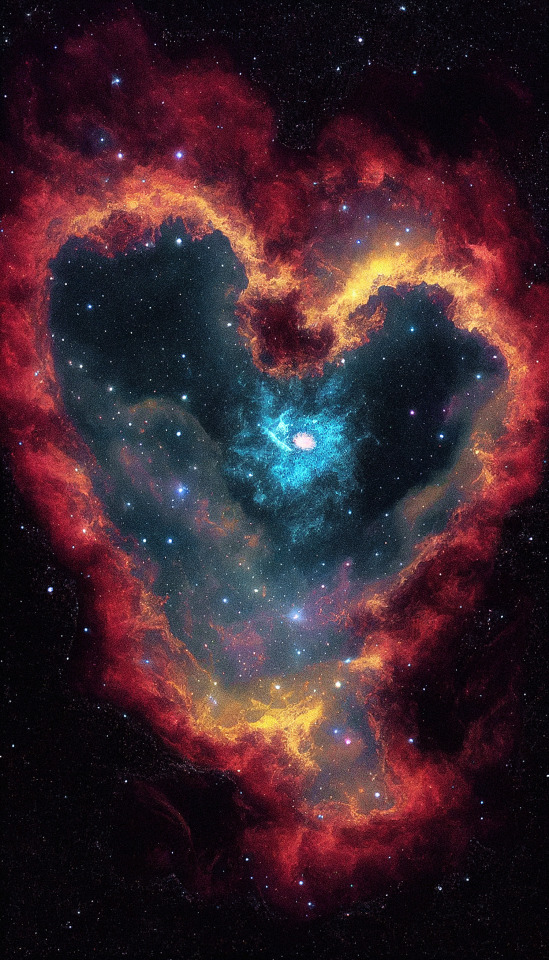

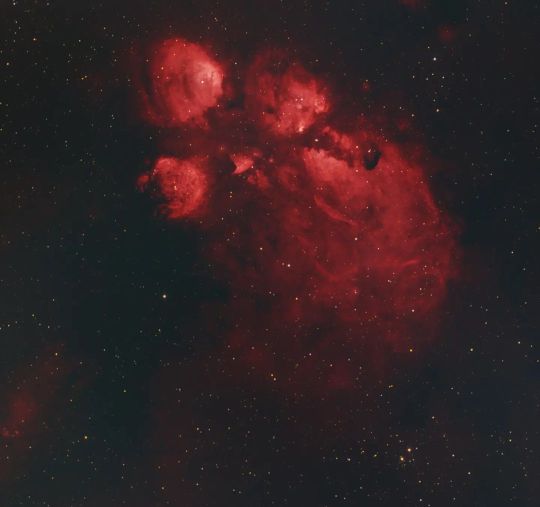
The Heart Nebula
--Mahaboka
The Heart Nebula (IC 1805) is a large emission nebula in the constellation Cassiopeia. The beauty of this iconic astrophotography target is due to its mix of both bright pink hydrogen gas, and dark dust clouds.
This glowing nebula gets its nickname from the familiar shape it resembles and is located approximately 7,500 light-years from Earth.
This emission nebula shares a resemblance to a human heart via its glowing ionized hydrogen gas and dark dust lanes
The Heart Nebula is an emission nebula, 7500 light years away from Earth and located in the Perseus Arm of the Galaxy in the constellation Cassiopeia.
6 notes
·
View notes
Photo
NGC 7822 - The Question Mark Nebula I attempted this target earlier in the year using the L-eNhance filter and once I got the L-eXtreme I wanted to give it another go. Captured over 3 nights at the end of imaging sessions, I was able to capture 4.5 hours and it blows my 3 hours with the L-eNhance away. Note, IG doesn't do this target justice, so head over to astrobin, link in Bio or below, to check it out full size. . Full resolution and details at Astrobin. Link in Bio or here: https://www.astrobin.com/tmdibg/ . 54 x 300s 800 ISO Dark, flat, dark flat and bias calibration frames Providence, RI - Bortle 8 . @radiantelescopes Raptor 61 @canonusa EOS Ra @optolongfilter L-eXtreme filter Sky Watcher EQ6-R Pro ZWO 30mm f4 MiniScope (guide) ZWO asi224mc (guide) . @provjournal . . . #astrophotography #astrophoto #astronomy #highpointscientific #OPTeam #myOPTgear #agenaastro #astromaniacmag #questionmarknebula #ngc7822 #cepheus #nebula #milkyway #stars #space #spaceimage #igworldclub_astrophotography #ig_spaceimage #ig_astrophotography #optlonglextreme #optolongfilter #canonphotography #ShotOnCanon #radianraptor61 #rhodeisland #astrobackyard #backyardastronomy #cityastrophotography #telescope #photography (at Providence, Rhode Island) https://www.instagram.com/p/CiNEpsxOSfv/?igshid=NGJjMDIxMWI=
#astrophotography#astrophoto#astronomy#highpointscientific#opteam#myoptgear#agenaastro#astromaniacmag#questionmarknebula#ngc7822#cepheus#nebula#milkyway#stars#space#spaceimage#igworldclub_astrophotography#ig_spaceimage#ig_astrophotography#optlonglextreme#optolongfilter#canonphotography#shotoncanon#radianraptor61#rhodeisland#astrobackyard#backyardastronomy#cityastrophotography#telescope#photography
36 notes
·
View notes
Text
JUNE 30, 2022
IT'S FUCKING THURSDAY.
WORDS OF WISDOM OF THE FUCKING DAY:
SUCCESS IS A LOUSY TEACHER. IT SEDUCES SMART PEOPLE INTO THINKING THEY CAN’T LOSE.
EDUCATE YOUR IGNORANT ASS:
A GUIDE TO MOTHERFUCKING SMARTPHONE ASTROPHOTOGRAPHY (PDF). more>>
FUCKING MIND-BLOWING BOOK OF THE DAY:
WORK THE FUCKING SYSTEM. more>>
USEFUL SHIT OF THE GODDAMN DAY:
LABEL SHIT. more>>
WEBSITE OF THE FUCKING DAY:
PLAIN-TEXT CRYPTO PRICES. more>>
AWESOME-AS-SHIT VIDEO OF THE DAY:
DO OTHER DISEASES HAVE LONG-ASS VERSIONS? more>>
22 notes
·
View notes
Text
A BEGINNER’S GUIDE TO SHOOTING THE NIGHT SKY: Part 1
This is the first in a series of entries covering night sky photography for beginners. If you're just starting out in Astrophotography, this session will covers what gear you'll need to have a successful, and enjoyable, session.
Before getting into the camera setup I used to capture star trails and the Milky Way, let's first review what items I use to capture my night skies.
THE RIGHT WEATHER
Okay, so you can't bring this with you but there's no point in venturing out if it's going to be cloudy, or worse. Be sure to check the hourly forecast in addition to the daily. Just because it's cloudy at sunset doesn't mean those clouds won't move out of the area before the stars come out (and, if shooting the Milky Way, you may have several hours before it rises, well after sunset).
THE RIGHT CAMERA
I use a Sony a7r iv, a full frame, 61mp camera body. You'll want a body that can handle higher ISOs without adding a lot of sensor noise, especially as you'll be taking potentially hundreds of shots for star trails and building up some sensor heat.
THE RIGHT LENS
Generally speaking, you're going to want two things out of your lens for astrophotography: wide angle and fast. I usually take two lenses with me. Since I'm shooting with a full frame and not a crop sensor (APS-C senor). I take my Sony 16-35 2.8 GM and my 14mm 1.8 GM primary lens. If you have a crop sensor camera and lenses, you’ll want to bring your widest lens with the widest aperture, preferably 2.8 or wider.
THE RIGHT TRIPOD
Be wary of relying on a light weight or flimsy tripod as you don't want your camera shaking during longer exposures (or, even worse, falling over). Ideally, you'll have a model that has a center hook from which you can hang your camera bag or tripod weights to help with windy conditions. I prefer and use SLIK Tripods and ball head. You can purchase directly from Slik Tripods website or on Amazon.
THE RIGHT APPS
I used PhotoPills to identify when and where the Milky Way or Polaris if I’m doing circle star trails, moon phase and position, and much more. It also has built in tools to help you: calculate your maximum exposure time to avoid star trailing (accounting for your camera's sensor size and your lens' set focal length), plan for time lapses, find hyperfocal distances… and a ton more. There is a lot to absorb and play around with and, fortunately, the developers provide tutorials for using all the tools (I spent about 90 minutes watching videos the night before the group outing). The mode I found most useful, however, is the night AR (altered reality) mode. Click on this and you're taken to a live view of your surroundings with an overlay of the sky. You can use this view to scroll back and forth through times and dates to preview where the Milky Way will be in the future; a great tool to plan your shot well in advance, especially when it won't be visible until 3am! Additionally, you'll likely discover that a star finder app will be useful, if you're trying to find/identify constellations or just need help finding the North Star (and can't remember your basic education, like me).

THE RIGHT STUFF
Jump past the Milky Way for a rundown of some other items you'll need, or should consider, for night sky sessions.
TRIPOD WEIGHTS
If wind is in the forecast, consider some weighted bags for your tripod. I found some on Amazon for a good price and filled them with play sand from the local hardware store. The set I ordered has four bags, enough to place one on each tripod leg and to hang one from the tripod's center hook. If you don't want to use weighted bags, or forget them, you can always hang your camera bag from the hook in a pinch.
EXTRA CAMERA BATTERIES
More important for star trails than shooting the Milky Way but you'll want an extra battery or two. Shooting 240 30-second exposures for star trails chewed through about 70% of a fully charged battery for my Sony a7r iv, and I ended up using all three batteries I brought for the overnight session (only one was completely drained, the other two each had roughly 15-20% left). The next worst thing to not checking the weather forecast beforehand would be having perfect conditions and running out of juice halfway through your shooting.
INTERVALOMETER/WIRED REMOTE AND EXTRA BATTERIES
Another must-have for shooting star trails. Yes, you could shoot manually but who wants to stand or sit next to your camera for 2-3 hours hitting the shutter button every 30 seconds? I also discovered that the built-in interval timer on the Sony a7r iv allows for up to 9999 shots, but some cameras only allow up to 99 shots. As for batteries, the intervalometer/remote probably doesn't draw much power but, again, you don't want to get halfway through your shots only to have the batteries unexpectedly die. I always bring spare batteries and a portable battery charger just incase. It’s always nice to be prepared then not have it.
RED FLASHLIGHT/HEADLAMP
A headlamp is a must. Make sure it has a red lamp mode. Also I always carry a compact flashlight just incase- for light painting, getting around, and for emergencies - and a head lamp that has a red light option. I only used the flashlight a few times to sweep the foreground during long exposures of the Milky Way but I used the red headlamp frequently as I walked to and from my camera and my chair or car, or as I needed to check various things on my camera or intervalometer here and there through the night. Remember, ideal shooting conditions are during the new moon; between that and (hopefully) being far away from light pollution, it will be much darker than you expect!
OTHER ITEMS TO CONSIDER
Chair
Snacks/Drinks
Bug Spray
First aid kit
Balaclava (best purchase I've made for chilly nights!)
Blanket
Pillow (I caught a snooze in the back seat of my car... the pillow helped... some)
Extra memory cards
Lens cleaning tools
And a lens warmer. This is needed for those long cold nights or high humidity nights where frost or dew can form on your lens over time. There’s. I thing like shooting a 700 image star trail or time lapse and seeing the last 200-300 images are hazy due to frost or dew.
This covers what I typical bring and equipment I use for Astrophotography. You can always add to list as the nights are long, or you can always kick back while the camera is clicking away and read some more of my blogs or checkout my tutorials and adventures on YouTube. But keep that screen light away from your camera, you don’t want to introduce any unwanted light pollution!
Don’t forget to subscribe and stay update with new blogs and more!

3 notes
·
View notes
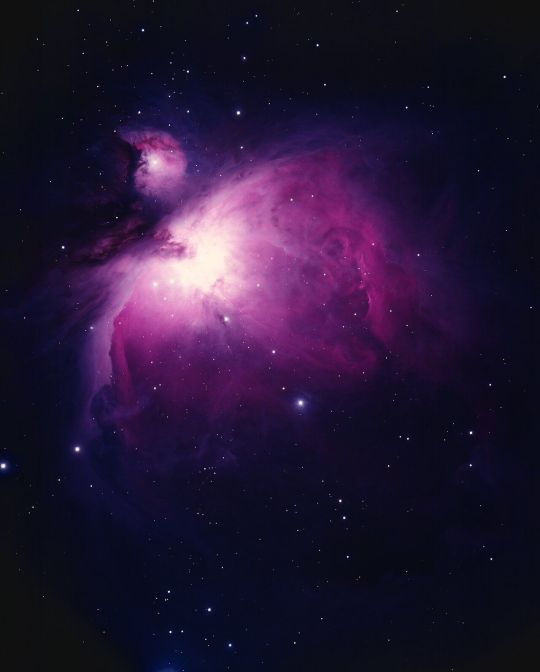
Text

starting off the blog with the first photo i took with my astrophotography rig - the orion nebula. more to follow as i get my mount polar aligned, my guide camera gets here, and i learn to use tracking/guiding software.
2 notes
·
View notes
Text
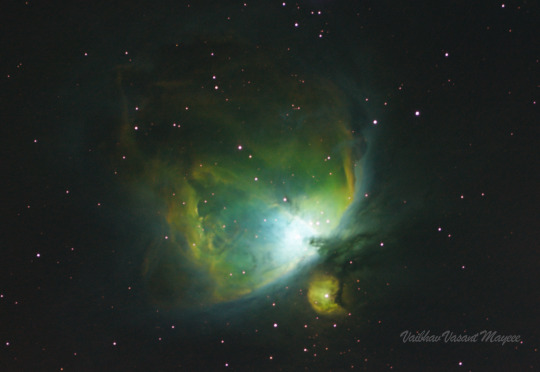
M42/M43, NGC 1976, Orion Nebula
M42/M43, NGC 1976, Orion Nebula

APOD: 2019 December 17 - The Horsehead Nebula

The Orion Nebula
First try with HDR in pixinsight, hope you like it ! -Equipment- Scope: TS-Optics 94/414 EPDH (414mm focal) Camera: ZWO ASI533MC Pro at -25°C gain 101 offset 49 Guiding: ZWO OAG Guiding camera: ZWO ASI 120MM Mount: Skywatcher AZ-EQ6 Filter: Optolong L-eXtreme -Acquisition- Light : 62x300s + 88x120s Total integration time 8h Dark: 100x300s Flat-50 Bias-100 100s120s Date : 30 January 2022 07,26,27 Febuary 2022 Location : France-Alsace Bortle 4/5 -Software- Carte du Ciel, N.I.N.A, Phd2 , PoleMaster and PixInsight Ez Processing Suite from darkarcon darkarcon website : darkarchon.internet-box.ch:8443/ -Pre Processing in PixInsight- Image Calibration Cosmetic Correction Debayer Subframe Selector Star Alignement Local Normalization Image Integration Drizzle x2 Dynamic crop -Processing *HRD* DBE 300s and 120s StarAlignement -> register 300s and 120s HRDComposition -> blend 300s and 120s frame Split L,R,G,B Chanel __L__ Ez_Deconvolution Ez_Soft Streatch HDRMultiscaleTransform StarNet++ for build nebula mask UnsharpedMask with mask LocalHistogramEqualization with mask __RGB__ ChanelCombination(RGB) BackgroundNeutralization PhotometricColorCalibration Ez_Soft Streatch HDRMultiscaleTransform Starnet++ SCNR star mask __LRGB__ LRGBCombination Ez_Denoise StarNet++ Final CurvesTransformation Save as jpg Clear skies !

Orion nebula M42 , SHO Hubble palette from Singapore.
Horsehead Nebula in Orion
The Horsehead Nebula and Flame Nebula. This iconic deep-sky object is a dark nebula in the constellation Orion. Astrophotography tips, facts, and more.

Orion Nebula wallpaper by DLJunkie - Download on ZEDGE™ | 5dcb

Orion
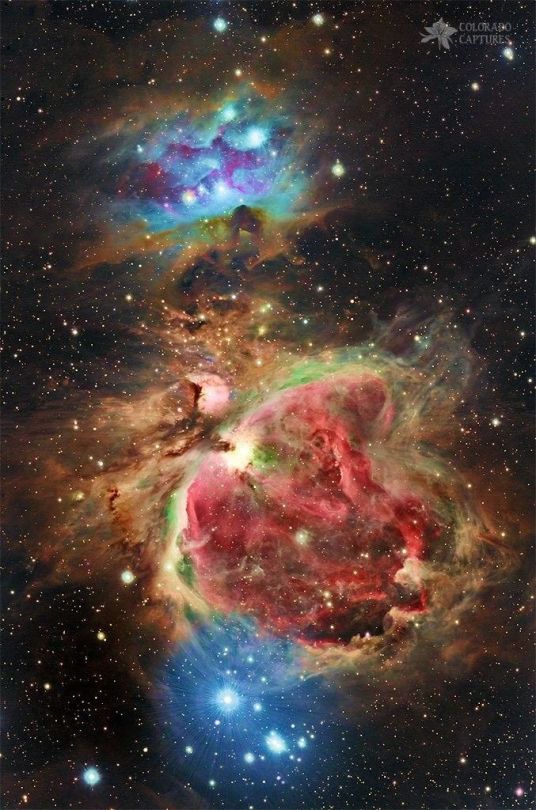
The Orion Nebula (M42/M43, NGC1976/1982) This picture shows the great nebula in the constellation of Orion the Hunter. On a good clear night, from a dark site well away from the lights of modern civilization, this glowing cloud of gas and dust can be seen with the naked eye as a fuzzy patch surrounding the star Theta Orionis in the Hunter's Sword, below Orion's belt. It is probably the most spectacular of all the objects cataloged by Charles Messier and now called by their `M' numbers. M42 had been known since the beginnings of recorded astronomy as a star, but it is so outstanding that it was first noted as an extended nebula in 1610, only a year after Galileo's first use of the telescope. Detailed descriptions started appearing later in the seventeenth century, and it has been a popular target for anyone with a telescope ever since. So many details are visible in even a small telescope that M42 will more than repay the observer who makes it a frequent target, and who will find that it is hard to make a realistic sketch that can capture all of the finer features. So outstanding is this nebula that it has two numbers. M43/NGC1982 is the separated portion to the north-east (top left), surrounding an irregular variable star. Although Messier stopped at only two, other parts of the nebula in this region have received further NGC numbers. M42 is our closest example of an HII region, being composed mainly of ionized hydrogen which gives off the red glow so dominant in every picture of the nebula. Deep photographs such as this one show that it is nearly a degree across, larger than the full Moon (although the Moon is so bright that it looks much larger). The energy to keep the nebula glowing comes from the very hot young stars in a formation called the Trapezium, embedded in the brightest part of the nebula and not visible in this photograph. The nebula and the brighter stars are very young indeed by astronomical standards, at about 30000 years. Compare this to our own Sun, which is considered to be a middle-aged star at over four billion years! M42 probably contains several hundred stars younger than a million years, still bursting with the energy of youth. Stars are still being born in a dense cloud behind the nebula, but they are hidden from our view by a concentration of dust which reduces their light to only a million-millionth of its original intensity. Fortunately, astronomers have developed special cameras and other detectors which are sensitive to infra-red radiation, more popularly known as heat, which penetrates the dust and reveals to us this stellar nursery. Although M42 is mostly hydrogen, in both neutral and ionized states, with a fair quantity of dust, it does contain significant amounts of other elements, especially oxygen. The green glow of doubly-ionized oxygen is strongest near the intense ultraviolet starlight at the middle of the nebula. To the north-east (the upper left in this picture) is a feature called the Dark Bay, which is a thick cloud of neutral gas which has not yet been ionized. Location: 05 hrs 35.4 min, -05 deg. 27 min (2000). Distance: nearly 500 parsecs (1600 light-years). Size: about 66 by 60 arc minutes. Mass: about 300 solar masses. Magnitude: 4.0. Power source: O and B stars. Photograph: Bill Schoening, KPNO 4m telescope, October 1st 1973. Original Ektachrome color transparency.Credit:Bill Schoening/NOIRLab/NSF/AURAUsage of NOIRLab Images and VideosAre you a journalist? Subscribe to the NOIRLab Media Newsletter.Image FormatsFullsize Original20.7 MB Large JPEG1.2 MBScreensize JPEG144.3 KBZoomableZoomableWallpapers1024x768131.3 KB1280x1024203.7 KB1600x1200314.3 KB1920x1200411.5 KB2048x1536568.3 KBCrossfade image:Optical (DSS2)Infrared (2MASS)Crossfade image:
2 notes
·
View notes
Text
The Maine Event
Acadia National Park in Maine has been on my mental “places to go” list for years. Only eight hours away, it’s close enough for a long weekend. Full of fun hikes, cool camping, and adjacent to cute ocean-front towns. Once I visited my first National Park this summer (Indiana Dunes), and made it an official goal to visit all sixty-three (or more, if and when new ones are added), Acadia moved higher up the bucket list. I convinced Dad to take a weekend out of sailing season and head up the coast, camp, and hike with me.
We were able to book a campsite at Blackwoods Campground in the park for the first weekend in October. When I had looked earlier in the summer sites were booking pretty fast, especially for weekends. Acadia opens campsites for booking three months in advance, and I suggest you book your site pretty close to that three months. The only other things at Acadia that require booking are the Cadillac Summit Road vehicle permits - either for anytime or sunrise, some are released months in advance but a large portion are released two days ahead of time. Sunrise permits get snagged up pretty quickly, so if you’re looking to grab one you should be logged in and ready to go when they’re released.
Acadia has three campgrounds in the park: Blackwoods, Seawall, and Duck Harbor. Blackwoods is closest to the most trailheads, visitor’s centers, and Bar Harbor. Seawall is a bit more secluded but is close to some trails. Duck Harbor is on an island only accessible by boat. If you’re looking for a place to sleep after a day exploring the park, Blackwoods is your best bet. If you’re looking for a relaxing getaway from civilization, the other ones are a-ok.
Got to our campsite, set up our tents, boiled some water for some mac and cheese, and went for a walk. After sitting in a car for 8 hours, our legs needed it. We found a path from the campground that leads to the ocean - or a very rocky ledge next to the ocean. We opted not to walk too far on said rocks because it was very hard to tell when they ended and drop down to the ocean began. We found a stable stop to sit and stare up at the stars. Acadia is known for its stargazing and astrophotography opportunities and often hosts ranger-guided talks about the night sky.
Dad, as usual, was up earlier than I was the next morning.. Early enough to head back to the ocean path and catch the end of the sunrise. As with basically any National Park trip, I start at the visitors center. Acadia does offer a free bus system to get around the islands, but the earliest pick-up at the campground was later than we wanted our day to start so we opted to drive.
The day’s included a spontaneous hike up the Dorr Trail to Dorr Mountain and over to Cadillac Mountain. A simple “hey I bet this Dorr Trail goes up to Dorr Mountain” turned into a rocky, scramble of a hike over the two highest peaks in the park.
We also found time for the Beehive trail, probably the most famous hike in Acadia. The trail is full of iron rung ladders and some rock scrambling, definitely not something to do it you’re terrified of height.
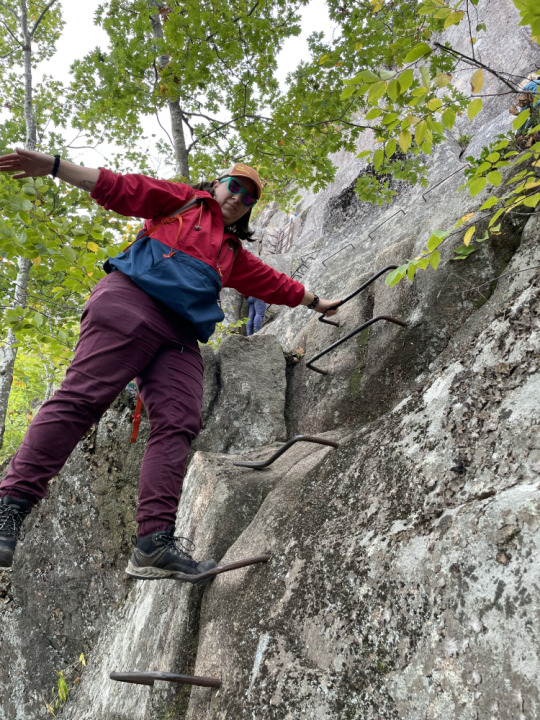
The next day we made sure to be up earlier enough to hike the Precipice Trail before we had to hit the road for the drive home. Precipice is similar to the Beehive with the style of rungs and ladders, only a bit more of them and more rock scrambling. It was very windy and chilly on the summit, but not terrible for October in Maine.
We said goodbye to Acadia and stopped in Bar Harbor for some hot coffee, some more food, and a quick wander through some shops before leaving the area. The drive home included a stop for dinner at a local place in New Hampshire so I could cross that off my list of states (#33!).
Acadia Hikes
There are LOTS of trails in Acadia and lots of them overlap and connect, making it easy to create your own loop, or to turn back earlier if needed, as long as you know how to read and map and know where you are.
Dorr to Cadillac to Ladder Trail:
5.5 miles, 1700 feet of elevation gain
The Beehive
1.2 Miles, 431 feet of elevation gain
The Precipice
2.2 Miles, 924 feet of elevation gain
3 notes
·
View notes
Photo
Cats Paw or Bears Paw Nebula. Just a quick one. I managed a couple of hours, there's fainter nebulosity in the background a few more hours would easily bring that out. The cats paw nebula is an emission nebula and star forming region. Gear Skywatcher F5 750mm Newtonian ASI533 OSC Saxon NEQ6 pro Optolong L-enhance filter Nexsus .75 reducer/corrector QHY5L-IIM camera and scope for guiding. Exposure, 180s. Gain 100. Offset 70. Cooled-5c. #Astrochick #universe #photography #skywatcher #skywatcheraustralia #practicalastrophotography #womeninastrophotography #practicalastrophotographymagize #spaceart #astrogirl #nightskyporn #astrophotography #amateurastrophotography #universetoday #astrophotographyporn #farpointastro #nightskyphotography #longexposurephotography #photographyeveryday #deepskyastrophotography #space #backyardastronomy #outerspace #apod #photographylovers #optolongfilters #zwoasi #astronomydaily #nightsky https://www.instagram.com/p/Chvd6xgv-Yj/?igshid=NGJjMDIxMWI=
#astrochick#universe#photography#skywatcher#skywatcheraustralia#practicalastrophotography#womeninastrophotography#practicalastrophotographymagize#spaceart#astrogirl#nightskyporn#astrophotography#amateurastrophotography#universetoday#astrophotographyporn#farpointastro#nightskyphotography#longexposurephotography#photographyeveryday#deepskyastrophotography#space#backyardastronomy#outerspace#apod#photographylovers#optolongfilters#zwoasi#astronomydaily#nightsky
2 notes
·
View notes
Photo
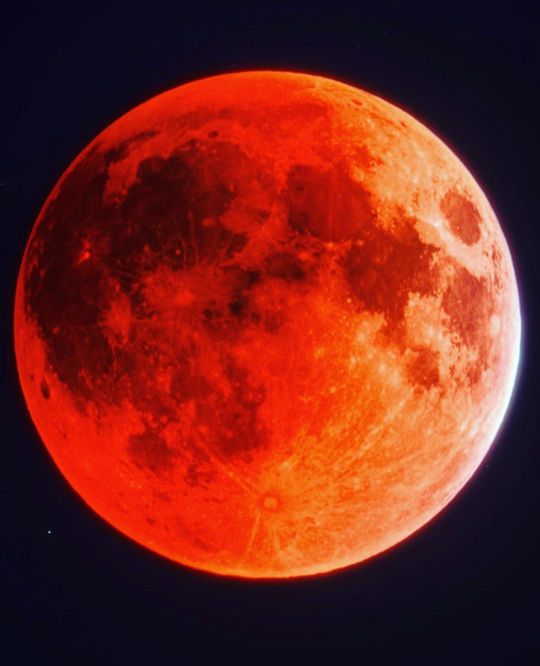
LUNAR ÉCLIPSE 🌒 ÉCLIPSE LUNAIRE 🌘 🫧 @astrofalls 🪐 Bray Falls 🔭 Full time space photographer Exploring the cosmos from Earth! Astrophotography help below 🌔 "Why do you want to reach the moon when we have the stars?" Etienne Daho 🌓 "Pourquoi vouloir décrocher la lune quand on a les étoiles?" Etienne Daho 🌗 🌚 curated #visualgrams #jeanlucbattini Founders @jeanlucbattini & Robbins Let us know what you think in the comments section Faites-nous savoir ce que vous pensez en commentaires Follow @visualgrams for more suivez nous 💫 Tap the link in our bio for our Guide to Instagram Growth, Lightroom Presets & more... - 🌙 #moon #red #moonknight #luna #lune #magenta #moonmagick #redmoon #lunerouge #astro #astrophotography #nature #themoon #artofvisuals #bevisuallyinspired #bevisuallycreative #sky #eclipse #themoon #moonphoto #moonphotography #photomoon #battini #photographymoon #cosmos #kofa #astrophotography #astrophoto 🌟 ✨ (at Kofa National Wildlife Refuge) https://www.instagram.com/p/CeDuZgQKw_e/?igshid=NGJjMDIxMWI=
#visualgrams#jeanlucbattini#moon#red#moonknight#luna#lune#magenta#moonmagick#redmoon#lunerouge#astro#astrophotography#nature#themoon#artofvisuals#bevisuallyinspired#bevisuallycreative#sky#eclipse#moonphoto#moonphotography#photomoon#battini#photographymoon#cosmos#kofa#astrophoto
1 note
·
View note
Text
The official Dark Sky® Observatory, located in Cumeada, headquarters of Dark Sky® Alqueva, is equipped with cutting-edge telescopes for solar and astronomical observation, which allow a unique visual experience from planets, to the craters of the Moon, passing through the deepest sky, with a cosmic journey among the nebulae, galaxies and clusters of stars that rise above one of the best skies in the world. The Dark Sky® Alqueva Headquarters also offers a wide variety of activities that allow you to combine astronomical observation with an incredible experience of sensations and flavors, such as relaxing at sunset and tasting a cocktail or doing a blind wine tasting at starlight. They also work with partners who are experts in other areas, to build packages specially designed for you, which can provide you with unforgettable days from sunrise to the end of the starriest night in Alentejo. Consult them to find out all the options and activities available.
The Official Dark Sky® Headquarters and Observatory, located in Cumeada, in Reguengos de Monsaraz, is a historic building around 50 years old, and one of the old primary schools of the so-called “new state”. Completely remodeled in 2015, it was specifically adapted to receive the Dark Sky Alqueva Headquarters and Official Observatory.
Inside you can visit the permanent astrophotography exhibition created by their international astrophotographer, Miguel Claro, and visit our growing mini-museum, where you can touch a real meteorite, to see the original autograph of the last astronaut to go to the moon. Guided tours are included in observation sessions.
instagram
0 notes
Last Seen Blogs

poisin666
The Antichrist

academyads-blog
Untitled

mrssnivellussnape
Mrs Profressor Snape
itsanuraa
Anura☁️

muscularworld
MUSCULAR WORLD