#maybe I should just sell one on redbubble or something
Text
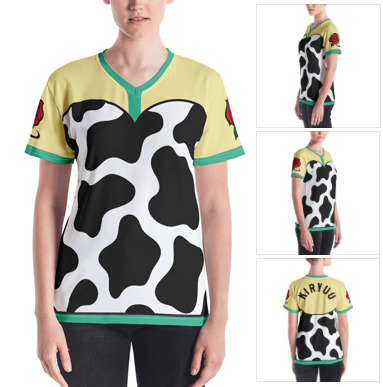
Shirt that says "My ancestors hunted so that I could get overstimulated at Walmart"
5K notes
·
View notes
Text
See, you cringe at the idea of the onceler fandom now. But what was that fandom??
Passionate teenage girls and young women, filled with inspiration and obsession. Zealous, hungry artists and writers who were making content for themselves and only themselves, not for money or for attention or fame or to make professional connections, but just for the joy of it. Back in the wild days of Tumblr, in the infancy of memes and content sharing and the transition from forums.
Those people loved something that wasn't meant to be loved that way.
But that's how love is.
You don't choose what or who you love. You don't choose how.
I defend those fandoms we all see as cringy now.
Because superwholock and onceler might embarrass you in 2022, but they're still better than the way fandom works now.
Look at what Disney does.
Look how they carefully construct and promote fandom, whether that's for their animated movies or Marvel or Star Wars.
Look how "fans" make reaction videos of every damn Disney product, gushing about how great it is or even how bad it is, just for clicks. Just for engagement. Look how Disney uses anti sjw rhetoric to promote themselves as woke and progressive, manufacturing outrage and "shutting down" man babies just for the exposure. It's so performative, how every time someone criticizes one of their shows or movies, they "fire back" by saying oh look these straight white guys can't handle a female protagonist!
It was the wrong fucking thing to do because by giving those fringe idiots exposure, they just created more and more. Now we have a fucking movement surrounding it, when I'd bet most of those annoying guys would've just kept grumbling to themselves if they hadn't been addressed at all. But Disney needed to look like a hero!
Look how cosplayers are paid by companies now to help promote their content and singers cover theme songs for YouTube views and artists draw fanart to sell stickers and pins and Youtubers create fake discourse and either rag or gush about some product just to try and game an algorithm.
There's nothing wrong with people using their fandom talents professionally, I'm not knocking that.
But the way media companies interact with fans feels so fucking sleazy. There's this desperation to it.
It's changed fandom.
Like people don't just like stuff anymore. They have to be slavishly devoted because they're told to be, not because they actually are.
You have to be dedicated to watching every marvel show. You can be paid to be dedicated to watch every marvel movie.
You can be paid to make iron man suits.
Sell pins. Make figurines and sculptures and post them on Etsy and redbubble.
You have to make a YouTube video, so you can make enough money to quit the job you hate. You have to make TikToks about fandom stuff so you'll get followers. You have to be funny on Twitter so you can be verified and fandom famous and have followers.
You have to hitch yourself to this company, or else you'll never be anyone or anything on your own.
It's not about actually being a part of a community. It's not about connecting genuinely with new friends and talking about characters or plots you liked.
It's not even about ship wars anymore. People viciously arguing over who should be with who, because they really, truly, delusionally love certain characters to death and were filled with rage at the idea of other fans misinterpreting them.
Now they just...consume product. Love the canon ship.
Because it's the only thing they can see anymore, when fandom no longer encourages alternative thinking about itself.
New fandom just feels like you're working for a fucking company and seeing everyone around you like a work buddy.
No one wants to step on toes cuz maybe that guy will be famous. Maybe that girl will be a Disney cosplayer. Maybe that guy will be sponsored by Disney itself.
Maybe that TikTok star will be the next hulk, you don't know.
Be nice because you're here to make professional friends.
It's...so hollow.
It feels so different.
Maybe it's just me.
49 notes
·
View notes
Note
their flag is literally the combo of the lipstick flag made by a biphobic racist transmisogynist and the butch pride flag emily literally didnt do shit and is monetizing off something made by others
emily gwen has spoken about this shit before including the fact that they never posted the flag as a serious suggestion or expected anyone to use it... openly speaks about combining the existing flags for various reasons including recognisability and shit AND always says that people should use whichever flag they prefer anyway... in the end Emily posted a combo of those existing designs and was the first to suggest something like that combo be used as a flag for all lesbians in general and came up with meanings for the stripes... they've never pretended to have done more than that
But also "monestising" wtf are you talking about who cares... they are just one of many people including corporations like fucking Disney and Target selling stuff w that design and they don't even make that much money off it. I WISH Emily was making shitloads off that design because I'd rather them profit than fucking Disney!!!
They're a poor mentally ill person who is struggling with medical debt and unstable work and housing, don't act like they're rolling in it just because they have a redbubble store that gives them a few extra bucks every month. Maybe don't be mad at person who has been homeless multiple times for promoting their stores to the following they've accumulated because people CHOSE to recognise their contribution to the lesbian community.
35 notes
·
View notes
Note
hiiii!! im so excited about the cheol part for UTS!! i have been reading fanfic since like 2011 and i am being so fucking serious when i say uts is one of my favorite things i have read. i am seriously considering getting a darl+ing inspired tattoo with like hints of under the sun themed art work tied into it because the little world that you built means so much to me!! i saw that you said you were planning on writing a poly fic and is that gonna be a continuation of under the sun? like idk if you are planning to and i hope im not overstepping but i feel like it would be so cool if you went deep into explaining the lore and reasons why they were there, why they remember certain things about their past when they are with the reader etc. i would love to hear your plans if you’re willing to share without spoiling it too much lol. i hope you are doing okay and life treats you well!! p.s. if you have any suggestions or anyone has any artistic ability to give inspiration ideas for an UTS tattoo or uts artwork in general that would be so helpful!! would it be okay with you if i got an UTS inspired tat? idk if thats weird to get a fanfic themed tattoo i feel like i should ask permission LOL just to make sure ur comfortable with that. have a great day!!
anon i dont know how to tell u that i all but Literally screamed when i saw this like i have several friends who can attest to the fact i sent them a screenshot going "WHAT THE FUCK /POS" bc of how floored i was to see this ??? like i dont know if u know how like... genuinely thrilling it is to read something like this as a writer but its the kind of thing that keeps me writing
anyway!! yes 100% feel free to incorporate UtS into ur tattoo if u want!! its ur body so its fully up to you, but you absolutely have my blessing to do so if you decide on it! i literally played around with the idea of like. maybe making some sort of subtle stickers to sell on redbubble or something if anyone would be interested in those? i do love the idea of a darl+ing inspired tattoo in general like its not my fave song at all but the vibes are still so comfy <33 my go-to thoughts would either be literal sun-inspired stuff or flowers since both are mentioned within UtS, but anyone more artistic than i am (which is probably most ppl haha) is 100% welcome to weigh in <3
i dont really know what all i can share from my current poly fic plans other than the fact that i think i'm going with a genuinely bittersweet ending? plus the fact that some of the scenes i already have envisioned for poly fic involves alternate perspectives on various scenes seen throughout the different parts of UtS if tht makes sense. i kinda called it pulling back the camera mentally while i was planning it the first time around (my example is... literally a scene i cant talk about bc it happens early in cheol UtS haha its not a major spoiler but i'll leave it obscure for now). theres some angst from tension planned tho that im rly looking forward to writing <3 but i think like... idk if its a major spoiler, but i feel like a huge part of UtS is acceptance? and i think that really comes through in poly fic <3
anyway!!! im literally gonna save a screenshot of this ask to like. remember forever. literally im still not over the fact ur asking to get a tattoo that incorporates my silly fic into it like thats literally the sweetest thing and honestly the kind of sentiment that most writers dream about!!! i hope u have a lovely day anon ty for making mine <3
2 notes
·
View notes
Text
some people asked for a tutorial on how i’ve been doing my lyric edits (examples here!) i’ve never done a tutorial before so if something doesn’t make sense, let me know! i tried to explain as best as i could, but i’ve been using photoshop for like over 10 years so sometimes i forget to explain things that i do instinctively lol
alright so first, i start with a 8inx12in file. this is because i personally want to order these all as small postcards on my redbubble for a mini collage, which are 4inx6in lol. but any size works! just keep in mind the size if you want to print them/put them on a shop.
settings:
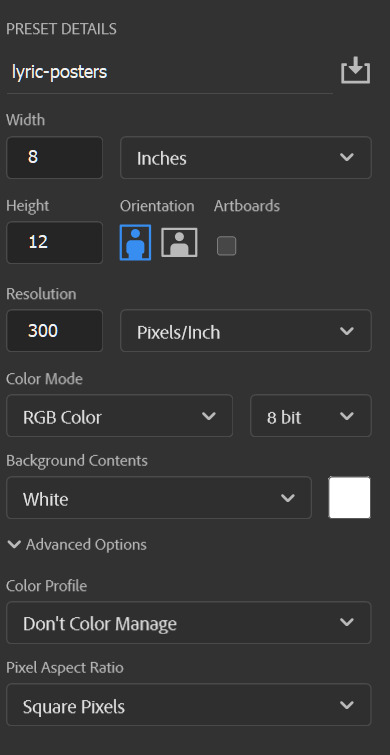
note that 300 dpi WILL make the file larger/slower, but it’s the best resolution for printing! dpi = dots per inch, which makes the image clearer when printing. if you’re not making things for print/shops, 72 dpi will be fine!
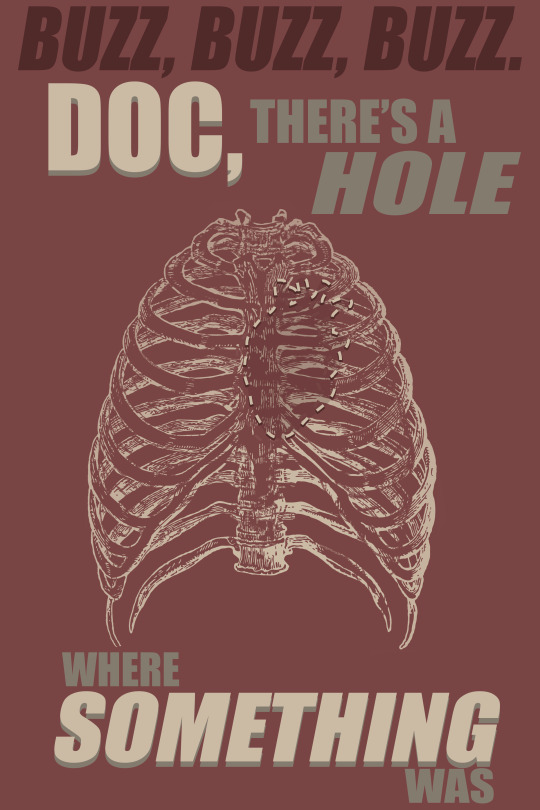
next you want to chose your song/lyrics. i’ll do this example with my disloyal order of water buffalos graphic i posted the other day! the lyrics i chose were ‘like buzz, buzz, buzz. doc, there’s a hole where something was.’
optional step: sketch it out. this is what my idea looked like before i even began. it’s messy but it got the job done to help me visualize what i was doing. this sketch was done quickly while i was drawing something because disloyal order came on and this image popped into my brain :)

note that this doesn’t even have the ‘buzz, buzz, buzz’ line yet!!!
alright, so you have your lyrics, and maybe or maybe not a vague idea of what you’re going to do.
if you have an idea for the image you wanna use, great! it’s time to search royalty-free* websites for something to use! if not, don’t fret! i have ideas on how to find inspiration.
*it’s important to note that if you wish to sell prints of your graphics, that you should be using royalty-free images so you don’t get into legal trouble. if you’re just posting them on tumblr, as long as you credit the original source, you should be okay! royalty-free websites i use a lot are pexels.com, pixabay.com, unsplash.com, etc. there’s a lot out there free for you to use!
okay, so i know i want a ribcage as the main image here. so i go onto one of my royalty-free stock photo websites and search ‘ribcage.’ not finding what i like, i search ‘ribcage drawing.’ and lo and behold, i find one on publicdomainpictures.net!
if you don’t know what kind of image you’re looking for, i recommend either analyzing the lyric and its meaning to you, or to search a word/phrase on one of the websites listed above. you can find inspiration just about anywhere. worst case scenario, ask a friend what the lyrics mean to them! for example, i’ve always interpreted these lyrics from disloyal order as the person’s heart being missing. someone else could interpret it differently, but there’s no wrong answer!
okay, so i dragged my image into my photoshop file. i like to save the image and drag it from the folder it’s saved in over to my photoshop file, as it helps keep the resolution of the image clearer when i mess with the size.

ignore the other layers for now, as this is my saved file and i do a lot of revisions :)
next step is to put the lyrics on. they don’t have to be fancy yet. just slap ‘em on!

this looks like a poster you’d see sitting in the exam room waiting for your doctor.
lately, i’ve been using impact font so i’m going to change my font to that. you don’t have to use it, but it’s been the font i like for these type of posters as it looks pretty clean. i use impact regular with all of my letters in caps. no additional bolding used, but sometimes i use italics.
so now that the lyrics are on there, i begin messing around with their placement. usually i separate words/chunks of words into their own text layer so i can play around with them. this is where the words end up on the final product:
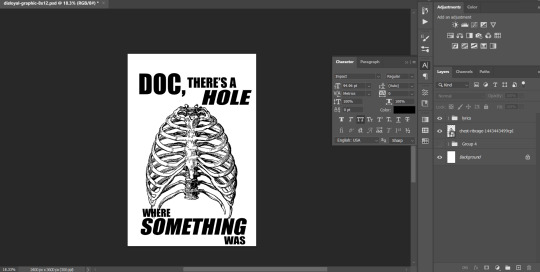
note that this took a lot of playing around and even asking for advice! you will be constantly moving the text around trying to figure out how it fits with the image. i size them all a bit different, depending on what word or phrase i want to emphasize. doc, hole, and something are the three i want to pop out, so they’re larger and two of them are italicized.
my other advice would be to separate the lyrics as evenly as possible to distribute the weight of the graphic. you don’t want it to be too heavy on the top or bottom. some exceptions are made, like when i decided to add ‘buzz, buzz, buzz’ because the top of this looked a little bare.
also, i try to frame the image with some of the words, as it makes it look a lot more cohesive :)
okay, so i have my image and text placed. next up is color palette.
i already had a bit of a color palette ready, when i colored in my first sketch i used this off-white-ish green color and filled in the background with a red. i have a limited number of images, so i won’t post that lol.
i personally just did random colors that i liked, BUT you can always look up color palettes online to help you if you’re not good at picking colors. for example you can search up ‘muted red color palette’ and get something like this.
i usually use the middle color as my background color and the darker and lighter colors as my two colors for my text. sometimes i add a color or two where i color pick one of the colors and shift it up or down in tone or saturation, but i try to keep the palette as limited as possible. (once again, there are exceptions! like my the last of the real ones graphic, which has a lot of color but they’re smaller pieces of the graphic.) here’s what i mean by shifting in tone or saturation:

so with my colors selected, i change the background and font colors. i like to make the words i emphasized the lightest color, and the other words the darker color. i also like to add a solid drop shadow to the emphasized words using the darker of the two font colors, as it really adds to that emphasis. for the drop shadow i use these settings:
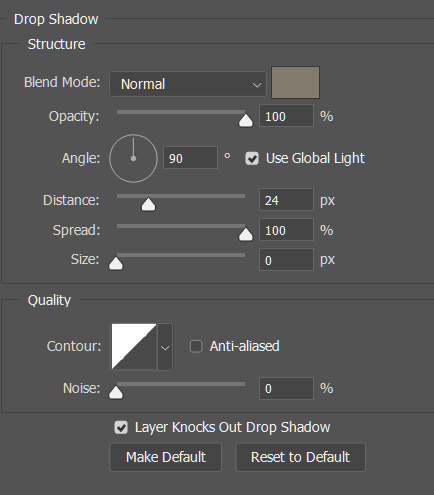
the distance depends on how large the font is and how far you want it from the text.
okay, so colors picked. next is the image.
first, hide all of your other layers so they don’t interfere with your editing of this image. this is an important step that could really mess you up later!!
since this is a black and white image, i do a few things to get rid of the background. one is to go to the top menu bar and click Select > Color Range and have your foreground color be the color you’re trying to erase. be careful with the fuzziness slider on the color range pop-up menu, as it can mess with your selection and select things you don’t want selected!
once you have that selected, you can either press CTRL + X to delete the selected pixels (you will have to rasterize the image if you do so). even though you can undo this easily with CTRL + Z, i don’t recommend this if you want to edit the selection.
i recommend going back up to the top menu bar and clicking Select > Inverse. then, i recommend creating a layer mask. this can be done by heading over to the layer panel and selecting the white rectangle with the hole cut out of it. this is usually located at the bottom of your layer panel! this is so you can draw on the mask to fix your selection without ruining the image itself. i usually have to touch up the selection because it missed a pixel or two.
if that doesn’t work out, instead of selecting the background color, select the color of the object in the image when you do Select > Color Range. then skip inversing it and go straight into a layer mask! it just depends on what works. i usually do have to end up cleaning these up within the layer mask no matter which one i do.
there’s two other ways i do this. one is just to set the image mode to multiply so only the black shows through. this works if you just want the image to be black. otherwise, do the above or the next option.
so i usually want my image to be a certain color. sometimes i create a new layer and do a clipping mask above the image and fill in with the color i want. it doesn’t always work out :( so instead what i do is Select > Color Range and select the color of the image itself with the eyedropper tool. next, i create a new layer and use the fill bucket with the color i want selected as my foreground color. this works but can also be a pain depending on the image itself!
you just have to try your best and figure out which method works!!!! this won’t work if it’s not a black and white image or an image with high contrast. that’s something for another tutorial :)
here’s what my image looks like so far:
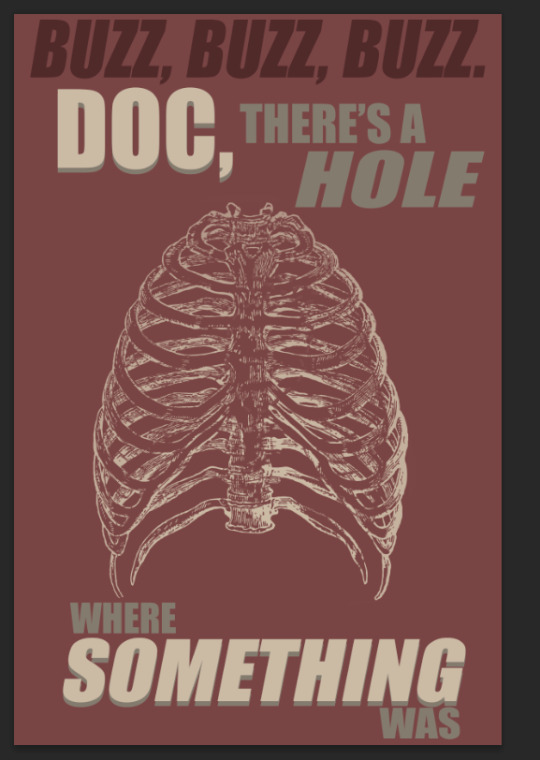
nice, right? but wait! i didn’t add the heart in yet.
this one was done differently. i searched for a drawing of an anatomically accurate heart and *found one. i just wanted the shape, so it didn’t matter to me what it looked like :)
*this isn’t the one i used. i couldn’t find the one i used for this image, because i forgot to save it as which website i used. that was my mistake!
for this one, i used the wand tool to select the white background, and then did Select > Inverse so i had the heart’s shape as my selection. i converted the selection into a path (with the wand tool, right click > make work path) and then a custom shape (with the pen tool, right click > define custom shape) so i could add an outline to it and size it without it being distorted too much, but you don’t need to do that if that’s not your goal. if you just want the shape itself, you can create a new layer and use the fill bucket to fill in the selection.
but for this graphic after i created the custom shape, i change it so it had zero fill and a stroke only. i changed the stroke to be the lighter color (which is the color of the ribcage and the emphasized text) and changed it to a dashed line. you can change it to a dashed line next to where the drop-down is for changing the stroke size. this is located right below the top menu bar!
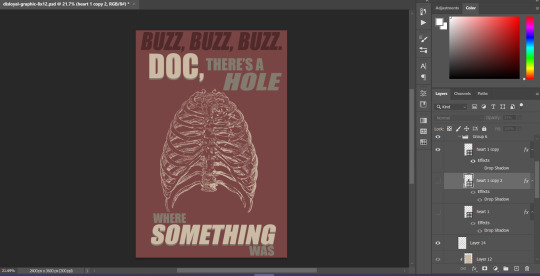
i noticed the light colored stroke didn’t stand out too much, so i added a drop shadow with the same settings as above (less distance) and used the darker shade of red that i used for ‘buzz, buzz, buzz.’
it still didn’t pop out enough, so i duplicated the shape layer (you can either drag the layer down to the new layer button at the bottom of the layers panel, press CTRL+ J, or right click the layer and select duplicate layer). i put the duplicated layer under the original one, and removed the drop shadow. then i set the stroke to zero and changed the fill to that same dark red shade as the drop shadow. i then lowered the opacity to 25% so you could see the ribs underneath. this ended up giving it more of a hole look in the end, so i was pleased!
this is what the final graphic looks like:
i hope this makes sense to you guys! if there’s any other questions or clarification that you need, let me know <3
53 notes
·
View notes
Text
i had an idea.
i want to open a store, in a perfectly normal mall or alongside a street, and i don’t know what it should be called yet but i do know what i want it to sell.
i want to make a store that sells pride things year round.
-small or big flags
-partnered with gc2b or something to get accurate measurements and a way to get binders physically sold (whether that means workers will take measurements and send them in to gc2b or what, i don’t know),
-there’d be patches for schoolbags and stickers for laptops and waterbottles, maybe enlisting the help of queer redbubble artists to use their designs, sending them the money and writing the name of their shop on the little drawer that the stickers are in.
-there’s a machine in the back that people can use to create their own pronoun pins by typing in their pronouns, so even people who made their own neopronuns can have pronoun pins
-a bead curtain that leads into a separate room with a little cursive sign reading “In The Closet” hung over the door, where more subtle pride merch is sold
-where any worker of any sexuality or gender or pronouns is hired and respected
-where there’s shelves and beanbags and places to sit and read LGBTQ+ books
-a place where people can get help and tips for being themselves.
-in the beginning, 10% of the store’s proceeds would go to LGBTQ+ charities, and depending on how much business the store gets, that percentage would increase, and change charities every month.
-the songs would be only queer artists, maybe with a little tv screen that displays the song playing and the artist’s flag
-the bags that products would go home in would be made out of fabric (bc killing the environment is unpog), and thered be two types of design, one black and white, and one very rainbow (if you bring the bags back you get a discount)
-employees would always wear their pronoun pins (unless they do not use pronouns then they wear a pin that says “no pronouns”)
it’d be cute if the store’s products started being like a signal, a little rainbow pin causes two people to see each other and think “you’re like me”
above all, i just want a place for all the queer teens to know “you are not alone. we are here, we are with you”
76 notes
·
View notes
Text
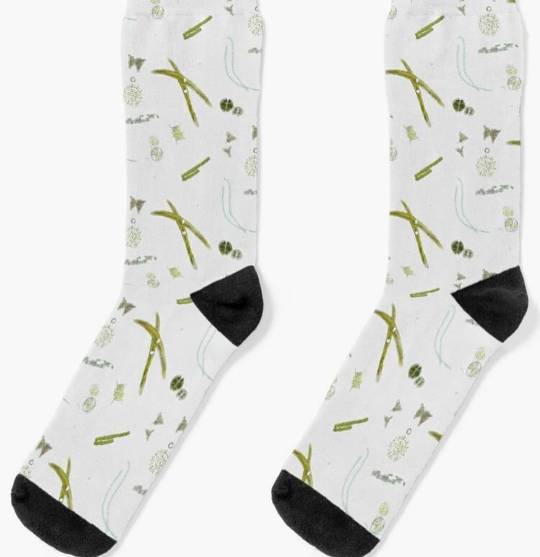
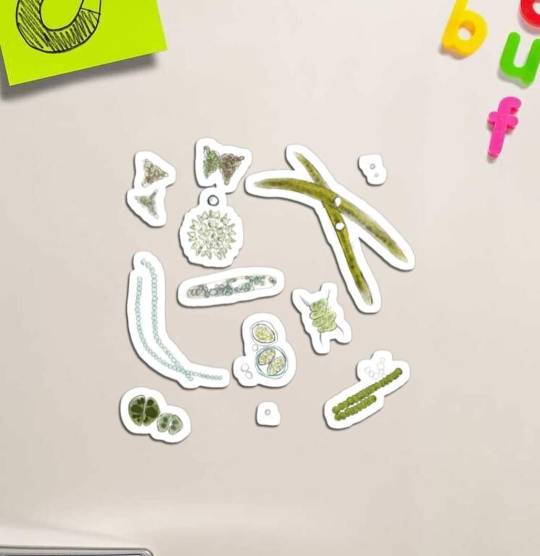
Who wants a facemask with all my favourite algal species on it!
My amazing and talented sister designed an algal print pattern from pictures I've taken of some of my favourite algae.
She sells them on two sites, Art of Where, and Redbubble.
These ones are made in Canada and come in different sizes. They're great quality but they take a while to ship out.
These ones are made in the US and are a little cheaper.
And just in case anyone out there is as algae obsessed as me, you can also get the algal print on basically anything else. Clothing, bedspreads, shower curtains, phone cases, note books, even stickers!


I should also add that I don't get anything when you buy from these sites. Except I guess if a lot of you buy things then maybe I can convince my sister to buy me some ramen or something.
#science#biology#photography#art#clothing#design#phycology#algae#artists#bipoc art#bipoc artists#fasion#microscopic photography#microbiology#microscope#plants#style
186 notes
·
View notes
Text
The Ultimate College COVID Packing List
Okay kids, you’ve seen the post about packing light for college, so here’s some specifics for all of you incoming freshmen or returning students who will be living on campus! This is NOT the year to bring extra furniture, decorations, etc. This is the year to pack light and be ready to get on out of there at a moment’s notice if you have to. i proudly present to you -
“What to bring and what not to bring when going to college in a global pandemic!!!”
STORAGE
i used to swear by my camp trunk when i packed for school and while a trunk can be useful because it has more space inside it’s going to be harder to take on a plane or bus. If you go for a trunk, make sure its combined dimensions (length+width+height) are 62 inches or less (the size requirement for checked luggage). The ideal size would probably be a 32x17x13 inch trunk.
Instead of trunks or big containers, go for a combination of suitcases and duffle bags. Your goal should be to minimize luggage - you want be able to carry everything through an airport without any help. So let’s say in theory at MOST you should have a combination that looks something like:
2 checked suitcases + 1 checked duffle + 1 carryon duffle + one personal item backpack
1 checked suitcase + 1 checked duffle + 1 carryon suitcase + one personal item backpack
1 checked suitcase + 1 carryon suitcase + 1 personal item duffle
Get creative, mix and match, calculate the costs for each combination, which will vary depending on if you’re flying, taking a bus, driving, or taking a train.
Checked and carryon luggage should ideally have 4 spinner wheels and a handle, this will make it easier to move all by yourself. Put your duffles around the handles of the luggage so you can carry everything yourself with minimal effort. If you have checked luggage and carryon luggage, consider a bag connector like this one! You can find surprisingly decent luggage at Costco and from Travelpro, which is designed for pilots and flight attendants but has massive markdowns all the time.
A good duffle should be spacious with multiple compartments or pockets. If you’re an experienced camper or backpacker, maybe use those types of bags! If you’re not, get something that’s 40 liters of space or more. i bought this 50L duffle for $30 and it’s absolutely absurd the amount of stuff i can fit in it.Leave all other storage options at home.
Don’t bring your own desk, drawers, furniture etc. Use only the furniture provided by the dorm. Don’t even bring a laundry hamper! Get a fabric laundry bag that you can easily fold.
LEARN HOW TO PACK EFFICIENTLY. Choose your fighter, the army rolling method or the KonMari folding method (Marie Kondo also has a great video on how to organize what you pack and choose only what you need). This will allow you to bring the amount of clothes you need while taking up minimal space. Speaking of which -
CLOTHING
Your goal is to minimize both items and travel (meaning you shouldn’t plan as if you’re going to travel home every break to swap out clothes). Now is a great time to learn how to build a capsule wardrobe of basic items that can be mixed and matched. Keep it simple. Obviously if you’re in a warmer climate, this will be easier. For colleges with seasons, i’d say aim for 2 pairs of jeans or trousers you like, 1 pair of dress pants, and 1-2 pairs of leggings/joggers/comfortable pants. 1 pair of shorts, no more than 2 skirts, no more than 3 dresses (1 nicer, 1 more casual and comfortable). 10-12 shirts or less (include a variety of tanks, tee shirts, long sleeves, button downs, sweaters, etc.) and 3-5 “layers” like a blazer, cardigan, hoodie, etc. 2 pairs of pajamas, one for warmer weather and one for cooler weather. One raincoat, one fall/spring midweight jacket, one good winter coat - if you’re in Chicago, NYC, etc. invest in a warm parka, and i don’t mean Canada Goose. Just something sturdy that will keep you warm.
You’re going to repeat outfits. That’s fine. You’re not going anywhere important and you’ll be spending a lot of time in your room online. Being able to get out is more important than looking cute.
Pack an appropriate amount of underwear, socks, bras, etc. Bring a hat or two, one for sun and a thick beanie for the cold. Bring one tie and one pair of snow gloves if you need either. Bring a scarf or two for cold climates (they can be an extra layer of protection over a mask). If you wear jewelry, choose up to 10 items you really want and put them in a bag or a small portable jewelry box.
You only need 4 pairs of shoes maximum - one pair of sneakers/gym shoes that you could easily walk two miles in. One pair of of easy slip-on slip-off shoes for going to get mail or do laundry (because you don’t want to walk the dorms barefoot these days) and bonus points if they can double as comfortable ‘nice’ shoes such as cheap loafers, TOMS, basic flats, etc. One flip flops or sandals if you’ll be using communal showers and bathrooms. And one pair of boots that can double as rainboots AND snowboots (duckboots are great for this!) You don’t need heels, wedges, or multiple pairs/styles of shoes for the same reason you don’t need multiple dresses or a full tuxedo - you’re not going anywhere this year! Or at least you shouldn’t! Parties, formals, conferences, etc. are all a terrible idea unless you want COVID-19.
What you should have multiples of are masks and gloves! Have a few reusable face masks you can wash (RedBubble has them in every style, almost every clothing brand sells them, and VogMask/Camridge Mask are great options for something a little more heavy duty). Invest in disposable gloves and one pair of reusable gloves such as dish gloves. Some basic eye protection doesn’t hurt either - i love blue light glasses because they provide some coverage while also being great for reducing eye strain during all your Zoom calls!
SUPPLIES
Keep it basic, and that means you too studyblr kids! You don’t want supplies to take up all your space. Buy a spacious pencil case. Buy a basic back of black Bic pens and put 10-15 in. Those things last forever. Put in 5 presharpened pencils and 5 unsharpened pencils. Bring a pencil sharpener, 1 pink eraser, and 10 eraser toppers. The eraser always runs out before the pencil does. Pack 1-2 glue-sticks, 1 pair of good scissors. Fill the rest of it with your non-essential favorites like mildliners, highlighters, felt tip pens, markers etc. But no more than what can fit in the case. And nothing too expensive, just in case you can’t bring it with you.
Small multi-subject notebooks y’all!! Just get one or two. You never use as many pages as you think you will in your notebooks and multiple full size notebooks are a pain to carry and pack. For my last two years of college i would buy 1 or 2 Five Star 5x7 inch notebooks with 5 subjects for each term. They came with pocket folders inside and i never once used all the pages. i’d often re-use at least one from last term into the next term. It also means you never have to run back for a notebook if you’re at the library and want to do homework for that other class because all your notes for all your classes are right there!!
Bring 2 rolls of scotch tape and 1 roll of masking tape in case you need to repair anything. Pack any essential medication you take, a first aid kit with bandaids, wipes, tweezers, etc. Pack 1 small bottle each of ibuprofen, Tylenol or acetaminophen, any multi-vitamin you prefer, and a vitamin C supplement to help keep your immune system strong.
1 pack of pads/tampons. You can buy more when you get to school, save the space for packing.
1 reusable water bottle. Buy plastic ones periodically/accept reusable free ones given to you at school that you can take if you need to go to the doctor/hospital/etc. so you can throw them away if needed afterwards. 1 mug, if you use one. Make it one you’re willing to leave behind if you must.
1 small set of non-breakable plates/bowls and utensils. i like the Ikea KALAS ones because they’re plastic but can be microwaved or put in the dishwasher. And it’s $2 for a set of 6. 1 small set of tupperware - again IKEA has some good cheap options - that is also microwave safe. You’ll want these solely in the event it’s unsafe to eat in the dining halls. This will let you bring food back to your room and eat, save leftovers from the dining hall or takeout orders, etc. Buy a small bottle of dish soap when you get to school to be able to wash your dishes.
If you use liquid detergent, wait to buy until you’re at school. It takes up more space. If you use detergent pods, choose your own adventure. Buy your shampoo and conditioner at school if you can, same with soap. Same thing with toilet paper, paper towels, and so on. Buy it there, be prepared to leave it behind. Do bring hand sanitizer with you though. Keep a small size in your personal item for your travels and always keep some in your bag at school.
2 disposable toothbrushes, 1-2 tubes toothpaste, 2 toothbrush travel cases. Store the toothbrush you’re using in a travel case while at school to try to prevent contamination. If you become sick, throw your toothbrush away once you’re feeling better and thoroughly wash your travel case. Buy new disposable toothbrushes as needed once at school.
A small wallet or zip ID case with a lanyard. Make sure you can fit your state ID/driver’s license, student ID, transit card, insurance card, credit/debit card, and a little cash in it with ease. One with a clear window is great because you can put your student ID in it to easily show it when required without needing to open your wallet up. A lanyard makes it harder to lose and lets you put your keys on it if you have a physical dorm key.
Your phone charger, with a wall plug. And a mobile charger of some kind (many schools give them away at some point during your first few weeks, orientation, etc. TAKE THEM). You don’t need an Apple branded one, you can find sturdy and cheap ones at Target, etc. You’ll want these in case you get stranded anywhere. And you’ll especially want these because if you need to go to the ER/doctor, you never want to let your phone die while you’re there.
1 cheap tote bag or small backpack or knapsack, etc. that you’re not too attached to. This will be your hospital go-bag. Keep a mini-notebook with your name/birthdate, emergency contact information, relevant medical information, etc. written in it in the event you cannot communicate this yourself. Keep one packed and ready. Other helpful things to have in this bag once you’re at school are a pair of shorts, a t-shirt and underwear; a granola bar, and a disposable water bottle.
1 pair of cheap but reliable headphones, ideally with a microphone. In-ear headphones take up less space than over-ear headphones. These will be great if you’re on a Zoom call or something and don’t want to be heard by your neighbors. Also great for listening to music or podcasts in the event you’re at the doctor/hospital, because just like you never want to forget a phone charger, you never want to be without something to listen to while you wait for a few hours.
DORM STUFF
Now is NOT the time to decorate your dorm. i’m sorry, i love a good Pinterest dorm board and DIY project as much as anyone else. My dorm had a whole aesthetic. It was great. But it was a nightmare to pack up when COVID hit.
All you really need is a duvet/comforter, 1 set of sheets (ideally dark color so they won’t stain, just make sure you wash them regularly), and 1 pillow.
If you want stuff on your walls, don’t bring anything. When you get to school, you’ll likely get some free swag like a college pennant you can put up. Or at the least you’ll get a bunch of papers and maps and things. Hang up the maps. Make them look cool. Draw or do calligraphy on the blank sides of the papers for DIY art and signs. Order a wall calendar with fun art or images on it. Go to Walgreen’s website and use their photo system to order a bunch of photo prints. They almost always have a discount offer happening which makes it super cheap. You can upload photos of your friends and family to surround yourself with nice memories, or upload pictures of art, landscapes, quotes, images you found on Pinterest, your celebrity crush, and literally anything else. Voila, wall decorations.
The key here is to never put up too many things. Everything you put up should be able to be taken down in 15 minutes or less and without any help.
If you really really want some decoration - buy a cheap thing of string lights from Target or something to put up. They add ambiance without much effort and don’t take up too much space. If your room is freezing with concrete floors, a small rug can help if you really think you need one. But - and you already know what i’m gonna say - BUY THEM THERE AND BE READY TO LEAVE THEM BEHIND.
No chairs. No hammocks. No lamps. No furniture. No bulletin boards. No extra bookshelves. Keep it as simple as possible.
The caveat is to bring one small grounding item from home. Maybe it’s a souvenir from a vacation you took. A mug your mom got you. A framed photo of your best friends. Choose one, and make sure it is small.
BOOKS, ETC.
Buy your class books once you get there, either from the campus bookstore, a local bookstore, ThriftBooks, Amazon (if you really must), etc. Or download them online ;) Either way, they’ll take up space while going to school so just get them later unless you have to do reading in advance.
As a book lover it pains me to say this but leave your books at home. Bring at most 4 books with you to school. i’d recommend at least one you haven’t read yet and at least one that’s a “comfort” book you like to reread. Books are one of the hardest things to move and you won’t have that much free time anyways.
Pick one hobby to pack for, and keep it basic. If you like drawing, make it 1 small sketchbook and a mini-pack of colored pencils, markers, watercolors, or crayons. If it’s photography, make it 1 single camera with 1 lens. If you like gaming, bring something small like a Switch lite. If you need a hobby to keep you busy inside, grab yourself a pair of wooden/bamboo knitting needles or a crochet hook, 1 ball of yarn, and go wild. The bottom line is only what you absolutely have to have to not lose your mind.
Have 1 large (32 GB or more) flash drive or SD card to back up your files from your laptop or tablet onto. This will be a huge help in the event something happens to your computer.
Finally, always have a plan with friends/family in the event you need to evacuate. How will you decide if you need to leave? How will you get home/to a safe place? Who will help you get there? How will you afford it? And so on.
Feel free to add anything tips that might be useful!
#college#university#studyblr#uchicago#university of chicago#covid#coronavirus#covid-19#covid19#packing#college packing
12 notes
·
View notes
Note
I'm really lovin' your YTTD comics & art, especially with how you draw Shin - he's cute and squishy! ^_^ Have you ever thought about opening a RedBubble or Etsy shop to sell your art? :oc
I’m glad you like cute and squishy Shin, because I’m about to draw him all dressed up (as if he belongs to the mafia) and cool~ Well not just yet but I plan on it! *cough*
Anyway! The thought of people buying my art (that are not direct commissions) never crossed my mind I’m sorry. But I’ll think more on it. Though I do not like the idea of selling my art when it’s based on something that does not belong to me... But maybe if one day I ever feel like having one of my drawing on a t-shirt or keychain I might just sell it...?I know for one that Ebay got some of my old drawing on cushions and stuff. Which I tried to have them remove it but didn’t work out in the end...But I’m truely touched by your interest, thank you! I’ll keep doing my best, money or not!Ah but I should consider opening commissions again: my graphic tablet don’t feel so good lately.
And I’ll keep drawing cute Shin for a bit but also look out for cool Shin~
32 notes
·
View notes
Text
Blog Info
This is a blog focused on SPN with miscellaneous art.
Things you should mind:
- no negative gossip about cast/crew
- LGBTQ+ friendly
- does not support “discourse”/ fandom drama
- YKINMK (tag your content properly and there won’t be any issues)
If you want me to check out your SPN content, tag your post under #spnhellfire.
I don’t sell prints of my art and because I just don’t have the time yet (I also dislike redbubble). But if you DM me I can link you a drive file of the requested image and you can do with it what you want. I only ask you to keep the watermark and maybe buy me a coffee - my ko-fi.
My content:
- headust art (digital and traditional fanart)
- Personal Space art (PPB 2021)
- Let’s Misbehave! art (BDBB 2021)
Tags that could be relevant:
- art references
- not spn, if you want to filter non spn content
- #nsfw, #adult content, #adult humour
- #übernatürlich German spn posts
Those are the most important ones for now. This list will be updated if there’s a new major tag, like a project or something.
Thank you everyone!
M xxx
2 notes
·
View notes
Text
2019 year in review
So… The 2010’s are almost over. Huh. What a decade it’s been. Hard to comprehend how much has changed in 10 years. I can barely believe that I was in high school at the beginning of this decade, and now I’m a college graduate with 2 degrees who’s been working at the same job for the last 3 years. But trying to summarize the past 10 years in a single post is a good way to give myself an existential crisis, so let’s not do that! Instead, let’s just focus on 2019 because there has been more than enough shit that’s happened to me in this year to talk about.
PART 1 OF 2: 2019 AND 2020 GOALS AND RESOLUTIONS
Huh, looking back through my archives, I apparently didn’t make a tumblr post about my goals this year. I definitely had some, though. Lemme list ‘em off real quick, and then we’ll go through them point by point.
1) Pay off all my student loans
2) Finish some song comics
3) Make art for my Redbubble account
4) Finish the first rough draft/script of a game I wanted to make
5) Practice ASL
6) Sew some stuffed animals
7) Finish some fan fictions
8) Work on Ghost Switch
9) AMVs
10) Do some original writing
11) Make illustrations for my fan fictions
Okay, first off, the student loans. I was actually SO CLOSE to successfully completing this one bUT THEN MY CAR HAD TO BE A WHINEY PISS BABY AND HAVE ITS ALTERNATOR DIE ON ME WHILE I WAS ON THE HIGHWAY AND THEN A BLOW OUT THREE WEEKS LATER.
GOD, if I had to summarize this year in two words, for me it would be “Car troubles”. I swear I spent more on auto repair in the first third of this year than I ever have just freakin’ OWNING a car. All four of my tires had to be replaced, my alternator failed and my car literally just SHUT OFF while I was driving, and I was barely able to coast into a gas station. Both my front breaks and rear breaks were worn down the metal and I only learned this when my car was barely able to stop after I had to slam the petal down full force! I went in for an oil change, and they found some problems and then I didn’t get my car back for three days! I don’t even like owning a car! I hate driving! I hate my country’s refusal to provide universal, free public transportation! I NEVER ASKED FOR THIS!
Oh-kay… number 2. Finish some song comics. I didn’t finish any. But that doesn’t mean I didn’t work on them. I have made tiny progress, but that’s certainly better than no progress. One of these song comics I hope to be realizes is going to be a collab with one of my friends. It’ll be a long-time coming as it’s pretty low priority for the both of us, but if anyone else out there was disappointed with KH3’s ending, we’re gonna have ya’ covered… With SONG!
3. Make some redbubble art. I actually did this one! Not in the way I expected, but I added (technically) 3 new designs to my redbubble in the middle of the year. If you like butterflies and dragons, I got some product for you~!
Number 4, finish a script for a game I want to make. I… thought about this. I thought about this a lot, but I never put pen to paper, so… oops. It almost happened! I debated making this my main writing project for NaNoWriMo this year, but ended up having more inspiration for another story. Maybe next year? (god, I hope not. I don’t want to wait a full year just to write something)
Number 5, practice ASL. I just straight up didn’t do this and I only have myself to blame. Still keepin’ up that Danish Duolingo streak, though. 4 years going strong and not a day missed yet.
Number 6, sew some stuffed animals. Again, another one I just straight up didn’t do, but I have an excuse of trying to save money while my car crashed and burned in every other sense except literal this year. Hopefully 2020 will be different. I’ll definitely be able to pay off this last loan within the first half of 2020, and then I can start saving for whatever I want to buy.
Finish some fan fictions was number 7, and I did this! Well, I only finished, 1, but it was a story I’ve been working on for over 3 years, and it came out to over 200 THOUSAND words long, which is the longest thing I’ve ever written, and I’m quite proud of myself. Now that the big story is out of the way, and I’ve gotten into a good rhythm of working on Ghost Switch, maybe I can squeeze in some short writing sessions more frequently. (either that, or just wait for my car to break down again and then go on a writing spree in a pepboys. The lord and the fan fic discord know that’s solely why I finished my other fic this year)
Speaking of Ghost Switch, working on it was a goal this year too, and I did that! I kept it up all year and took a vacation in November and it was wonderful. While the major plot points have been in place since before I started drawing, I still need to script each arc beyond Snowdin, but hey, by the time we get there, it’ll be 2022 so I got time. (Note, don’t do this, kids. Script your stories and comics thoroughly before publishing. The road I’m on is paved with misery and pain and it will only end in tears unless I change lanes soon)
Number 9, amvs. Do people make AMVs anymore? Idk… the last one I made was... Jesus, 5 years ago? (it was a gravity falls/fall out boy crossover, if you were curious) I’ve been wanting to do 2 more for just as long, but in order for me to do that, I’d have to spend time re-watching the shows to find the footage, and then actually edit them together, and I just don’t…. feel like it. Maybe someday, but not any day soon.
10; do some original writing. I did this! For nanowrimo! I wrote the first draft of some original fiction I’ve been planning for a year or two now and it completely sucks! But it’s on paper now and I’m happy. Will I revise and edit it? Sure, but not for a while. I want to let it sit and forget about it and look at it with new eyes months from now so I can be sure I can make it better when time comes to rewrite.
11, make illustrations for my fan fics. Now that You Monster is done, I want to go back and add pictures to it. I didn’t do any this year, but I did keep a list of scenes I wanted to draw, so I have plenty of ideas to do as warm up sketches next year~ I kinda want to stream them~
So, that was 11 goals, and I successfully fulfilled 4 of them! That’s! Not a very good ratio… QmQ So, goals for 2020. Some I’m gonna keep from this year, some I’m gonna drop and some I’m gonna add. In short I would like to,
1) Finish paying off that last student loan
2) Put more stuff on my redbubble
3) Illustrate my own fan fics
4) Sew at least one stuffed animal
5) Make an enamel pin
6) Read one new book a month
7) Write one page a day/Complete at least one new fan fic
8) Learn Python or C# for the game I want to make
9) Finish fully scripting Ghost Switch
10) Boost my patreon
Most of these I think are pretty self-explanitory, but I’ll go into detail just a bit because I’m on a roll and typing my thoughts helps me feel less alone in the middle of the night when you’re super tired and you know you should probably go to sleep, but the toddler in you is throwing a tantrum and doesn’t wanna go to sleep just yet, but you can’t fight the progression of time either way.
Number 1- I should be able to reach this goal by the end of March. End of June at the absolute latest. Once that goal is met, my secret new year’s resolution will be unlocked as well!
Number 2- I want to put more art of my OCs on redbubble. These OCs are tied to the game I want to make. There’s already some art of them up there, but I want at least one piece for each character.
Number 3- Mostly for You Monster. Embrace the cardinal rule of fan fic and apply it to fan art. If you want to read about see art about certain ideas, scenarios, or what-ifs, you gotta make it yourself.
Number 4- I have 3 potential ideas to sew. One is definitely leagues easier than the other two and will probably be chosen if/when I have the time and materials.
Number 5- This year I got really, REALLY into the idea of making enamel pins. Unfortunately it’s a pretty big investment (like, $350 to make 100 pins you might not even sell). If this happens, it’ll probably be towards the end of the year, and if I get enough interest. I’m currently torn between making an original enamel pin and one based off Undertale. We’ll just have to see where this goes.
Number 6- Back in 2018 when I paid off one of my many student loans, I rewarded myself by spending over 200 dollars in used books. All these books had a theme; they were focused on dragons because I have a problem. I have not yet read a single one of these books I have bought, and I would like to fix that. I have, like, 20 unread dragon books, and even if I only read 12 out of 20, I would consider that an amazing accomplishment and money well spent.
Number 7- I currently have about 8 different WIPs I could work on. (well, I don’t know if I can even call them wips. More like, a general idea and a title written down.) I want to build good writing habits, and if I can write just 200 words a day, hell, even 200 words a week and just one of my 8 stories done, I would consider this goal met.
Number 8- I’m torn between making my game in unity or ren’py. I know jack shit about both. Ren’py is more user friendly, but unity will allow me more customization. (Lol, can you guess what kind of game I want to make yet?)
Number 9- I really just want the full story to be done and written incase anything goes horribly terribly wrong in my life and I find myself unable to continue making ghost switch in comic form. Then at least I can finish the story by other means, you know?
Number 10- It always surprises me every month when I get that patreon email saying I got paid. Sure, I don’t even make double digits on it, but it still awes me enough to know that people out there like my work enough to throw me a tip. I can’t thank my patrons enough for supporting me and I hope to one day be in such a good place I can update my comic/song comics/writing frequently enough without need for goals or milestones. But until that magical day arrives, money is always a great incentive for anything, I suppose. ¯\_(ツ)_/¯
ALRIGHT. PART 2 OF 2: SHIT THAT HAPPENED TO ME IN 2019
Cheesus crust what a year. This year started off great! Back in late January Kingdom Hearts 3 FINALLY released, and let me tell you a little story. Back in the summer of 2006 I was a 13 year old middle schooler with no way of making money other than by doing house hold chores at a rate of 25 cents a task. A few weeks ago, I had a sleep over at a friend’s house and they let me play this weird game called “Kingdom Hearts” and god, I was instantly hooked on it. That summer, I did over 800 chores, enough to earn myself 200$ and buy myself a playstation 2 (just in time for the ps3 to come out, gg me) The only games I had for the ps2 were KH1, 2, Re:CoM and Okami, and I beat them all… except Okami. Miffed that the PS3 wouldn’t allow for backwards compatibility, little 13-year-old me made a promise. I looked myself in the mirror and said “I will not buy the next playstation console until KH3 comes out, AND BOY that was probably a good choice for me to make with my level of gaming. I’m even less of a casual gamer than the average casual gamer, but I have been waiting 13 years for this piece of closure, and I even told my friends and family that “the day Kingdom Hearts 3 comes out is the day I will buy a playstation 4”. My dad apparently thought this was the funniest shit, because he literally took the day off from work that Friday to drive me on base to get the game and console (he thought it would be less crowded than a regular walmart, I suppose). I paid $400 on a ps4 pro while he bought me the game. Again, I have an impecible sense of timing seeing as the PS5 is now right on the horrizion, but just like before, I’m not buying a new console until the next KH game is released. See you in 2045, sony~. While I was at the gamestop on base, I also picked up Okami HD and The Last Guardian. For all of February and even early March, I took my time playing through KH3. And…! It was the best disappointment I’ve ever played. After a month away from gaming, I started The Last Guardian and finished it in a couple weeks. I love trico and would die for him, but trying to get 100% completion on that game is udder insanity. Okami, HD, however… again after a month break after finishing TLG, I started replaying Okami. I think I had only managed to get about halfway through the game before I just… stopped playing it on my ps2 version. I am currently SO CLOSE to getting a 100% on the ps4 version. In fact, I’ve beaten the game. I only (techinically) need 2 more trophies to be done; 1st, escape the water dragon without being eaten, 2nd, I need to beat that dumb stupid race with Kai, in order to get the last bead on my rosary, as well as the top dog trophy. I hate her so much. I hate this race so much. It’s awful and bad.
Flash forward to December! Earlier this month I was at Barnes and Noble, buying myself a planner for 2020. I exit the store and notice that there’s a gamestop across the street. For shits and giggles I go inside to look at their game selection, and I find KH 1.5 and 2.5. Now, my PS2 died a few years back (it just won’t read my discs anymore, I don’t know why) and I haven’t been able to replay any of my other kingdom hearts games since. If you had seen me the day I finished kingdom hearts 3, after the ending credits rolled, you would have heard me say “Man…. I wish I could play kingdom hearts 2 again”. AND NOW I CAN, ALONG WITH BBS which I had never even played yet, but knew the story of. I’ve restarted playing kh1, and I was so happy to hear that familiar music when I booted the game up for the first time. While at the game stop, I also picked up Rime and Tearaway, two games that had looked interesting to me. At the time of writing, I’ve finished Rime and am 25% done with tearaway. Rime was…. An interesting experience. I learned about it through Jacksepticeye’s channel a couple years back and thought the art style was enticing. For a super casual gamer like me, I found the puzzles just the right level of challenging and exploring was a blast! The music gave me VERY strong Princes Mononoke vibes, but the overall story left something to be desired. Overall I had fun, and enjoyed completing this game to 100%. Now for tearaway. Can I just say this game is super fucking adorable? I know the original was on the ps vita and the gameplay there was arguably more diverse and imaginative, but this game is just so fucking cute I don’t care?? ALSO, this game’s sound track is ABSOLUTELY incredible and I’ve only heard the first fourth of it! Listen to The Orchards, Pig Riding, and Gibbet Hill Pilgrimage for a taste of their wonderful beats and fantastic use of string and woodwinds! God, I’m so excited to get some more games in 2020. I’m proud to say I currently own more ps4 games than I ever did with my ps2 (and now the majority AREN’T Kingdom Hearts titles!), and I’m still hoping to play Journey, The Witness, and Abzu before everything becomes ps5.
What else happened to me this year. Oh, I went to a doctor for, like, the first time in seven years. I also had my blood drawn for the first time ever, and the nurse said the most disturbing thing to me while she did it. Now, whenever I get shots, I refuse to look. I did that here. So she thought it would be appropriate to say to me “Can you feel your blood leaving your body?” Lady… You can clearly see I am uncomfortable with what is happening here. Why, of all the things you could say, did you choose to say that. Unfortunately, while my doctor is nice, she keeps wanting to run tests on me, that I just cannot afford with my current salary, and my monthly insurance is about to go up to 200$ a month, so I’ve cancelled my next appointment with them, and don’t plan to go back until it’s absolutely necessary. Capitalism is fun, guys. Preventative healthcare is for wusses.
I started going to a chiropractor on a monthly basis. Story time- I don’t know when it started, but sometime late last November I began to notice that I had a headache that just... wasn’t... going away? And each day it was starting to get a little worse. It made it hard for me to find a comfortable position to sleep, it made it hard for me to be in bright areas or move fast. So I said to myself “Okay, if this headache persist through the month of december, then something is proooobably wrong and I should go see someone about it. And hoo-boy were thing wrong with me. By the time this January rolled around, I couldn’t even stay on my feet for more than a few hours without it physically hurting to just BREATHE. So I started going to this chain called The Joint (A+ name, I know). THey aksed me “How are you doing?” I said “I’m in pain” and they said “We can help fix that!”. I’ve only been to a chiropractor once before in my life a few years back after my freshmen year of college because I began to notice my hips weren’t able to support me? LIke, I would lie on my back, and I couldn’t push my hips up when my feet were flat on the floor. I also couldn’t climb anything steep, because my legs just couldn’t push me up if my knee had to bend more than 90 degrees when I lifted my leg up. (Turned out both my hips were apparently out of place). This time only one of my hips were out of place (which they fixed. they said one of my legs was an inch “longer” than the other because I had been leaning all my weight on one leg when I stand). But two of my ribs were apparently “Stuck” which was why it was hurting for me to just breathe, and one of my shoulders was missaligned too, causing one of my trap muscles to constantly be streched, which was pulling on my skull, and causing the headache. Anyway, after they popped all my bones back into place, I still felt terrible, but by god, that night was the first time in weeks I was able to sleep without a migrane. A chiropractor can’t magically heal your arthritis, or fibro, but I definately think they have merit to keeping your posture good and helping your body with things like circulation. 10 outa 10, would recomend. It’s all the fun of getting your neck snapped without the dying!
Earlier this month I got together with two of my friends and we baked Christmas cookies. It was a lot of fun, as well as a great learning experience. A member of my family has a gluten allergy, so we used rice flour for most of the cookies. We learned this is a bad idea! The cookies will just fall apart! A few member’s in one of the friend’s family have nut allergies. Other friend and I knew this and were careful to avoid cookie recipes with nuts, bUT THEN COMPLETELY FORGOT THAT ALMOND MILK AND ALMOND EXTRACT COUNT AS NUT. IN FACT, ALMOND EXTRACT IS PURE CONCENTRATED NUT JUICE AND WE FELT SO BAD FOR ALMOST ACCIDENTALLY POISONING THE FAMILY.
Earlier this year me and these same friends took a field trip to Hobby Lobby and just dicked around the store for a couple of hours. It was super fun, 11 outa 10, would recommend, a great date idea for your artsy S.O.
Back in May I went to a wedding for the first time in my life. (well, not true, but the first one I could remember) we left at 5am, drove 5 hours to get there, hung out at a zoo and spent the night in a la quinta before the wedding day. I slept on the bathroom floor because my mom was snoring too loud in the main room and keeping me awake, and the rest of the day was just spent me trying to keep myself together because I was pissed off and tired.
Other than all of that, nothing really major happened to me this year. I guess one more thing I’ve tried to do this year is started the process of breaking certain internet addictions so I can use my free time for more personal projects. Seriously, I found myself watching way too much youtube and following blogs that didn’t even make me happy. I had a personal intervention with myself where I sat down and asked myself, “why do you watch these videos and youtubers? Why do you follow these blogs? Do you really enjoy their content? Do you really care? If you stopped watching/following them, would you even notice?” After critically thinking it over, I’ve found myself unfollowing several channels and blogs and suddenly I feel so much happier. I thought I would miss it, but I realized I didn’t really care if I saw their content or not. I wasn’t missing much. And now I feel like I have more time to draw, read and write. If you think you spend too much time consuming and not enough time creating, I suggest you try and de-clutter your internet habits as well. It’s done wonders to un-fuck my headspace.
And… well, that about sums up my year. How are your holidays going? Anything fun, exciting, dramatic happen to you this year? I hope your new year is warm and safe! Good night, everybody!
12 notes
·
View notes
Photo


It has been suggested a few times that we open a means to donate to Empty Movement’s maintenance costs and content purchasing, which literally never stops. While I have made a Ko-fi page, or at least am working on one, I feel kind of guilty just taking people’s money like that, I’d rather be able to give you something in return, be it the series-accurate teacups from the musical, or now, Empty Movement uh....merchandise?
I was asked a while back about how best to make a series-accurate version of Utena’s disaster gym shirt for a cosplay, and my answer was like, holy shit let me do that. Naturally this started on RedBubble and spiraled out of control as I realized the degree of detail and print quality I wanted wasn’t available there, but only through drop ship companies, requiring I have my own storefront. Well, hell. I think I know how to do that!!!
Welcome to Morphology, Empty Movement’s swag store, where your money apocalypse is assured.
There are other items already, like Miki’s Notebook, and pillows using the Black Rose “To the Engaged” letter pattern, however I have not gotten to order samples of those yet. They should be just fine though, and if you do grab them please send me pics! I’m also working on some things like mugs inspired by Miki and Kozue’s shake glasses, and maybe something cool for Pride Month.
Note: Check the categories, and only try to check out with matched companies. If you try to order from Printful (the shirts) and Printify (the other stuff), they get into a fist fight and charge you four times for shipping. Apparently I have to resolve this by doing manual shipping calculation, but for now I don’t care to, and may never do so because each company more reliably saves you money!! Checking out separately will not change your total, by the way.
So yeah! I just finished this website, so definitely let me know if anything’s not on the up and up. It uses Paypal only, because I don’t want to see people’s credit card information. I’ve never used drop shipping to sell merch, so this is kind of a maiden voyage, but it can’t possibly be worse than RedBubble screwing up my payment last month so it’s held for like, ages now, with my profit margin being like, barely shipping on a magazine I bought with an article about Utena in it anyway. Also, I’m waiting on some other items to release in Japan and ship to me, at which point I will be doing another round of auctions as I have a few more teacups and some other merch I was asked to hold on to until after Christmas. Which suits me fine since all my website hosting/domain stuff comes up in the beginning of the year, BOOO... Anyway.
171 notes
·
View notes
Photo
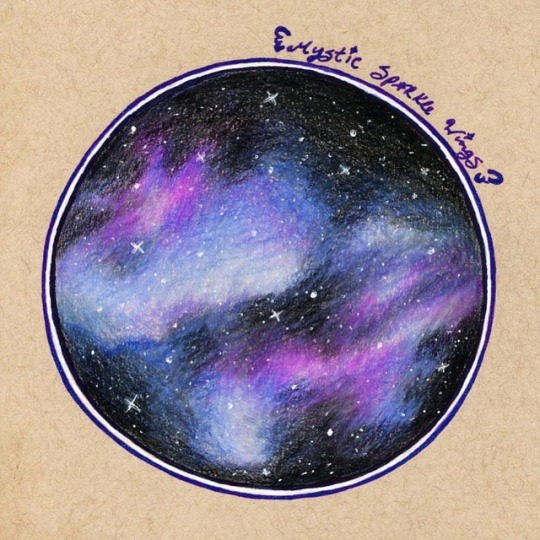
Arteza Expert Colored Pencils Review
Hu-boy, have I got a story for you guys!
So I've been seeing Arteza's Expert colored pencils floating around in both ads and as freebies to Art Youtubers for a while now, and finally, it was too much and I threw up my hands and said to myself OKAY LET'S TRY THEM. (even though I very sincerely don't need any more colored pencils...)
Previously, I've tried their Woodless Watercolor Pencils and liked them, and I've specifically heard good things about these pencils. So I went in with measured, but positive expectations.
The full 72 set goes for about $30 either on Amazon or Arteza's own website, which is the same price point as the Schpirerr Farben colored pencils currently on Amazon. So they aren't the super-duper cheapest, but the price is pretty fair compared to companies like Derwent, Faber Castell, or Caran D'ache.
So, some tea first, and then I'll talk about how the pencils handle (tea in small text in case you don't care):
My set came in the mail and I immediately opened them and went to swatching, as I do.
It was when I was writing out the color names (I write the names out first, then go back and put the color down) that I noticed I had two "Charcoal A120" pencils, and likewise discovered I was missing "Peacock Blue A008." And suddenly I was filled with dread; oh no something's wrong I'm going to have to contact customer service ohnononoohno.
So I contacted their customer service through the Guarantee address ([email protected]) on the back of the tin, hoping to get the issue resolved as quickly as possible and wanting/expecting nothing more than the one pencil I didn't have.
About two hours later, they got back to me and through a bit of back-and-forth, I provided pictures (which I expected them to ask for), then a screenshot of the Amazon Order Details and my shipping address (also expected). It was just after 4:00, last I heard from them on a Friday, so I figured either that was that and I should be on the lookout in the mail, or they had closed up shop for the weekend and I'd heard from them again on Monday.
I woke up Saturday morning with an order confirmation email that confused me, and another reply informing me they couldn't just send the one pencil, so they'd be sending me a whole new set, and I didn't have to return the original set; I was welcome to keep or donate it. This made the confirmation email make sense, as it was for the shipment of the new set.
This naturally was a nice surprise. (And I must also add the reply email had a timestamp of 4 in the morning so I have to applaud the magical soul that was coherently responding to customer service emails at such an hour as I would be loathed to do the same.)
With that issue at least temporarily dealt with (as I wanted to wait and see the new set before "officially" closing my mental books on it), I moved on to producing the test image you see above and otherwise evaluating the pencil. However, I decided to wait and not fill out a Colored Pencil Testing Workshop for these until after the new set arrived, just in case.
And I'm glad I did. The replacement set came in on Wednesday, and I was practically bursting at the seams to get it open and see what was what.
All 72 different colors were present and accounted for.
However, the "Emerald A094" pencil's tip was broken/missing. I did sharpen it back up, and it appears completely fine. Probably what happened is it was broken during sharpening or something at the factory. Not a big deal, but noteworthy when combined with my previous experience and considering that there are other signs of minor quality control issues. For example, the company/color names and information printed on the pencils are not aligned consistently, and if you go on Amazon and start looking at the negative reviews you'll find a lot more than just these relatively small things.
My point in including all this: As I'll talk about in a second, the pencils themselves work just fine and I don't think Artexa is maliciously producing defective sets of colored pencils and just trying to make a quick buck. Quite the contrary. I think they are dedicated to making the best products they can while still keeping them affordable compared to their competition. It's just that they have some issues here and there like every company in existence does, and part of that, in my theory, is likely because they have less in the budget for certain quality control measures when compared to the more expensive brands. This isn't a dealbreaker by any means, but I do think it's important to keep in mind.
So all of that out of the way, how do these pencils actually work in the field?
They're not as soft as Prismacolor, but I went in expecting that from what I'd already heard. They're not as hard/rigid as the Faber Castell Polychromos, so they land somewhere in the middle. They layer pretty well; they don't seem to build up wax quite as quickly as Prismacolor, but they aren't nearly limitless with layers like the Polychromos. Blending was better than I expected and overall pretty good.
The white surprised me a little. The Prismacolor white is still the best I've used, but this one did better than I expected. It also worked well with blending other colors.
Speaking of; Color selection is interesting. In the plastic trays, they seem to be arranged from in color order...but in three separate "sets," rather than in typical "all the yellows are together, and the pinks are together," etc. color order. This bothers me a little since I'm used to the other way, but that's just me. The colors themselves though seem to sit somewhere between typical color choices and also trying to be different, which is. (Also a lot of them have really fun color names, which I really appreciate personally.) (And while we're here, I will say the tin and trays are nice/pretty standard, but the trays are pretty snug in there so I have a little trouble moving things around, but it's not so much of a deal-breaker that I feel I need a separate case for them.)
They seem to generate a lot of dust/crumbs, but the weird thing was that when I went to wipe it away, it didn't smear specks of color on the paper. Good, but odd.
Honestly, they measure up about the same as the Schpirerr Farben pencils in terms of falling somewhere between Prismacolor and Polychromos in terms of performance, and that makes a lot of sense considering both sets are at the same price point. (Though the Schpirerr Farben pencils do still behave and feel different, most likely because they're oil-based to the Arteza's wax-base.) They aren't my new favorite, but they are pretty decent and if Prismacolor is just too expensive for you, I'd say they're not a bad second choice.
I did notice something exceedingly peculiar during my testing though: These pencils have basically no water resistance. They melt down almost like watercolor pencils, or at least like the Derwent Inktense (which dissolve pretty well but compared to typical watercolor pencils they do take a little more water and working to melt down entirely).
Typically, regular colored pencils do move when hit with a lot of water, but not to this extent, and it usually takes a lot to really pull a noticeable amount of pigment out.
The thing about this is that Arteza sells a set of regular watercolor pencils, and as best I can tell from the pictures (as I have yet to procure a set for myself) the only differences between that set and this one are the colors on the front of the tins, and the Expert pencils are round/circular, while the watercolor pencils are hexagon shaped. Other than that, there aren't any visible differences between the two. Granted, this isn't really fair, as the main differences would normally be in how they perform on paper and you can't really tell that from stock photos.
And yet, and I can't help but wonder if there's something fishy going on there. Could they be the exact same cores, just packaged differently...?
I am very tempted to order a set of their watercolor pencils just to compare...But until then, I am planning on trying a watercolor piece with these just to see what happens. Maybe I'll try and they won't turn out that well and my theory will be busted, or maybe I'll have to order the other set and find out for sure that way...
____
Artwork © me, MysticSparkleWings
____
Where to find me & my artwork:
My Website | Commission Info + Prices | Ko-Fi | dA Print Shop | RedBubble | Twitter | Tumblr | Instagram
2 notes
·
View notes
Note
Hi!! I love your stuff!!! You inspired me to draw and I want to try selling my own stuff. But everywhere I go, there is issues with fan art, redbubble won't let me sell unless hasbro approves-can I ask what you do? How did you bypass that on Etsy? There are a lot of fan artists selling stuff so it must not be that illegal? I asked a few other fan artists too but no one replied yet :/. I just want to try to make some money so i can maybe eat lunch some days.
Hi! Thank you so much, I’m so glad you like my stuff! ^^ I’ll be honest, all the legal stuff surrounding fanart is really confusing and even I don’t fully understand it. I sold very briefly on RedBubble, and I had no trouble putting my art for sale there. As long as you drew the art, you can click the little ‘yes this artwork is mine’ copyright checkbox on RB as far as I’m concerned. I have heard of artists getting removed from Society6 for fanart, but not RB (that I know of!). But you should be fine selling your art on RB despite not having permission from Hasbro directly. Same with Etsy! I’ve never run into any problems selling my art there, and I’ve made more money than I would have on RB. Most big companies aren’t going to chase down every fanartist selling merch, but something you could do is add a little ‘copyright Hasbro’ blurb in your item description. Fanart is kind of a slippery slope, but you should be completely fine selling your art on the online shop platform of your choice! I hope that helps somewhat! I just jumped into selling my stuff online, so I’m kind of learning as I go. Good luck with selling your art though, I wish you all the best!
#there are lots of videos on youtube about selling fanart too#if anyone has any advice to add to this you're welcome to do so#ask#anon
4 notes
·
View notes
Note
Hi! I tried to go buy a copy of SSM but the link isn't working, says it can't be found. Pleased help. I need a hard copy of this fic in my life!!!
Hey,
Unfortunately, SSM got deleted off the site, so it’s not available any more. This is obviously pretty disappointing and I do not feel that good about it, but yeah, that is what happened. I hope that people who already got one will be able to receive it, but I don’t know for sure.
As noted, fanfiction and the public sphere is a tricky business, and while I kind of suspect that someone unfriendly noticed it and made sure to flag it, I don’t know that either, and I have to bear my share of responsibility for putting it out there, even with zero financial gain and as a fun thing to do for my fans which had been requested of me, and which had worked fine for me in the past. It does feel like a bit of a double standard, admittedly, since fan artists can take commissions and be paid for art of other people’s characters, sell merchandise on Redbubble with fanart, and keep the money. I’m not saying that they should not be allowed to do this, but I wasn’t even doing that. Again, however, I recognize that this is how things work and I wouldn’t want any trouble anyway. So while I will definitely keep looking into ways to make it a hard copy, perhaps a little more privately, that option does not work right now and I feel pretty sucky about it and if I misled or got people’s hopes up... yeah. It’s not fun.
Anyway, I am going to be taking a couple days to detox from fandom, since this was pretty frustrating, and I may be around here or I may not. Either way, though, I really don’t want any kind of larger kerfuffle around this, as drama on the internet is my least favorite thing ever and I just have to take it on the chin and move along with my life. Again, I absolutely understand if people feel frustrated or upset or that someone deliberately tried to ruin our fun (as I have some of those thoughts myself), but if so, and they’d like to continue to show their appreciation for the fic, maybe a communal re-read or a fan-creation spree or something else fun. That way, the positive energy can be kept and maintained, even in the absence, for now, of a hard copy of the story.
So... yeah. That’s what happened.
24 notes
·
View notes
Text
SELLING ON REDBUBBLE: TIPS FROM SOMEONE WHO HIT 20K SALES
Over on Instagram, I shared that I recently hit 20k sales on Redbubble and started getting a lot of questions about selling on Redbubble! This blog post details all of my best tips for selling your work on Redbubble from starting out to sharing your shop. Make sure to follow me on Instagram for more tips on selling your work! Click here to follow me!
what is it?
Redbubble is a website similar to Society6 and Casetify, where artists, designers, and photographers can upload their work to sell on various items like stickers, tshirts, prints, and more. The best thing about Redbubble is that they handle all of the production, shipping, customer service, etc. so all you have to do is create the artwork and upload it! I began selling on Redbubble in 2017 when I was a sophomore in college starting my brand. I knew I didn’t want to be shipping products or keeping an inventory as I was living in a dorm room at the time. I highly recommend selling on Redbubble for everyone, but especially those who don’t want to deal with shipping and keeping inventory!
how does it work?
When listing an item on Redbubble, you want to export your artwork as either a PNG or a JPEG, depending on the design. If it’s a digital design, I usually do a PNG. If you are uploading a pattern or a photograph, you may want a JPEG. When creating your work, you do want to keep in mind your resolution and artboard size. I usually made mine at least 10x10” (I would think of it in terms of inches because I often uploaded my designs to work for both stickers and tshirts) and at a resolution of at least 300. After you create your piece, you upload it to Redbubble and select which products you want the design on. I’d usually go through and format it for most of the products but stickers and tshirts were my most popular.
is it free?
YES! It is free to signup and it doesn’t have a listing fee like Etsy does. The downside to selling on Redbubble is you only get paid an artists margin. So, a shirt could sell for $20 but you may only see $6.00 from that sale. I usually make 20-75 cents per sticker I sell, which is my most popular item. While this may not seem like a lot, I don’t have to do anything after uploading the artwork. I rarely even check my Redbubble shop, usually once or twice a month do I even look at my analytics!
I totally understand that 20 cents does not feel like a lot. It isn’t. My first paycheck from Redbubble was like $3.00 so I get it. However, Redbubble is something that once you build it up, it runs itself. In the last year, I’ve maybe uploaded like 20 new designs. It took me about a year to hit 1k sales, then I hit 10k the next year, and I just celebrated hitting 20k sales about a year and a half after that. It’s one of those things where you put the effort in up front and it can pay off. It’s now something that I don’t even have to think or worry about- the only thing I have to check is to make sure I claim my Paypal earnings each month!
getting started
To create your Redbubble shop, you can click here!
It’s super easy to create an account and start selling!
tagging your work + collections
I’ve found that tagging your work is SO important! Once you upload and format your work, there is a section near the publish button that includes tags. Here is where you should add words that customers may search for to find the design. I think of this like a hashtag on Instagram. Think about it like this, what would your ideal customer be searching for?
I’ve also found that sorting your work into collections can be helpful when people find your shop. If you have a lot of designs like I do, this can help customers find similar stickers. For example, one of my collections is named Ohio and one is named Baseball. Any stickers that have to do with baseball are found in that collection so if someone is interested in baseball stickers and they like my style, they could find other designs!
sharing your work
After you publish your art and create your shop, you want to share about it! Make sure your shop link is in your social media bios or linktree to help drive traffic. One tool that Redbubble has that is really neat is the mockups and resources they provide to help artists share their work. While I think this is a GREAT resource, my biggest tip involves taking your own photos.
biggest tip for selling on redbubble
While Redbubble provides mockups for their artists, I personally preferred taking my own photos for social media when I had the time! I would order a couple products and then take my own photos so they matched my personal brand and stood out on Instagram. When you post to Instagram, make sure you’re using hashtags.
Some examples of good Redbubble hashtags:
#redbubblestickers
#redbubbleshop
#redbubbleartist
#redbubblelaptops
#redbubblestore
#redbubbleart
When you scroll through these hashtags, you see a lot of Redbubble’s mockups. I would take my own photos for social media instead which helped me stand out. While I obviously couldn’t order and take photos of each product- I have 295 designs on a variety of different products- I would order a couple every now and then.
need some photo ideas? here’s a list!
Order a shirt with your design and post a photo of you wearing it! People love seeing the person behind the work. Some caption options include making it a #FridayIntroductions post and mentioning that it’s a shirt from your shop or wear it to an event like a pop up shop or craft fair. If you take brand photos, that’s another great chance to wear one of your shirts!
Purchase stickers and showcase them on your laptop or water bottle! This shows how multiple of your designs work together and could encourage multiple sticker sales from your shop. You could take the photo in your work space- whether that is in your bedroom, dorm room, home office, or in a coffee shop! Another note: I cannot tell you how many times my stickers have started a conversation - when someone compliments them, PROUDLY say you designed them!!
Order a mask with your design on it and wear it! My whole family has been wearing masks I made with our enneagram type patterns on them.
Purchase a print with your design and showcase it hanging in your work space while you’re brainstorming new designs. include some behind the scenes with your work in the background!
Order a mug with your design on it and share a shot of your morning coffee! Ask your audience how they like their coffee (I’m an iced coffee girl through and through) in the caption and/or do a $5 coffee giveaway!
Design a journal or sketchbook and use it to keep a list of your ideas! Post behind the scenes shots of you brainstorming new ideas on your account and show off your journal. People love seeing how designs and concepts come to life AND you’d be promoting your own products.
Incorporate some products into your home decor! A couple ideas could be purchasing a throw pillow and sharing a shot of your couch with the pillow and some of your artwork hanging above it. Or put your designs on some coasters and style your bar cart or coffee cart with them!
Do a giveaway! Giveaway a collection of stickers or a tshirt (whatever your budget allows) and do an instagram giveaway where people have to follow/like/tag others to enter! This will help get you new exposure AND give back to your followers.
other tips
Upload a profile photo and a banner! This helps people see and connect with who they are supporting!
Include a bio on your page with links to your social media and portfolio. This can help direct people who find you on Redbubble to your social platforms!
Post about Redbubble sales- especially around holidays, black friday, etc. Share them on stories and make sure your link is in your bio!
If you utilize Pinterest, try pinning some of your designs! Redbubble does create and run ads with your work but Pinterest is such a good resource!
Upload new designs as frequently as you can! I used to set a goal for like 5 a week when I was really trying to grow my shop.
Wear and use your products! You never know when someone might ask you where you got something and you can share your shop. When they do ask, be proud of your work and you shop!! You’ve worked hard so own it.
Offer to create custom designs for people or put a suggestion box up for your social media followers to give you ideas!
Order a couple of your stickers or an item and do a giveaway on Instagram!
0 notes
Last Seen Blogs
maddyinbcn
Maddy Burtt

petrigrofyuri
Petrigrof Yuri

incezekacom
İnce Zeka sosyal içerik platformu

mcgrathsoo
Crazy 4 Katie McGrath & I bet she's immortal