
thomasforsyth
Thomas Forsyth
British designer and artist
179 posts
Don't wanna be here? Send us removal request.
Last Seen Blogs

ceiwiart2
CeiwiArt 2.0

l4lsxw-blog
Esl'

celenaashbry-blog
maybe i'm not crazy

mydeztination
Welcome to My Deztination

nikolyagogolsad
sad gogol
Text
Featured on 3DPrint.com
We recently helped ServiceBrand Global develop their ideas for a desk toy and turned them into real, tangible objects... and we just got featured on http://3dprint.com/62928/3d-printed-desk-toy/
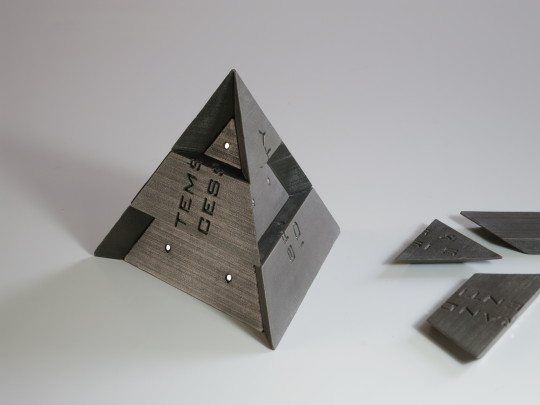
#3dprint#3dprinting#toy#neodymium#magnet#magnetic#design#making#craft#bronze#metal#pyramid#tetrahedron#servicebrand global#communication#business#executive#manufature#uk#london#London Design Festival
2 notes
·
View notes
Text
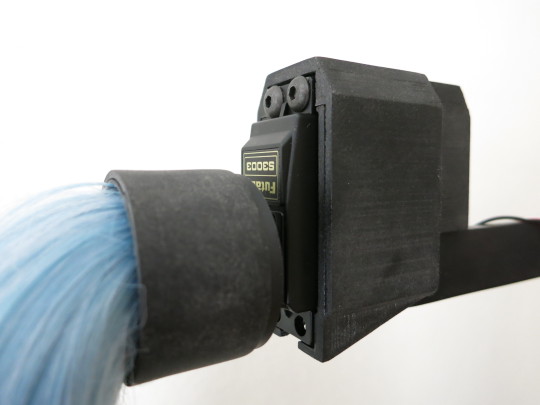
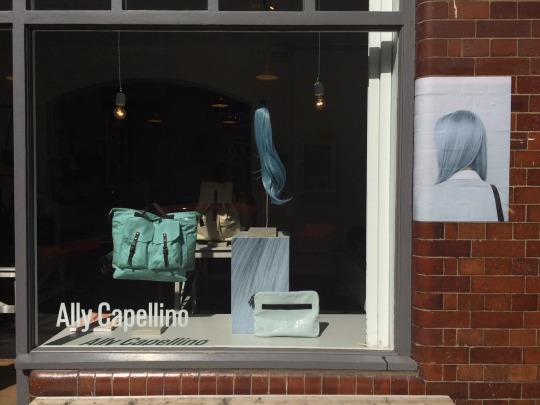
Ally Capellino window display props
We had a wonderful request from the talented people at Ally Capellino, to create moving ponytails for their window displays in Portobello Road and Shoreditch, London. They wanted these to tie in with a recent photoshoot in which the model’s hair colour matched the colour of the leather product they were modelling. So we helped them develop their ideas and created a pair of these...
vimeo
The ponytails run code on an Arduino micro-controller, which moves a servo motor in just the right way to make the hair burst into life! We designed custom 3d printed components, to fit the hair and electronics to Ally Capellino’s gorgeous metal and concrete point-of-sale bag stands.
#ally capellino#designer#uk#brand#bags#satchel#leather#window#display#3dprint#3D Printing#3d printer#ultimaker#Ultimaker 2#design#electronics#hair#blue#ponytail#servo#motor#arduino#micro controller#london#portobello#portobello road#shoreditch
5 notes
·
View notes
Text
Bronze metal prints are on their way
So we decided to go with bronze metal co-polymer material for the 3d printed desk toys for ServiceBrand Global, and they’re printing in the studio right now!
vimeo
#3dprinting#3dprint#3dprinter#ultimaker#ultimaker 2#colorfabb#bronzefill#design#art#toy#desk#office#executive#future#london#amazing#awesome
9 notes
·
View notes
Text
Havas Helia Data Conference
Here’s a couple of images of a sculpture I created live in response to data, for Havas Helia’s data conference in Shoreditch, London.
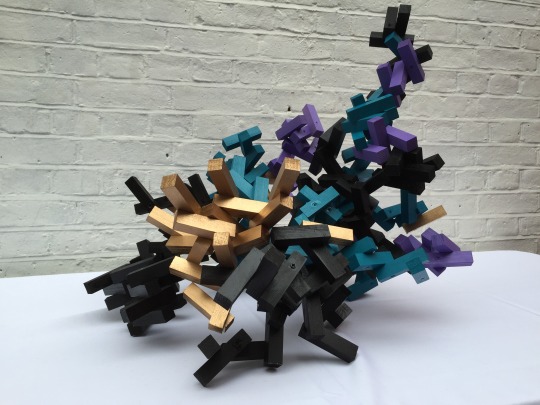
Fun day! Big thanks to the lovely people at YCN for getting me involved.
2 notes
·
View notes
Text
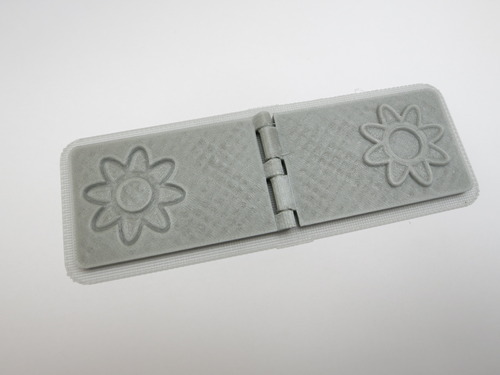
ServiceBrand Pyramid first prototype
First 3d printed prototype of a new project for ServiceBrand Global. More details soon
vimeo
Coming along nicely... only a few final touches to the design and material choices left now...
#3dprint#3dprinting#3dprinter#ultimaker#ultimaker 2#design#toy#gift#executive#desk#office#servicebrand global#puzzle#neodymium#magnet#magnetic
8 notes
·
View notes
Text
Polar Explorers Chest
Sound artist Jay Harris needed to add form and light to his sound compositions for an upcoming exhibition, so we created this...
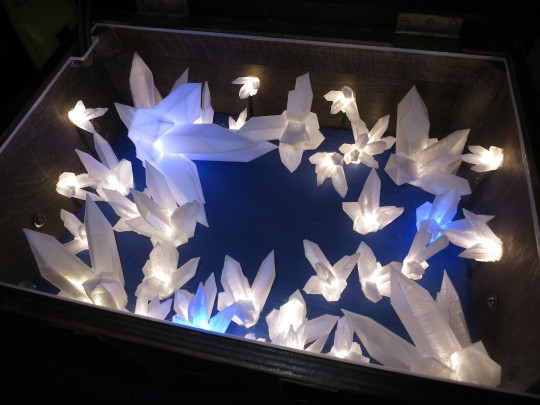
The sound and light are triggered when the lid of the chest is lifted, and the reverberations from the internally mounted speaker cause the smallest crystals to dance!
vimeo
0 notes
Text
Block Rocker - Wheel Hack!
I recently embarked on creating a wheel system upgrade for Ion's marvellous portable boom box - the Block Rocker.
The current wheel system that the Block Rocker is issued with works well when being pulled on flat surfaces and make an excellent use of space. The issue arrises when pulling the Block Rocker over uneven pavement or hard ground. The weight of the Block Rocker can very easily crack the standard issue wheel system, greatly impairing it's portability.
Using SketchUp and an Ultimaker 2, I prototyped an alternative wheel system, consisting of two 3D printable brackets and a number of off the shelf parts. The bracket system is designed to fit into the original wheel system's place using the same threaded bolt holes. These brackets then hold wheels with a larger diameter at the sides of the Block Rocker to create a smoother ride, capable of being pulled over slightly rougher terrain.
Here is the list of parts needed for the upgrade:
1 x 460mm (approx.) length of M8 stainless steel rod
2 x M8 standard nuts
2 x M8 lock nuts
6 x M8 washers
4 x M4 round headed bolts (15mm long)
4x M4 washers
2 x scooter wheels (approx. 100mm - 130mm diameter) including bearings.
1x Left 3D printable bracket
1 x Right 3D printable bracket
For 3D printable bracket files see: https://www.youmagine.com/designs/ion-block-rocker-wheel-hack
And a little secret... I couldn't resist fitting this Block Rocker with some scooter wheels that double up as disco lights when on the move:
#youmagine#thingiverse#hack#mod#modify#block rocker#ion#scooter wheel#3D Printing#Ultimaker 2#Prototyping#prototype#design#make#maker
3 notes
·
View notes
Text
Dewars Whiskey Installation (Testing the gears teaser)
A little teaser video for an installation piece I created with StinkDigital and Mr. President earlier this year. More information and footage of the full workings coming soon...
Thomas Forsyth - Dewars Whiskey Installation (Testing the gears teaser) from Thomas Forsyth on Vimeo.
#stinkdigital#mr president#Thomas Forsyth#design#engineering#electronic#arduino#gears#cogs#dewars#whiskey#glass#bottle#carpentry#woodwork#installation#celtic knot#barrel#cask#nixie tube#cabinet making
0 notes
Text
Clip design makes it onto Thingiverse homepage!!!
So, my girlfriend and I spent an afternoon hanging out and prototyping various versions of a clip/peg for general use about the house. Once we'd figured out one that we were happy with and had started using them, I popped the design files on Youmagine and Thingiverse, just in case anyone else might find them useful. And this happened...
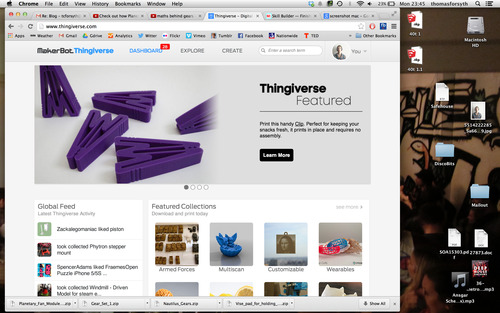
Yep... they got featured on the homepage of Thingiverse!
We designed the clip to be self-sprung and printable in one piece, with no need for support structure. It's crazy to see how fast a little idea can go round the world and into the homes of others at such low cost using this technology. I'm finding my Ultimaker 2 such an exciting product to be part of.
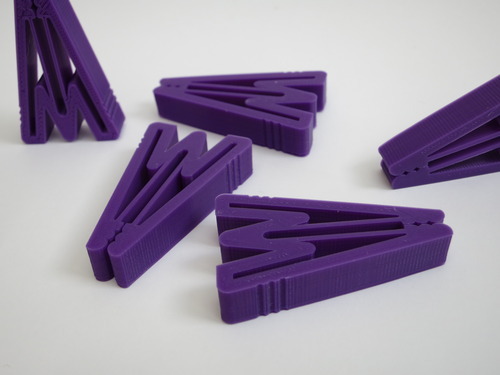
Anyway here are links to the files for the clips on Thingiverse and Youmagine for anyone else who's interested:
https://www.youmagine.com/designs/clip-peg-general-purpose#!design-flag
http://www.thingiverse.com/thing:298955
#thingiverse#youmagine#3dprinting#3dprint#ultimaker#Ultimaker 2#makerbot#peg#clip#opensource#design#home#homeware#house#feature#featured
7 notes
·
View notes
Text
Using an iPhone to take a 3d Scan for 3d Printing
Things just got crazy... I didn't expect this to work so well at all.
Yesterday, I took a 3d scan of the front of my girlfriends face/head using the iPhone app '123D Catch', fixed up the scan model file in 'Meshmixer', then generated support structure and sliced the stl file using Cura (all of this software is free to use by the way).
It took 2 attempts to print, mainly due to me underestimating the need for a raft to help the print adhere to the print bed. Here's a photo of it printing, including support structure:
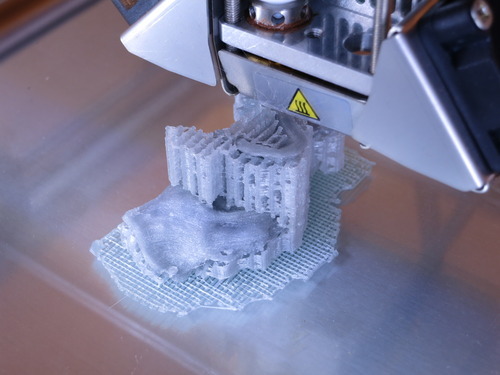
And then here's the result with the support structure still attached:
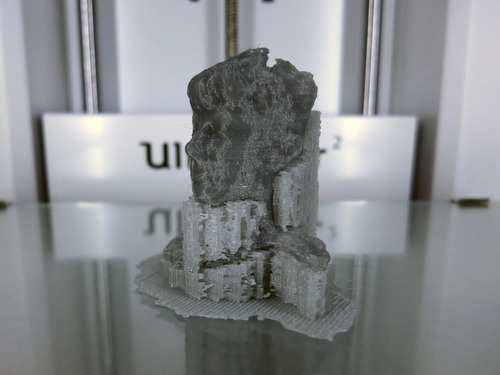
And now here it is after being cleaned up (most of the frontal support structure has been removed, using only jewellery pliers, snips and and a pocket knife):
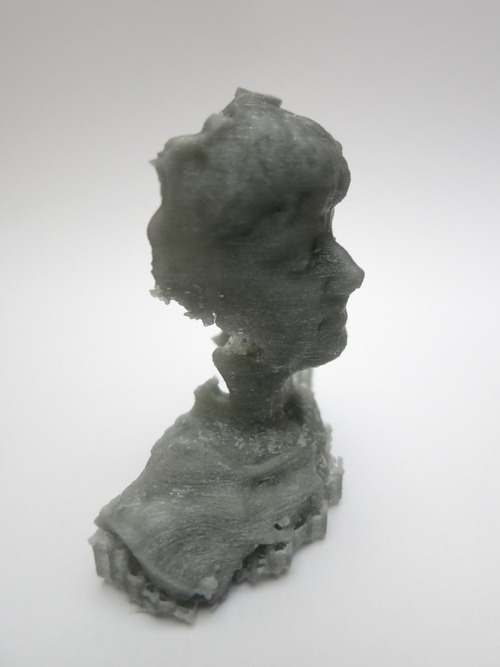
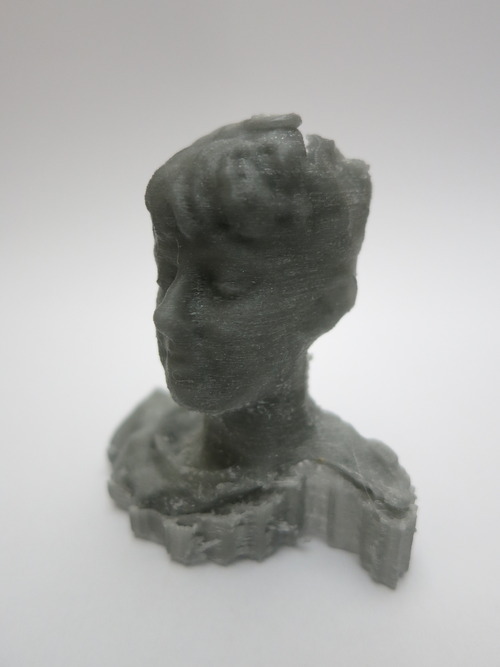
I'm feeling that I just reached a new level with my Ultimaker 2.
The possibilities of what you could scan reasonably well with a mobile smart device (in the right environmental conditions), especially if you are then planning on scaling the model down (increasing resolution) are enormous. Whether it's for personalised wedding cake 'bride and groom' decorations, or new component parts for a product, this is some seriously awesome technology...
#mini me#bust#sculpture#3D Printing#3d print#Ultimaker#Ultimaker 2#scan#3d scanning#meshmixer#123d catch#cura#iPhone#design#camera#photo
10 notes
·
View notes
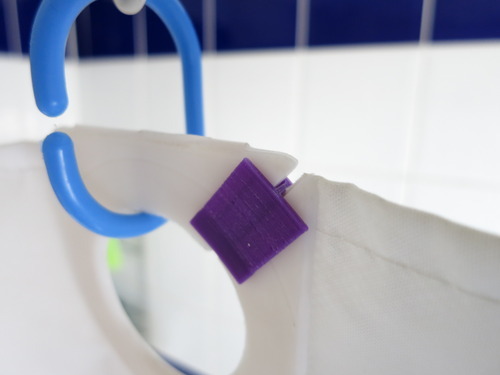
Text
Customised 3d Printed Clips
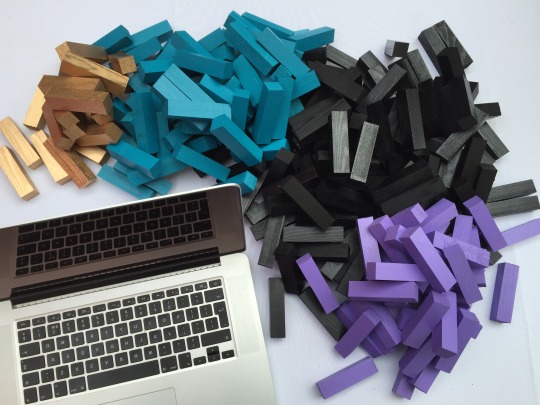
One weird thing that these extrusion based/studio 3d printers seem to be amazing at is customised clips. The Ultimaker 2's accuracy and speed make it so easy to rapidly generate and prototype ideas with often no need for support material. Whilst the first idea is printing, you carry on working on version 2,3,4, etc.
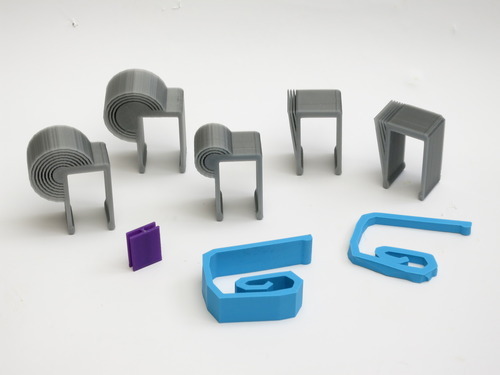
The rear grey clips, were designed to cushion the impact of a door banging against/chipping the paint off a radiator. The blue ones are for holding on dining tablecloths. The small purple ones stopped a shower curtain from constantly falling off.
Simple ideas, but unbelievably effective, and of course once you've got one working... you just print as many more as you need.
#clips#table#home#homeware#hardware#3dprinting#3d print#pla#pha#custom#design#craft#ultimaker#Ultimaker 2#radiator#prototyping#prototype#rapid#ideas
0 notes
Text
Moving Parts, Larger Parts, More Fun & Mastery
So... plenty of new technical learning arising, and I've got to admit I'm enjoying it.
First thing was the realisation that some items in CAD files you'll download are by default made too small, so will need to be resized in order to get them working nicely. This was done unbelievably easily in the slicing software Cura. When I first tried to print this ready assembled, moving gear bearing, the tolerance gaps were too small between the parts. You can see the first few layers of a smaller purple gear bearing in the video further below... all the parts are fused together. Again, easily solved and stunning results! I set this print going before bed and it was done when I woke up.
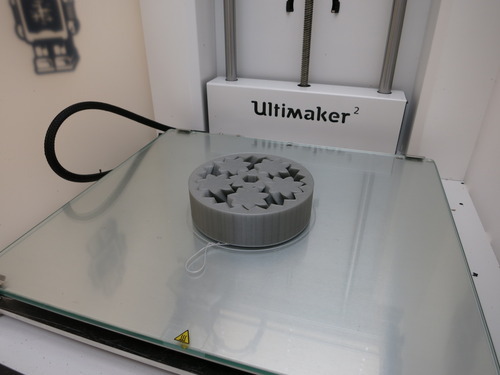
Here's a video of it moving:
Gear bearing printed at 'normal' quality, no assembly necessary. CAD files at http://www.thingiverse.com/thing:246807
The next interesting issue I found whilst trying to print this paper embossing stamp (not fond of the design, but a very interesting concept). You can see that the right-hand side of the first print attempt curls up badly at the edge. This was due to it delaminating from the print bed during the initial print layers and curling up slightly, causing the following layers to smudge together.
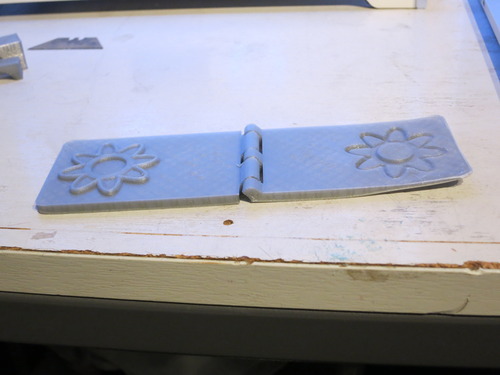
For this I started investigating 'rafts' - printing a fine mesh underneath and around your print to help it adhere to the print bed. This worked a treat. As you can see below, no curling, with a perfectly assembled moving joint.
The only issue with rafts, seems to be removing them afterwards. Most of it was easily removed with a chisel, but it would require sanding if I wanted a smooth finish.
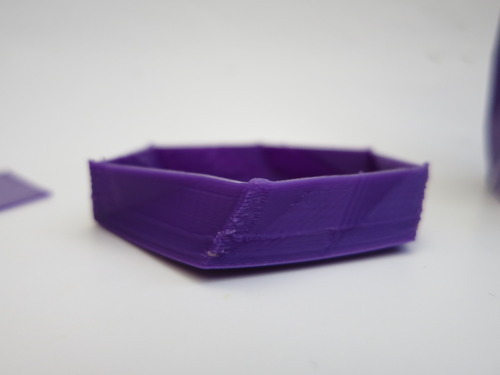
Next was larger objects. I decided to have a go at reprinting the vase 50% larger, reaching a 150mm height. It took three attempts to nail it in the end. Again I experienced a similar issue with curling/delaminating from the heated print bed. A wobbly/curved bottom on a vase is going to be a problem, when filled with top heavy flowers:
Various adjustments seemed to help with this in combination. Here are some things that I found helped: raising the heated bed temperature (mine was up to 90C), use a raft and Pritt-Stick on the heated bed, increase the speed at which the printer creates the initial layers (from 20mm/s to around 50mm/s), reduce the material thickness of the bottom of the vase (from 2mm to about 1.2mm) and increasing the print layer thickness to somewhere between 0.2mm and 0.25mm. And the other important one - turn off the print head fans for large flat/solid areas, especially close to the print bed.
All of these measures are essentially trying to increase the adhesion to the bed and decrease the amount of time and mass at the bottom of the print, to reduce the amount of identical large flat layers being created on top of each other (each of which will be cooling/drying at a different rate / pulling the corners of the print up). The result... flat bottom and general awesomenessnus:

1 note
·
View note
Text
Day 3 of testing
Well... I'm still massively impressed with the Ultimaker 2.
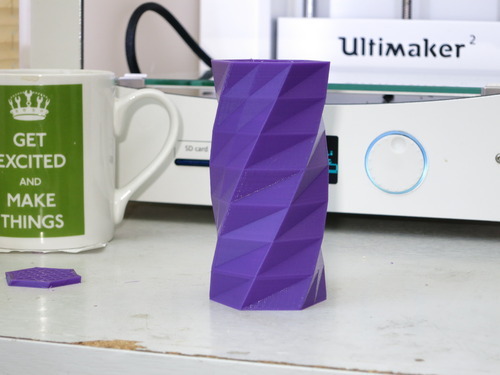
Experiencing some of the usual quirks of 3d printing like 'stringing' and have now started playing around with the expert settings in Cura (Ultimakers open-source slicing software that helps you prepare your 3d models for the printer).
Definitely starting to get more of a feel for what settings affects quality, speed, structure etc. But over all, the quality is insane for this type of studio printer! The vase above (100mm high), experienced a small amount of stringing inside (which I think may be a solvable temperature/retraction issue in this case), but hasn't had any post-production work on it and only took around 3hrs.
The tricky part with this one was making it hollow, for which I had to start playing with the expert Cura settings. I found this thread massively helpful: http://umforum.ultimaker.com/index.php?/topic/2807-tips-on-printing-a-vase/
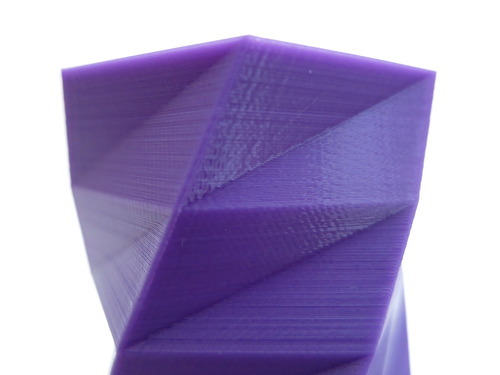
But, check out the resolution! (Seriously close-up).
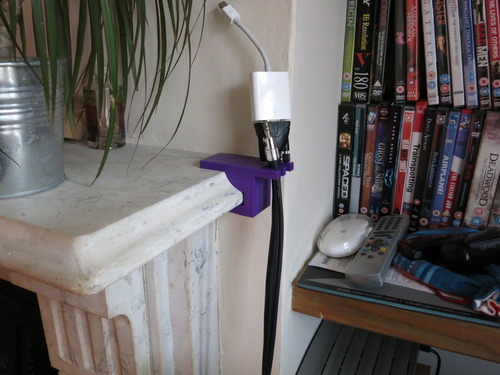
The next thing I wanted to do was have a quick go at designing/printing something to fit an already existing object. The first thing that came to mind was a custom shelf clip to tidy the cables by the TV.
Things I've learnt... the numerical support structure density settings take a bit of getting your head around (just getting used to how little/much support material you'll need for a particular model and what kind of number corresponds with that), though, even with almost no support in the clips 'mouth', I was amazed at how the printer recovered to a fine quality again after only 3 or 2 bad layers.
The other thing is that I completely underestimated the strength of standard PLA. It's definitely more brittle than Colourfabbs PLA/PHA mix filament or ABS, but I could have thinned down the design enormously and it would still have enough strength to do the job.
Play time again.
#ultimaker#ultimaker 2#3D Printing#3d print#3dprinting#design#art#manufacture#services#vase#tutorial#help#advise#review
6 notes
·
View notes
Text
So... My new Ultimaker 2 3D Printer...
This purchase has been something I've been building up to for the last couple of years, especially with using 3d printing more often for clients in work projects.
I'd narrowed it down to two printers which I thought were leaders of the prosumer market for quality and reliability, and with enough popularity to have a decent community around them. The first was the Makerbot Replicator 2 (not Replicator 2x, or, although it looks very promising, the 5th Gen Replicator (which isn't quite out yet so will most likely have 4-6 months of teething issues as most new printers seem to)). The second was the Ultimaker 2. I went for the Ultimaker 2.
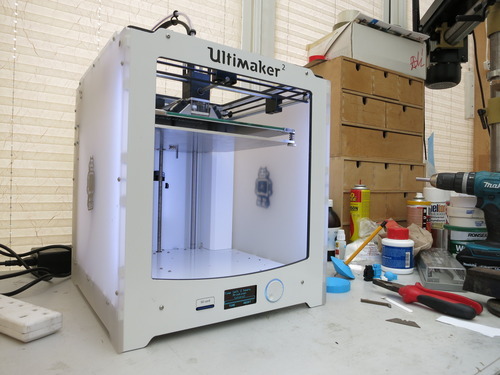
I bought it from iMakr Store London, UK instead of buying direct from the Netherlands because I live in London and iMakr offer an included 1 year warrenty, so paying slightly more, but gaining the option of being able to pop down the road / ask advice on any of the inevitable problems you'll encounter whilst 3d printing, was a good option in my mind. I can't sing their praises enough for how helpful they've been already.
The printer itself...
IS SO DAMN AMAZING!!!
Not to hype it up too much, because all 3d printers have a need for experimentation and learning, but this printer (newest version ready installed with firmware 14.03) has blown my expectations of how it would perform.
As printers go it's fast and relatively quiet. The heated bed, as you'll see in the reviews, works like a dream. The fact that its open source appealed to me too. It seems like Ultimaker are fully into its community trying to push the limits of their printers. If you look at the back of your machine, it already has room for a second spool of filament and if you look at the print head, there's already spaces there for a second extruder. It's also wifi ready. So these features, although they are not included are likely going to be offered as an extra package if you decide you want to add to your machine later.
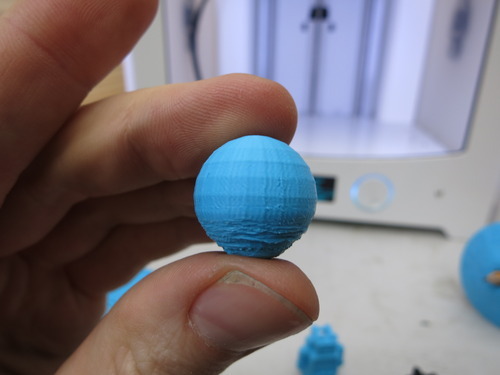
Here's some of the first test prints I've been playing around with:

From left to right, a panda cookie cutter, a small globe (printed with no support), 2 Ultimaker robots (one printed in the iMakr store, one at my home studio, to test continuity with environmental temperature difference), one small 10mm cube (to test dimension accuracy) and a test for one of my drawing top toys.
Things I've noticed so far...
Like most 3d printers, one of the big challenges is quality of printing on overhanging parts / bottom surfaces (overhangs). Essentially - you can't print into thin air. So far it's handling them well compared to a lot of printers that I've seen, but I'm lead to believe that it may improve as I master the expert settings and get the hang of support material.
Other than that, millimetre accuracy seems to be very good. Colourfabb PLA/PHA seems to be well worth the extra money for finish and also strength.
Anyway enough for now... back to play time :)
#ultimaker#ultimaker2#ultimaker 2#3dprinting#3D Printing#art#design#maufacture#studio#new#best#cura#imakr#tutorial#help#advise
5 notes
·
View notes
Text
Check it out... LAZERS!!!
This years project for the Creative Circle Award. Celebrating creativity within advertising.
A 'making of' for this years beautiful and mischievous awards.
The awards were project managed and produced by Thomas Forsyth www.thomasforsyth.com
Massive thanks goes to David Gunter & Graphic Metal Ltd, Qualitetch Ltd, Owen Gildersleeve, Edwin Peel, Lydia Wong, Mike Roberts and Jeremy Green.
#advertising#advert#design#Designboom#core77#its nice that#manufacture#award#ceremony#lazer#casting#resin#mould making#gold#photo etching#studio#workshop
2 notes
·
View notes
Text
Baileys Liquid Alchemy
Last year I was employed to work on the prototyping/engineering phase of this rather luxurious video for Baileys tasty new chocolatey boozy tastiness. Sadly wasn't available for the build, it looks awesome!
Baileys has created a sensation in chocolate with their newest addition, Baileys Chocolat Luxe. The ground-breaking fusion of luxurious Belgian chocolate, Irish whiskey, and cream has taken over three years to craft, resulting in a rich molten chocolate drinking experience.
CREDITS
Director: Juriaan Booij
Client: Diageo, Baileys
Producer: Lisa Joseph, RSA Films
Agency: R/GA
DOP: Zubin Mistry
Music: Nicolas Wright, Mad Planet
Visual Effects: Jason Bruges Studio / Asylum Models & Effects
Post Production (edit / VFX / grade): Unit Media
2013
http://www.baileys.com
0 notes
Photo
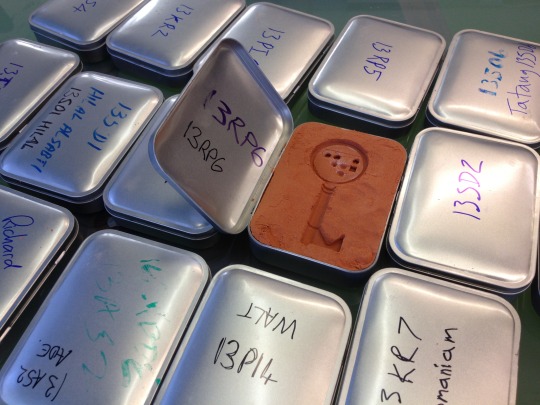
The first round of coded key moulds are ready for action at Saïd Business School, Oxford University
#Oxford University#oxford strategic leadership program#casting#mould making#smelting#3D Printing#3d print#key#code
2 notes
·
View notes