#that and diy accessories
Text
Steve and Eddie looking like they’re giving Chrissy/Robin/Vickie scary guard dog privileges, but only because the public doesn’t know all three girls are a little feral and not afraid to commit murder should the occasion arise
#Chrissy gets two girlfriends and a metalhead best friend and now she’s willing to set a car on fire#Robin was always a little down for crimes and she’s been ready to help Steve hide a body since the Russians#Vickie already bites people now she can just focus that energy#I’m not sorry Vickie gives bites people energy and I stand by that#it’s what her and Eddie bond over#that and diy accessories#buckingham#vissy#rocky#I’m gunna come up with a ship name for these three since no one else will#pyreposting#chrobie
65 notes
·
View notes
Text


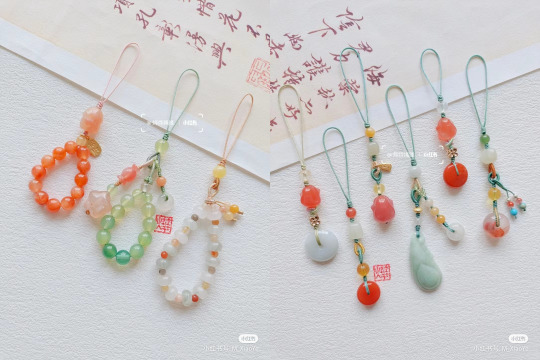

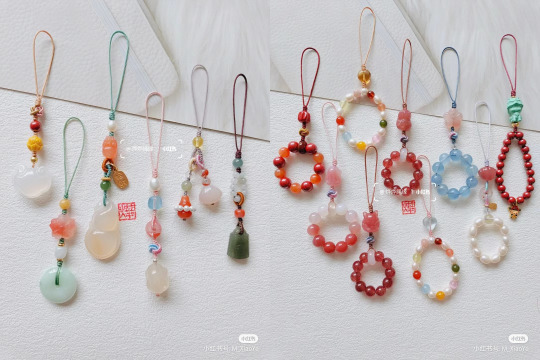
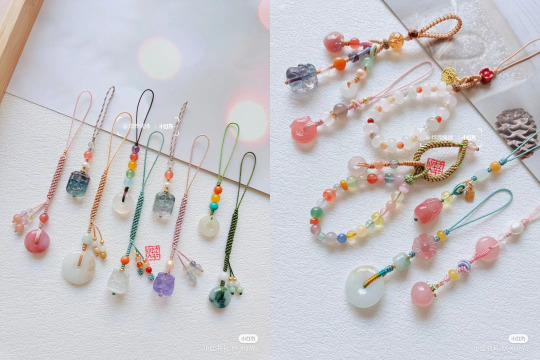

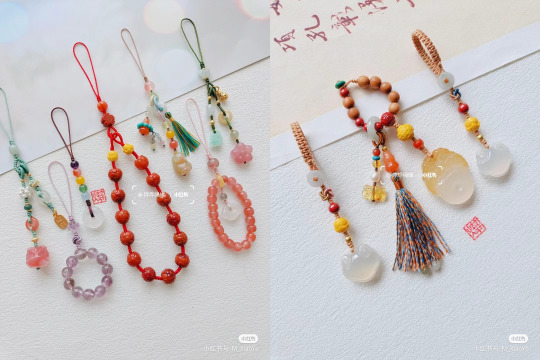
chinese jade phone chains&straps by 烨烨绳缘
769 notes
·
View notes
Text
When I met (unexpectedly, amazingly) with @coveredinredpaint, I saw that his army bag has many pockets. Mine only has one, so I gave it more pockets.
Here's the hidden pockets that made my fingers kinda hurt because the fabric is thick af:
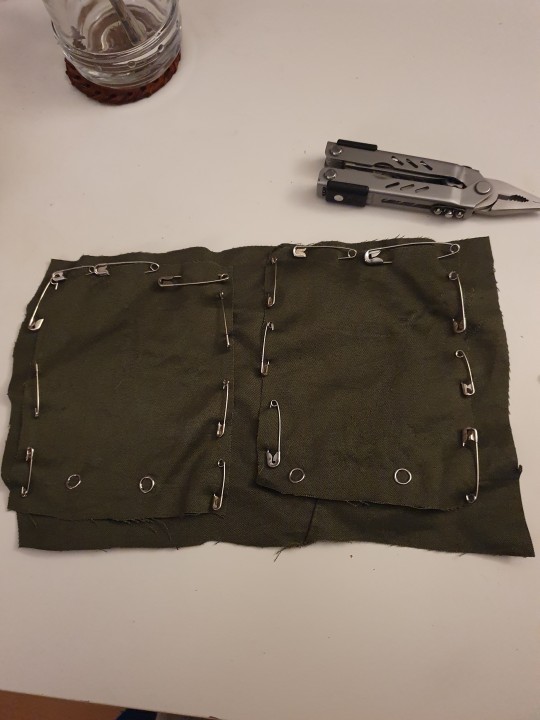

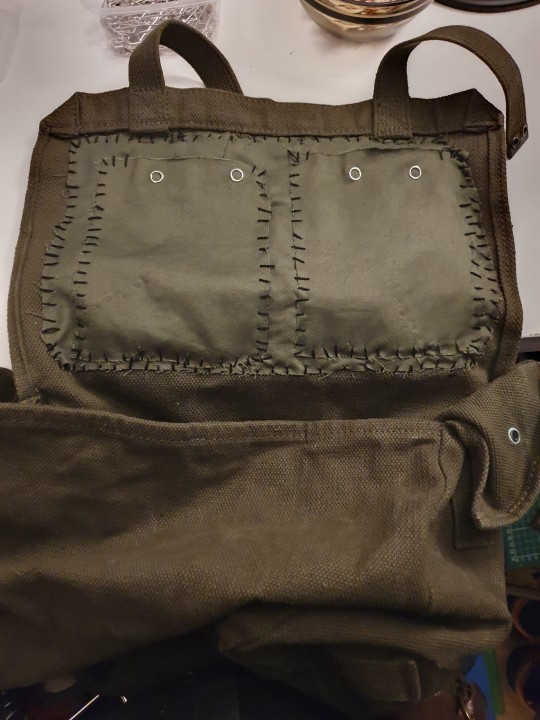
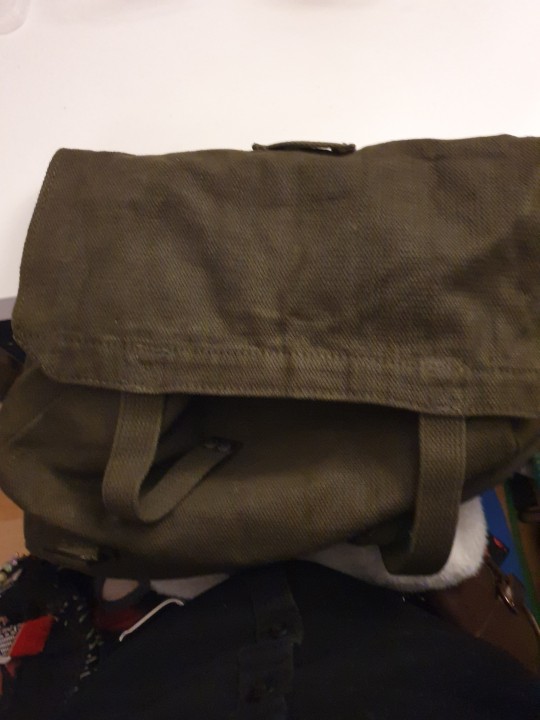
As you can see, they're also completely invisible from the outside! A good place for essentials like emergency pads, candy, stickers, gum, etc
#things i made#diy#sewing#diy clothes#diy accessories#army bag#clothing modification#hand sewing#punk diy
178 notes
·
View notes
Text
a cool bag i’ve decorated recently!!
#art#grunge#aesthetic#customization#diy bag#diy#crust punk#pop punk#punk fashion#diy punk#punkart#queer punk#emo kid#emo accessories#scene kid#scene#patches#punk patches#punk pants#patch design#bmth#manic street preachers#soad#paramore#lgbtqia#transgender#lgbt art#queer artist#artists on tumblr#mil0thefishart
1K notes
·
View notes
Photo
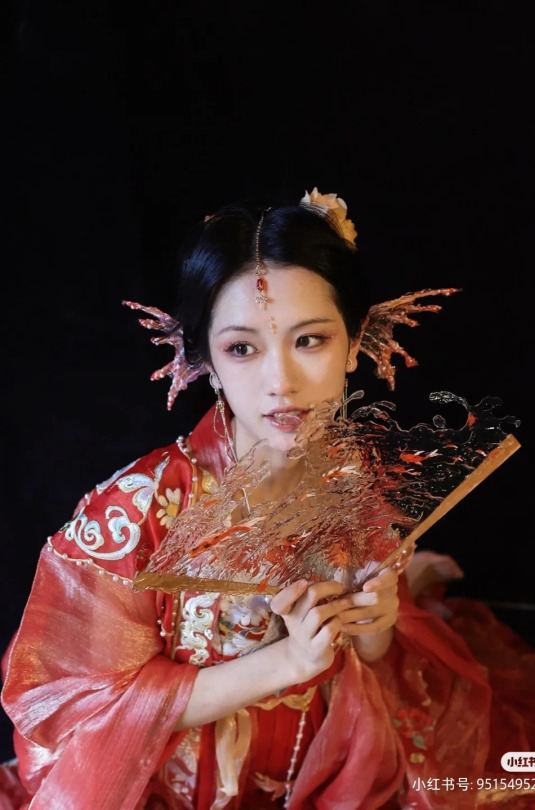
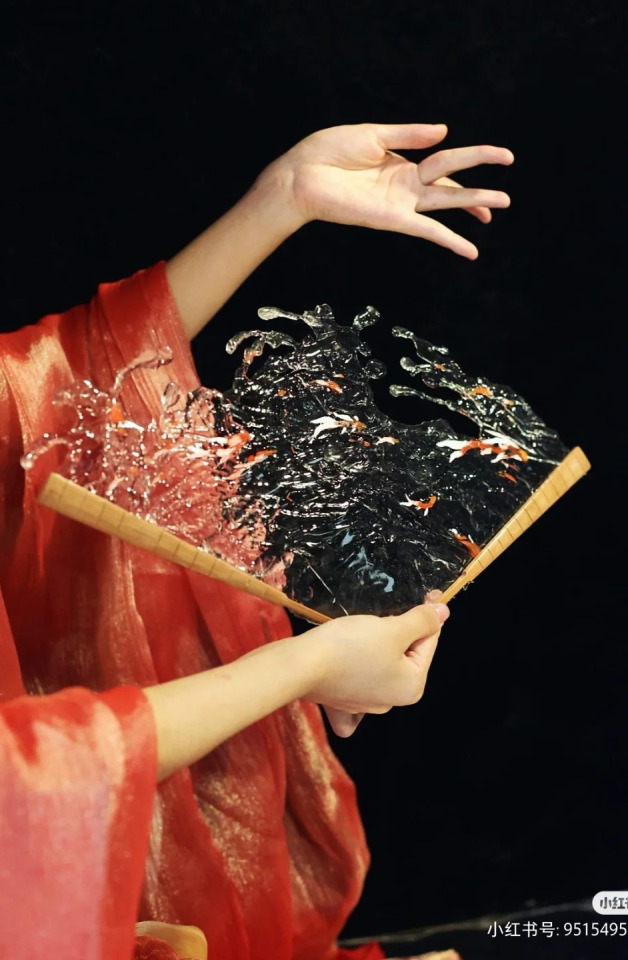
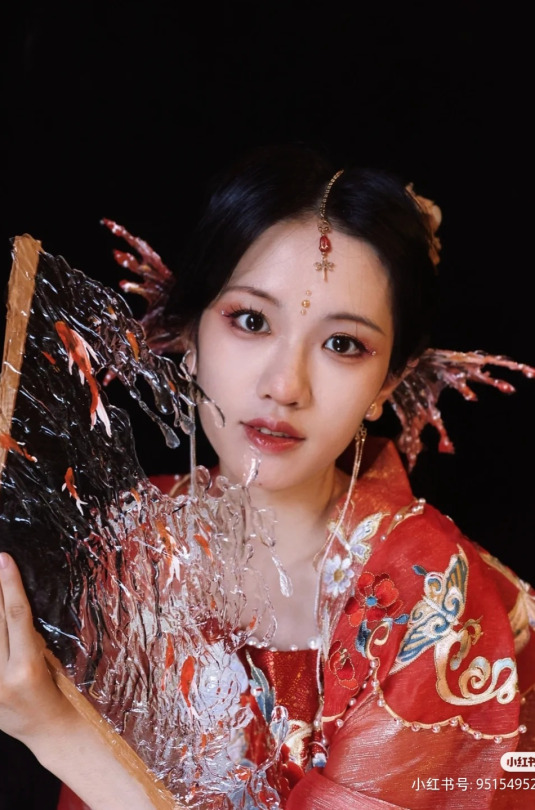
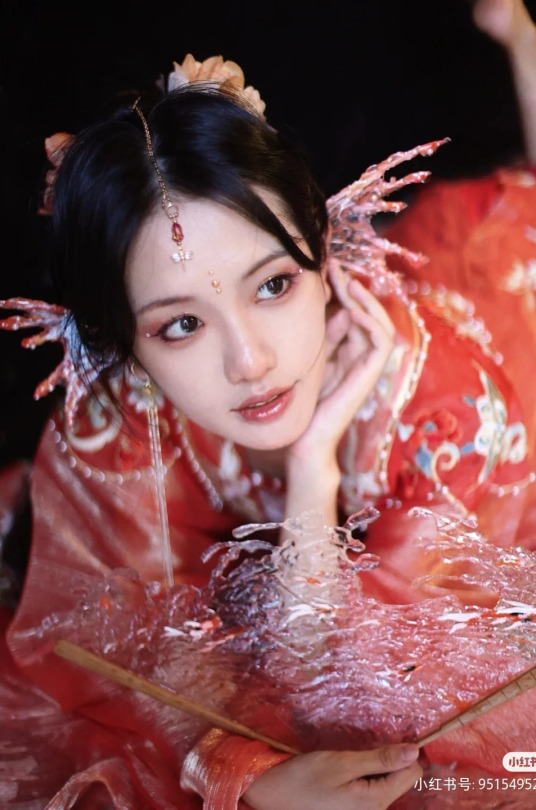
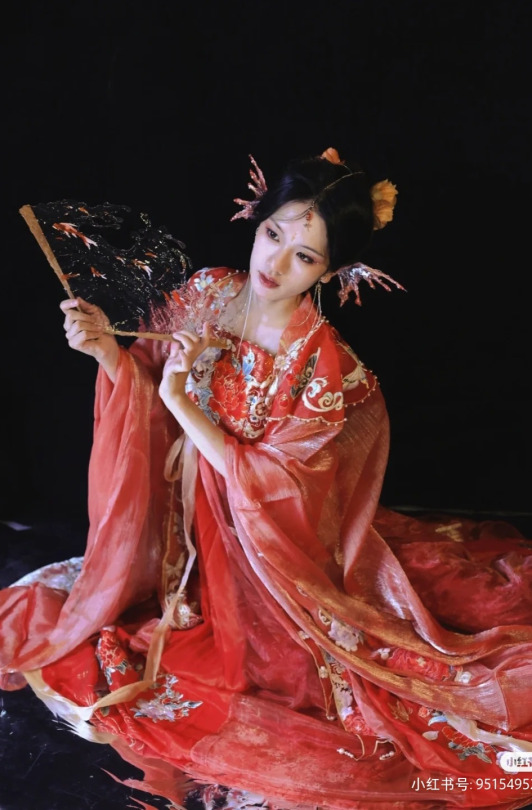
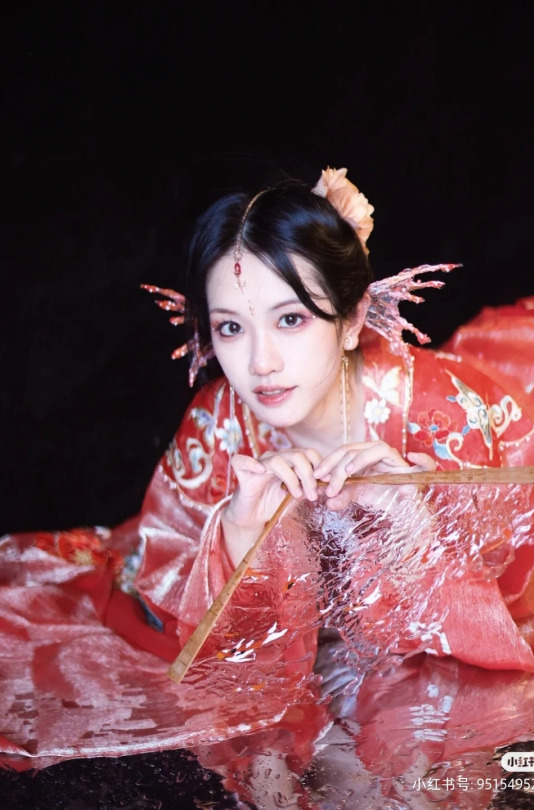
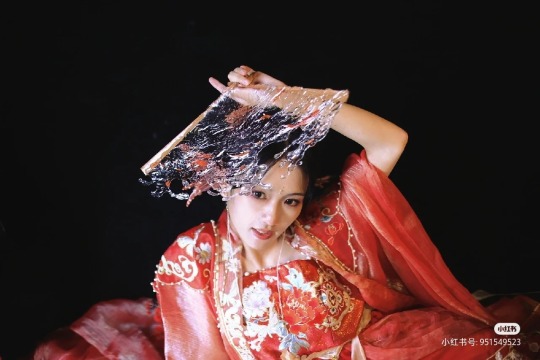
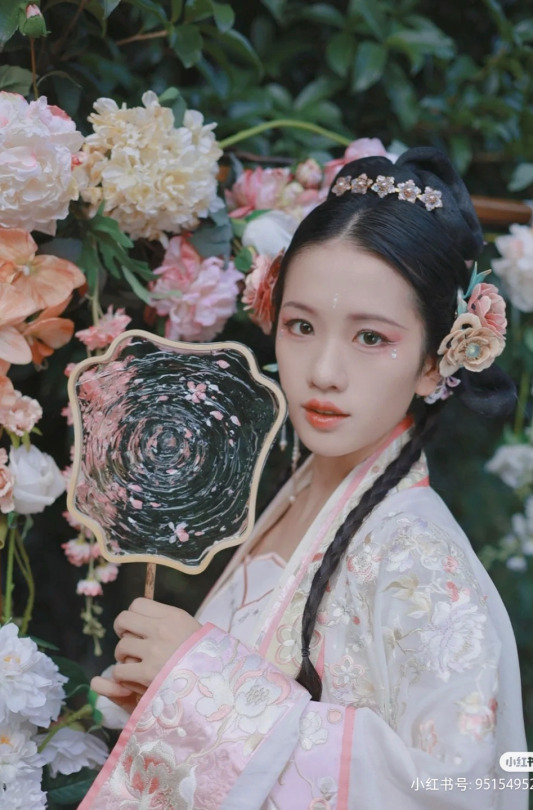
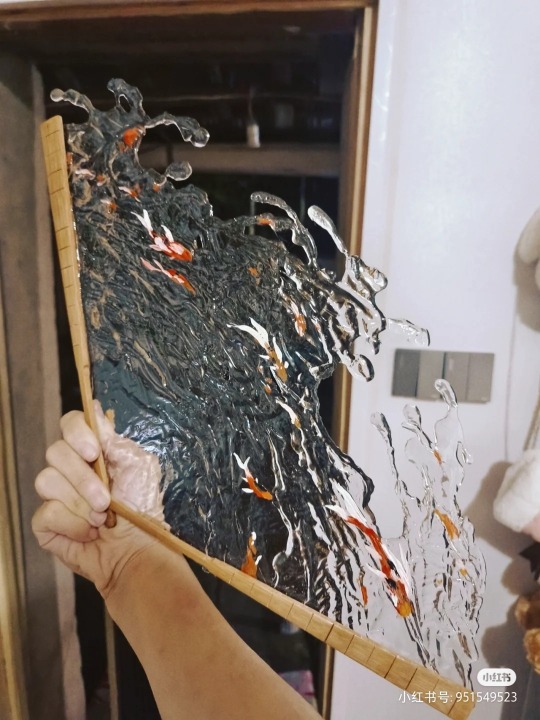
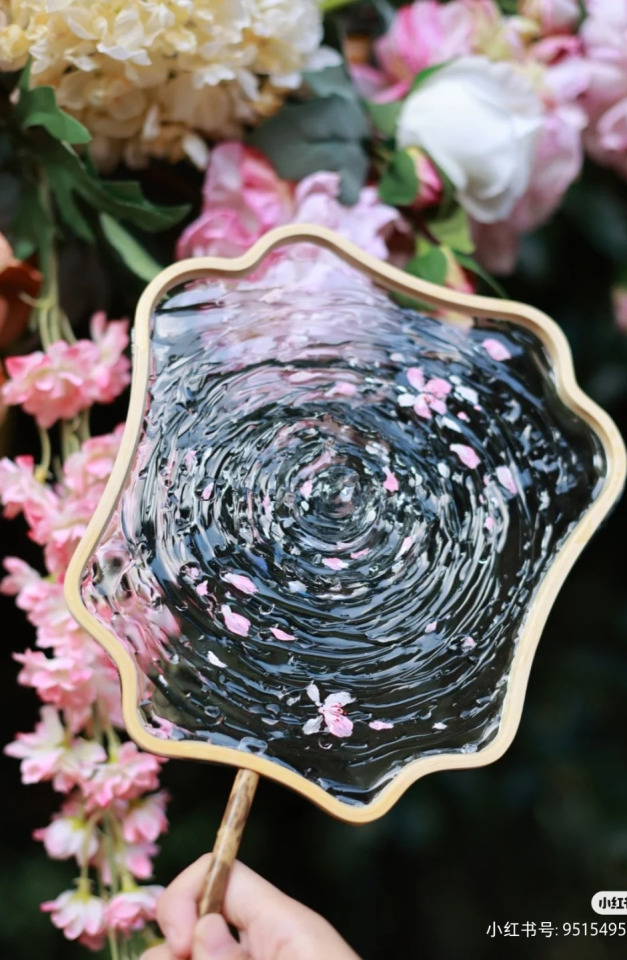

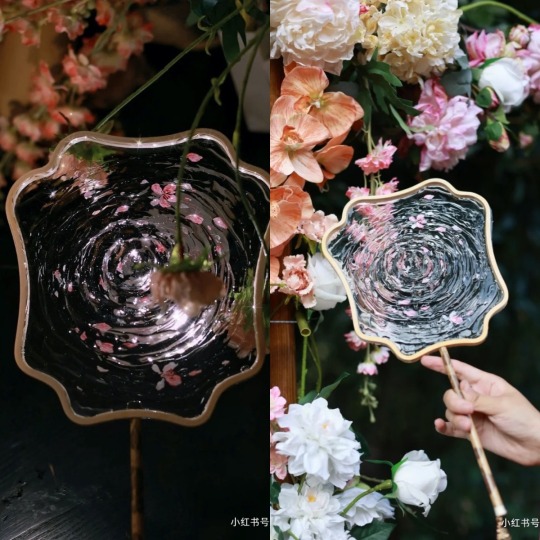
transparent chinese fan for chinese hanfu by 闪耀软软
2K notes
·
View notes
Text
So I stumbled across this Etsy that sells dog accessories, and like 50% of the patches they sell (intended for use on dog jackets) go harder than anything made with humans in mind. Like am I crazy or
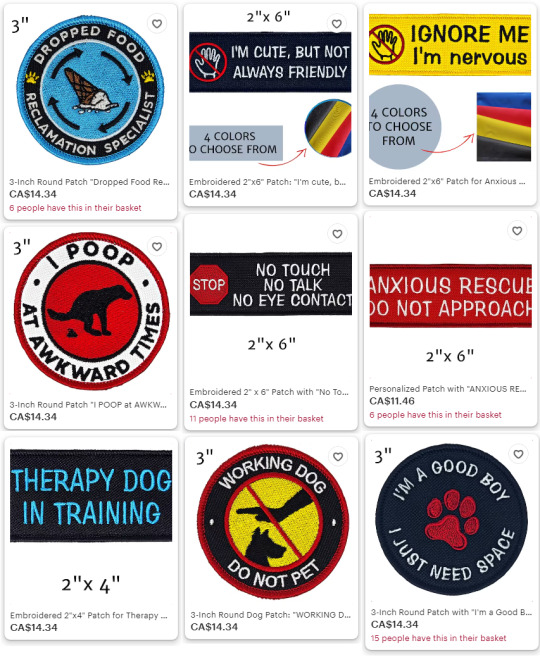
battle jacket exclusively featuring dog patches
#unfortunately they also sell blue lives stuff#patches#dog accessories#dog#dogs#punk#diy punk#punk diy#diy fashion#battle jacket#battle jackets
46 notes
·
View notes
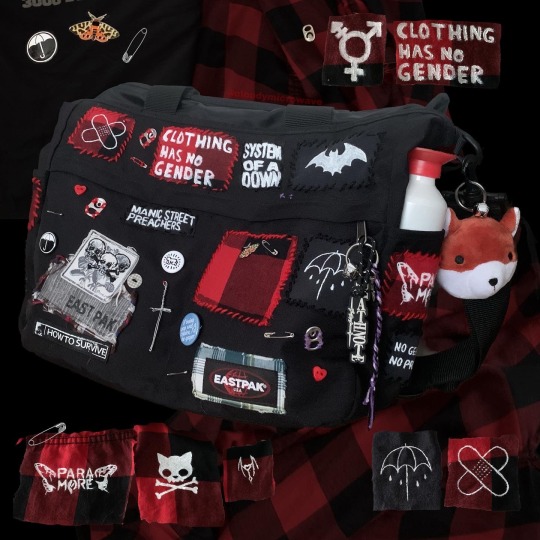
Photo
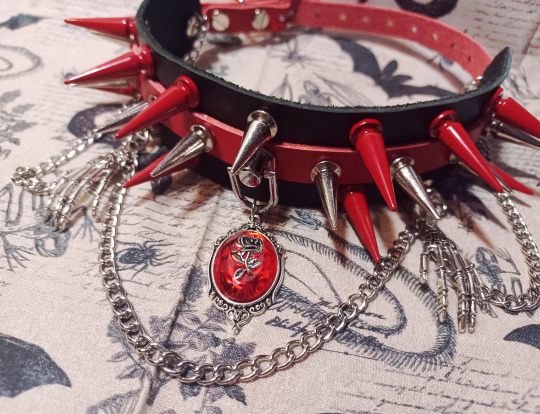
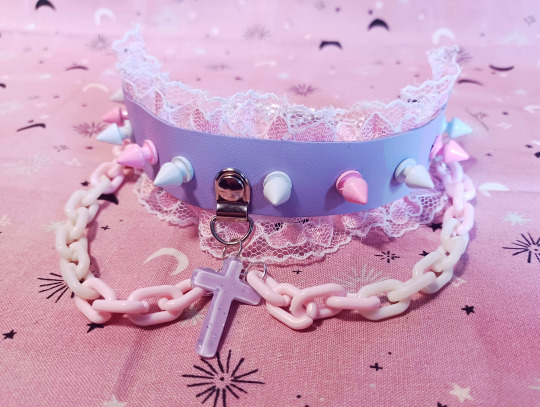
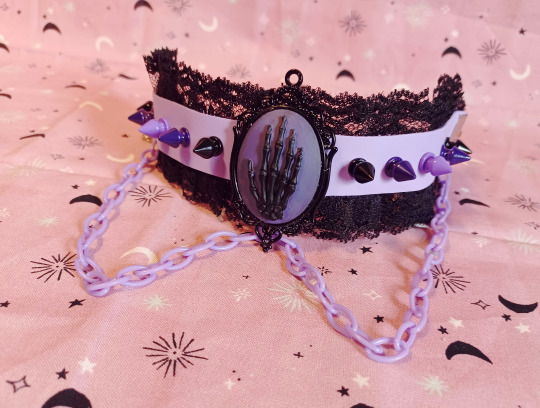
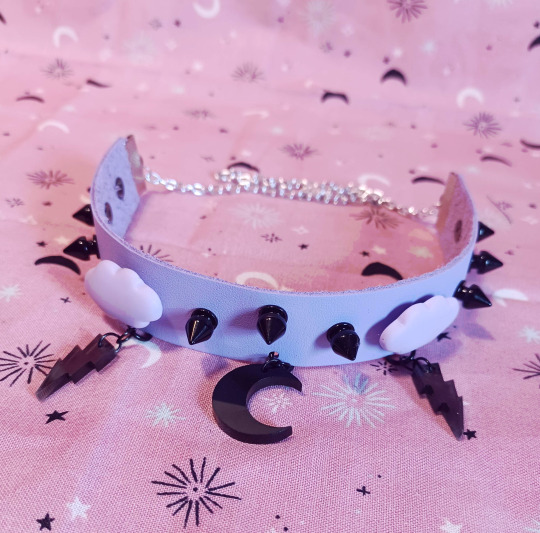
NEW BIG OL’ ETSY POST HEY HELLO
It’s been awhile so here’s a new post for this stuff. I make a bunch of stuff! I mostly make patches for battle vests and jackets and chokers for various flavors of alt people (primary other plus size folks!). I also dabble in earrings, stickers, prints, buttons, etc.
If any of this sounds cool to you, or if you’re just looking to support an afro-indigenous trans artist, you should definitely check out my shop! Everything you see above is currently available to buy.
ETSY SHOP || KO-FI
(If you’re buying chokers, they’re usually one of a kind items, so check the description for measurements. If you don’t see anything that fits that you like, but you’ve liked other stuff I’ve made, I’ve got commissions open right now. Feel free to message me about those here or on twitter.)
#dazed n confused#thats my new art tag ig#id appreciate promos/reblogs if yall can#shop tag#gonna use that in case i wanna go back n find these#moreso to archive the choker pics than anything yk#ok now to tag shit uhhh#etsy#etsy shop#goth#diy#choker#goth accessory#trans#lovecore#pronoun buttons#plus size#alt fashion#pastel goth#vamp goth#??? sure#handmade#i know this shit doesnt work like it does on insta but ive been out the loop a bit for what tags ppl r usin for stuff idfk
240 notes
·
View notes
Text
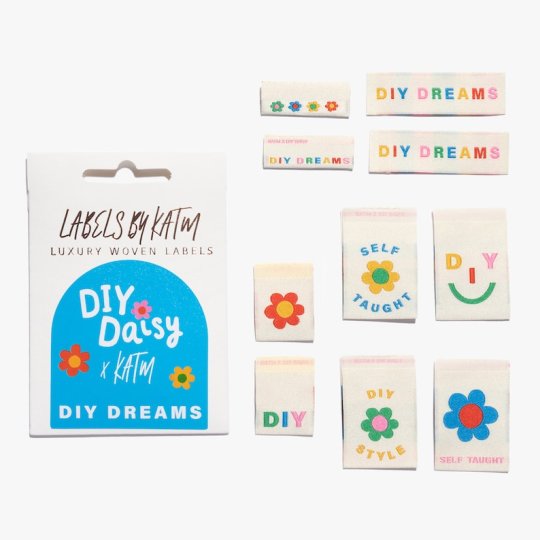
Kylie and the Machine - DIY Dreams by DIY Daisy x KATM | Sew-in Labels by PrettyLittleHedgehog
#sew in labels#sew in tags#sewing#sewing supplies#sewing accessories#diy supplies#diy accessories#craft supplies#PrettyLittleHedgehog
42 notes
·
View notes
Text
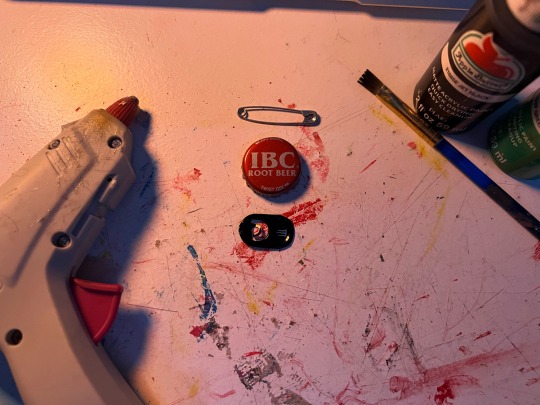
[ DANNY'S TUTORIALS: BOTTLECAP PIN ]
Hi there!! I'm gonna teach you how to make a bottlecap pin since I've gotten a lot of questions about where I got mine from baby punks and others who just find them cool! I've found that a lot of people buy their pins online from companies that overprice and over-process their designs, and often times steal them from smaller businesses. Punk has been gentrified over the years, so this tutorial acts as a way to reconnect to the roots of DIY fashion made by people with limited resources and time. This is a great way to show your interests, pride in your community, and pretty much anything else you want even if you don't have a penchant for traditional art. Don't worry about it looking good, just try to have fun! At the end of the day, the shittier the job, the more punk it is.
[ Step Count : 6 ]

Here's what you're gonna need! (optional materials have a star next to them instead of a regular point):
-> hot glue gun (in replacement of pliers)
-> safety pin
-> bottlecap (unbent, preferably a twist off)
-> can tab
✮ pencil/pen
✮ sandpaper
✮ paint & paintbrush/posca pens
✮ regular Elmer's glue
STEP 1:
Gather your all of your materials and place them on your workspace. I'm going to paint mine, so I got the sandpaper, paintbrush, and paints as extra materials.
STEP 2:
If you're not going to paint yours, go ahead and skip to step 3. Otherwise, get your sandpaper and your bottlecap, then sand down the surface (A). Paint your base, draw a design with the pencil/pen, and fill it in with your paints/posca pens (B)! After I'm done painting I'll usually seal it in regular Elmer's glue to make sure it doesn't get messed up anytime soon (C). I chose a little green skull since the person I'm gifting this too likes and spooky stuff and green is their favorite color :]

[ Also sorry for the change of scenery, I had to finish at the library cause I was studying. Visiting, donating, and helping your local library is Punk As Fuck. ]
STEP 3:
What you're going to do now is set your bottlecap aside, and take out your can tab. I have joint problems and I can't use pliers, so I bend it over the edge of a table by holding it half over the edge and pushing down to bend the metal. But try not to bend it too much so your safety pin stays in place!
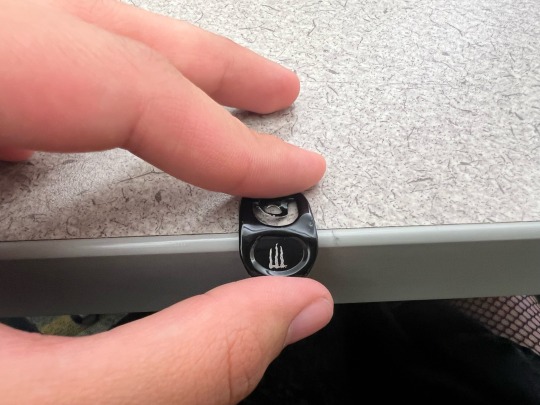
STEP 4:
Okay, here comes the tricky part. Like I said, I have joint issues, so I can't use pliers because they hurt my hands. Instead I'm going to set aside my now bent can tab and bring back my bottle cap, then flip it over. Place 2 hefty drops of hot glue on the bottom and top of the pin, then get your safety pin and open it so you can place it on the back horizontally.
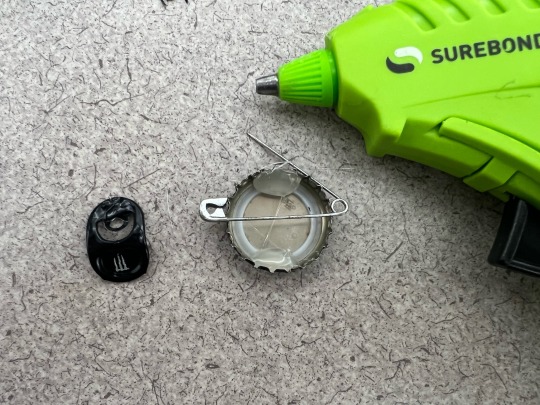
STEP 5:
Now, place your bent can tab on the back of the pin and over the open safety pin, pressing it into the hot glue drops and letting it dry for a little bit (A). If you like, you can also put two more drops of hot glue on the tops of the bent can tab for extra security (B). I also put some hot glue in the middle of the tab's opening for extra security on the safety pin. Please pardon the absolute dogshit photo quality it wasn't cooperating for some reason LMAO
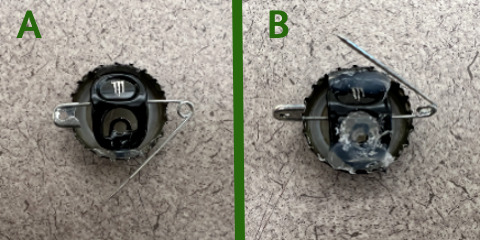
STEP 6 [FINAL]:
Wait for it to dry, then you're all done!! Your very own bottlecap pin. You can attach this to bags, jackets, shirts, pants, and pretty much any material that a safety pin can glide through.

Here's the finished product, as presented by my friend D at the library (everybody say thank you D for modeling)!!
[ -> Next (coming soon:]) ]
#punk#diy punk#bottle cap pin#diy tutorial#punk rock#bottlecap#bottle caps#punk tutorial#diy#diy jewelry#diy accessories#danny's tutorials
473 notes
·
View notes
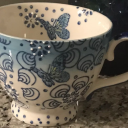
Photo


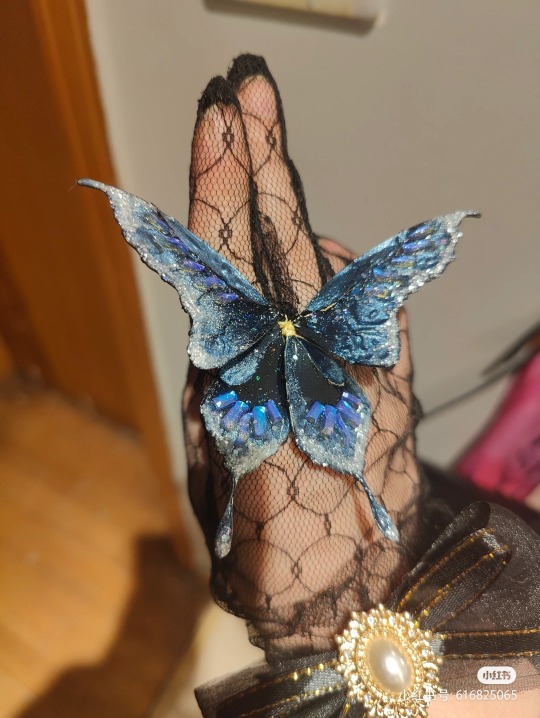
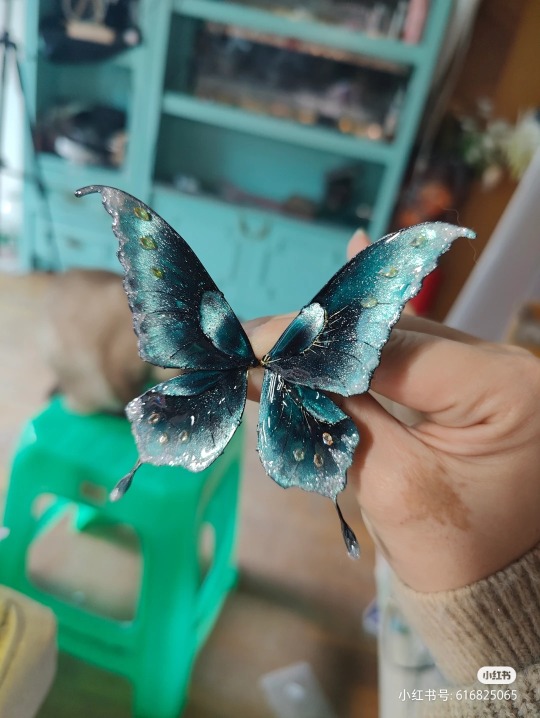
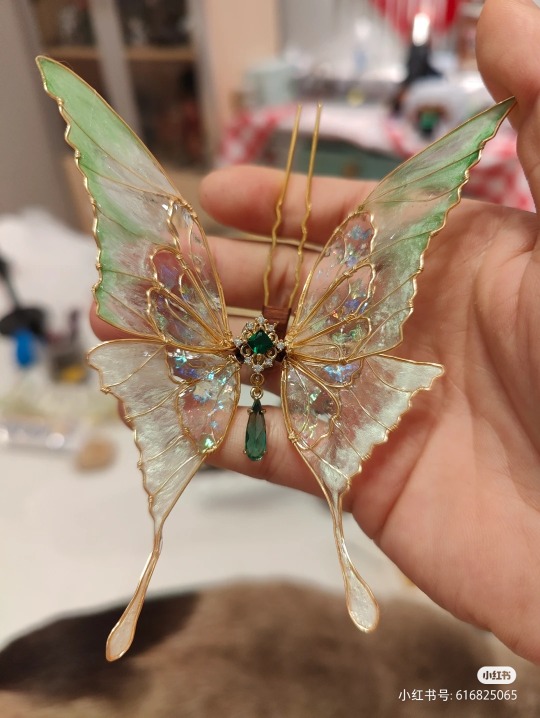

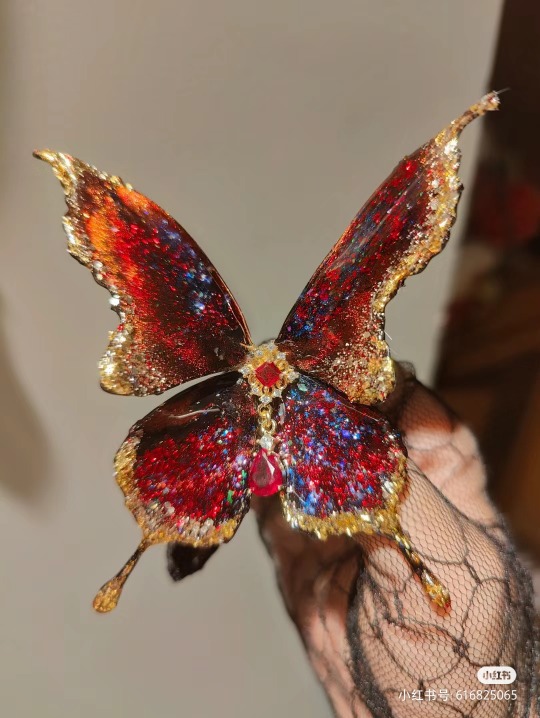
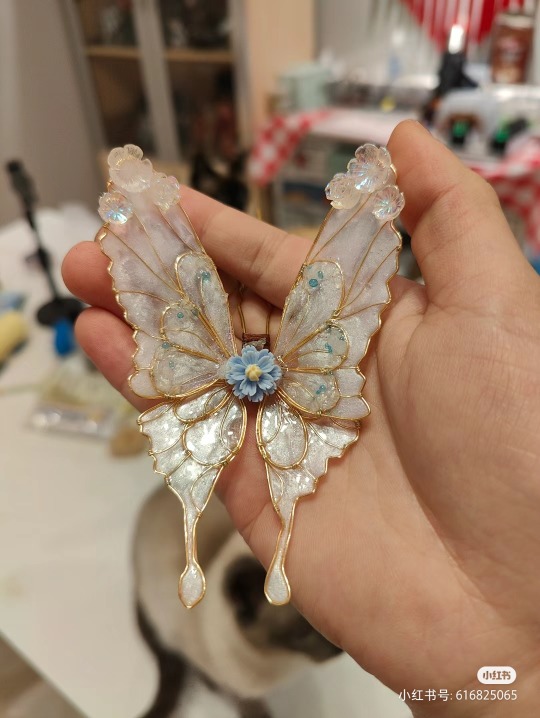
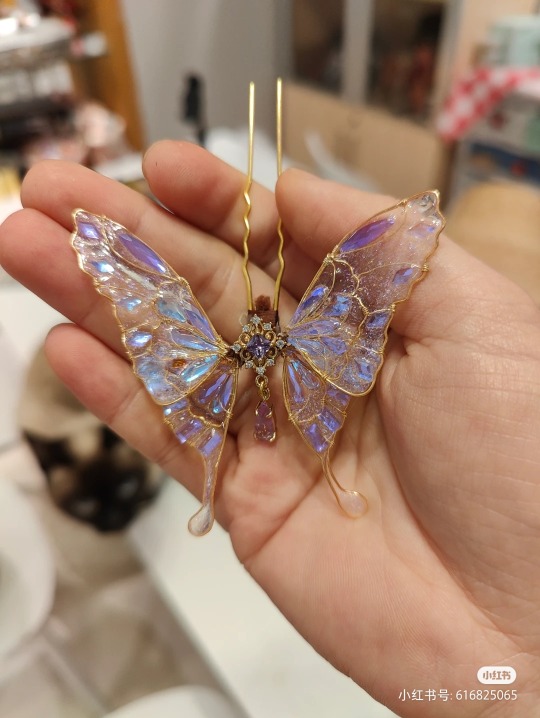

butterfly accessories by 扑蝴蝶的喵喵呀
1K notes
·
View notes
Text
Cripplepunk Modern Au Hiccup
#he does have a lot of views that line uo with punk ideologies (bc. reminder its not just fashion. its music based and political 🤓)#also for those who dont know cripppunk is a movement made by disabled punk ppl regarding disability rights and the like#(its preferable able bodied ppl just call it 'cpunk')#i feel like hiccup would have s very wide music taste that'd inevitably include some punk stuff#cant fully see him in super 'punk' clothes but he'd put lots of patches and buttons on his stuff both like abt his interests#and environmental/political stuff i think#httyd#hiccup haddock#httyd modern au#cripple punk#hiccup horrendous haddock iii#canon disabled character#moth.txt#he'd be very into diy clothes making n stuff like reminder he canonically sews#It'd be more in his accessories tho jackets n stuff and like i said patches n pins#bc he'd totally wear those ugly ass 'paused my game to be here' graphic tees as well as dragon themed stuff bc hes a loser like that
22 notes
·
View notes
Note
I have been sent
What's your favourite thing you've done DIY-wise recently? I saw the cloak a bit further down the blog and the moons on the back look super cool
It's so hard to pick a favourite tbh... the cloak is one of the largest things I've made recently and I'm very very happy with how it came out!
Here's some recent works that I don't think I posted on tumblr yet?

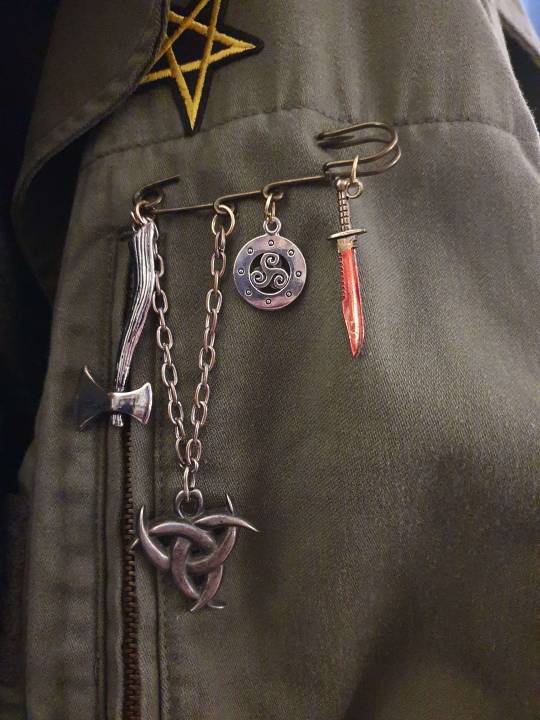
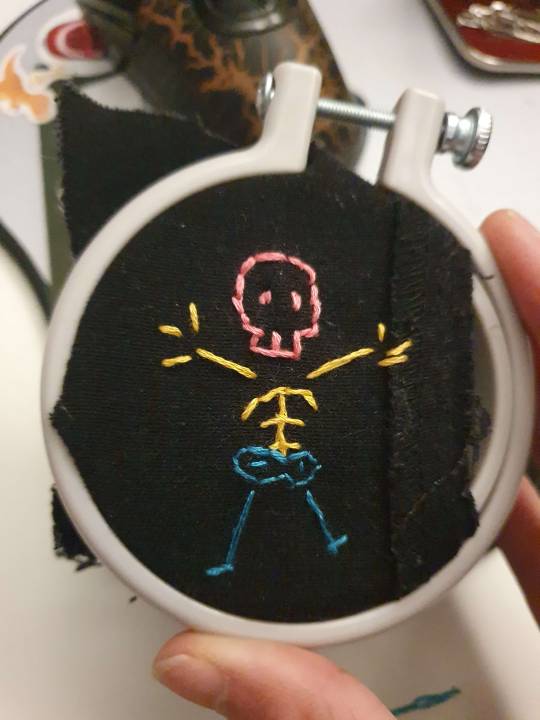
Pouch I sewed earlier this year and embroidered for @coveredinredpaint, a dangly trinket for on a jacket and a little pan flag skeleton
148 notes
·
View notes
Text
Leaf-in hair treatment (aka leaves for your hair)
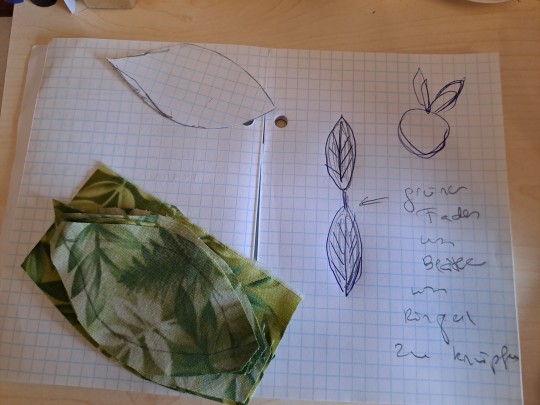


I made these leaf-y hair rings for an advent calendar swap I've participated in!
The idea translated so well from the image in my head to how they actually came out! I'm really happy with these cute leaf- hair rings and want to make some for myself to keep & incorporate into my outfits.
[Image description]
Picture 1: An open notebook with the idea for the leaf hair accessory sketched out in blue pen. Some leaf shapes have already been cut out of green fabric printed with ferns and are laying next to the sketch.
Picture 2: A leaf sketched out on grid paper and cut out, in order to use it as a pattern. Two hairrings have been already prepared with it. The wooden spool of white thread and the green lace flower and wooden leaf earrings are coincidental clutter, but fit the theme well!
Picture 3: A decision was posed between a small brown hairring and a bigger brown hair ring. A finished leaf pair, ready to be attached to one of the hairrings is laying beneath. It's made out of two fabric leaves, which are connected by cotton yarn in the middle. The fabric leaves have been decorated with a stitch around the border and one stitch stem down the middle.
Picture 4: Shows the inside of a leaf. The two fabric sides have been sewn together but not yet turned inside-out. The threads also haven't been clipped yet, nor the seam allowance cut back. You can see the second leaf poking out of the turn hole.
Picture 5: Two finished hairrings with leaves knotted on them! They are both big hairrings (in brown and black). The fabric used for the leaves has a pretty fern pattern on it. The leaves look somehow inspired by nature and cartoonish at the same time.
[/image description]
#mori girl#mori kei#handmade#diy#sewing#handmade fashion#mori fashion#handmade accessory#gift ideas#ideas for little presents#quick diy#image description#image described#advent calendar#advent calendar stuff not posted in chronological order
37 notes
·
View notes
Text
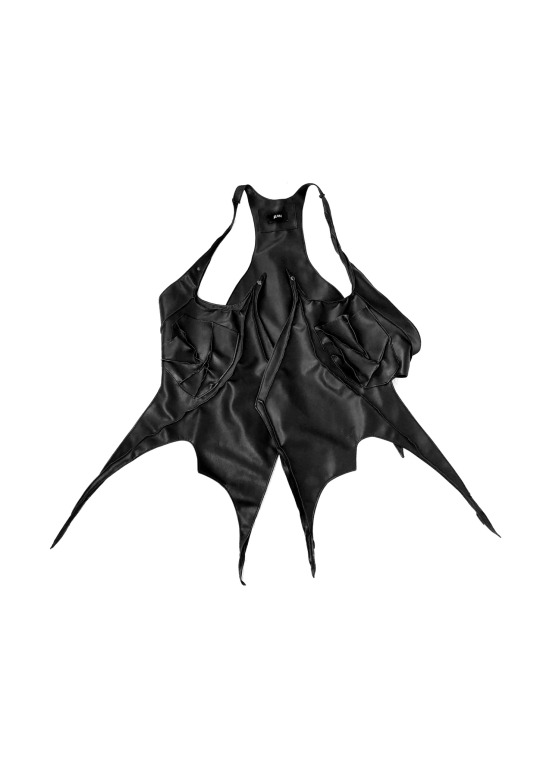
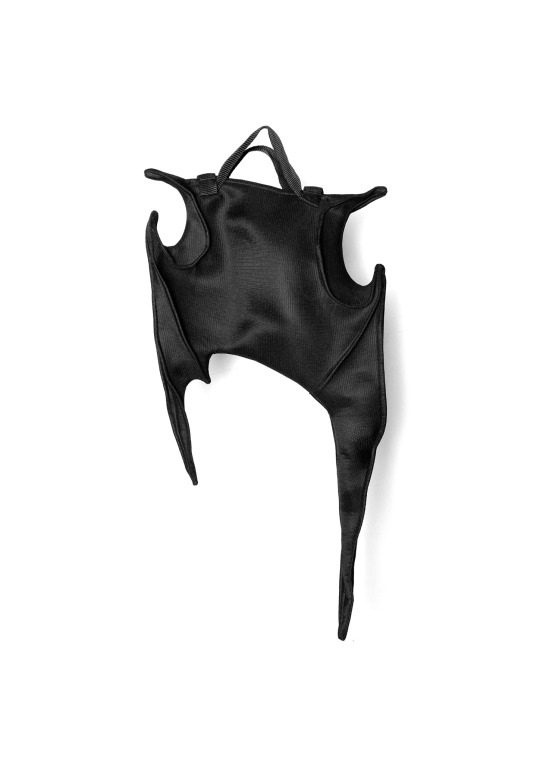
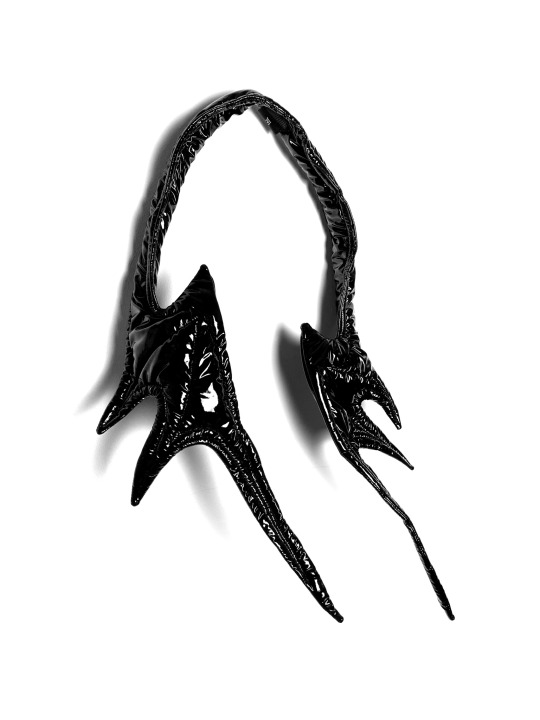
Batwing designs by Jean Louie Castillo
#goth#goth fashion#jeanlouiecastillo#fashion designer#goth aesthetic#gothic#goth menswear#goth men#alternative goth#dark fashion#gothic art#goths#gothic outfit#accessories#goth accessories#fashion#fashion design#designer#design#goth design#diy fashion#sewing#sewing tips#bats#cute bats#bat wings#the batman#batman#horror#gothic horror
23 notes
·
View notes
Text
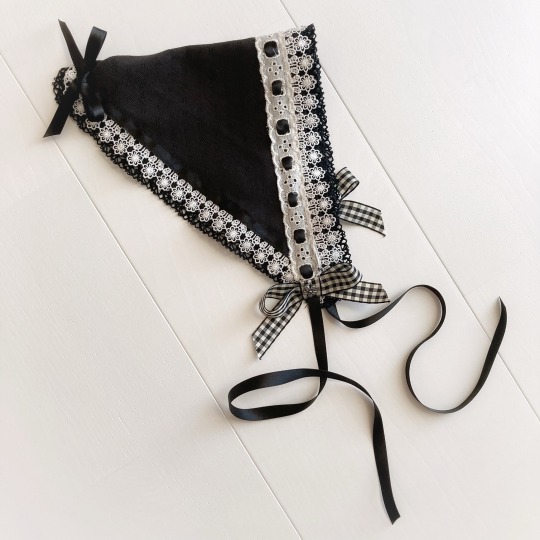


Some handkerchief headdresses I made out of pieces of leftover fabric from past university projects. The black and red were gifts for friends and the pink is for me 🎀
#jfashion#kawaii fashion#kawaii#kawaii accessories#eglfashion#eglcommunity#egl#cottagecore#cottagecore aesthetic#sewing#diy#crafts
23 notes
·
View notes
Text


tiny adventures ☕️🧸🎀
OF | fansly | wishlist | my links | nsfw blog
#me#mine#diy fashion#leg warmers#pink bows#coffee#cozycore#cute accessories#black and pink#pink and black
64 notes
·
View notes
Last Seen Blogs
nayrs-thoughts-13s-icons
For Icon Requests 👉🏽👈🏽

neyhoie-blog
Aemiliano
thx1085
Here I am, World.
chelscups
ChelsCups

rotaryunions
Roto Flow - Rotary Unions Manufacturer in India