#also trying a new colouring technique for sketching
Text
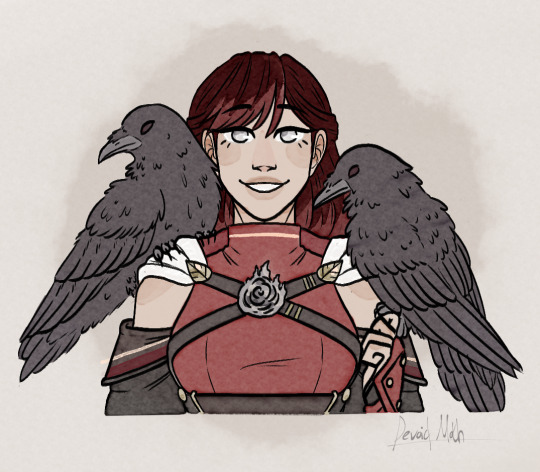
Summers Ravens.
#wanted to play off the ozpins ravens thing because she def was more in charge lol#also trying a new colouring technique for sketching#so far I am liking the brush#rwby#rwby fanart#rwby spoilers#rwby summer rose#summer rose#rwby raven#raven branwen#rwby qrow#qrow branwen#uncle qrow#team strq#strq#rwby strq#strq fanart
714 notes
·
View notes
Text
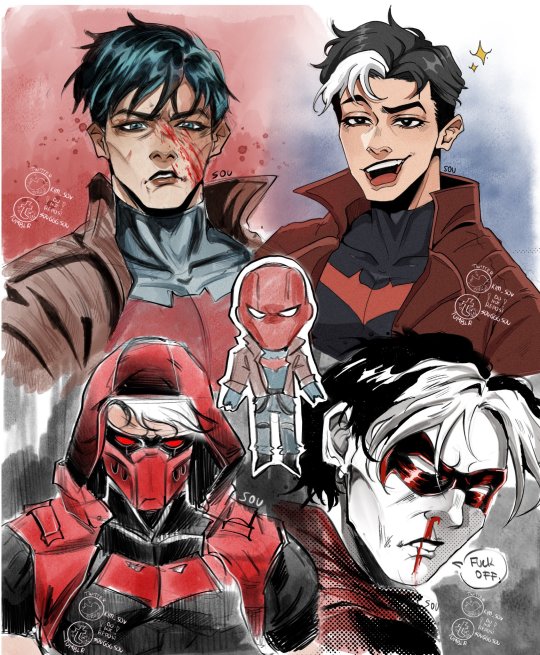
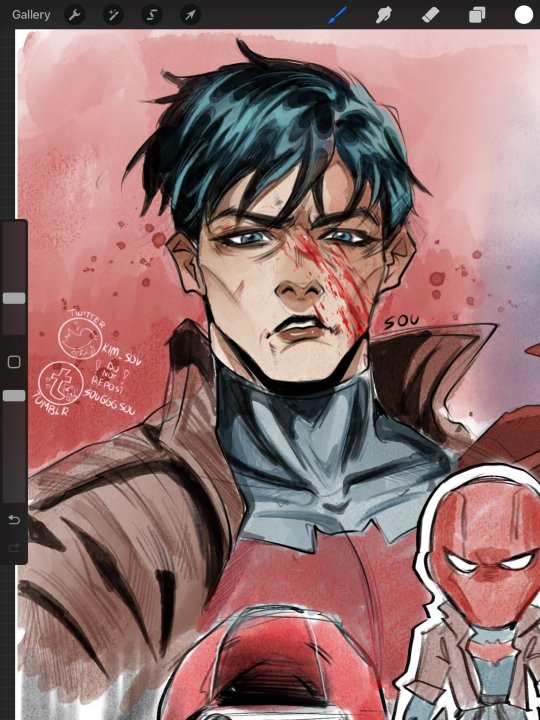
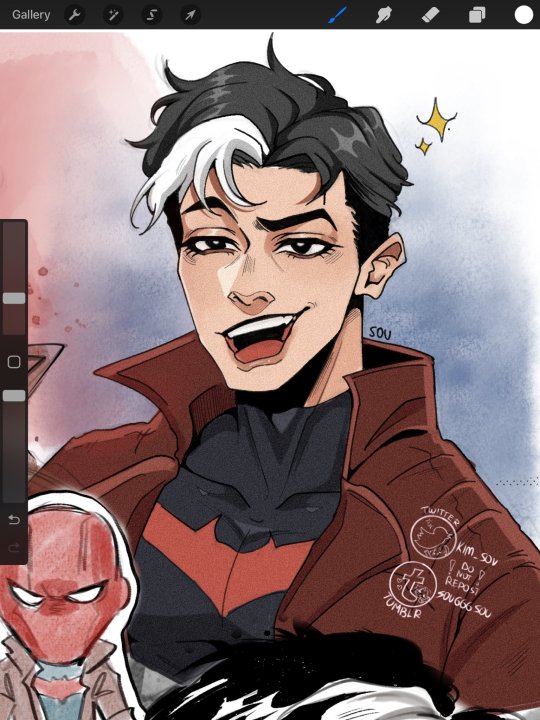
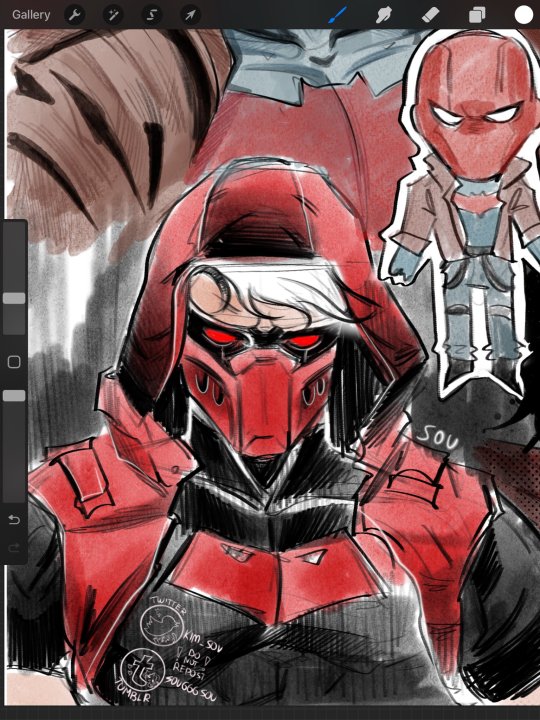
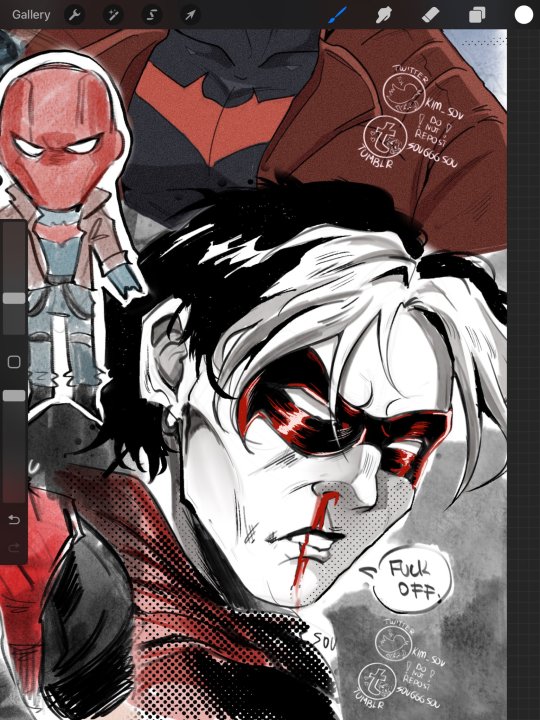
Jason Todd aka RedHood in different (??i think) arstyle
I was just try new brushes i got so each sketch i try doing with different brush and also colour with different techniques ( 1 jason is with watercolour/ pencil technique to make it's look like traditional drawing, 2 jason i make with simple manga brushes, 3 jason i make with pencil/ marker combo and 4 jason in some comics brushes combo)
#jason todd art#jason redhood#jason todd dc#jason todd fanart#jason red hood#jason todd#red hood art#red hood fanart#red hood#redhood dc#dc fanart#dc comics#укртумбочка#art#fanart#украрт#sovbarkbark#jason todd deserves better
350 notes
·
View notes
Note
Uh… hi! It’s uh… me again.
Sorry for popping into your inbox so much. It’s just that I’m a beginner ceramicist and I’m fascinated and awed by your work. (It also doesn’t help that my irl teacher doesn’t know what she’s doing). I’ve got some questions about the way that you bring your adorable creechurs to life.
What is the method of layering clay and then carving out designs in the different coloured clay? I find it really interesting, tbh
Where does the process start? Do you like, start with a sketch? Or with like an “I want to make a cute creature.” Sorta vibe?
And uh, what kinds of glaze do you use? Any tips?
Sorryagainforaskingsomanyquestionsitsjustthatiloveyourworksomuch!
Have a nice day!
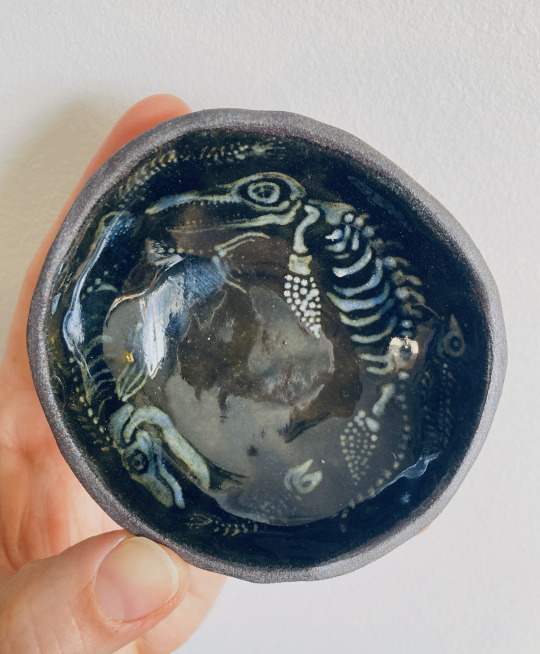
Hey, @drgalacticcandy! This ask (which please, never apologize for sending an ask! I love them!! Also thank you for your kind words about my work!) came at a perfect time because your first Q is answered by another ask I just responded to in great depth!
The technique where I carve out designs is called sgraffito & I just wrote a small novella about the technique here!
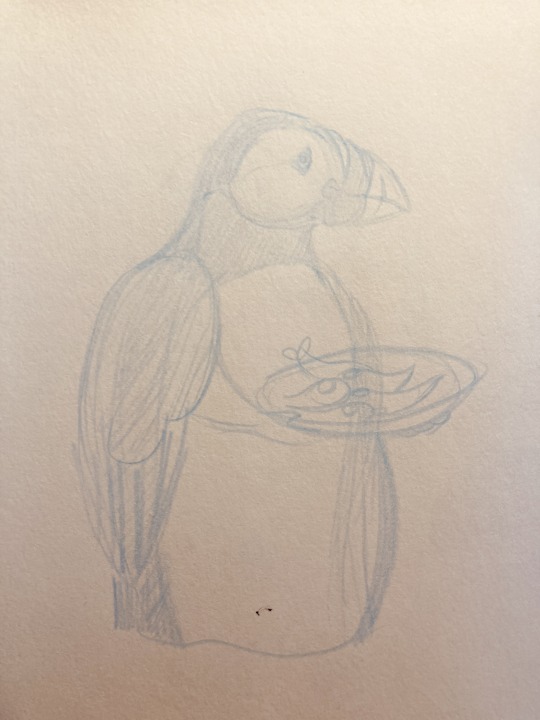
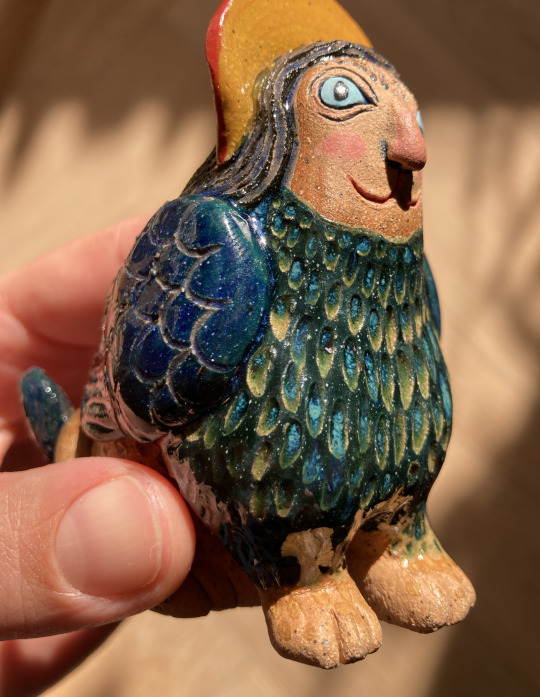
In terms of the creative process, it depends on the creature! Almost all of them need some sort of photo-reference at some point, especially the ones I want to look more like an actual creature that exists (eg. my bird ladies, the pod guys).
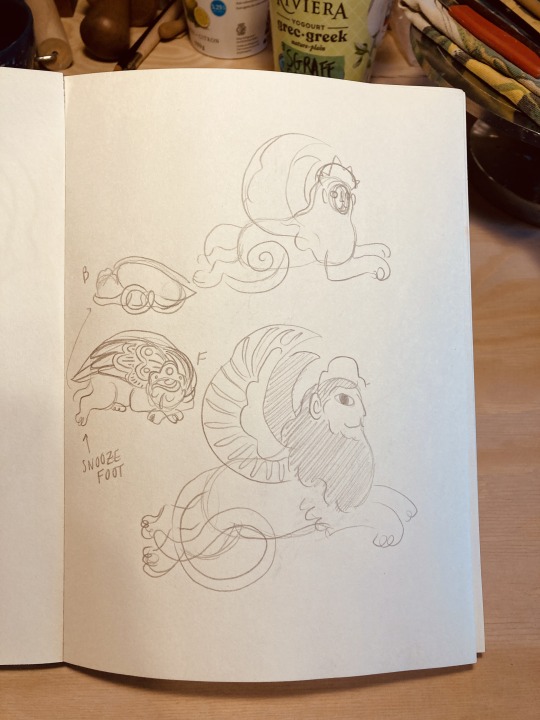
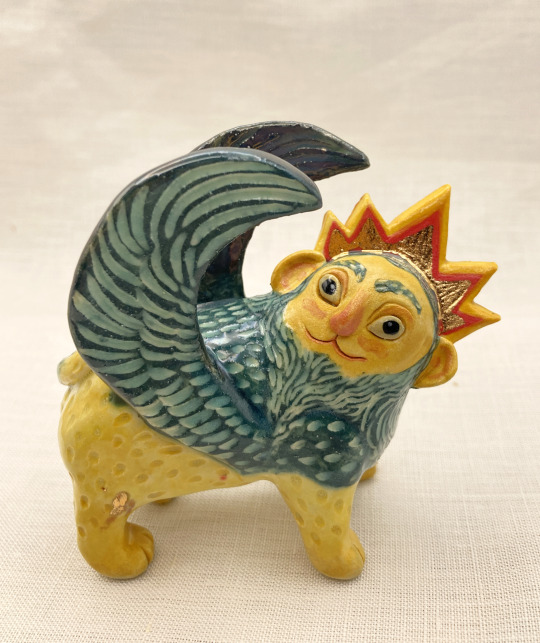
For things like the sphinxes and the ungulates, I did peek at some photo reference at the very start (looked at some cats for sphinx anatomy & lots of musk oxen & goats for the ungulates), but am now just going off of what's goopin' around in my brain. I do sometimes still do sketches for the designs I make a lot, especially when I want to do a new body shape, eg. this flying guy.

I did quite a few sketches for the Puffin BirdLady because I'd hardly even drawn puffins before, let alone sculpted one, but other birds I'm more familiar with (loons, ravens/crows) I just keep some photo ref up on my laptop in case I need to check a detail & go straight to sculpting.

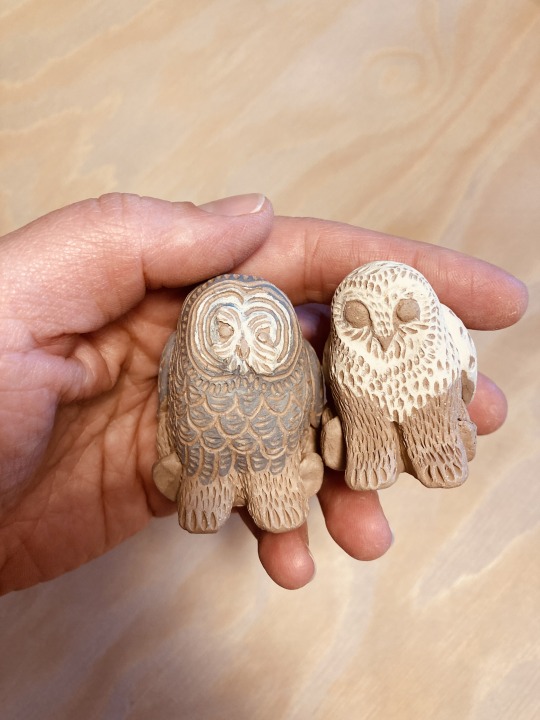
Some of the simpler beasts I just go ahead and sculpt without any drawings, eg. the snats/slats (snailcats/slugcats) & the owlbears (tho I did look at a bunch of owl-face photo ref to inspire their patterns!):

I do find sketching especially useful for creatures that require some new engineering, eg. the sphinx dishes or fishbutts in new positions, as doing the drawings helps me work out how the various bits will attach together or what issues I might come up against while trying to sculpt a new pose.


And glazes...whew! I'm still SUCH a glaze newbie & really don't know anything about them yet. My usual tendency when encountering a new art adventure is to just dive in headfirst with minimal research and GO, which is mayyyyybe not the best with glazes??
And yet I still just see a pretty glaze and go OH HI I AM BUYING U NOW (with one caveat -- I always read the description and if it's described as a runny/difficult to use glaze I drop it and run because my sculptures are wee and I don't want any glaze floods in the kiln!).
I'm also lucky to have a really great kiln tech in my friend who fires my stuff who does actually know more about the chemistry of glazes, so sometimes I pass my flights of fancy by her to make sure I'm not doing anything silly. In terms of glaze brands, I love Amaco & Coyote, both of whom make plenty of beautiful glazes that are also easy to use.
For my sgraffito work, when I'm not glazing with clear glaze I put a variety of colours of celadon glaze overtop (most of mine are Coytoe brand). Celadons are translucent, so patterns will show through them - you can also do designs in underglaze and put a celadon glaze overtop & get some neat effects - below are some examples of celadons over sgraffito...
...and celadons over underglaze designs...


I know the glaze portion of this answer wasn't the most helpful, but there are definitely lots of forums & websites that contain loads of great info about all the alchemical intricacies of glazes! If you can befriend some potters IRL, that can also be an amazing resource for learning.
Phew. Why do my answers always end up so long?? I hope this was helpful & please don't hesitate to ask if you have more Qs!
185 notes
·
View notes
Text
23rd Feb '24 - [arch] OH RISO my beloved!!!!!! ft. cyberpunk hermitcraft soup group
A cliffhanger!!!! And now I have to wait a month for you to upload the second half?? How will I cope :’’0
For real, it’s so awesome to see your process and the sheer amount of inspiration you take! In particular, I thought ‘Sit on Two Chairs’ and ‘This Was Our Pact’ were particularly yummy.
I think book covers are really hard. You have to sum up a book’s energy in one image, make it stand out and show just enough so people want more. Exploring the narrative through those full pages is really interesting - though this is something you did for fun, it could be a really useful technique for getting to know a narrative. When I’m designing my comic covers, I always do it last - that way I’ve had practice with the visual style and I’m thoroughly familiar with the themes, so I guess spending a bit of time with the characters and narrative in this way helps for standalone book covers too. Of course, it helps if you have the time for that XD
Okay!! Onto what I've been up to!!! [warning this is a beefy post I'm sorry for your poor reading brain]
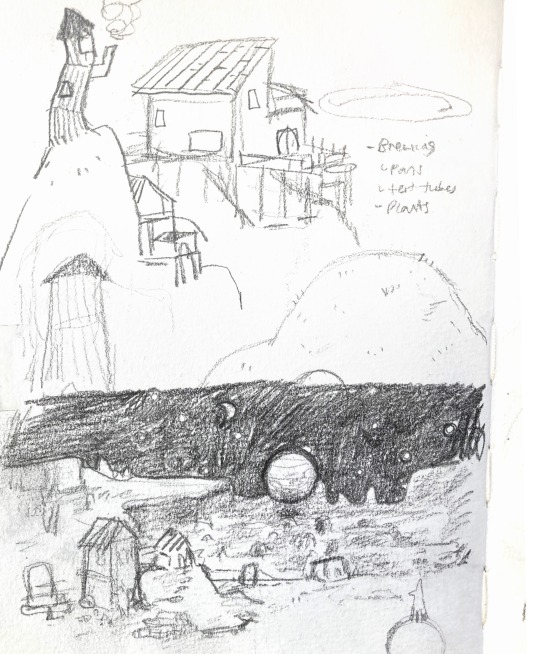
The past two weeks have been really enjoyable! I’ve been playing a lot with slow world-building, in sketchbooks, google documents, and voice notes to friends. Letting myself really sit with concepts, think about the characters, let them play in my head with no expectations. With this relaxation and lack of pressure, some beautiful narratives and interactions have been developing. I’m starting to need a name for a world/ the story. I’m not quite ready to give them a full introduction to the internet - I know it doesn’t but it feels like there’s some accountability to *produce something* and this slow development is really important for the quality and my skill building.
It’s really hard to take on, but we actually don’t have to make the perfect thing now! In fact, it’s impossible. Pressure on ourselves makes it so hard to make something good if we’re always grasping at the final result.
In the meantime, while those characters develop, I have been working hard on my basic skills. I wrote about characterization last post, but this week I focused on setting and colour. I was inspired (once again) by Hermitcraft. I’ve seen some really incredible illustrations of Minecraft builds in the fandom, and it seems like a great exercise.
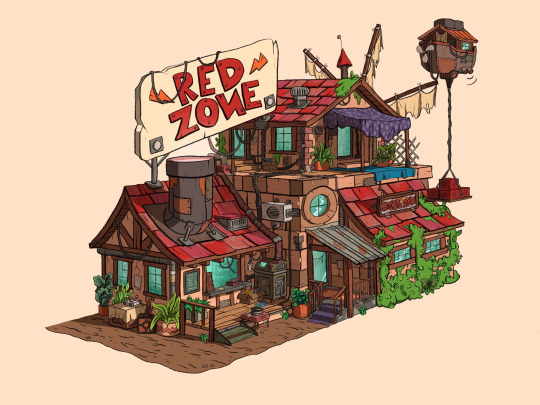
Bdouble0's Season 10 Base illustrated by @applestruda [source] and The Red Zone, built and illustrated by Bdouble0 [source]
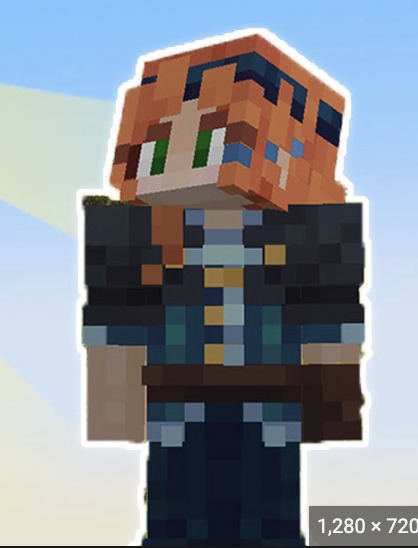
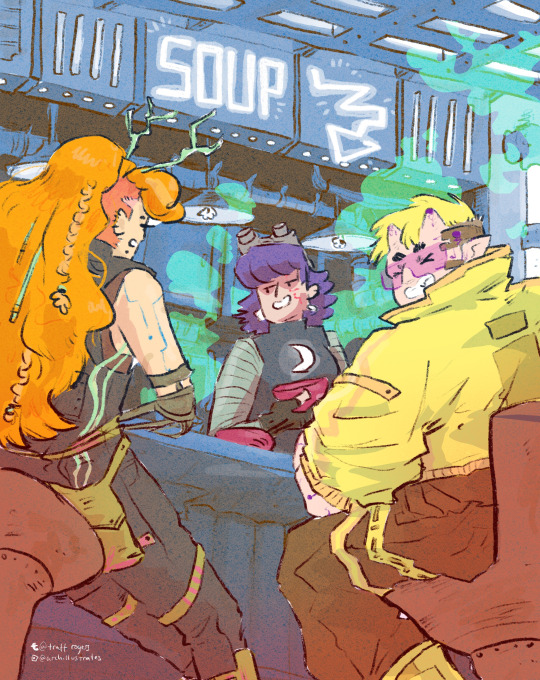
One of the creators on Hermitcraft, ImpulseSV, created this build in a recent episode. It takes inspiration from the last season of Hermitcraft, where he was part of the ‘soup group’ with two other players, and his current base concept - a cyberpunk city. I also LOVE his new character design, so I wanted to place him in the scene.
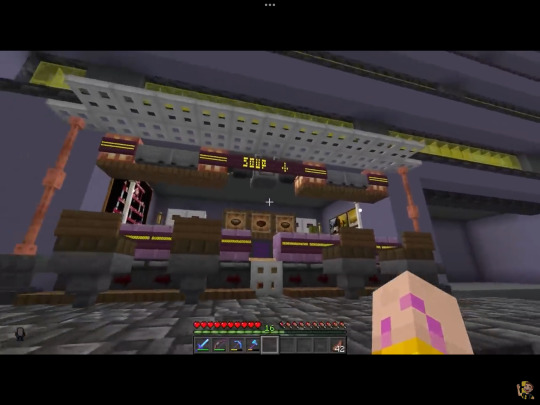
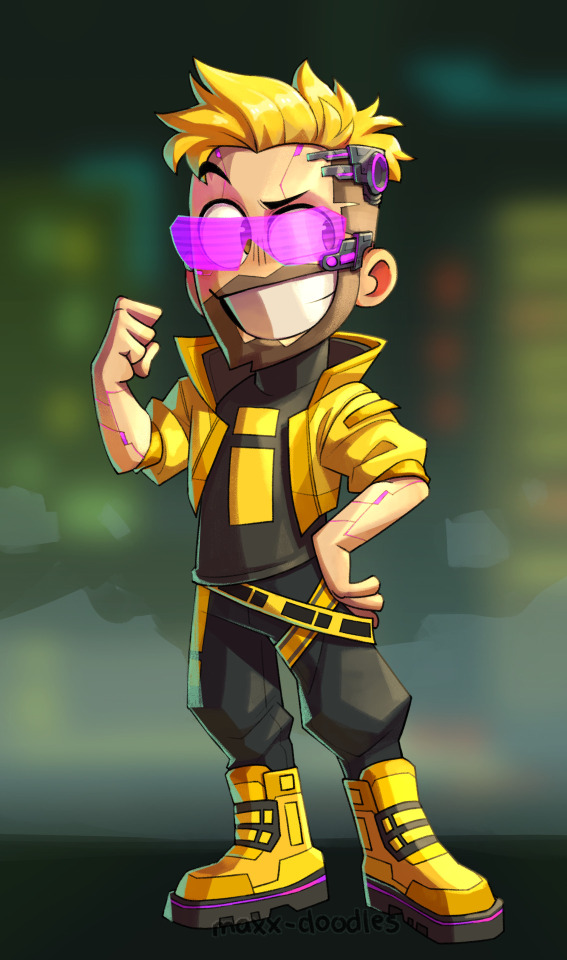
Screenshot from Impulse's video and new impulse design by @maxx-doodles
Here are some initial thumbnails I did, trying to figure out the composition. I wasn’t sure of the vibe yet, so I tried some rough thumbnailing, and drawing on an isometric grid and other perspective techniques. I’m going a bit mad for characters at the mo, so I wanted to place some in the scene. I found the angle of the isometric grid steep to place characters comfortably, so decided against that.
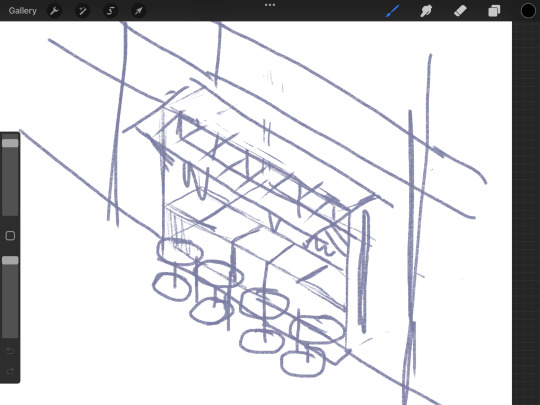
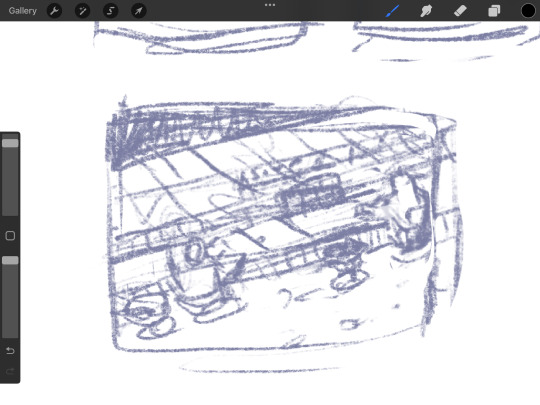
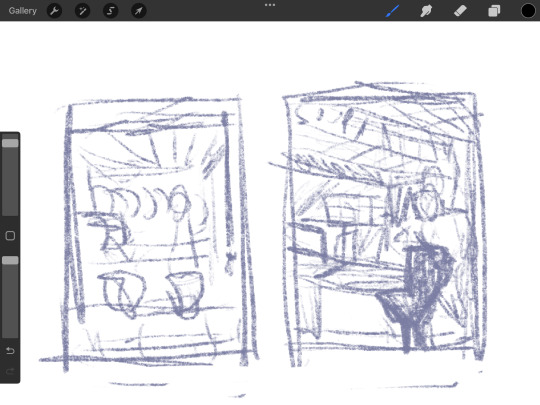
Looking back at it, I love the second! But I believe I was struggling with the perspective. I decided on the last one eventually.
Now, I absolutely adore all of the players in the Soup Group, and I am BIG fan of redesigning their notable characteristics to suit different settings. So yes, I decided to put all of the soup group in the image.
PearlescentMoon (left) from my comic and GeminiTay's Hermitcraft Season 10 design [from this thumbnail] (right)
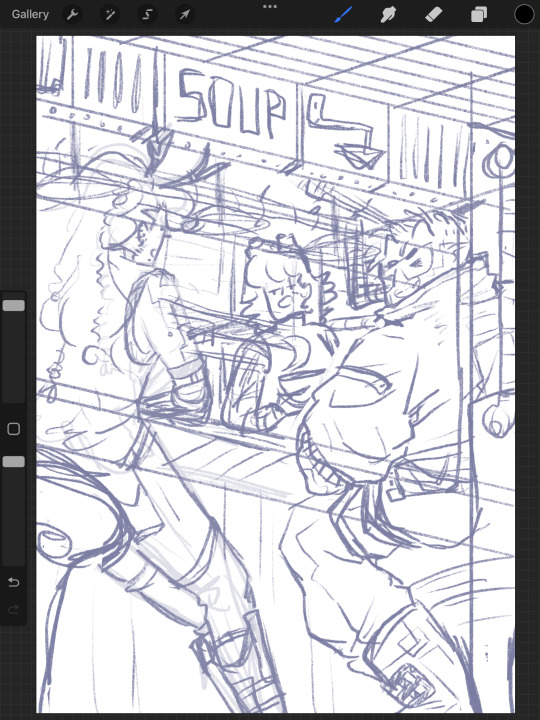
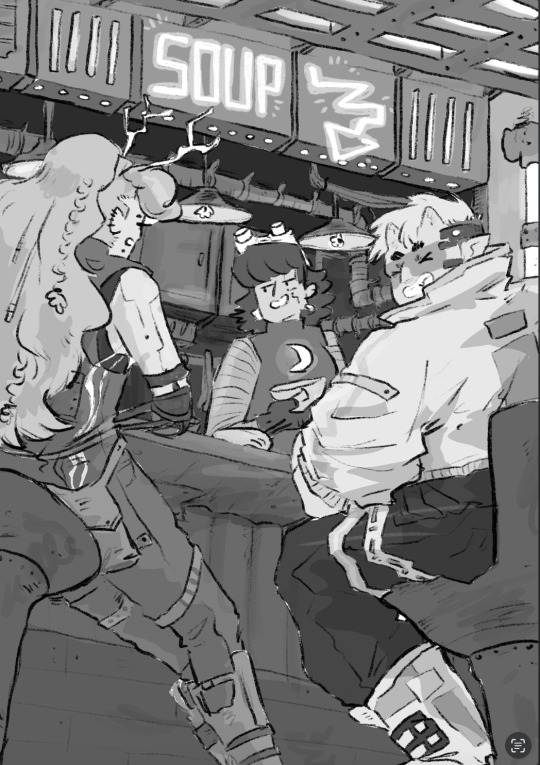
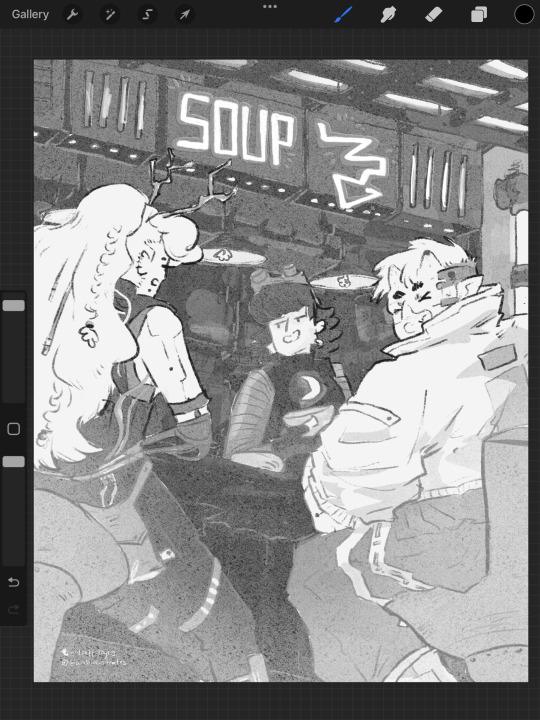
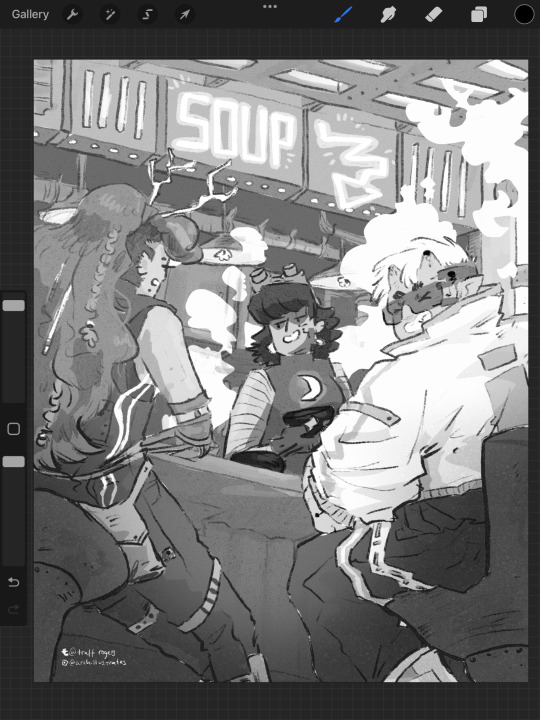
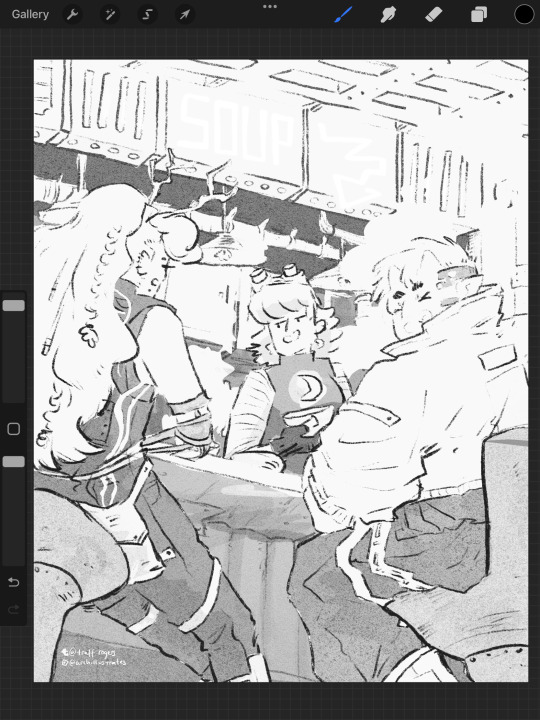
Here's the sketch of the final image. I really enjoyed coming up with cyberpunk versions of them all. I used the impulse design almost exactly, with a few extra interesting details since he's mostly viewed from the back. For PearlescentMoon (middle) I kept her fringe, dark hair and gave her a glowing moon symbol on her top. For GeminiTay, I kept her long ginger hair, antlers (but glowing!) and took inspiration from her new season 10 design - a dark blue jumpsuit to match her dark blue clothes in her new design, and the braids she is often drawn with. I also gave them edgy new hairstyles. And a robot arm. I don't have lore for that.
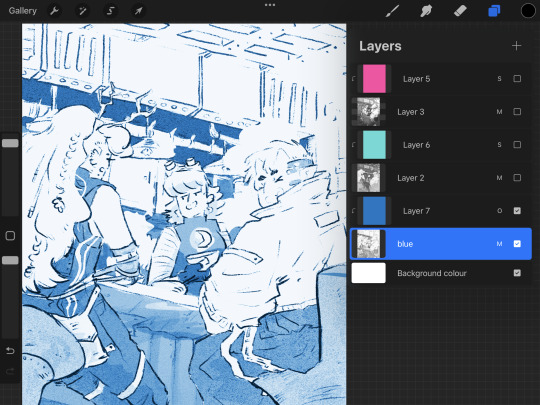
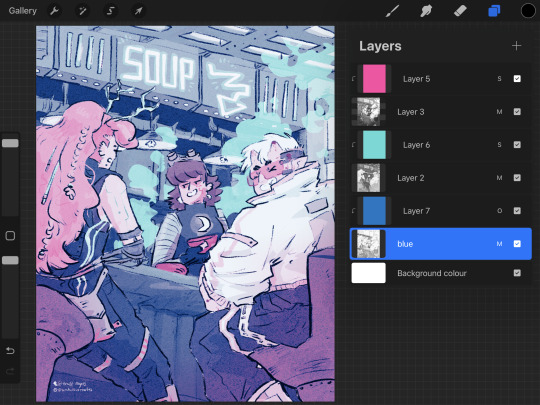
As usual, I filled each flat colour-to-be with black and lowered the opacity to play with the values. Then I added colours one at a time, aware might be riso printing it. Originally I stuck to trying to make it printable (making the colours out of ones I could make my layering 2-3 colours at different opacities), but as I went on, I decided to drop that and focus on the quality of the image in a digital format alone. I did keep the grayscale version above with all the separate layers in case I needed that if/when I came to riso printing it. Below are the main two digital colour schemes I tried out.
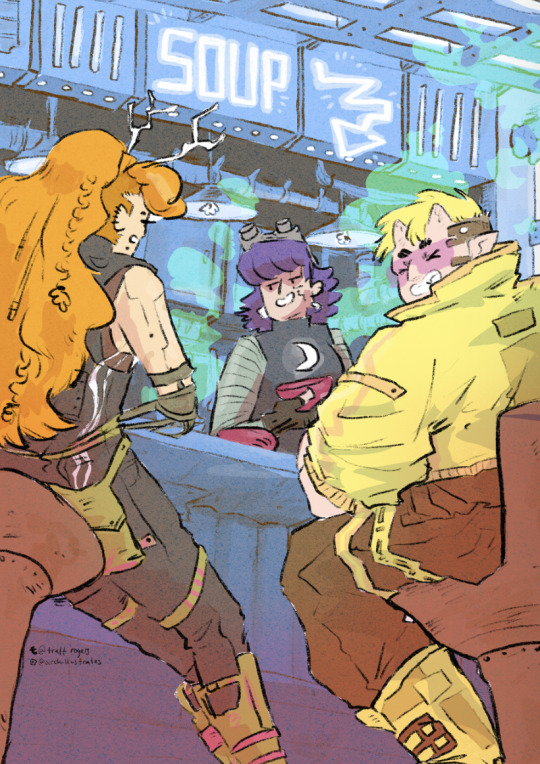
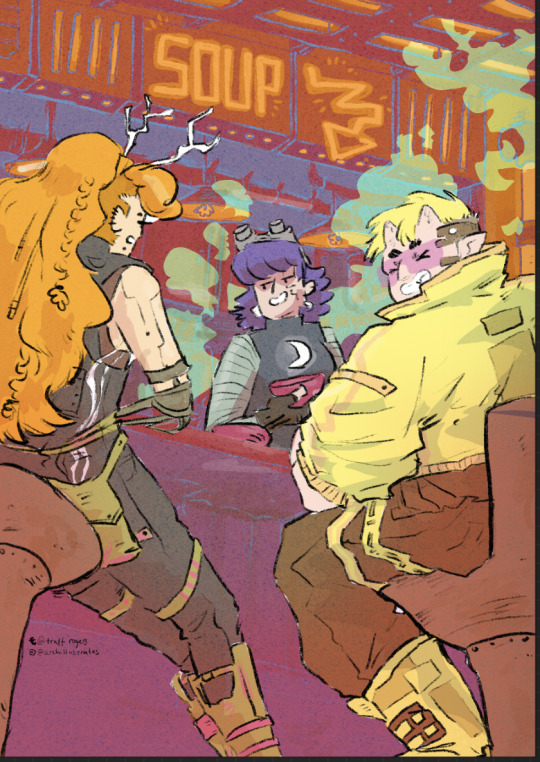
I settled on the one on the left, with the blue tones - the foreground characters really pop. I put a few details in Gem's hair, colour variations etc, and cropped it for Instagram. I actually much prefer the cropped version - it sits better in a rule of thirds.
Now the moment we've all been waiting for :'')
RISO!!!!!!!!!!!
I returned to Cardiff after a couple of months away and was delighted to spend my first day back at The Printhaus, an awesome shared print studio where I have basically made my home. A few of my awesome friends happened to be there, so I spent the day playing around with this image with their help! (please check them out they're very cool - Gavin helped me a lot (we hung out at Thought Bubble, remember? and Rhi gave good crits too!!)
For those who don't know, risograph is basically a shitty photocopier that can only print one colour at a time. However, you can play with gradients and opacities, and layer colours really nicely to combine. I've done a lot of single-colour tonal work with riso but this is my first go really layering.
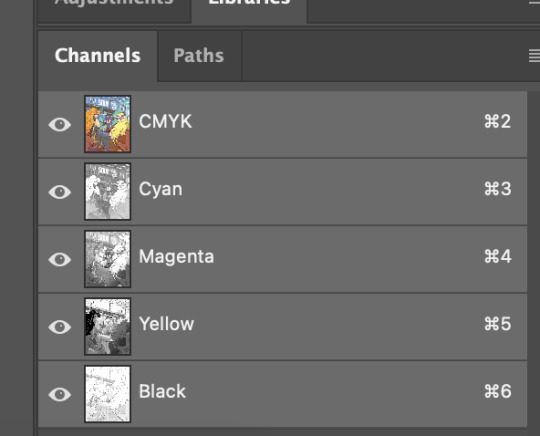
First, Gavin showed me how to separate the channels in Photoshop, using the flat image uploaded to the 'gram. We copied and pasted these layers in grayscale and added blending modes to each layer to replicate what they might look like when printed.
With blending modes, the digital mockup looked like this!!
This bit goes into technical details for replicating what the print might look like for those who might want it - feel free to skip :)))
I copied and pasted the Cyan, Black and Magenta layers as greyscale (as you can see above)
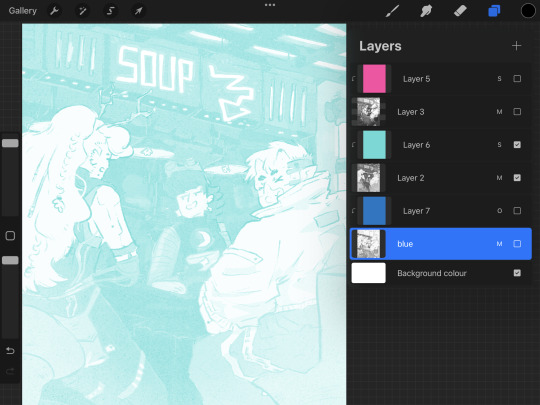
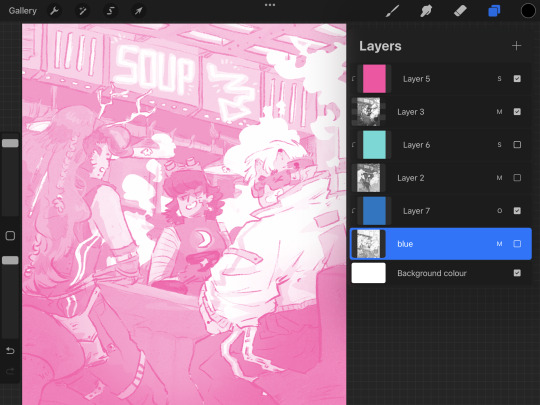
I made all of the greyscale layers multiply layers since risograph ink is transparent and we wanted to see how it layers. The ink usually comes out a bit lighter than you think, so it's good to bear that in mind. I used a clipping mask over each greyscale layer and a blending mode. WHEN YOU PRINT, PRINT IN GREYSCALE, NOT COLOUR.
Here's how I split the colours from CMYK to the riso colours, their hex codes and the blending mode I used to replicate the colours:
Cyan - Mint [HEX#82D8D5] Screen
Magenta - Fluorescent Pink [HEX#FF48B0] Screen
Black - Blue [HEX#0078BF] Overlay
Yellow - scrapped for colour scheme purposes
Blue, Mint and Florencent Pink layers in greyscale in Procreate.
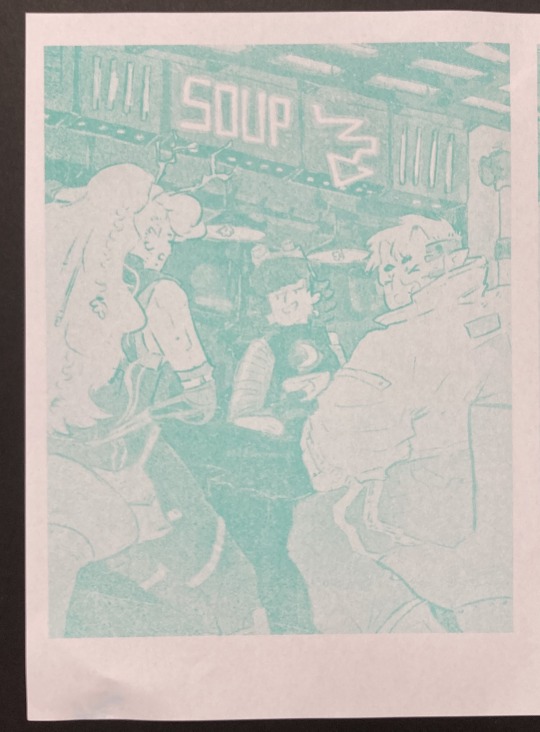
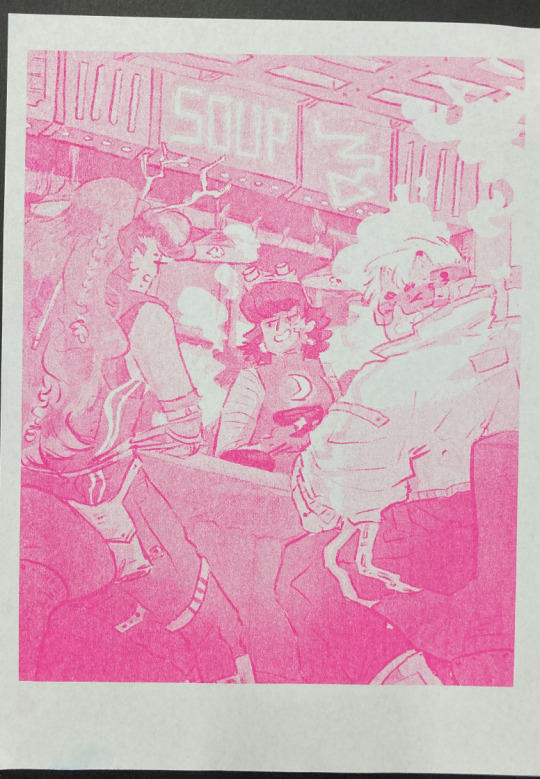
Riso printed Mint and Florescent Pink layers on separate paper, followed by the two layered together.
We always start with the lighter colour inks first, because sometimes the rollers can pick up the ink and cause extra marks where you don't want them. The first two colours came out great!
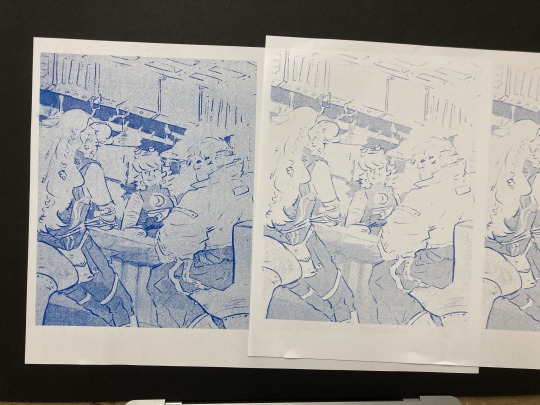
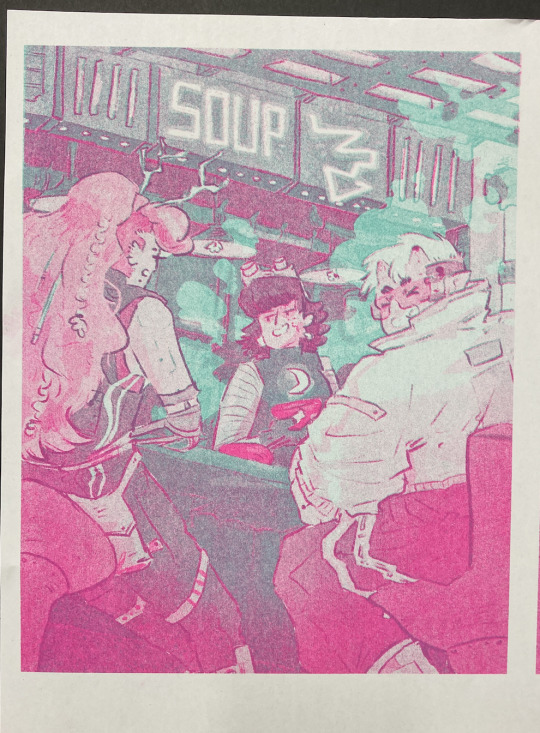
The first time we printed the blue, it came out very dark (left, first image). I have had this issue before - my last book, Winter Wellbeing, came out much darker than I wanted. Now I realise that the blue ink is super sensitive. All the 'white space' that is covered by a low-opacity blue on the left is only 2%, and yet it has come out pretty strong. We tried printing it on one of the misaligned images just to see, but it took all of the brightness out of the neon soup sign at the top of the image (second image). So I changed the values and pushed them way lighter, so it just pushed the values of the darker bits slightly, and brightened some of the lineart (right, first image)

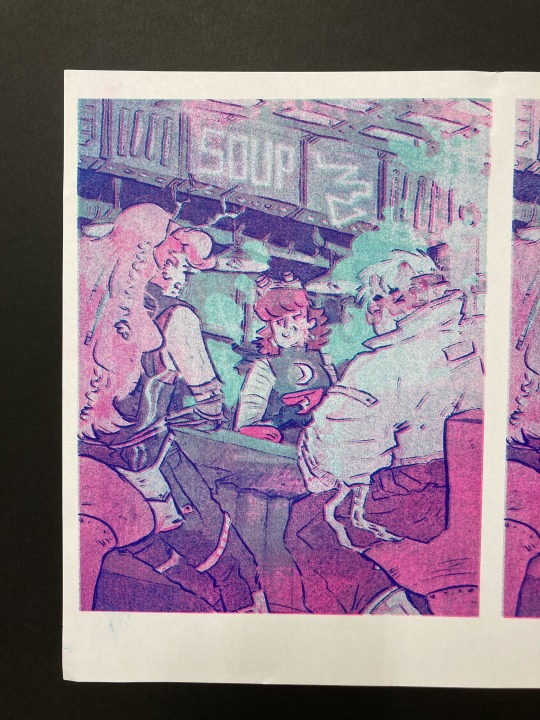
And this is the final riso printed version!! I'm so so happy with how this came out. It's so different from the original digital version, and I actually love that.
I didn't create new colours in the way that I intended to - I wanted to play with overlaying purposefully to create specific colours eg. orange for the hair etc. But!!! I'm really happy with how it came out. That will have to be a project for next time.
Also, many copies are slightly misaligned, so in future I think I'd do flat layers for the colours a more blobby style with the linework on one layer only so there's less of a chance for obvious misalignment. design for the riso, rather than riso the design.
Overall though, this feels like a super cool step up and a milestone for me. Super happy with how it came out!! And I'm excited to play with colour some more.
Can't wait to see the rest of the Lionheart brothers! Enjoy your weekend :)))
Archie 🕺🕺🕺🕺🕺🕺🕺🕺🕺🕺🕺🕺 <3
#archillustrates#arch is learning#smileyshri#project development#art#art process#art resource#process#artists on tumblr#illustration#comic#picture book#small art blog#art blog#illustration blog#female artists on tumblr#queer artists on tumblr#illustrator#book illustrator#female illustrator#queer illustrator#comic artist#comic art#female artists on instagram#artists on instagram#procreate#digital artwork#digital artist#artist blog#artist on tumblr
18 notes
·
View notes
Text
overall i know people pay more attention to miles canonically being an artist, but consider artist hobie
i think, as someone who proclaims to hate consistency, he’d do his best to keep you on your toes, so is constantly switching up with new ideas for dates for you two
he’d take you to lots of his favourite places to eat— all family-owned restaurants or vans or things like that. refuses to take you to maccies or costa or anywhere like that— is adamant that no matter how much you like the food, he can find something better and cheaper because “those fucking prices are a bloody joke, love, and it tastes like shit too.” but spends the entire time taking photos of you eating to sketch out later because you’re just so stunning when you’re caught off guard
i think his favourite thing to do would be to swing you both up to one of his favourite rooftops, one on an abandoned building ridden with tags and murals on every wall you can see, with a bag full of spray paint. he lets you go to town with a bunch of colours on all the walls he’s left free or sprayed over for you, even if your technique is a little bit shitty
i don’t think he’s the type to take photos a lot either, until he meets you. before his camera roll consisted of pictures of gig crowds, or shots of what he’s doing with his bandmates when he’s stoned. after he meets you his camera roll is completely cluttered with photos of you that, for some reason, make him feel all warm inside— you, eating his mum’s favourite recipe with such a bright smile, you, brow furrowed in concentration as you try to copy the chords hobie’s playing for you, fingers splayed over the frets, you, lazing in his bed whilst he’d been getting ready and putting a frankly atrocious amount of belts and spikes on
he’d also make it his mission to make sure he draws you right. he can’t stand people that draw their significant others, and yet leave out or sketch over the features they deem unattractive— he spends hours studying your eyes, the way you do your hair, your lips, all your little habits that you think he doesn’t notice
(i also think that’s how he realises he’s in love with you. a few too many sketches that are a little too in depth, a few too many ideas for a tag for you, and all it takes is a little moment to realise— “oh, fuckin hell.”)
31 notes
·
View notes
Text

Hobie Brown! Drew this for a bff's birthday last weekend and finally can post this.
First spiderverse character i drew for the first time i think? It was interesting because I was trying a new "technique" to get the messy feel of Hobie's art style, so I scanned my pencil sketch into Firealpaca to tried to make it transparent for the "lineart". You can probably see it better without the background:

Overall it was a mix of fun and pain, because on one hand I didnt have to give a shit about colouring in the lines or being clean about it, but also ARGH he has so many patches and details in his design!! I love punk style man it's just a lot!!
Either way my bestie liked it so I consider that a job well done, lol
#spiderverse#atsv#hobie brown#atsv hobie#hobie spiderverse#across the spiderverse#moonies makings#i still rendered the face a lil but yeah it was a lot of detail#it's a little saddening you cant see all of it unless you zoom in but ay man a job well done is a job well done
23 notes
·
View notes
Note
do you have any tips for rendering for digital art?
Hello! Sorry for the late reply on this ask I was thinking about how to answer it. I guess I can give general tips about just painting/rendering but feel free to ask for specifics if you want!
For me, I think the most important things for rendering are making sure the values and edges/shapes of the shadows in any drawing look correct. Just roughly laying out colours/where the light/shadows are with a (usually) big brush size to start off. I can usually just eyeball my light and dark colours under my sketch but sometimes I don't feel like it so I'll use a 'multiply' layer on top and mess around with that (I'll just think of the approximate vibe of the colour/mood i want then work from there.

Anyways, for actually painting over top….it kinda feels like second nature to me now. I think about what shapes/interesting areas I want to keep in a work (to keep me excited about what I'm drawing) and also the ones that need to stay (for like…"realism", loosely). Then I layer on colour until most of the sketch is mostly hidden. I just try to slowly build up colour and blend until I'm happy, add texture along the way. If I feel like the values or colours are lacking I'll use an adjustment layer or multiply layer to fix problematic areas. I will try and layer with a big brush then move to a smaller one for details but most of the time I paint with whatever and fix as I go hahahah

Really just slowly building up until everything looks right or I get sleepy hahahah.
It's kinda hard to explain but here's a real time video to kinda see everything in action
youtube
other tips:
zoom out once in a while or have another window with the canvas open (navigator or just window > canvas > new window for other programs) just to check everything looks good
test new brushes and techniques just to keep things fresh
look at what other artists do and maybe try to integrate some of their techniques too
uhhh yeah thats about it
Again if you have anything in specific you wanna know feel free to ask ^_^
10 notes
·
View notes
Note
I absolutely adore your art style.
It has such a cozy vibe and it just fits with how the characters are described, I dunno am I making sense? I just feel like it fits in my head with how I’ve thought about them. But I think my favourite is your ginny. I love how you make her outfits and designs so warm and comfy but still make her facial expression a little hawk like. It just suits her.
the other thing I love is you Yule Ball series you did for Ginny, Hermione and Luna. I was wondering if you would be willing to draw the Patil Twins? Because the movie absolutely ruined their outfits. You don’t have to.
I really love your Art Style so I was wondering if you had any tips for people who wanna start digital art in a style similar (but not exactly the same obv) to yours? I really suck and I cant get over the ick I feel when it doesn’t look like what I want it to, so I don’t actually feel like trying again and practicing.
Sorry this was really long haha. :)
Hiya! Thank you very much! That means a lot! I am definitely going to do the Patil twins at the Yule Ball. I want to do a series for the Ball. The Patil twins, Cho Chang, Angelina Johnson, and Katie Bell, etc. They all deserve their moment in the spotlight.
To answer your question, I don't know a lot about digital art either. For most of my illustration work, I use traditional techniques. I use my iPad and Procreate for these artworks because I draw them when I'm all cozied up on the sofa :) But, if you want to try some more art digitally, I can tell you this: I try to draw the same as I would in my sketchbook. I sketch out the character, then create a new layer for line art. I keep that sketchy as well, otherwise, I get pretty stiff poses. Then, I just colour them like a colouring book. You can play around with some layers with special effects, like imported textures or overlay layers, etc. Just play a bit with your effects and try to find something you like working with.
It also helps to study some digital art guides on Pinterest, for example. I did that a lot when I just started out. And remember to keep having fun. Improving your drawing skills can be really tough, but as long as you still love doing it at the end of the day, you'll be grand.
I really hope you found this helpful.
Love XXX
8 notes
·
View notes
Note
Hey Cody! I was just thinking about how much I love your art, I admire it a lot! I do decent with traditional illustration but whenever I try with a tablet it’s like trying to speak a foreign language. What software or techniques help you? Or really anything you’d like to share!
Thanks! 🙏 ❤️
Hey ho! Oh thank you I am happy to hear that ☺️🤍
So eh to be honest I tested out a few different apps for my tablet...the thing is I got a samsung so that limits me a bit 💀 So I haven't tested procreate and such...
The app that I use is just IbisPaint X and I gotta say it is completly fine for the sketches that I am doing 😌
The style of it is pretty simple and I got the hang of how to work with it relatively quickly ☺️ BUT I am not big on using any like effects and colour stuff for shading and such which the app can do...I just never really used it 💀
If you want to look into it the app also has a website with loads of tutorial vids on how to use it! Which is pretty nifty when trying to learn new things or remember how to do certain techniques 😌
Other then that...ah yeah when it comes to my own drawing techniques...ABSOLUTE CHAOS. 💀 I don't know what else to call it...I put down a rough undersketch...like just a stick figure or some swishy lines and then I start 🤣
What helps me when doing those silly doodles is just keeping the lines loose and flowy...don't concentrate too much on perfection and sometimes just capture the vibe of the picture...I also gradually build line weight/thickness for details and shading...BUT if I get too tangled up in the details I get frustrated 💀 You can't imagine how many GIANT sketches I deleted cause I straight up HATED them cause they turned stiff...and urgh...💀
ANYWAYS! I am fuckin shitty when it comes to advice but I hope I was able to help out a little bit 😅🤍
4 notes
·
View notes
Note
Ask Game for writers: 1, 7, 10. 😀
In which I should have read this more carefully 🤣 I saw it was about WIPs and didn’t realise it was so fic focused. I guess I could answer this two ways. I could convert it to art which is fandom, or I could vague talk my original novels. Maybe both? 🤔
1) 🦈Tell us the name of your/ one of your WIP(s)
Hmm well I don’t want to share the name of my original novel 🫣 I know I probably should but I get afraid about it. I sort of put up a division between “personal fan me” and “career me”. Not that I have a career (yet) but I can dream.
As for art well that doesn’t have names exactly, and also I don’t have WIPs in the same way. I have a list of ideas and I tend to take one, and finish it, rather than juggle several projects like I did fanfic.
I am currently signed up to the Librarians Exchange and I will be making something for that. I probably shouldn’t talk about that though because of the whole ‘secret’ gifter thing.
I would like to pick one idea off the list and say “I’ll do that next” and talk about it but truthfully what I am hoping to do is practice basic techniques. I spoke about this earlier with my frustration at being stuck with the ‘tracing’ and wanting to do it properly. I don’t know if I will be able to ‘teach myself’ to any level so that I can use it for the exchange. I mean I have had literal years to do so and not got anywhere with it so far 🤷♂️ I got a new sketchbook (because clearly the half dozen I already had weren’t enough) but maybe this time I will commit. I got some erasable coloured pencils and sketching in purple seems very fun so 🤞
7) 🖍Post Any sentence from your wip
As said I can’t really do this. I wish I had some kind of sketch to show, but again as I said art “WIPs” are more just ideas unless I am mid-project and I’m not right now.
To make up for not answering this I have picked another question for you.
11) 🛠Is there a scene or anything in the WIP you are struggling with right now?
For my original novel quite a lot of things 😂 but description is usually the hardest part. I can see it in my head but it’s so clunky when I try and write it down. Way too much frowning or smiling going on lol. I am trying to use more body language and less dialogue tags but I need to find more variety in it.
For the art it’s like I said I have my current process of bashing together a bunch of different references. Sometimes this includes selfies when I am struggling to get limb angles to match what’s in my imagination, but it just doesn’t work. It’s a) botched together so a lot of the angles are just slightly off/mismatched and it is unnatural and b) so stiff with no flow/life. It has zero style.
10) 🤡How many Wips are you actively working on?
Well I am actively drafting one original novel. I have benched the redraft I am 1/4 of the way through, the first draft I need to reboot, the first draft I am only about 70% finished with, and the first draft I only wrote a bit of (I think that covers them 🤔). But really it’s just the one for “actively working on”.
For art… well I can’t lose sight of the gift exchange. I’m wondering if I should pick up ‘Sketch a Day’ again. I definitely want to do the 100 heads challenge. I got a copy of the Loomis Method book (heads and hands) and I think I should go through that. Same with Hamptons book (figure drawing). I was doing some screenshot redraws from “What If?” as I adore that art style. I can’t seem to pick a medium (paint, pencils, markers, ink) and so there’s so many options for rendering practice. It’s a bit overwhelming to be honest all of everything I want to work on.
Thanks for the ask ❤️
1 note
·
View note
Video
youtube
Drone
Noun: A Deep Sustained Or Monotonous Sound
The following is an excerpt from Drone director Sean Buckelew's much longer in-depth behind-the-scenes article found here.
Drone is concerned with some pretty lofty concepts and we wanted to be sure we fully understood the director Sean Buckelew’s point of view before we dove in, so we requested a reading list and pounded through some relevant literature in front of a log fire on our Christmas break. We found Frankenstein to be the most fruitful reference, paralleling so many of the key ideas in Sean’s script in an equally lyrical way.
To kick us off, Sean sent us a WIP along with some spotting notes. In true Buckelew fashion, they were fun & casually worded but extremely well thought-out.
His first note: “Overall, I think the sound/music oscillates between two modes: one is kind of bureaucratic and banal, the other is dreamy, impressionistic and poetic” presented to us the idea of a duality at the heart of the story. So, borrowing a technique from David Sonnenschein’s book Sound Design: The Expressive Power of Music, Voice, and Sound Effects in Cinema, we plotted a table of two columns with relevant motifs aligned with the two main ‘modes’ that Sean discusses. We thought the film a little too nuanced to label “good vs evil” or “man vs machine” so we decided upon the much broader terms “Inside” & “Outside” to name the two forces.
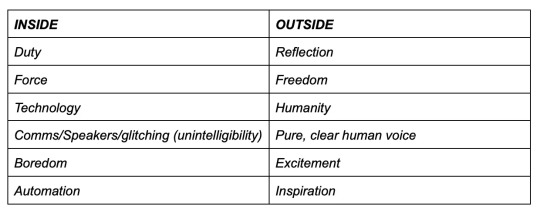
Our “Bipolar Evaluation” of Drone:
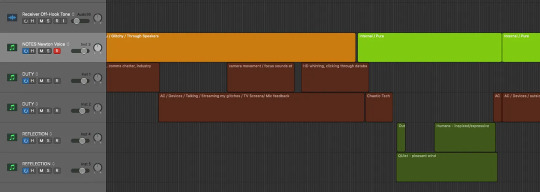
We then mapped out the timeline of the film with colour-coded slugs that tracked the two main polarities to help us plot the emotional beats of the story arc, forming a solid guide for us to follow while we worked.
A couple of weeks later, we presented our first sketch to Sean: We went big from the outset, unabashedly invoking signifiers from the sub-genre of ‘hollywood flying music’, Namely: a soaring melody, vivid chordal gestures, and rich, lush strings over a floaty waltz feel. This OTT feeling seemed to elevate Newton’s monologue into the realm of fantasy, contrasting with the cold cynicism of the office scenes.
In a previous collaboration with Sean, Lovestreams, we relished the opportunity to create an Enya-inspired, floating & ethereal ‘semi-New Agey’ score that could perform on a dual level: Being playfully ironic while legitimately tugging at heartstrings. We approached Drone with a similar sensibility.
vimeo
Sean’s response was very enthusiastic: “you guys are fucking brilliant, skillbard strikes AGAIN!!!!”. Smashed it first time!
But really all credit goes to Sean for making it easy to get right. When a filmmaker understands their message, thinks things through as thoroughly as Sean does, and takes the time to communicate so effectively with collaborators, it starts to feel like all we need to do is go away and start pressing the buttons. He had notes, of course, but nothing major, so we pressed on, fleshing out our demo and writing cues for the rest of the film, sending regular WIPs to Sean for his thoughts. We also started work on the sound elements, focusing mostly on the bombing scene to establish overall dynamics of the film, since that’s the loudest/most intense bit.
vimeo
Now we had established the musical DNA for Newton’s journey and we set about extrapolating, variating and developing outwards to set up the other cues.
EG During Newton’s death cue we rendered a sombre, minor-key variation from the core motif.
As usual, music was the most noticeable emotional & atmospheric signifier but every sound you hear was considered in terms of how it contributed to the story emotively, narratively & even conceptually. Perhaps the most obvious example is processing of the dialogue EG: a feeling of alienation was often achieved through tactical intelligibility of dialogue. It’s not always clear what Newton is trying to tell us while he’s delivering his manifesto because, ultimately, it was never heard or understood outside of creating a spectacle.
Similarly, a lot of the dialogue in Drone is heard through speakers, we’re not sure if this is something we discussed with Sean but our perception was that this was an expression of technology’s power to create distance between people. It seemed important that this is something that is felt by the audience. We did a lot of ‘reamping’ by hacking gritty, small speakers to make this talker—>listener detachment palpable.
vimeo
Once all the music was written and demoed and approved by all parties, we sent our sample-based mockups to our talented orchestrator Finn McNicholas (Midsommer, Daniel Isn’t Real, Swansong) and briefed him on how we’d like them to end up when played by the orchestra. Finn listened carefully to what we’d programmed in MIDI, transcribing it to page to achieve everything we were expressing in a way a room full of 30 people can understand and play without complication.
See the full scores for this cue here.
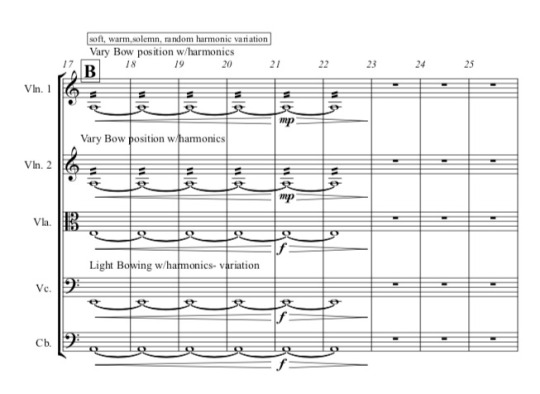
To invoke Newton’s destructive intentions, Finn helped us pin down and notate a number of ‘extended techniques’ for our orchestra to try; often ‘unmusical’ playing styles that push the instruments outside of its regular usage into more savage tones.
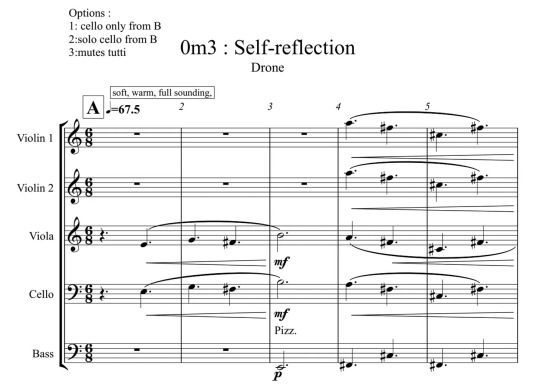
This musical thread begins during the night time cue ‘Alienation.’ Newton’s monologue describes an “interwoven fabric” while we see a spaghetti junction. We wrote a long sustained drone featuring an airy random textural movement from the string players, giving a musical sense of threads rubbing together.
Later in that cue when Newton describes the destruction he is about to bring forth while we see a field in flames, we wrote two powerfully opposing chords with a tense and nervous tremolo, going between ‘sul tasto’ (string player playing close to the neck) and ‘sul pont’(string player playing close to the bridge) to express his destructiveness and contradictory nature.
In the death scene after he crashes we hear a scratchy gnarly string articulation, Newton’s full destructiveness wrought…
When we had worked through exactly what we wanted with the orchestration, we attended and directed the session with the Budapest Art Orchestra (Queen’s Gambit, Locke & Key, Godless).
A portrait of two composers and orchestrator on the day of recording
Covid prevented us from attending the session personally—which was a shame because a pint of beer in Budapest is like £2!
vimeo
Unfortunately their live room camera fell over immediately upon starting our session so this is the best angle we have.
Hear each cue in isolation here:
13 notes
·
View notes
Note
Hey Noodle! How's life been? I was wondering a few things...if you wouldn't mind answering a couple of questions!
What kinds of landscapes do you really enjoy painting/drawing?
Are there colours you find yourself really gravitating to?
What do you reference when drawing/painting? Your own pictures? Other peoples? Real life subjects?
Favourite watercolour method?
Do you pick out the size of your canvas/paper or just grab one on a whim?
What kind of subjects draw your attention? (e.g Happy people, colourful flowers, or maybe even still life's you create yourself?)
Favourite pencils/charcoal for drawing?
Do you have any tips for younger artists getting into traditional art? Anything you wish younger you knew?
:] No pressure to answer all of these, if any, btw! Have a good one :D
Hello there :D life has been decent and I hope you've been well too!! Let's see
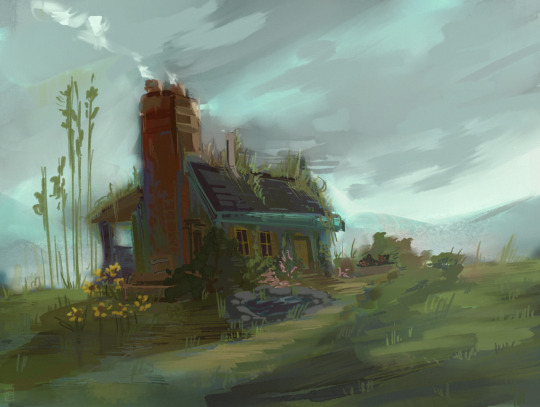
-i really like to paint very green and saturated landscapes. It can be anything from flowers to trees to mountains, I just love it when there's lots of strong colours. But I mostly like to paint landscapes that are a bit messy? It helps me be a little looser with the painting and not obssess over details, if that makes sense. I try to use techniques that give the illusion of details and depth, though i don't know if i succeed but I try lol
-at the beginning, when I started out with art, I was always quite worried about it being realistic. But after a while I now feel that real life is quite desaturated, everything in nature is a tone of grey, and absolute colours are not very common to find. So I now try to make my art as colourful as possible for it to look lively and more my style, becasue when I was aiming for realism, all my art would turn out dull and muted and I couldn't figure out why. Some colours I really use a lot are greens, all kinds really. I love all colours, but I think green is the colour I enjoy using the most these days.
-i use a lot of places to find my reference photos- pinterest, tumblr, Instagram, Google, and my mom is always sending me random pictures of clouds and landscapes and mountains too. Sometimes when I'm drawing people and I need to understand anatomy I use myself as a reference, although I don't really draw full human anatomy much, only portraits. Sometimes I use my own pictures of flowers and clouds and all that as reference too. I actually have a folder in my phone gallery for references, and I put at least 5 pictures I find in it everyday, because I'm always finding weird things to use as references. I save a lot of old paintings by classical painters too so that I can study them later, learning from the masters is the best way to learn :)
-ehh I don't really know the formal names for methods, you know? But I do like the wet on wet method, I love the look of it. I also like making clouds in watercolour, also fun hack- put down a wash of your blue watercolour, take a paper towel and blot where you want clouds to be-voila pretty clouds!!
-i just grab stuff on a whim and use whatever I feel like whenever I want and make it fit to my art, I don't really plan much, although I'm trying to do that more lol
-i actually don't have a definite favorite subject, I think it really depends on my mood, but I think most of the time I really like making simple things you know, like goats, urban sketches, simple portraits. I don't try to overthink about it, and just draw whatever I feel like. Although in portraits I really love drawing people candid lately
-i use the Staedlr pencils and Faber castle Matt black hb pencils for graphite drawing, and for charcoal pencils I use a local brand. I also have charcoal pencils from General Pencil Co. And they're really good too
-well I think one thing about traditional art is it can be expensive. So what I used to do when trying out a new medium was buy a cheap one and if I like it then get a better quality one. Also when it comes to brushes, I think it's best to buy good quality brushes. I used to buy cheap brushes and use them until they were in horrid condition and then buy new ones every few months. It wasn't a very good system, so I bought better quality brushes and learned how to take care of them and now I have had some of my brushes for years and they're still in really good condition. So learn how to take care of your art supplies!! Also do research about art mediums and supplies, so that you know what you should start with when you're trying something new and don't get overwhelmed
When trying out a new medium, don't feel bad if you don't get it at first, it takes time and the first painting will probably be muddy, but don't give up without trying your best!!
I also think that when it comes to art, it's very important to practice. So draw everything! Fill lots of sketchbooks. And not everything has to be good or perfect, it's quite cruel to expect such perfection from yourself. I still struggle with practicing regularly but it really does help.
And as I mentioned earlier, learn form the masters! Whatever art style you're trying to do or learning, studying and drawing older artworks of masters will help you a lot
thats all I can think of now, thank you so much for this ask galen, you have a good one too <3333
7 notes
·
View notes
Text
Week 6 -Digital sketching tutorial
In the previous week, we have learnt about the process of analogue sketching and this week we are extending that by going digital and creating the entire sketch digitally using Adobe Photoshop.
I have followed the provided tutorial on Moodle and essentially replicated it and changed up a few parts and did some small parts differently, and I ended up doing this in order to help me better learn this type of method, because I have used Photoshop in the past, but never quite this way and I have managed to learn a lot which will all become really helpful later.
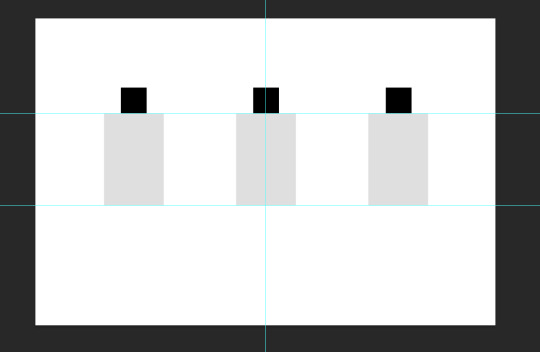
The process started by creating the canvas and on it on a new layer drawing a basic layout of where all the elements of the final image will be placed.
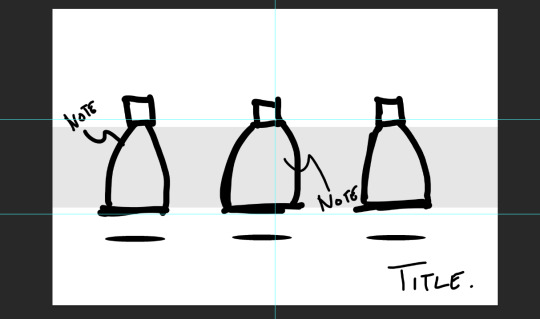
After that I constructed the basic coloured boxes which construct the bottles, and these were done to the same proportion as provided in the materials on Moodle.
After that I sculpted away at the boxes in order to get the shape of the bottles.
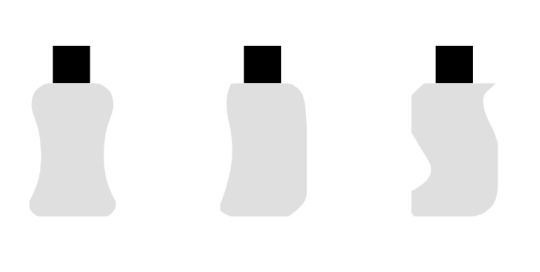
After that I added some rendering using the techniques discussed in the provided material, and the same goes with the outlines and the shadows.

After that I added the background banner and all the text in order to get the final composition. Overall the task given wasn't really difficult, because the tutorial was easy to follow and clear of what needed to be done. I had some difficulty with some of the selections, but that's only because of my nature to skip over some parts, but I eventually figured it out. I think the end result came out great, the biggest part which I changed was the pattern in the background and I also added some extra outlines at a slightly lower opacity to add to the sketchy aesthetic that we were trying to achieve.

10 notes
·
View notes
Note
7 and 15 for the artists questions thing!
7. What work of yours got more feedback than you expected?
these doodles of gimli, legolas and aragorn, I drew them so fast and the post got lots of likes, I was like REALLY lol but I am so grateful people like my designs!!!
15. Is there any new style/technique/medium you want to explore next year?
I would love to simply improve my style and my colouring especially! and draw more backgrounds. I want to try to do more proper illustrations but I also wish I will be more comfortable just posting silly doodles and sketches!
3 notes
·
View notes
Text
Reflective writing
Research skills Key areas in research that help inspire and extend my designs are from other students around me and Pinterest. Looking at other students' work and talking to them, helps me to see other areas I could try to look into for my poster designs, and by talking to them, they can give me tips to create better designs. Going on Pinterest it helps me to see a variety of really cool designs and different techniques I could be using in my designs. I also would look up YouTube videos to learn how to use the different software. I could improve my research more by talking to my teachers more so they can give a more professional look into things.
Creative Process
I tried many different design ideas. I would start by figuring out the main idea that I wanted for the poster and then I would do a quick sketch on Procreate. Procreate helps me to visualise what the final poster might look like without spending hours on one design. This process is very quick so I can get out many ideas quickly. I on occasion printed out my favourite designs and saw what they looked like in person. I would then put my favourite/ most successful designs into InDesign and play around with all the different tools. Some of my strengths that come from my design process are getting out lots of different design ideas, but my weakness is self-doubt. Because although I may be putting a lot of designs out there, I am not happy with most of them.
Decision making
How I decided to choose the theme of my posters because I wanted to make something fun and not serious. The way I did this was by picking something from my childhood. What I chose was my childhood memories at Whiritoa. I chose this because my memories of that place are very positive and also because it connects to the brief of Whiritoa being a beach in Aotearoa. One thing I found hard was deciding what words to put on my poster. I went kind of generic but I think that is okay because children have simple minds. At some points, I was stuck to come up with better ideas so I had a look on Pinterest and picked some elements from other posters and experimented with them. Since my posters are based on my memories from my childhood of a beach, I chose the colours blue and orange.
Challenges
I had many challenges going into this assignment, one was learning InDesign. It is similar but very different to Illustrator so I had to adjust to using the software. I also struggled with coming up with ideas that looked cool but were readable and clear as to what the theme was. The last poster I made I like the best but I still think I can push myself to create a better design. One insight they suggest for me for the rest of my semester is to brainstorm better. A couple of skills I need to improve is InDesign and refining my creative process.
My name is Shana Flett, and I am an 18-year-old Christian designer born and raised in Auckland, New Zealand. This year I have begun my tertiary education at Auckland University of Technology, studying a Bachelor of Design, majoring in Communication Design. I chose to start this degree because it will help me broaden my design knowledge and skills.
0 notes
Text
How To Use Watercolor Pencils Professionally
Have you ever tried painting with watercolour pencils? If not, it's your sign to do it today. The art industry has been through a significant evolution. From the time of cave painting, we can leverage even I in our creations today. This progress urges you to try something different to see what more you can create. Watercolour pencils are one such phenomenal product that should be discussed more. Today, through this blog, we will introduce you to some of the best brands and how to use watercolour pencils professionally, so stay tuned!
What Are Watercolour Pencils?
You might have yet to hear about watercolour pencils because they are relatively new for most of us. However, to draw watercolour art, you must know precisely what this product is. Pencils are a hybrid medium that combines the precision of coloured pencils with the versatility of these colours. The best part of using these colours is that they give a proper finish and give you control over your drawing. It comes in pencil form and is highly pigmented with water-soluble pigments encased in a wooden barrel. Using artist-quality watercolour pencils for drawing has several benefits. It allows for precise and controlled application, which ultimately supports you in fine-line working.
You can also control the intensity of colour washes by varying the amount of water applied. This control is particularly beneficial for achieving gradients and subtle transitions in artwork. Unlike traditional watercolours, these pencils allow easier corrections that help us draw well. Mistakes can be lifted or adjusted with a damp brush or paper towel before the pigments are fully set. Creative pencils can be used on various surfaces beyond watercolour paper, including mixed-media paper, canvas, and even wood, offering artists flexibility in their choice of canvas. Above all, it is highly convenient to carry them anywhere.
These benefits make it a popular and go-getter product for artists. Ultimately, it has become a favourite medium for exploring new artwork techniques. Still, some newcomers need to learn the methods to use it. Knowing it will help you attain the maximum out of it.
How to Use Watercolour Pencils?
Using watercolour pencils is very easy if you know the right steps to apply. Here are some easy steps that can make your artwork smooth:
1. Use it to sketch your drawing lightly on the paper. The lines will dissolve when water is added, so keep the sketch light and easy to blend.
2. Start adding colour to your drawing with this. Apply light pressure for a golden colour and more pressure for darker tones. Layer different colours for depth and dimension.
3. Use a wet brush to go over the pencil marks. You can wet the paper first and then apply the pencil for a softer look, or apply the pencil and then use a wet brush for more defined lines. Experiment with both techniques to see what works best for your artwork.
4. You can create gradients by applying more colour in some areas and then blending them with a damp brush for a smooth transition. Also, try lifting the colour with a clean, wet brush or paper towel to create highlights.
5. After the initial layers dry, add more colour or details. This allows for layering, so build up the colours gradually to achieve the desired effect.
6. Don't hesitate to experiment with techniques like dry brushing, splattering, or using a dry pencil on wet paper for different textures and effects.
7. Allow your artwork to dry completely before adding more layers or details to prevent smudging or unwanted blending.
Things To Remember While Buying A Watercolour Pencil
Now that you know the benefits and application of watercolour pencils, it's time to understand how you should buy them. Don’t buy anything without analysing if you seek a professional result from your watercolour pencils. It's also a good idea to start with a smaller set or try out a few individual pencils before investing in a more extensive collection to ensure they suit your style and techniques. One thing which you should always strive for is the quality of watercolour pencils. Look for reputable brands known for their art supplies. You should especially look for five major features while purchasing watercolour pencils, which are:
1. Lightfastness: Lightfastness indicates how resistant the colours are to fading over time when exposed to light. Look for pencils with high lightfastness ratings if you want your artwork to last.
2. Water Solubility: Some pencils activate more easily with water than others. Test a few colours to see how well they dissolve and blend with water.
3. Core Size and Hardness: Consider the core size and hardness options. Larger cores offer more coverage, while more complex cores might be preferred for fine details.
4. Colour Range: Evaluate the colour selection available in the set. Some sets offer a wide range of colours, while others might have more limited options. Choose based on your preferred palette.
5. Reviews: Look for reviews or recommendations from artists using the pencils. Their experiences can offer valuable insights into the performance and quality of the pencils.
If you don’t know any good brands with all these five features and more, we have some suggestions for you. Caran d'Ache Supracolor Soft Pencil | Neocolor II Crayons and Derwent Watercolour | Inktense Pencils are the most demanding brand products. They have made the finest quality watercolour pencils. These pencils have high pigment concentration for vibrant colours. Lower-quality pencils have weaker pigments that don't blend or layer well. Moreover, you don’t have to wander around to buy them. You can order them online by sitting at your home from King's Framing & Art Gallery. Grab the best deals, discounts and various options to bring the best on canvas here.
Final Thought
So, that's the scoop on watercolour pencils – having this product enhances your experience of creating art. It is undoubtedly a ticket to a colourful adventure. Whether you're an experienced artist or a newcomer, King's Framing & Art Gallery has your back. It's like having a friend that brings out the best in your drawings. So, what are you waiting for? Grab your pencils, dive into the world of creativity, and let the magic begin! Your masterpiece is just a pencil stroke away.
Place your order now for your favourite craft product! Enjoy the convenience of home delivery. For any questions, please email us or reach out through our website.
FAQ
Ques.1 Can I use this for detailed work?
Ans. Watercolour pencils are perfect for intricate and detailed artwork.
Ques.2 Can I use this with other mediums?
Ans. Yes, watercolour pencils can be seamlessly combined with various other artistic mediums.
Ques.3 Do I need special paper for these watercolour pencils?
Ans. It is recommended to use watercolour paper or heavy mixed-media paper for optimal results.
0 notes
Last Seen Blogs
blartlover
525,600 Paul Blarts
shit666post
Letters To Myself

chisaeve
in order to make everyone in the world happy!

canna-bliss
Untitled