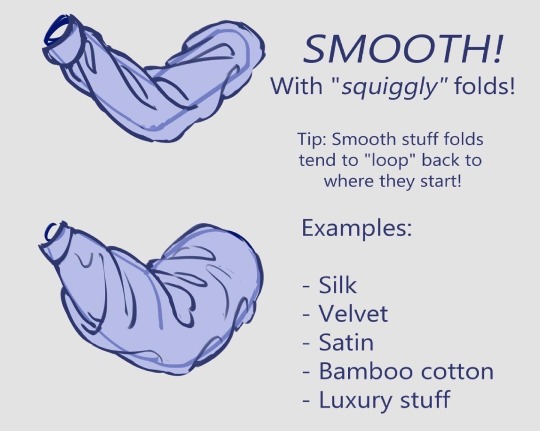
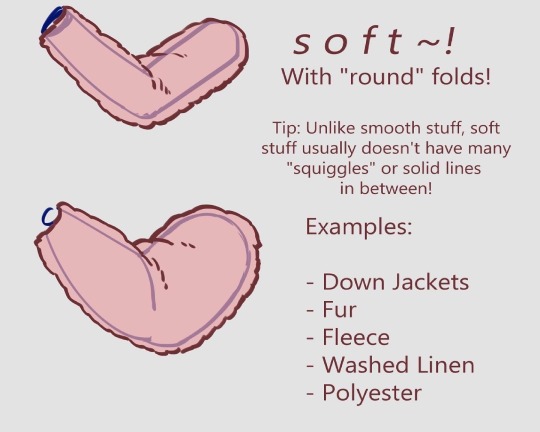
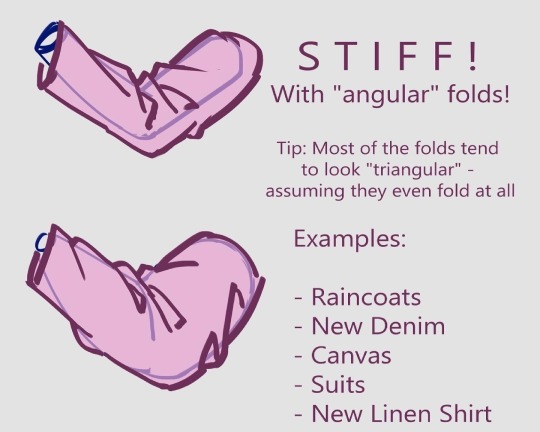
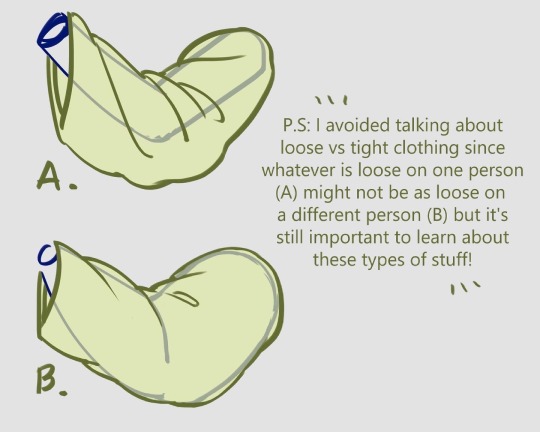
#clothes tutorial
Text
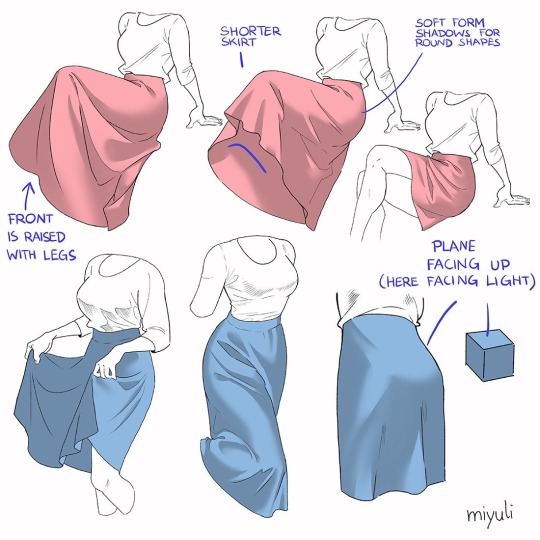
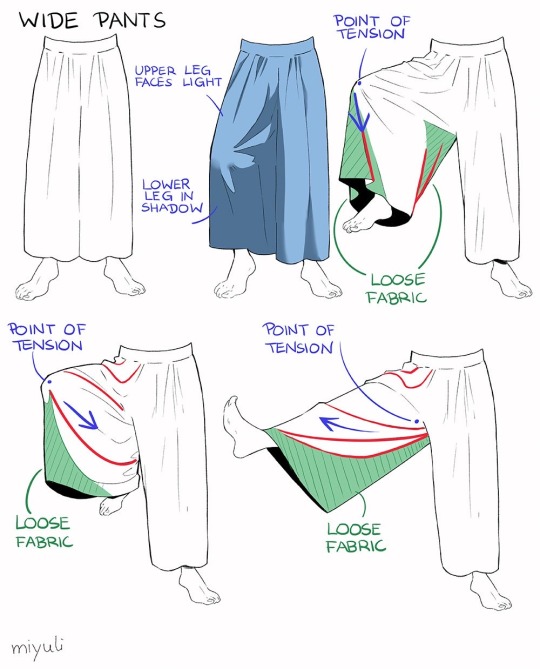
“Notes on skirts and pants”
Source: miyuli on twitter
#art tutorial#digital art#art reference#tutorial#art tips#drawing tips#drawing clothes#drawing pants#drawing skirts#drawing cloth#clothes#pants#skirts#clothing folds#clothing tutorial
47K notes
·
View notes
Text
I forgot I have to be active here so here’s my Twitter tutorial on how to draw folds I made a while back to help a friend!


160K notes
·
View notes
Text
Art Help

I redid this list because broken links 💀
General Tips
Stretch your fingers and hands
Art is for fun
Never too late to start/improve
Tumblr radar! Submit your work!?
Using a tablet
Editing software: pictures & video
Moodboard resources
Comic pacing
Storyboarding techniques
Watercolor
Coloring
Color Theory (not children's hospital)
Gemstone reference
Resources: coloring things a different color
Gold
Dark Skin undertones
Dark Skin in pastel art
POC Blush tones
Eyes colors
Cohesive Color Palette
Lights and Colors
Human Anatomy
POSE REFERENCES
Eyes: pupil shape, direction
Wizard Battle poses
Romance poses
Shoulders
Tips for practicing anatomy
Proportional Limbs
Skeletons
Hair Directions
Afro, 4C hair
Cane use
Dingle dongles: male reproductive
Clothing
Long skirts
Traditional Chinese Hanfu (clothing reference)
Cultural clothes
CLOTHING REFERENCE
Medieval armor
Sewing information
Animals
Horse -> Dragon
Snouts: dogs, cats, wolves, fox
Foot, paw, hoof
Plants
Blossoms: cherry, plum, apricot, etc
Plants/flowers: North America, Hawaii, Patagonia
More
Drawing references sources
More references: floorplanner, height & weight, expressions, hands, animals, sculpting tool
Art tutorial Masterlist
Another art tutorial Masterlist
Inspiration: father recreates son's art
Inspiration: Lights
ART BOOKS
Art Cheats
#art tips#art tutorial#art references#pose reference#art masterlist#clothing art#art clothing#digital art#watercolor#poc#art
41K notes
·
View notes
Text
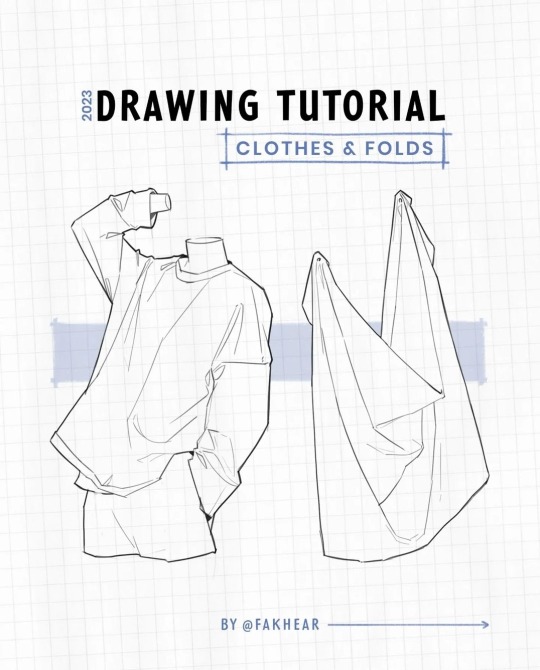
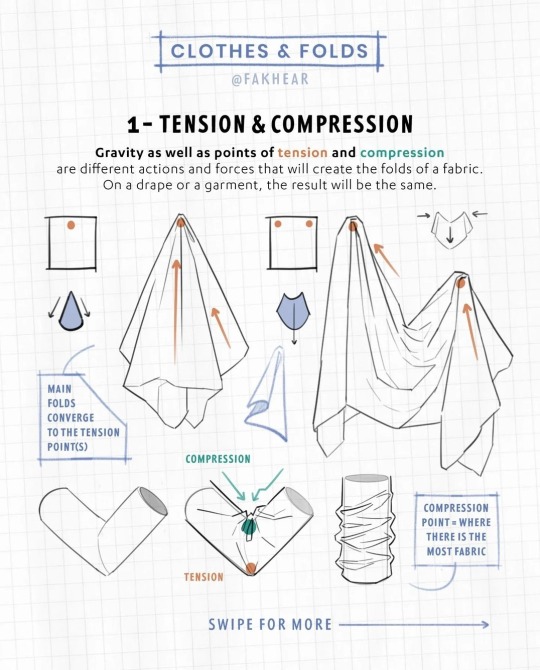

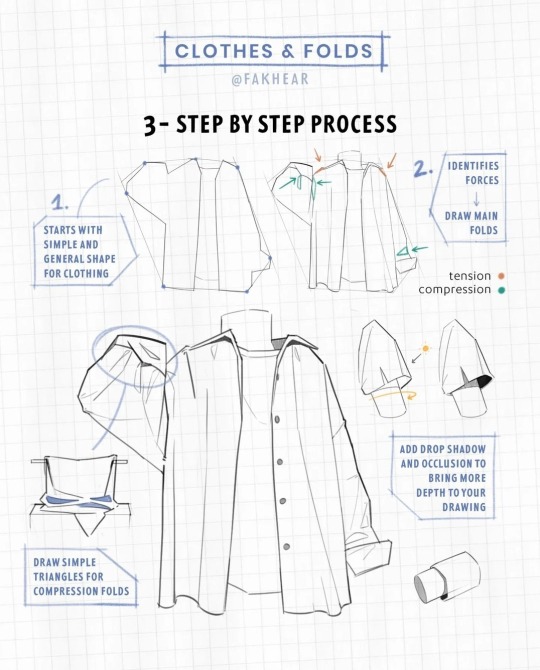
Clothes and Folds Tutorial by fakhear
Support the artist and visit their Etsy!
16K notes
·
View notes
Text
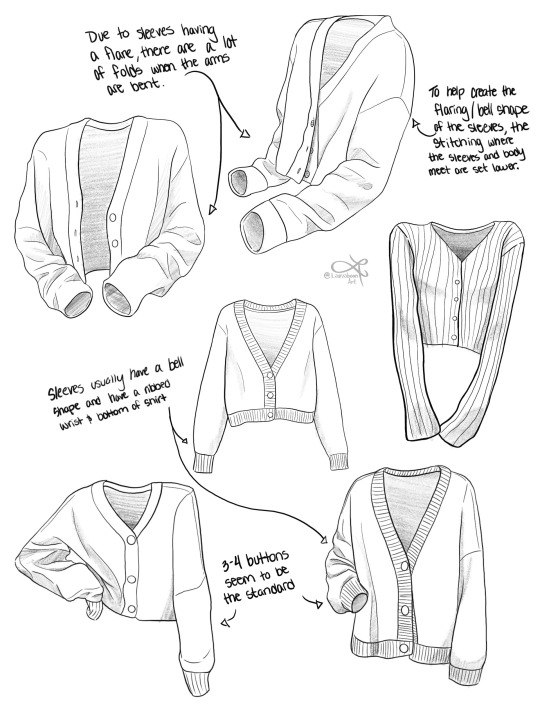
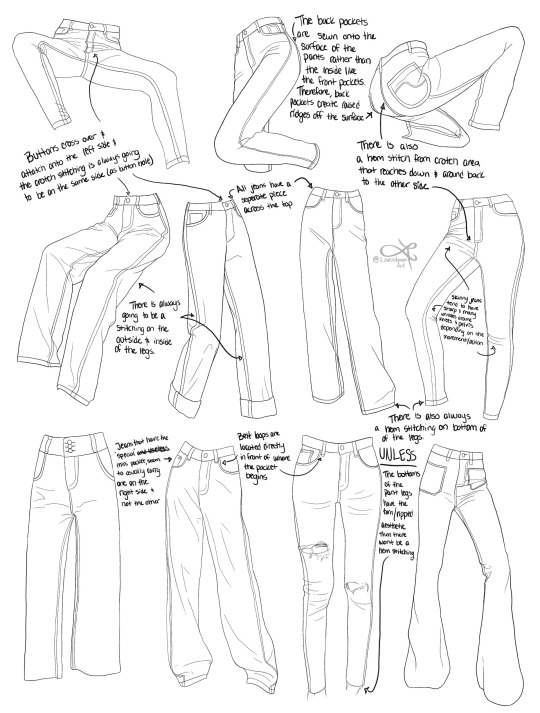
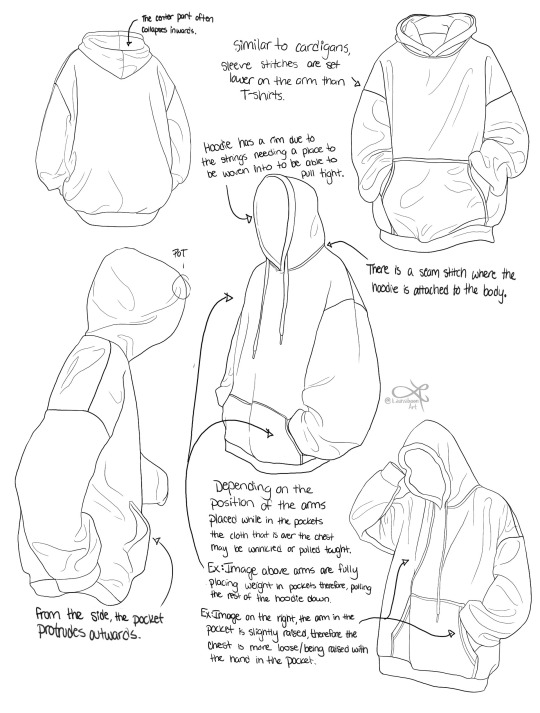
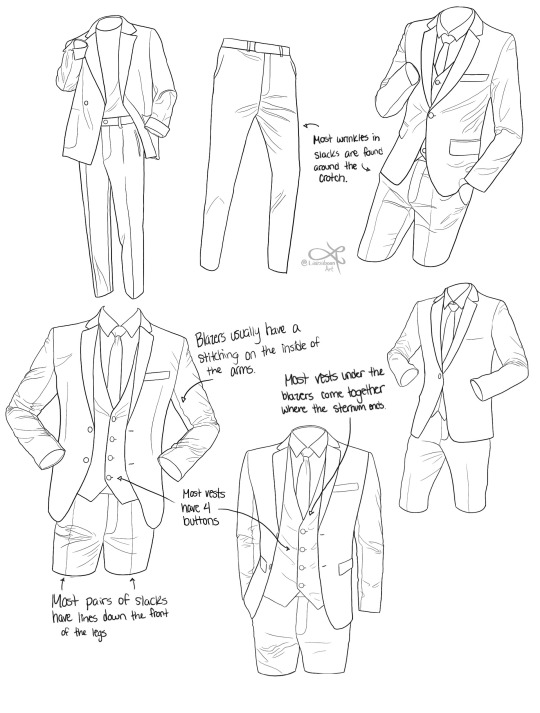
I'm currently doing an online art school program and I thought I'd share some notes on clothing pieces for anyone else whose like me and for some reason can't understand objects with free from lol I hope you find some of these observations/ notes useful for any of your art journeys!
#art reference#reference#art tutorial#art tips#art resources#art advice#drawing tips#drawing reference#clothing reference#how to draw clothes#drawing#how to draw#drawing tutorial#art education#art help#clothing#fashion drawing#art school#artists on tumblr#art community#art study
19K notes
·
View notes
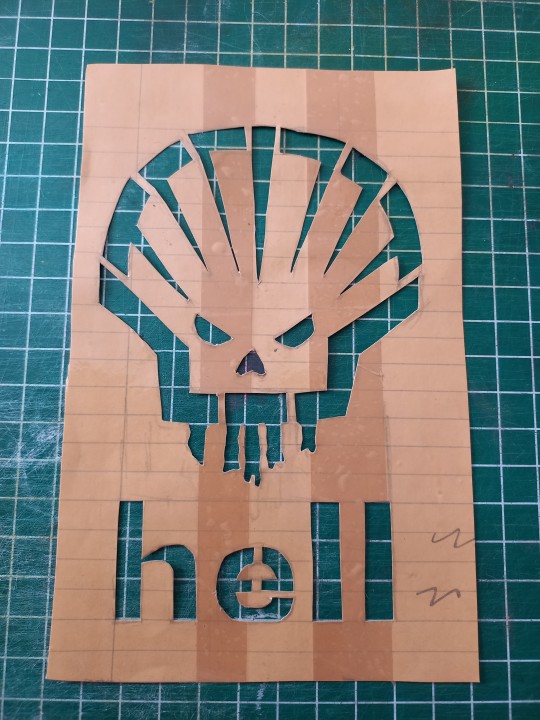
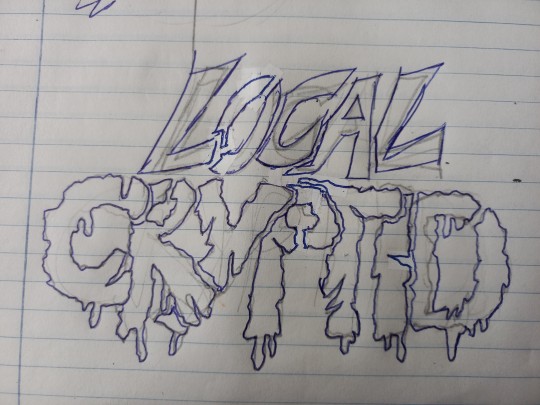
Note
Patch making tutorials?
and here i am once again, with a patch making tutorial
how to make stenciled patches:
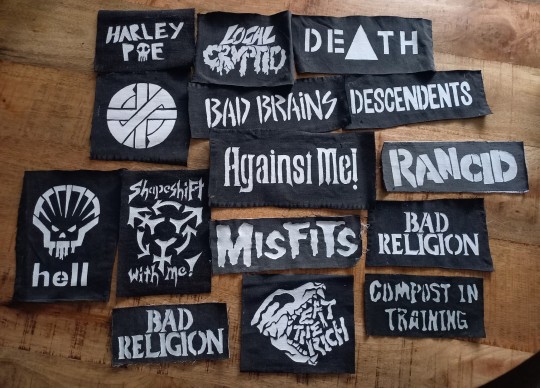
i'll post a part two in the future which will cover freehanding and stamping ur patches
-
first some general info that might be useful:
i get my patch design inspo from pinterest, etsy, and tumblr. if sell your patches make sure you arent ripping off another artists patch design when using etsy for inspo. anarchostencilism also has tons of stencils both on deviantart and reddit which are free to use.
i use acrylic paint for my patches, but if you can afford it id advise fabric paint. to seal paint into the fabric iron the patches, it helps em last longer. some acrylic paint survives very well in the washing machine, but wash your stuff by hand the first time to see how well it holds up.
if you make your patches multiple colors, dont first make the whole patch one color and then paint over it with the other colors. if the paint starts cracking the base color will show through. (if you like that however then dont mind this)
i paint my patches on jean fabric, cause it makes the patches sturdy yet flexible. but shirt fabric or canvas both work very well too. anything except really plasticy/slippery or textured fabric can be used
i pin my patches down with pins onto multiple layers of taped together cartboard, to prevent the fabric from moving around and distorting the print
-
there's two ways in which i make my stencils
1. with paper covered in tape
2. with the plastic folder you put in your binders
-
option 1:
draw out your design onto some paper, make sure there arent any "loose" parts in the design that will get lost when cutting out the stencil

cover the paper in tape front and back, make sure you can still see your design through the tape
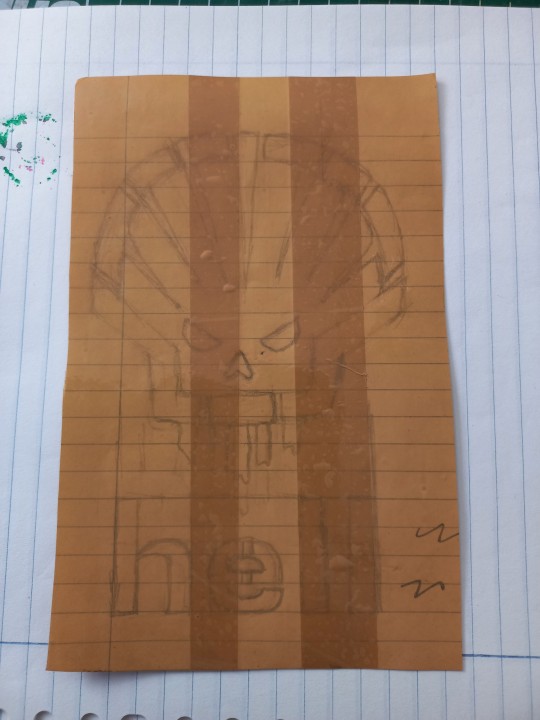
cut out your design, i use scissors and an exacto knife
-
option 2:
draw out your design (you can also draw the design directly onto the plastic folder)
cut a piece of plastic out of the folder big enough to cover your drawing and tape it down.
trace the design onto the plastic with pen or marker (any mistakes can be wiped out)
cut out your stencil
-
continuation from both option 1 and 2
after finishing your stencil you can pin them down on some fabric
dap on your paint with the point of a big brush or a sponge, depending on the paint it'll take 2-3 layers.
make sure your previous layer dried completely before adding the next one

after the paint has fully dried you can carefully take off your stencil.
!!dont unpin the patch before it fully dried, or the drying paint may cause the fabric to warp!!

thats it, questions are always welcome, now go and make stuff!!
#punk diy#diy fashion#punk#queer punk#diy punk#punk clothes#punk style#punk patches#patches#tutorial#my stuff
2K notes
·
View notes
Text
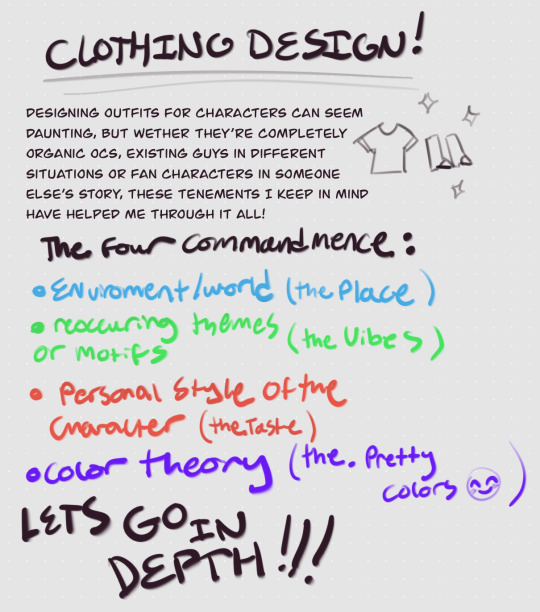
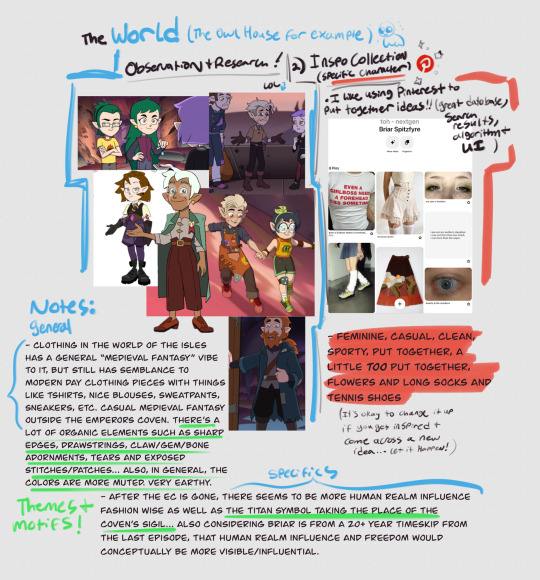

I’m really not sure why this took me a week but here’s a little tutorial on how I design clothes for characters ??? I hope it’s somewhat comprehensive, making tutorials can be hard for me because I have so much to say LOL
While I used a preexisting show in this example, this method can really be applied to any oc universe or story as long as you establish the basics :]
#my art#art tutorial#character design#clothing design#the owl house#toh#color theory#toh nextgen#Briar Spitzfyre#brischa
641 notes
·
View notes
Text
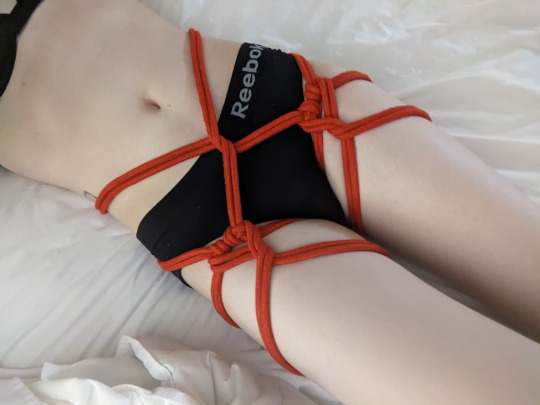
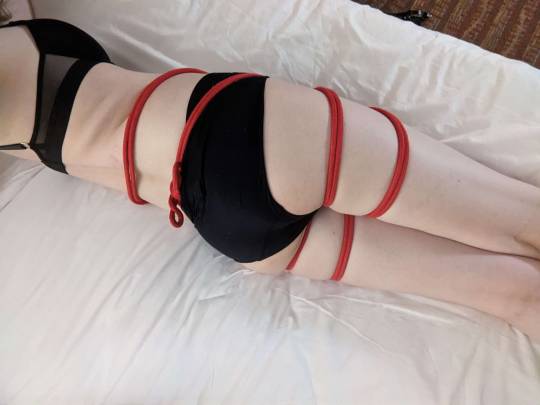
Heart Thigh Garter
We found this lovely tie on @kinkyfemqueer's blog, the tutorial can be found here alongside our other resources.
We used a 30ft length of rope but weren't able to finish the last few ties around back to secure it all, so it might be smart to use a 50ft length if you follow the tutorial.
I love how this felt, nice and snug hugging my hips without being too tight anywhere. It shifted easily with my movement and felt nice to tug on. Plus the hears are absolutely adorable.
It is going to be super fun to revisit this with a prettier set of clothes to match.

#shibari#ropeart#black and red#has tutorial#heart tie#hip harness#red rope#black clothes#first thoughts
568 notes
·
View notes
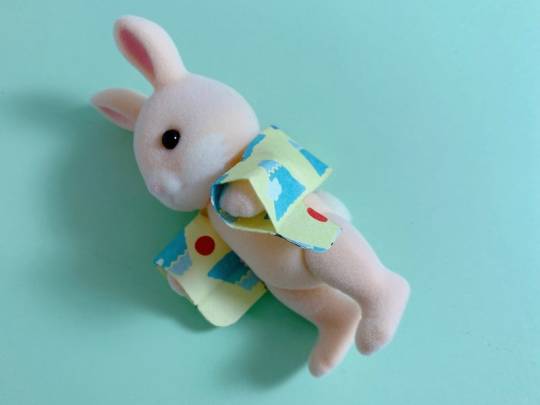
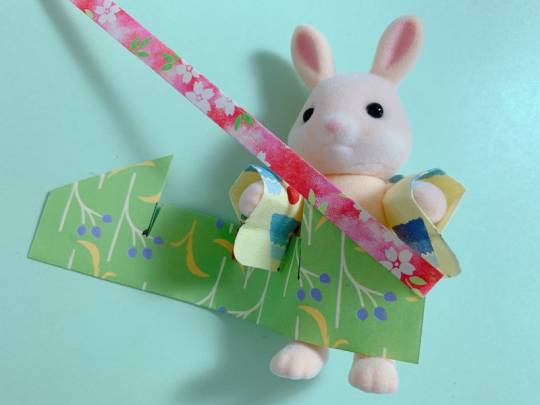
Photo
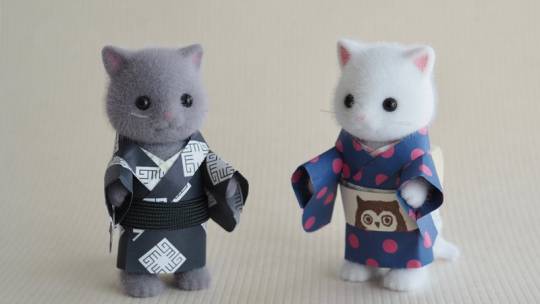

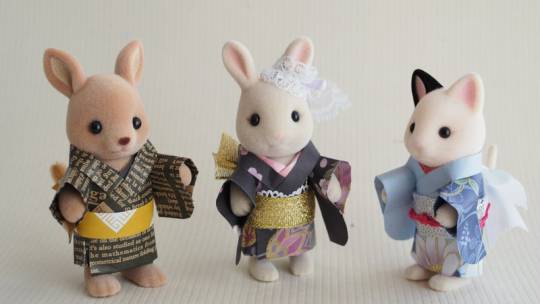
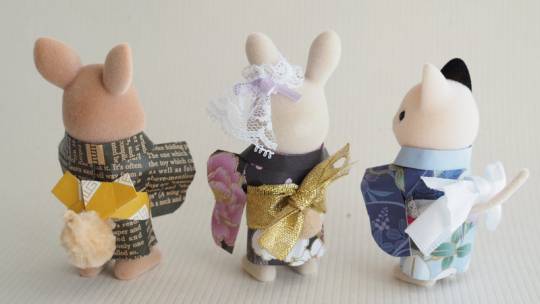
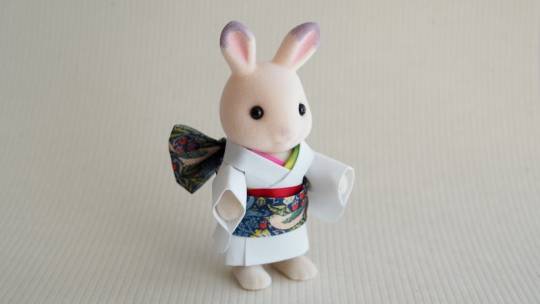
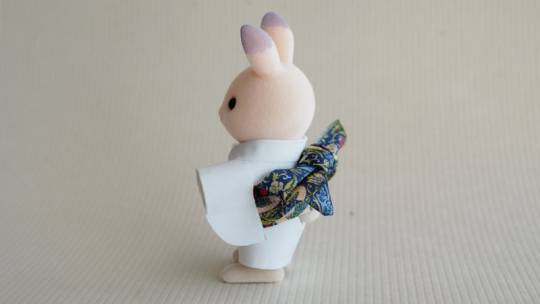
Adorable papercraft/pepakura kimono made for Sylvanian Families (Calico Critters) figurines. Patterned origami paper is cut to form 3 different pieces (top, bottom, collar). You’ll find the measurements and step by step on OP’s website (example below is found here):
#japan#art#craft#sylvanian families#doll#figurine#doll clothes#calico critters#kimono#paper kimono#papercraft#pepakura#diy#step by step#tutorial#着物
1K notes
·
View notes
Note
hi! I ADORE your art sm, and was wondering if you had, like, a ref sheet for zuko? im trying to figure out how to draw him :-)
thank youuu! and i did not have one but lucky for you i’m going Thru It (the artblock) and i’m prAYING that doodling zuko will cure it. i hope u can find this helpful too lol


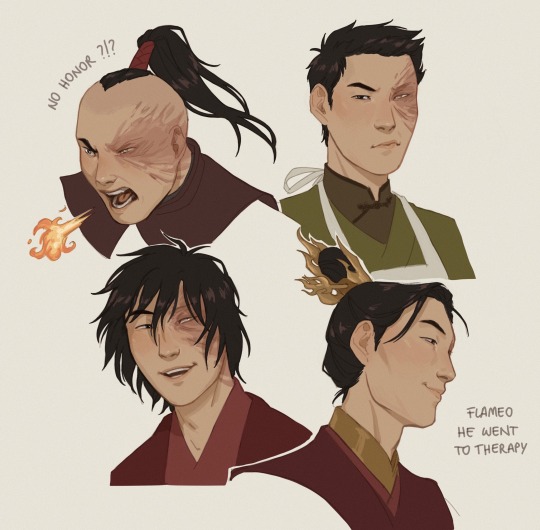
#id in alt text#my son my scrinklo scrimblo my one and only my rotten soldier my sweet cheese#learning the hard way that silly little portraits wit kinda monotonous expressions are my comfort zone hehe#im also working on the clothing tutorial for the other anon it just uhm. might take a bit#trying to break down my art process is DIFFICULT lads idk what i’m doing all of the time i’m serious#zuko#my art#ash replies#ask#also side note. this is the first time i drew ponytail zuko and u know what i take back everything i ever said about that hairstyle#its amazing it’s bold it’s a statement s1 zuko ur a misunderstood fashion icon#ahead of your time
3K notes
·
View notes
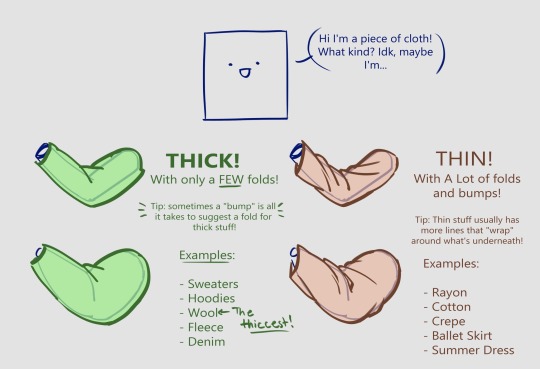
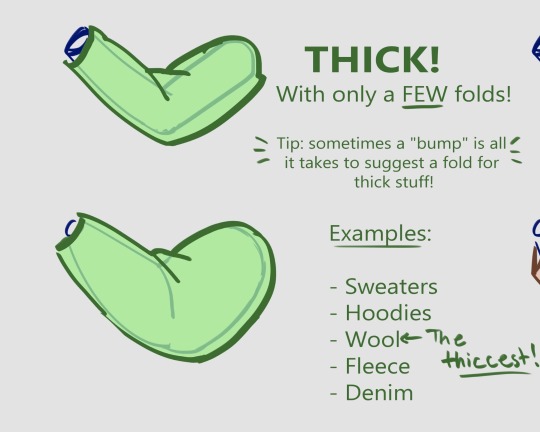
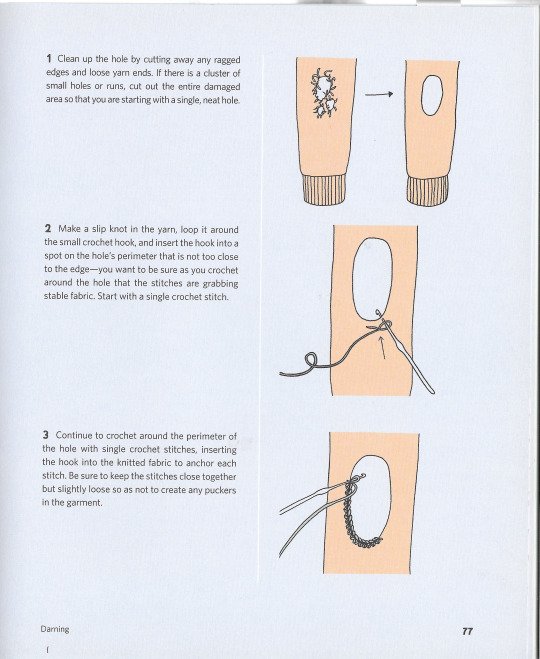
Text
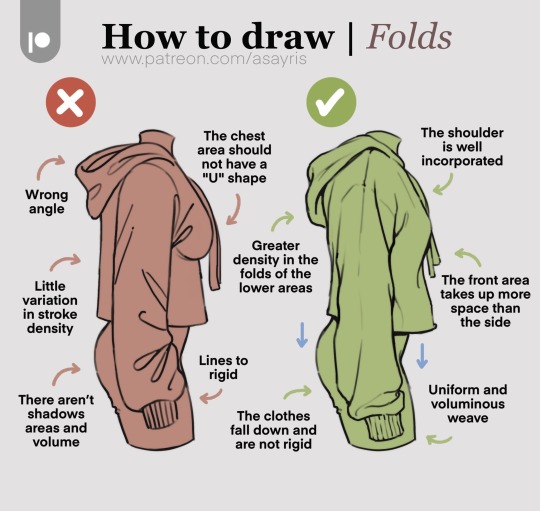
“How to draw folds ✍🏻👕✨”
Source: asayris_art on Twitter and patreon
#art tutorial#digital art#art reference#tutorial#how to draw folds#drawing clothes#cloth#drawing folds#drawing tips#art tips
1K notes
·
View notes
Text

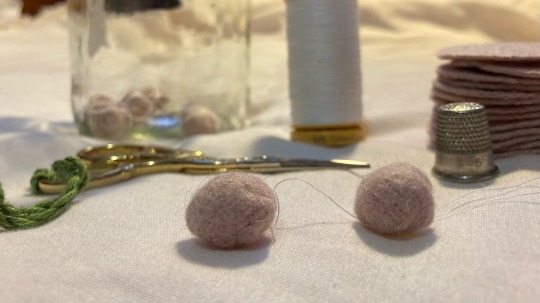
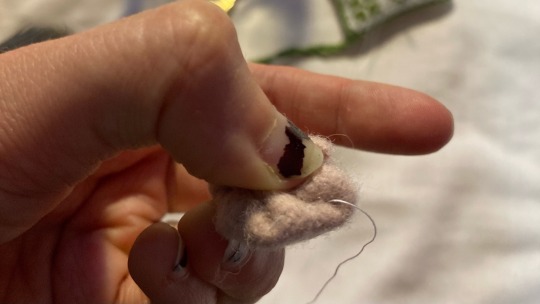
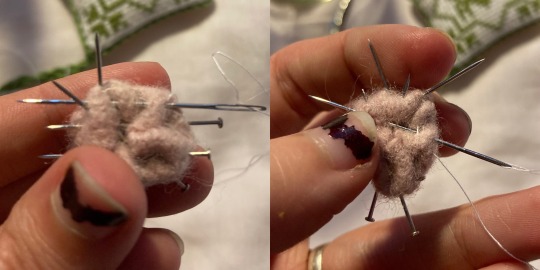
Crochet Patching
from Mending Life: a Handbook for Repairing Clothes and Hearts by Nina and Sonya Montenegro
#crochet#crocheting#crocheting tutorial#clothing repair#visible mending#mending clothes#patches#reference
929 notes
·
View notes
Text
How To Make Medieval Fabric Buttons
You will need:
• fabric (I’m using a medium weight wool)
• a sewing needle
• cotton or silk thread (it MUST be strong)
• a thimble
• dressmakers pins
Using this style of button as a fastening technique was very prevalent in 14th century Europe, on both men’s and women’s clothing. It was used for anything from sleeves and openings on the front of garments, to the iconic liripipe hoods (which is what these are gonna be for!).
They were usually made out of leftover fabric from the same material that was used for the garment they were intended for. As well as using every scrap of material possible, they also save you from having to buy metal buttons, which… aren’t cheap (both now and then).
The trade off is of course having to make them, which can be a painful process (literally - try not to get stabbed by the hedgehog ball at step 4!!). I thoroughly recommend a thimble to push the needle through as you form the ball - this is hard enough without having to pull it through.
Making buttons in my experience is 10% knowledge, 60% spite, and 30% hatred. It is a contest of wills between you (who wants a button) and the fabric (who doesn’t want to be a button). I wish you luck soldier.

To start with, cut a circle out of your fabric. How big will depend on what fabric you use - if it’s linen, you’d cut a larger circle than you would for wool. Mine is about 30mm.
Using a long long thread, bind on and then sew running stitches around the outside, about 5mm from the edge (may vary with fabric).
Pull this thread tight like a pouch, and turn the raw edges inwards in one direction. Try and tuck them inside the “bag” section. It will likely be more of a squashed oval at this point than a sphere.

Now, get your dressmakers pins and go absolutely ham. Continue to squish it “inward” (towards where the opening was) as you pin. The button should now resemble a very unfriendly little creature now (good luck with not getting stabbed, it can be a bit of a prick).
Next, basically use your needle to try and get it to stay in that shape. I usually do a bunch of stitches around the edge of the “back” end, and then spend some time criss-crossing the back. Try and put your needle in close to where it came out, so that you don’t get long pieces of visible thread.
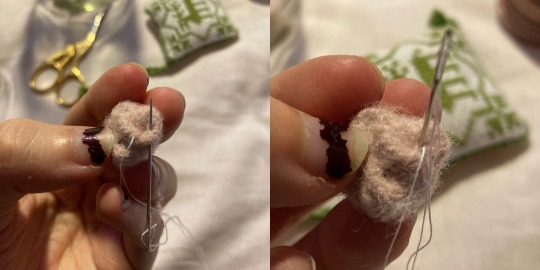
Once you are confident that it will hold A Shape ™ (but also isn’t so stabbed that you can’t refine it further!), remove the pins. Your button will most likely resemble a little tiny messy wool brain at this point, but that’s ok!
The next step is to use your needle and thread to continue tucking the ball inwards to the centre of where the opening was. Above illustrates how I’ll flip the open part of a fold inward, by coming up through the fold and then levering it downwards so it gets tucked away. You can also just use the thread to pull errant folds inwards. Use the hand holding the button to squash it into form, and then sew it into place.
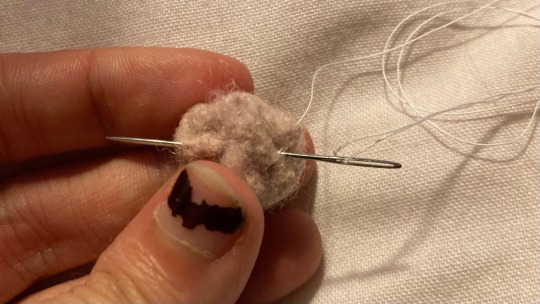
Once the button is actually a ball shape, crisscross the back of it a bit so that everything is firmly held in place. It should now (all things going well!!) actually be a sphere.

Once you’re happy with the shape and firmness, take your thread to stem out of the centre back. Bind off, and then slide the needle off the thread, leaving the long end. This can then be used to sew the button onto the garment.
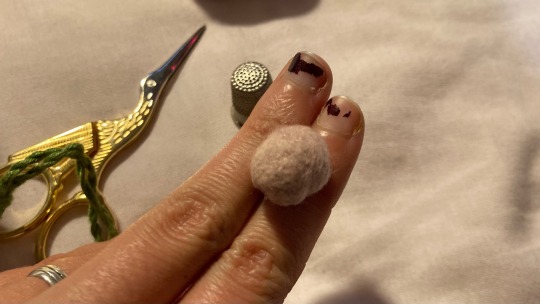
The back will still be somewhat messy, but the front should be smooth, and the whole shape roughly spherical. When the button is sewn on using the remainder of the thread, you won’t be able to see the back!
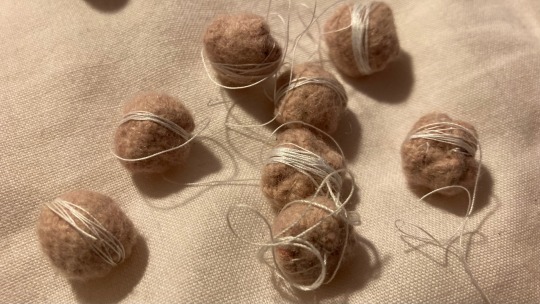
I wrap the remainder of the thread around the finished button so it won’t get tangled, and then pop it in a jar with the rest while it waits to be sewn onto the garment.
Good luck with your crafting! Feel free to ask any questions in the notes, or straight into my inbox :)
#sewing#tutorial#medieval#medieval reenactment#medieval clothing#medieval costume#historical fashion#historical costuming#medievalcore#14th century#buttons#crafting#diy#i’ll be on my merry way now#I have…… sO many of these to do#truly pain torture and misery hours over here
520 notes
·
View notes
Text
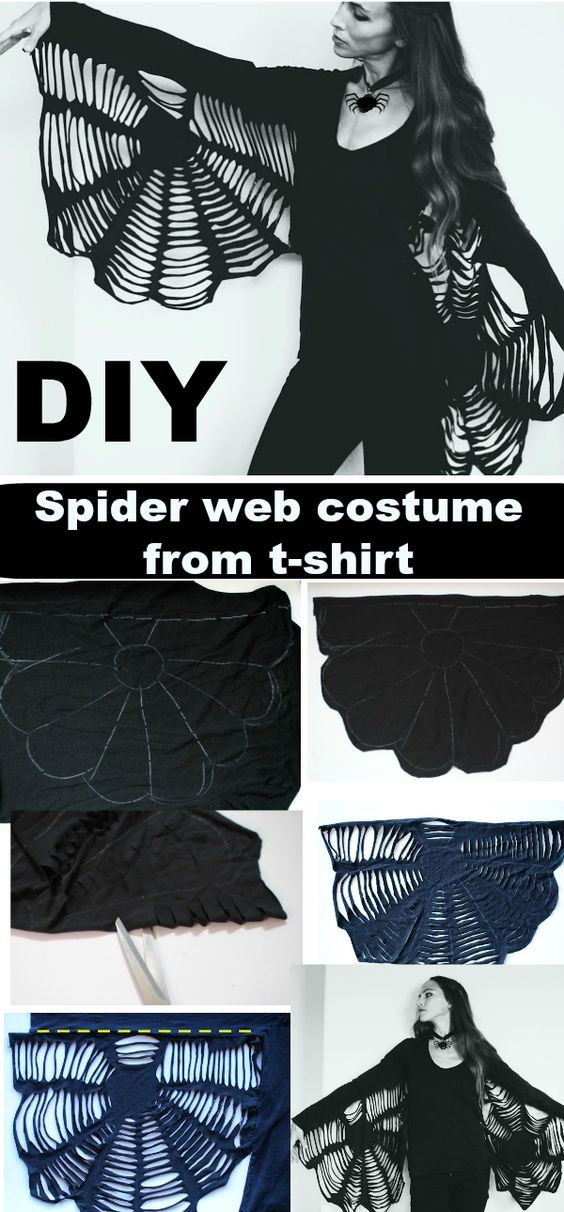
Source: Pinterest, TrashToCouture
(Sidenote: her blog also has some interesting tutorials for goth/alt-adjacent clothes, like this lace choker or a lace slip dress)
#darkcomforts#gothic#goth aesthetic#goth#romantic goth#aesthetic#diy#diy clothing#thrift flip#alt diy#alt clothing#spider web#halloween#spooky season#diy inspiration#diy tutorial#sewing#handmade#crafting#crafts#arts and crafts#goth diy#gothic diy
450 notes
·
View notes
Text
How to draw clothing material folds, creases, tension points and depth
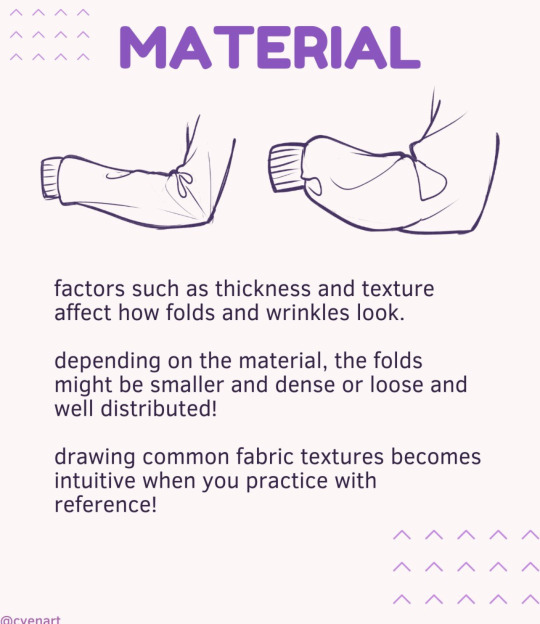
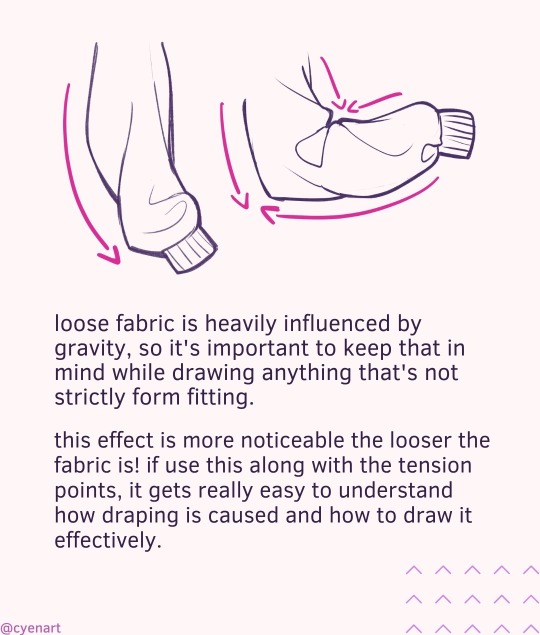
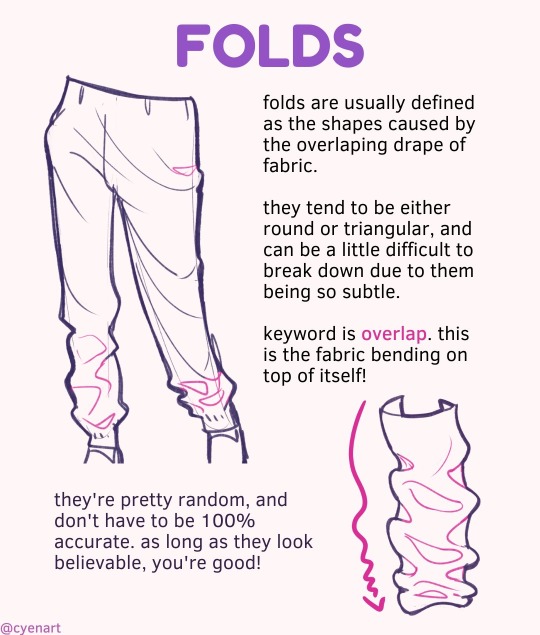
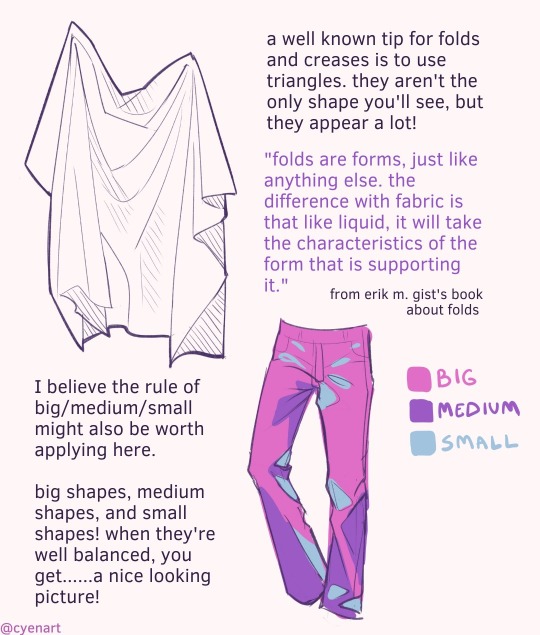
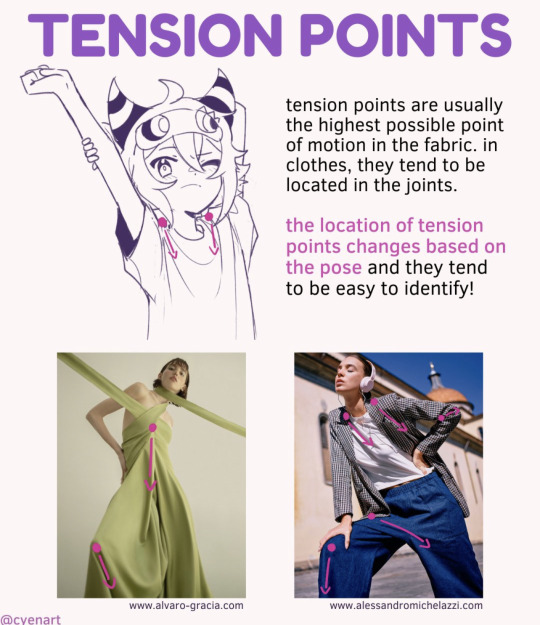

Credit: Cvenart
#random tip#random tips#tip#clothing#cloth#material#fabric#folds#creases#tension#top#shirt#pants#costume#accessories#art tutorial#art tip#drawing tip#art tips#art tutorials#drawing#drawing tips#drawing tutorial#drawing tutorials#art#clothes#outfit
464 notes
·
View notes
Note
Do you have a tutorial for the denim choker and/or the bat keyholder you made?? They're so cool :0
a tutorial on how to make chokers from some old pants!!


you will need:
-some old jeans
-a button
-strong thread, for these i used emboidery thread
-spikes and/or other decorative stuff you wanna put on the choker
-scissors
-pliers
-sewing needle
-seam ripper or small scissors
•
first get your pair of pants, and cut of the waistband. you can remove the belt hoops with seamrippers (or keep em and sew them on as extra decoration) i always use the part with the buttonhole, it saves on sewing
the band should be a large enough to wrap around your neck plus some extra space


measure and draw on where your button will be placed (on the end where the buttonhole is not) then about 5cm from there, make a small cut in the band and fold the ends in, press together and sew closed. there should be around 2-3 cm of band left next to where youre gonna attach the button (where i drew the white line)


time to gut em!! open the seams on one side (not fully till the ends) and attach your spikes, this prevents the point or screws from pressing/poking into your skin. (i made this part the next day hence the lighting change)
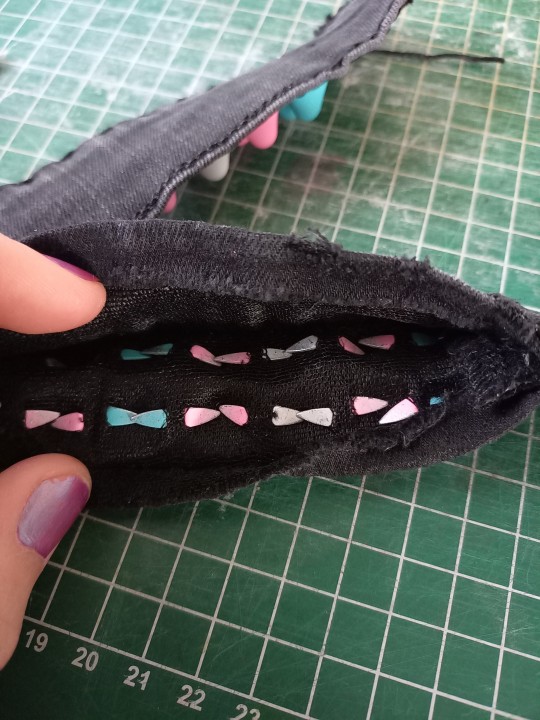
sew em back up and attach your button
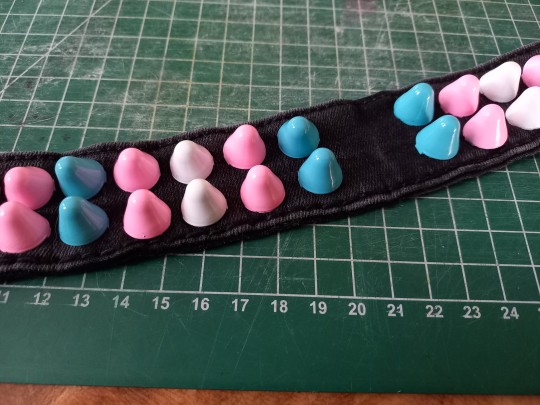

i added an eyelet so i could attach charms to the choker, but you can also attach chains, soda tabs, embroidery or whatever on there. after that youre done! you can also use this exact method to make cuffs, just make the band shorter.
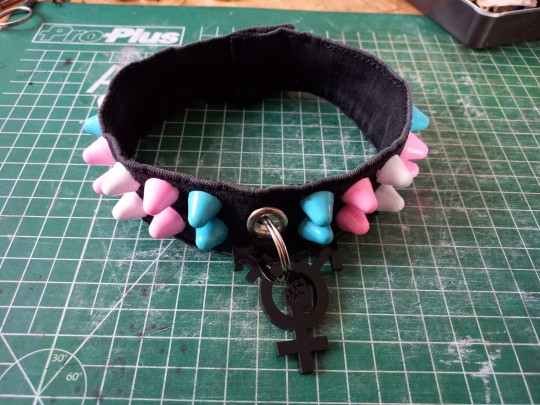
#punk diy#diy fashion#diy punk#punk clothes#punk style#queer punk#tutorial#my stuff#queercore#punk#punx
466 notes
·
View notes
Last Seen Blogs
profeprez
ProfePrez

angyfrancy
Francesco Praino
sunspray-peak
Sunspray Peak

libraheart
Elena
bl00dycorpze
♱ Maverick ♱