#so i don't remember the source
Text
Jazz wasn't crazy. People might argue that burning her childhood home to the ground with her parents still inside would be an indicator of insanity. But how else was she supposed to react after coming back home from college to find out her parents had brutally killed her brother via vivisection?
Dying her hair blonde wasn't crazy either before anyone asked. Plenty of girls dyed their hair when they needed a change. Besides, she could never live with herself if she kept the same hair color as that vile woman.
Admittedly Jazz would have to secede moving to Gotham had been a little crazy but it was the perfect place to start fresh and blend in despite her "quirks". She had even picked out a nice new identity for herself.
Clearly Jazz was not crazy as she had managed to land a job at Arkham Asylum as a psychiatrist. If she were really insane would they have ever hired her? No they wouldn't have.
Jazz was not crazy. She was very much sane. Just like her precious Mr. J.
#dp x dc#dc x dp#dpxdc#dcxdp#hyper prompts#winter's tales#not sure which one this fits under more#surprise! jazz is harley quinn#do not ask me how my brain concocted this for i truly have no idea#i was merely as vessel for my own crazy thoughts in this case#btw y'all i tried to look up whether harley was a psychologist or a psychiatrist because i couldn't remember#and i got conflicting answers#i think the general consensus is she's a psychiatrist who acts like a psychologist#because most writers don't know the difference#and by general consensus i mean i saw a total of one source that had that opinion#but it makes the most sense to me so i'm running with it#the same source (reddit) as theorized that she's a double major#which also makes sense because even in her origins she's studying psychology#but she's also going to med school!?#hello??#you don't even need to be an expert or anything#just open a dictionary!#look it up on google!#something!#anywho#her job switches depending on the era comic run writer etc#you know basic comic book shenanigans#sorry for the rant y'all#it was just so mind boggling that it actually became a little funny#so i thought i'd share
935 notes
·
View notes
Text
Evening Dust
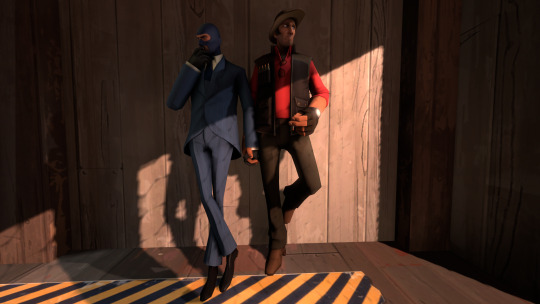
I've got a dozen Heavy / Medic SFM wips lined up, but I wanted my first posted render to be a tribute to the ship I was obsessed with when I got into TF2 6 years ago <3
Alt Shots, process, and sources here
#take this away from me before I hate it again lol#sniperspy#SFM#source filmmaker#my stuff#sniperxspy#I've been away too long i don't remember what their weird shipname is#tf2#team fortress 2#second is because tu*blr mobile handle 16:9 poorly go figure#I've decided to be slightly normal and not post my unnecessarily detailed commentary unless this actually gets some hits#it still doesn't look great on mobile but. eh.#why does it look so dark on mobile!!
391 notes
·
View notes
Text

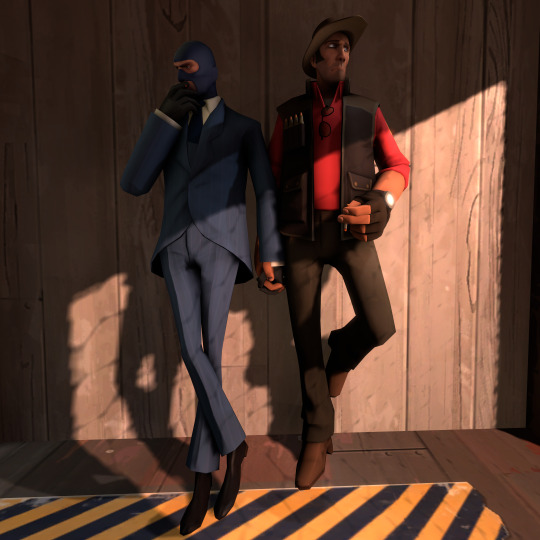
Hob with longer hair and fancy accessories ❤️
If you wanna know where this brain rot came from check this post. I blame @magnusbae ☺️
#dreamling#because it's obvious even without explanation who's the one that keeps giving Hob these pretty things and who braids his hair :D#silly rabbit au#because of course it is#gasp not a digital art this time? yeah sometimes I feel like using a good old pencil. but then i remembered why i don't do it very often#taking photos of the sketches is such a pain! especially without a decent light source#and the weather was so gloomy today so no good daylight either TT_TT#and looking back on the sketches maybe i could have gone more wild with the jewellery. that would be probably more funny#in the context of dream making a claim by giving his human a bunch of talismans#which to anybody with supernatural background basically screams BELONGS to the DREAM of the endless!! do NOT approach!!! x'D#but i worried that I'll go overboard and make it look tacky ¯\_(ツ)_/¯#hob gadling#ferdinand kingsley#mayhem art
492 notes
·
View notes
Text
BNHA Fanfic idea that won't leave me alone:
All for one is Midoriya Hizashi, but...
Nobody knows. Like, literally, nobody knows. Inko never figured out his identity, and with him getting busier after Izuku's fifth birthday it looks like he left bc he's quirkless, so she never much cared for trying to find him and neither did Izuku. All pictures of him are banished into a box in her closet and haven't seen the light of day since Izuku was six or so, when they had a fight over the telephone over him wanting to fix Izuku.
AFO himself suffered obviously a lot of head trauma when fighting All Might, and this gave him partial amnesia. He has no or only very few memories of the decade or so prior to the battle, so he has none regarding his family that he meticulously kept from everyone else's awareness, including the Doctor's. He does see the monthly payment to Inko but assumes it's from a bribe or keeping a corrupt official in his pocket. Given that he can't recall whom it's to and immortality made him extremely wealthy, he doesn't cut it off, nor tries to follow it and make the memory loss obvious.
The only one who does know?
The ghost of Yoichi, who suddenly had another person he could haunt and went to see what's going on. Maybe throw in Nana too, if you want Inko to secretly be a Shimura.
Cue Yoichi fretting over his baby nephew the very moment Izuku gets OFA, up to and including giving him in-depth instructions on how to use the quirk and helping him manage it without harm to him while the other vestiges (minus Nana) are busy laughing their asses off.
#boku no hero acedamia#bnha#prompt#i haven’t seen a fic with this premise before and i want it#everyone is constantly two steps away from figuring it out but bc their communication skills are canonically shit they don't#yoichi has several heart attacks caused by Izuku doing reckless stuff#like confronting Stain and fighting Overhaul at full power with Eri on his back#he is consistently twenty seconds away from figuring out how to manifest simply so he can yell at the adults#another source of great amusement for the other vestiges: mother hen yoichi#though Nana is probably agreeing with him regardless of if Inko is her daughter#the vestiges see the Quirk Analysis and are suddenly very glad AFO can't remember Izuku and Inko#Yoichi deliberately went to haunt AFO for a while after the fight and learned of it#he does periodically check that he still can’t remember#especially after the times Izuku either interacts with the League/Shigaraki or makes the news#just in case#his nephew is his now#got the quirk and everything
157 notes
·
View notes
Text

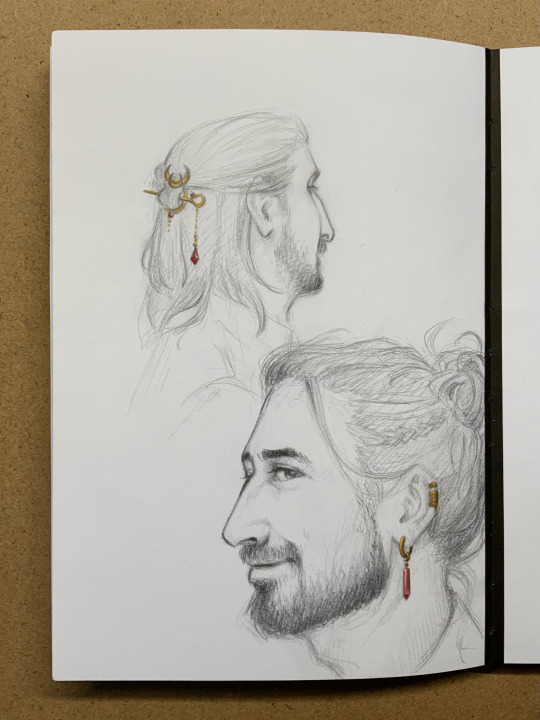
ワンルームエンジェル 第1・2話 one room angel - ep. 1&2
#just started watching this so i'm mad i juuust missed ep2 release on tver and now can't find a quality source for it sorry for this trash#a harada manga getting a live action... who would've ever thought. luckily i don't remember what happens in this one so it's a surprise#at least i feel like i remember this one being way less f'd up than the others so it's prob a good one to do a live action on haha#one room angel#jdrama#i'm happy i don't really remember what happens in this one but regardless it is harada so i'm guessing it won't be for everyone#but for people interested in Different stories with Different characters it's likely gonna be a refreshing one. a lot of moral greyness#this angel typing away on a smartphone and saying チン毛 like it's nothing... yeah that ep 3 reveal makes a lot of sense haha#i like how the dialogue is rly harada-esquely just Saying Shit so it's prob staying pretty close to the manga i think#honestly i just wanted to gif this mfer basically motorboating the wings hahahaa#but i don't have the ep in 1080p aaaaaaaaaaa so it looks like crap but it is what it is#mine
78 notes
·
View notes
Text
Modern crystal healing: It opens your ~chakras~ you will attract ~abundance~ you will ~connect with the universe~
Medieval crystal healing: This shit makes you invisible, stops your periods from hurting, and makes your husband love you.
#chatter#Yes those are all taken from real medieval descriptions of crystals.#I can't remember the last one but the first two are topaz and carnelian.#I prefer older crystal healing sources I will not lie.#Its the fact that they're less vague and more confident about their assumptions.#I have read modern (70s) crystal healing books and they are INCOMPREHENSIBLE.#The thing about these books from the 70s is that if you follow the citation chain of modern books they all lead back to them.#I don't know how you could get any useful information from Healing “diamonds are so strong they cause cancer” Stoned.#Want medieval rock information?#Hildegarde von Bingen's Physica and Albert the Great's De Mineralibus.#English translations: Priscilla Throop and Dorothy Wyckoff respectively because I've read those.#Physica includes a lot more than crystals and Throop's translation is easy to read so I recommend it in general.#Wyckoff's De Mineralibus contains a lot of interesting footnotes that explain what Albert could've been referring to.#Because shockingly in a society without ways to definitively test minerals sometimes every green rock is an emerald.#Bonus: Want some Roman crystal knowledge? Pliny the Elder's Natural History volume 11.#||#witch#witchblr#witch memes#witchcraft#crystal witch#crystals#witch meme
231 notes
·
View notes
Text
so you want to use OBS
hello! i’ve decided to compile information on my OBS setup and some resources that have helped me along the way. this is mostly for personal reference, but maybe others can make use of this information!
some notes before i get into it:
i use OBS for both offline recording and (twitch) streaming. any footage i record is edited using DaVinci Resolve 18, which is free.
most of my OBS captures are of video games (through a USB capture card, specifically elgato), and the occasional screen/application capture (like clip studio paint, and sometimes PC games).
as such, the information here is reflective of these experiences. this post is not comprehensive to all of OBS’s features- this is just an overview of the settings and configurations that are most relevant to me.
with that out of the way, all the information will be under the cut!
Basic Setup
file format:
how to change: settings -> output -> recording -> recording format -> press “apply” once finished!
I save most of my recordings as .mkv files- it supports multi-track audio! i prefer .mkv over .mp4 because if your power goes out, you still have a recording to work with.
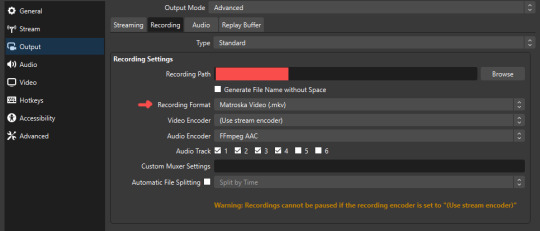
.mkv files can be read by DaVinci Resolve without an issue- but for Adobe software, they'll need to be remuxed to .mp4 within OBS! (file -> remux recordings -> press the … to select a file -> press the “remux” button)
video resolution and framerate:
how to change: settings -> video -> output (scaled) resolution
my obs canvas is @ 1920 x 1080p (16:9)
i switch between 720p and 1080p as needed! if you're concerned about space, you can probably just go for 720p. i also record at 30 fps, simply because that’s what my capture card supports.
video bitrate:
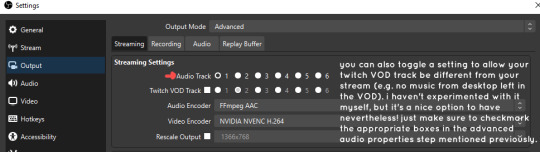
how to change: settings -> output -> encoder settings (located in both the streaming and recording tab) -> press “apply” once finished!
bitrate is a bit of a doozy to explain, but the most important thing to know is that bitrate affects your video’s quality. lower numbers = lower quality, while higher numbers = higher quality.
generally speaking, you'll want higher bitrate when you're recording things with high depth of information (e.g. you’d want a higher bitrate for something fast-paced like splatoon, compared to a slower-paced game like animal crossing).
my video bitrate is either set to 3000 or 4000 kbps! and here's some of my other (related) settings while i'm at it:
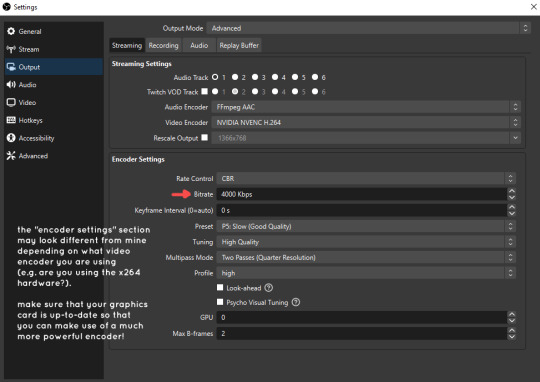
you can put your bitrate at much higher values than me if you're a stickler for quality- but keep in mind that a higher bitrate means:
bigger file size
more information to upload (when streaming)
your computer will need to encode more
i’d recommend reading twitch’s guidelines on encoding, bitrate, resolution, and framerate to get an idea of what values to pick. for people who are doing offline recording or streaming on a different platform, i suggest googling the appropriate resources!
multi-track audio:
this is mostly applicable to anyone looking to do video editing!
multi-track audio basically allows you to separate your audio sources (e.g. discord, game audio, and your own microphone) into different tracks.
this is an immensely helpful tool because it lets you adjust audio levels in post-production (editing). some examples of how this can be used:
increasing someones microphone volume if they speak too softly
increasing/decreasing game audio
muting swear words/sensitive information
completely muting voice call + microphone if you want to upload a no commentary video
and more!
to set this up, take a look at your audio mixer panel, and press the ⚙ icon. this will bring up advanced audio properties.
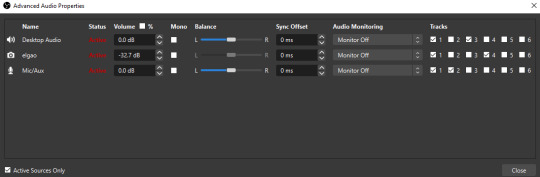
by checkmarking a track box, it puts the audio on that track. to make the above screenshot easier to digest:
track 1 consists of ALL three audio sources- desktop, elgato, and microphone.
track 2 only has the microphone audio.
track 3 only has desktop audio (i use this for voice calls)
track 4 only has the elgato capture card audio (game audio). the volume has also been lowered so that any speaking voices can be heard clearly.
tracks 5 and 6 are unused.
you might be wondering, “why do all three of these have 1 checked off?” this is what i call the universal audio track. i recommend having a universal audio track for a few reasons:
when you stream from OBS onto twitch/youtube- you have to select ONE audio track.
it’s also a nice backup in case you didn’t separate your audio correctly.
if for whatever reason you need to move around your individual audio tracks in editing, the universal track acts as a nice reference point.
mark off your audio tracks for each audio source as you see fit! once you’re finished with the advanced audio properties, go to settings > output.
for the streaming tab, you’ll want to have the number of your universal audio track selected. in my case, that will be audio track 1.
for the recording tab, checkmark all the audio tracks that are applicable to you (in my case, audio tracks 1, 2, 3, and 4). by default, only audio track 1 is selected.
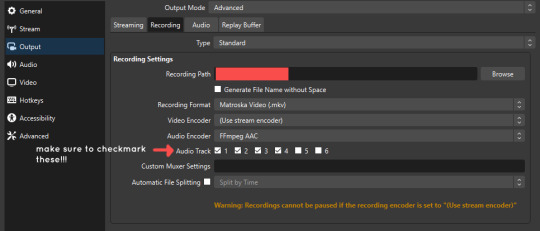
if you don’t check off the additional audio tracks in the output > recordings section, you will not have access to those audio tracks in editing, and you won’t be able to edit your audio tracks independently of each other. so don’t forget to do this! 👍
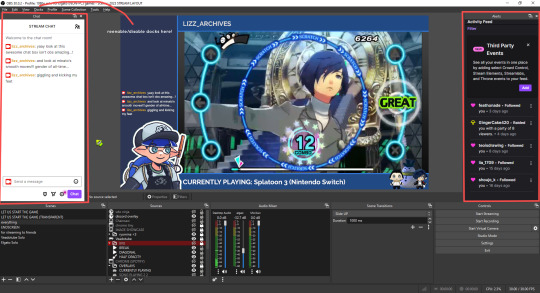
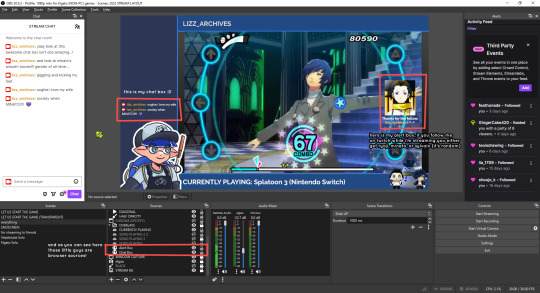
custom browser docks
custom browser docks are a great tool for when you’re streaming and want to have access to your twitch chat and/or activity feed! (or if you wanted to have some other web browser on OBS).
to create one, go to docks -> custom browser docks.
you’ll be given a table interface that asks you to put the dock name and URL. for streamers who want to have chat and alerts available, do the following:
on twitch’s homepage, go to the upper right and click your icon
then, click creator dashboard
once you’re on your dashboard, go to stream manager
click the vertical “...” on my chat OR activity feed.
press “pop-out chat” OR “pop-out activity feed”
copy and paste the link into the table back into OBS
press apply once you’re done
click and drag the docks around at your leisure to put them where you like!
if you ever decide you don’t want to have something on your OBS dock (or want to bring something back), go to the toolbar, click “docks,” and click the appropriate dock!
third party things
a section of optional things that you may enjoy having.
streamlabs alerts
this is basically for anyone who streams and wants to have their chat and/or follower notifications visualized on screen!
streamlab alerts can be added to OBS by adding a browser source into your scene, and the specifics can be customized on streamlabs itself. it’s pretty self-explanatory, so i’ll just leave a link to streamlabs website, where you can log in using the streaming platform of your choice: https://streamlabs.com/
discord overlay
this is a browser source that can be set up to show people who are in a server's voice chat and who speaks. i recommend this to people who make multiplayer content- it can help viewers distinguish who is who but also it can be helpful in editing.
to set this up, go to https://streamkit.discord.com/overlay, click “install for OBS,” and after logging in with discord, go to “voice widget” and click the server and voice channel you want.
you are able to apply CSS if you'd like more control over the visuals, but the standard layout tends to work fine for me! a search of “discord overlay css” on youtube can help you get more information.
veadotube mini
this is a pngtuber software that a friend recommended to me! no webcam is required- mouth opening and closing is based on your microphone input!
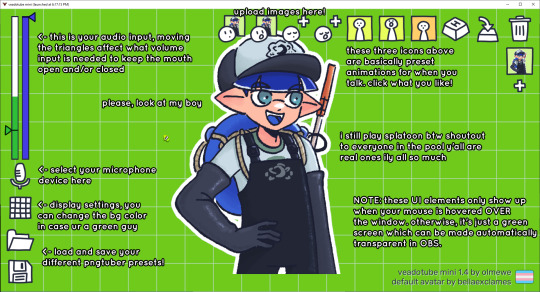
you can download it here (it’s pay what you want!): https://olmewe.itch.io/veadotube-mini
for a proper tutorial on how to use it, i recommend checking out the app's documentation, which you can read here: https://veado.tube/help/
source record
have you ever wanted to stream something with a chat overlay/layout, but wanted your recording to ONLY be the gameplay? or maybe you wanted to record BOTH your gameplay AND your webcam so that you can have a crisp zoom-in on your webcam!
source record is a third party plugin that can help you with that!
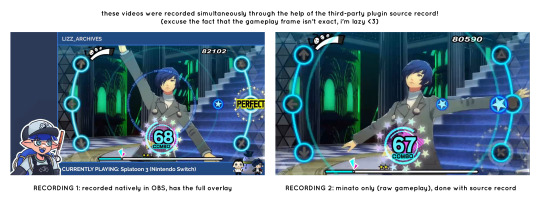
the general gist of source record involves applying the “source record” filter on either a scene or source, and customizing the encoding settings accordingly. the exact details of how to set it up is beyond the scope of this post, so I'll just direct people to this video instead (it was very helpful to me):
youtube
⚠ a quick note about source record: this plugin can be intense for your computer. be sure to do test recordings and the like to see what your computer can handle (and see if the recordings come out the way you like). it took me a few tests before i settled onto something i liked!
you can download and install source record here: https://obsproject.com/forum/resources/source-record.1285/
vdo.ninja
have you ever wanted to do a collaborative video or stream where you feature someone else’s video on your stream? or maybe you’re doing a multi-person streaming event! vdo.ninja is the perfect tool for you!
vdo.ninja turns your OBS virtual camera into a browser source link- which your collaborator can add on their stream! this is a new tool that i’ve added to my arsenal recently- since my friend and i are planning to stream a side order challenge together! i’ve still got to iron it out a bit more, but i like what i’ve used of it so far.
try it out for yourself at their website here (with documentation and demos available on the homepage!): https://vdo.ninja/ (no downloads required!)
ok! i’m set up! what now?
and with that, that’s all of the settings and tools that i thought would be worth mentioning! while most of my setup was written with video games in mind, some of these plugins and setups may be applicable to other types of videos (e.g. tabletop gaming with a physical camera)!
now that i’ve outlined all these settings, i have one more thing i have to say: regardless of what you're using OBS for, do a test recording before doing anything “official” with it. this recording can be as short as 30 seconds. it’s a good habit to develop that can make sure your streams/recordings turn out the way you want them to!
here are the kinds of things i like to check! it’s not an exhaustive list, but this can be a starting point:
video:
does my video look the way i want it to (and can my computer handle that)?
can my computer handle the load of encoding? - OBS will note in the bottom if the encoding is overloaded. if it can’t handle it, turn down your bitrate or adjust other encoding settings (e.g. i had to toggle psycho visual tuning OFF because it was causing lag)
this is especially the case if you're recording PC games- you don’t want to have slowdown on either your game or the recording!
audio:
are my audio sources (e.g. desktop audio and microphone) correct? - if you plug/unplug devices a lot, be sure to check this (settings -> audio).
are any of my audio sources muted? - make sure you don’t have anything on 🔇 if you don’t want it to be muted! otherwise the audio will be lost forever… (i lost my friend’s VC audio once… it was sad)
are my audio tracks separated properly? - requires you to boot up your editing software, but it's worth doing! for the test recording, just have something from all your sources playing at once, and see if your editor has things separated into tracks.
can i hear the voices clearly? or does the music and/or game overpower them?
if for whatever reason your OBS crashes, or you want more information on anything “critical” or “warning” worthy in your set-up, you can go to help > log files > upload current log file > analyze. crash logs currently can’t be analyzed by the log analyzer- but they’re a valuable tool when asking for help on the OBS forums!
and that’s all! for real, this time. i hope that some of these tools and settings can help anyone wanting to get more out of OBS. there’s definitely other things i didn’t touch upon (e.g. audio filters for noise compression, suppression, etc.), so i suggest doing your own research and trying things out!
happy recording/streaming, and thanks for reading! ✨
#lizzy speaks#this was a fun little write up!! i've been slowly getting some of my friends into video making teehee and its SO FUN!!!#(digital) video is like one of my other passions next to art. everyone say thank you splatoon for getting me back into it again <3#i've been using obs since like 2018 so i wanted to share some of the things i learned for funsies... i really love video...#but also i like having reference posts like this in the case people have questions they want to ask me...#because i don't always remember what video tutorials i watched and it's nice to document that somewhere...#warning to anyone who reads it this is like 2.1k words. i do want to stress that this isn't comprehensive but there's still a lot of info#that i wanted to put for this post...! that said topics like designing your own stream layout + assets for it are NOT in the scope of this#post and nor is this a beginner's guide to obs (i wrote this with the assumption that you know how to record and/or stream and that-#people already have an idea of how to use scenes and the different types of sources obs can use).#i hope everyone's had a lovely march 5th! i would love to look at the fanart but im still not done with reload...#but im hoping to finish it by the end of the month!!! yipee!!!#Youtube
45 notes
·
View notes
Text

Every person who has time-traveled to Peter's early years as Spider-Man, expect Eddie Brock.
#cindy moon#miles morales#logan howlett#jj jameson#gwen stacy#wade wilson#mayday parker#teresa parker#eddie brock#comic books#marvel#peter parker#spider girl#spider man#spider gwen#wolverine#deadpool#i don't want to cite all the sources (nor do I remember most) so it's Spider-Man/wolverine#an issue of spectacular Spider-Man: peter parker (2019) for the jjj/peter/ teresa one then for gwen it's in her original run but#you can find it buy searching a weird venom looking variant of her on fandom while for eddie i think it's from an issue of the current run#while for mayday it's one of the early issues of her solo comic and for the rest good luck
46 notes
·
View notes
Text
Tsuna *whispering*: Umm... Yamamoto, why's Gokudera's cat standing on his head?
Yamamoto: I-
Gokudera *from behind a newspaper*: He likes to be tall.
#khr#katekyo hitman reborn#gokudera hayato#uri#tsuna sawada#Yamamoto takeshi#incorrect khr quotes#source: the office#i think...#I don't remember how gokudera called Tsuna... it's been so long ;;;
74 notes
·
View notes
Text
Faralda, teaching Onmund to drive: Okay, you're driving and Brelyna and J'Zargo walk into the road. Quick, what do you hit?
Onmund: Oh, definitely J'Zargo. I could never hurt Brelyna.
Faralda, massaging her temples: The brakes. You hit the brakes.
#the real reason cars don't exist in tamriel is faralda destroyed them all so she wouldn't get roped into teaching driver's ed#true story#faralda#j'zargo#onmund#brelyna maryon#college of winterhold#nerevar queue and star#incorrect quotes#incorrect elder scrolls#incorrect skyrim quotes#tes#the elder scrolls#skyrim#the elder scrolls v: skyrim#source: tumblr#i recognize this quote but i can't remember from where so this is fine
57 notes
·
View notes
Text
It's always tempting to debate bigots about their bigotry, but honestly the best thing you can do is often to directly help those affected by said bigotry.
Bigotry doesn't exist to be debated. People who are bigots do not care about debate - they care about humiliating their opponents. You cannot outsmart somebody who doesn't give a flying fuck about their position being incorrect. You will be playing a completely different game by trying to debate somebody out of their bigotry.
The best thing you can do is to show up for the marginalized. Check in on them, talk to them, and engage with them as people. Ask them if they would like help and then respect their answer to the best of your capabilities. Oftentimes, that will be sufficient enough and will go a long way.
#ally advice#the bigot will not rely on trusted peer-reviewed sources. they will rely on charisma and charm and humiliating and degrading the other team#because a bigot doesn't believe in 'you go low and we go high'. like... they're bigots because they choose to go low#so they will use dirty tactics in order to absolutely obliterate your point because you aren't going to be playing the same game#this is why i don't debate transphobes. i will engage in conversation but i do not debate bigots anymore#like do y'all remember in 2016 when the online alt-r*ght started to grow exponentially? that's the same sort of thing#many people argue that debating bigots has the chance of bringing them over to your side but...#...personally i don't really value that as a *sole* strategy or something we should focus our energy on#i absolutely will never debate a bigot because i know the stakes and i know that they'd play dirty (especially if it is in front of others)#inspired by a conversation with my dad where he surprised me with his outlook and views#(i'd assume that we would disagree heavily but no... he actually pretty much completely agreed)#(which isn't a huge achievement BUT we are pretty different people with very different views at times)#(i'm a carbon copy of him but if he came back Wrong)
119 notes
·
View notes
Text
re:hbomberguy, on the topic of citing sources, i want to say:
it is insane how many people on here don't even click the sources op links on their own post to learn more and just hit reblog saying "oh my i didn't know about this thank you for teaching me!". like guys CLICK THE LINK!! CHECK THE NOTES!!! CHECK THE SOURCE!.... i swear half the time the link is dead or takes you to a nonsense page (i see this a lot with art specifically???? and excerpts from magazines??) and some times the linked source disproves a claim the very post that linked it made and people just. don't bother to check, no one bothers to even reblog saying "hey that link is dead! here's a new, working link!" or "hey that link doesn't work, can you link the source again?" and when it comes to misinformation people just share without checking or looking at the notes where numerous people will (in the best case scenario) already be pointing out the misinformation
"OH BUT I CAN'T CHECK EVERYTHING I SEE ON THE INTERNET" there is a surefire way to prevent spreading this kind of stuff even if you don't have the time to fact check immediately. just accept it's fine to save a post for later if you can't look deeper into it right now!!!!! literally just reblog it in private or save the post as a draft so you can come back to it later and check. it won't kill you and in fact it will actually make your life a lot better lol
#hbomberguy#misinformation#plagiarism#adding those for reach honestly because im kinda pissed rn#heres some more on citing sources for this week! sometimes people cite sources and THEY DON'T EXIST. it is REALLY frustrating#people do this to PRETEND they linked to the original artist a lot here on tumblr when theyre actually linking 1- nothing or 2- google imgs#it drives me INSANE#and sometimes they will add “source: xyz magazine” and then you go look for it and there is no available source. its just a loop of-#one person quoting another on where the source came from and none of them actually checked the source#ALSO sometimes journalists will do this kind of crazy bullshit where they quote something from wikipedia thinking the wiki source is real-#and it turns out to not align with the statement in the wiki and so the journalist claims that without checking or sourcing and then#other news sources will quote the journalist on that cyclically up until the point where the journalist that used wikipedia as a source-#becomes a source for wikipedia#'confirming' the statement that actually came from there in the first place#there is a name for this phenomenom but i cant remember it if i find it i'll reblog with an addition#sorry if you saw this before i deleted it to word it better
27 notes
·
View notes
Text
Murdoch: We are having a baby.
John: A WHAT?
George: DETECTIVE??
Henry: GUYS WE ARE HAVING A BABY!!
Watts: We're what???
Julia: *sips tea*
Brackenreid: *facepalms*
Murdoch: I meant me and dr. Ogden─
Henry: WE! ARE! HAVING! A! BABYYY!!
#incorrect murdoch quotes#incorrect murdoch mysteries#murdoch mysteries#william murdoch#llewellyn watts#george crabtree#julia ogden#thomas brackenreid#henry higgins#john brackenreid#jilliam#i don't remember where i found this so source: unknown
38 notes
·
View notes
Text
Hey! It's coming up fast, but please consider checking out @barricadescon 2023!!! This year's virtual con will be 14-16 July and features both academic and fandom tracks!
I personally am part of two panels this year:
featuring the fabulous @thepiecesofcait and @thecandlesticksfromlesmis wherein we discuss our processes for characterizing the Amis in our respective mediums (writing, art, and film), and
with @eldritchw1tch and @grantairelibere , a social event where we read Preliminary Gayeties, eat, and drink along with the characters.
Even if these events don't speak to you, I strongly recommend checking out the con's events page to see if anything piques your interest! It's only $10, the money goes toward a good cause, and there are many scholarships available to anyone who wants to attend but can't afford to!
#barricades con#jean valcon#les mis fandom event#les mis#les mis fandom#if you remember me saying I was going to present on 1817: no you don't#(no I was but my job has been so insanely hectic the past six months that I have barely had time for recovery on weekends)#(much less has the bandwidth to collect all of the sources to support everything I know about The Year 1817)#*have#(and find info on the things I didn't totally get)#but this was so much fun last year! I highly recommend it!!!#also if you have time I understand that they are looking for volunteers for this year and future years
62 notes
·
View notes
Text
I have a theory guys


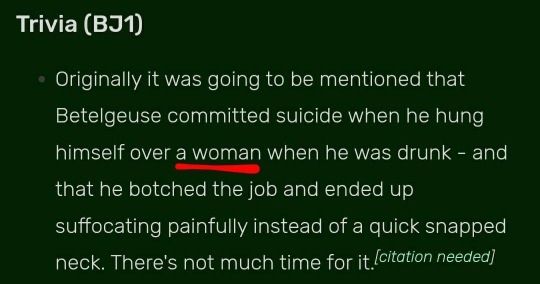
The woman that he died over is the wife in the sequel, and also the owner of the finger with a wedding ring he pulled out of his pocket, so I guess that makes her his ex wife so I could be wrong but maybe they just didn't add ex when they revealed casting for whatever reason.
#I CAN'T BELEIVE THERE'S NO CITATION FOR IT#I can't find a source for this information no matter how hard I look#Everything cites the wiki as its source but the wiki doesn't cite anything else#I read the whole early draft movie script and I don't remember seeing it mentioned#Maybe it was said during an interview or something I don't know#If anyone does know where the wiki got that information from pls tell me#:3#beetlejuice#beetlejuice 1988#beetlejuice 2#I haven't actually looked into the plot of the movie so I may be completely wrong Idk#I've been ignoring its existence for months now#Hoping that by doing so it'll stop existing but that hasn't worked#And now I'm in peak moviejuice brainrot and I'm... EXCITED FOR IT..... ewwwww I can't believe this
14 notes
·
View notes
Note
what are your go-to resources for phantom blood fashion historical accuracy...... ...
ok I'm glad you asked this because I've been writing up a whole other post on dio's fashion sense and i wasn't sure how much of the period's fashion trends to explain since I didn't want to make an assumption that nobody knows anything about late victorian fashion. this will be a good reference post for me...and you... and anyone else who wants to use it.
regardless; I hate to say it but the best way to start drawing period clothing is to do a little reading on the fundamentals of [late] victorian dress because it will seriously assist you in the long run, e.g., you won't have to scratch your head and spend time wondering why you keep coming across two different lapel types on tailcoat fashion plates if you're aware that both peak tips and shawl collars were in vogue in the late 1880s and the '90s.
I'll put some basic information that I've collected for myself here so you don't have to go looking for it; I'm going to write this assuming you're a newborn baby deer poking your nose into the victorian era for the first time in your life fully unaware of the customs.
reference links for the wayfarer so you don't have to scroll all the way to the bottom:
Etiquette books. Look for anything written in the 80s/90s; again, period trends change. There's usually always a section on how men should be dressing on different occasions (weddings, funerals, daily casual travel, etc.) in these. In an ideal world one would only have to reference books written/published in London, however I've found that there are many more from US. This is fine though IMO, there was a lot of cross-talk between countries due to the implementation of the telegraph and hence a lot of etiquette standards are "universal" (it's why fashion between EU/US/AU can look pretty similar at the same time--they were all talking to each other). If there's a difference between the "New York" way of doing things and the "London" way of doing things, the authors usually point this out. kind of funny. I love reading these, they're also very good for understanding the general quirks of late Victorian society and how the standards at the time characterize their behavior.
The National Portrait Gallery (link is an advanced search; you can change the dates. I set the results to be located in "london")
Victoria & Albert museum online gallery
The Met museum online gallery (in general for clothes on mannequins, but they also list an archive of fashion plates here, separated by year. A lot of them are misfiled though so be wary of that)
Alamy website. genuinely one of the most all-encompassing resources I've used, I use it for everything and especially when I'm into period pieces. "boy 188*" "man 1880s portrait" "man 188* suit" etc. you find a lot of illustrations from the time period this way too. it fucking rules. my computer is on the brink of crashing 24/7 because I keep too many alamy tabs open at all times. A lot of really good Vanity Fair illustrations are on here too, just plug it in with a year and see what pops up.
Sites like this (Gentleman's Gazette) with little articles giving a run-down of period clothing can be helpful...... to an extent. idk. I don't really trust them. GG is solid for the most part and so is The Black Tie Blog and Victorian Web, but I've spotted too many errors on other sites to trust anything they say wholesale. Fashion Institute of Technology is worth mentioning as well, though, despite their coverage on men's fashion being pretty brief. Goes by decade, though, with a lot of information on women/children's fashion, too (it's very interesting! I linked their 1880s fashion rundown, highly recommend going through it, especially the Aestheticism segment). TL;DR: My advice when it comes to website hopping is "stick with primary sources".
How to Read a Suit (A Guide to Changing Men’s Fashion from the 17th to the 20th Century) by Lydia Edwards. Look this up on libgen. It's broken down into chunks of decades; REAAALLLYY recommend reading the introduction to "Chapter 4: 1860-1899". Probably the most historically informative consolidation of relevant fashion information in one place. Very interesting writing, pretty short too. If you're gonna read one thing out of this whole list, make it this.
The Dictionary of Fashion History by Valerie Cumming. look this up on libgen. for when you don't understand what some article or book is talking about and google will not give you answers. as it is it wont to do. (could not wrap my head around top frocks until this point; the wikipedia article for it is quite frankly embarrassing.)
here's my google drive of fashion for this time period, I had just been keeping these on local folders but I think drive would be better so I started transferring them here... compiled myself. this is a "work in progress" and will be updated.
I am going to write a bit about men's fashion at the time period under the cut because I think it's important to understand, if you don't know much about the victorian period, that the dress decorum was heavily emphasized and if you wore the wrong ensemble in the wrong setting everyone WOULD think you were ill-bred and would not invite you back into their home again. because just seeing you exist like that was impolite and quite frankly very embarrassing to witness. these resources are great but not if you don't know where and when these guys would be wearing these things... for instance i know the fashion plate archive there are some drawings of men in livery and you may be tempted to put dio in something like this because WOW! they do look kind of cool. with the big brass buttons... but I think he would more readily batter another human being physically than dress up like a butler at a dinner party and get mistaken for a butler. it's the little things.
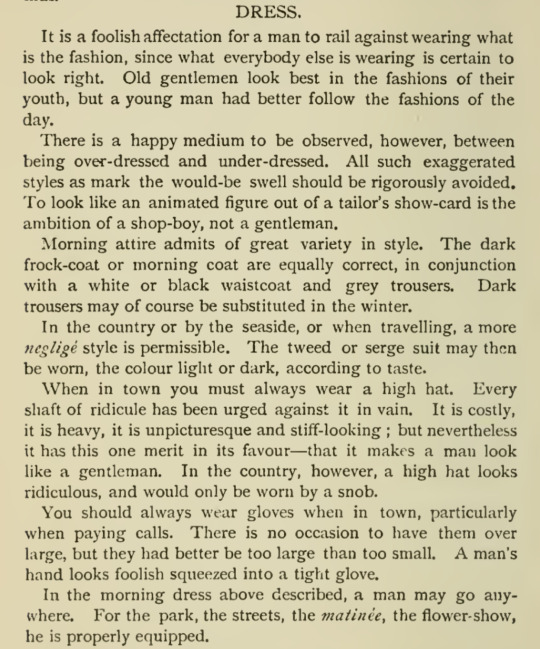
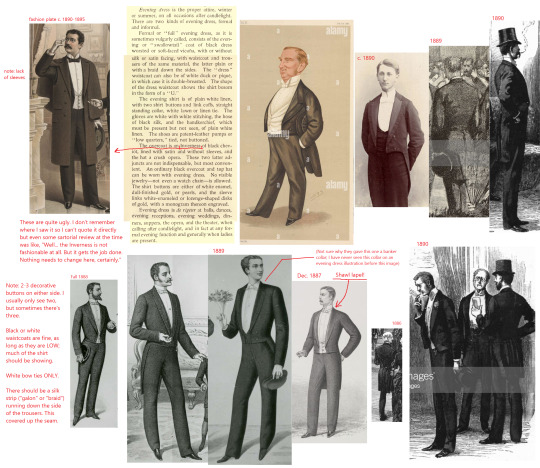
first thing: you were expected to dress differently for different times of day. This consists of: morning dress, afternoon dress (semi-formal; not really "mandatory" except at special events, like weddings, at least for men), and evening dress (anything past 6 o'clock or "by candle light" is the general rule).

here are overview excerpts from Modern Etiquette in Public and Private published by Frederick Warne and Co. in 1887:
and excerpts from The Complete Bachelor: Manners for Men by Walter Germain, written in 1896:

Cecil B. Hartley states in his Book of Etiquette and Manual of Politeness (1860) that "by dress we show our respect for society at large, or the persons with whom we are to mingle".
He advised men that there were “shades of being ‘dressed;’ and a man is called ‘little dressed,’ ‘well dressed,’ and ‘much dressed,’ not according to the quantity but the quality of his coverings.”
Black was "the" color. As Lydia Edwards writes in How to Read a Suit (2020), "while it is unrealistic to imagine that all men everywhere only wore black, the acceptable color palette was certainly more limited at this point than it had been for the first half of the century. The rising professional middle classes seemed to embrace a centuries-old association with black for certain professions, which perhaps made this an inevitable choice for the evolving and expanding world of work in the nineteenth century."
I'm going to add illustrations now; humbly request you ignore how terrible the paint canvases i threw things in. Things to note moving forward:
there were three different types of shirt collars in vogue at the time: stiff, high stand collars that hugged your neck, wing-tip collars, and one that's closer to the "regular" collars you typically see nowadays (banker collar). don't really see the last one in any of the fashion plates but you do see it in portraits.
Do note that walking sticks were commonplace and in fact expected to be touted around, hence why they (in addition to umbrellas) keep reappearing in the illustrations;


(1890)
Frock coats were the most "formal" of the daywear. When going through the National Portrait Gallery website you'll notice that most men are wearing either a morning coat or frock coat; the lounge coat was still too informal to be considered for how much money you'd spend to get a photograph taken. Don't you want to look nice?

Lounge suits, again, were the ultimate "informal"; they were viewed with distain by the frock-coat. (here's a good thread on this, actually; i love this fucking guy lol). really, really don't think Dio would be wearing one that often. maybe a double-breasted one? i really think he's too much of a snob to wear what he sees as filthy poor people rags. appearance is everything, etc.
~~~
waistcoats you have a lot of freedom/liberty with, at least in regard to design (except for evening waistcoats). different lapel shapes, no lapels... unfortunately shifting into the later decades of the 19th century it was pretty much expected that the fabric of your waistcoat match the fabric of your suit (along with your trousers; called a "ditto suit"). jonathan would conform to this mode IMO, i don't think it stops dio. he has a vision & his waistcoats are likely very extensively detailed. actually I just remembered that we do see one as depicted by araki's tenuous grasp of historical fashion and it is. awesome. i, too, love to wear cravats directly underneath my shirt


(1891 / 1892)
~~~
Evening dress is (comparatively) much more simple & men had much less artistic freedom in their choice of dress: black tailcoat, white gloves, white tie, waistcoat in either black or white, black button boots. Regardless, it was its own beast in the fact that this was something that you really weren't supposed to dick around with. (Dio would've found a way, but that's a discussion for a post that isn't crashing every 3 minutes.) From A Gentleman by Maurice Francis Egan (1893):
If a young man is invited to a dinner or to a great assembly in any large city, he must wear a black coat. A gray or colored coat worn after six o’clock in the evening, at any assembly where there are ladies, would imply either disrespect or ignorance on the part of the wearer. In most cities he is expected to wear the regulation evening dress, the “swallow-tail” coat of our grandfathers, and, of course, black trousers and a white tie. In London or New York or Chicago a man must follow this last custom or stay at home. He has his choice. The “swallow-tail” coat is worn after six o’clock in the evening, never earlier, in all English-speaking countries.
(1885 (misfiled) / 1888 / 1888 / 1890)


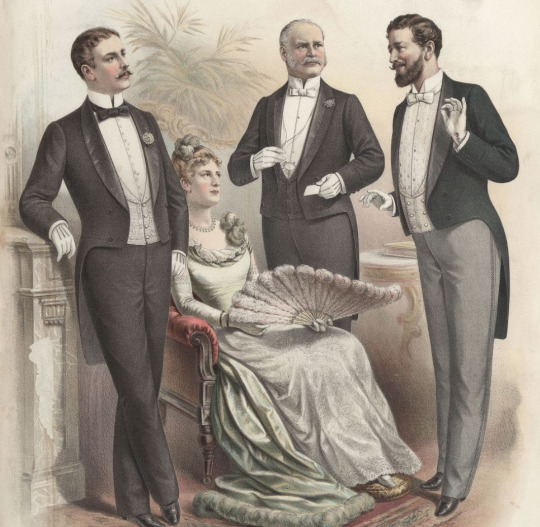
MET evening suit ca. 1888; different aspects of the ensemble displayed solo at this link.
In the 80s the "dinner jacket" ("tuxedo" in US) was introduced. It was used for more informal occasions.

final evening dress "tips":


~~~
Outerwear was pretty varied… you can get a pretty wide dynamic of form depending on choice of coat, so keep that in mind. chesterfields tended to be pretty formless, top frocks a bit more fitted. Length/density would change depending on season, too.


~~~
Children's fashion:


end notes:
everyone would be wearing suspenders, not belts; belts were pretty much only worn with military uniform at this time (except in america)
sweater vests were really only considered sportswear until the first few decades of the 1900s. they would not be wearing these casually under jackets, they'd be wearing waistcoats
button boots were buttoned using a special button hook. video demonstration
NOTE: trousers being "creased" began to be more in vogue in the 90s; this is because they finally invented the trouser press. read article for more information--you sometimes see creases in the 80s, really not before then though. look at how they bunch at the knee (c.1880s)!
When it comes to gloves, different colors denoted different occasions to wear them. In the text screenshots provided in previous sections, it usually states which colors are appropriate for whichever situation. The paragraph I am about to end this on is relatively useless, but I thought I'd include it anyway:

#ask#dio brando#jonathan joestar#phantom blood#I make myself sick going through fashion plates and the costume archives on museum websites identifying dio outfits regularly#that one image in the frock coat graphic reminds me so much of jeremy strong...kendall will get his day on ottiliere someday. but not today#I'll probably add to this post as I remember or discover more things to add. we're all on a journey of learning...together#posts that crashed one million times while editing#there was a lot more I wanted to add to this but every time i click something in here the entire post crashes. so i am leaving it#also FYI: i don't have a degree in this or nothing. I am a hobbyist victorian enthusiast. don't think anything is wrong in here especially#considering I cite sources but yaknow. <-disclaimer
54 notes
·
View notes
Last Seen Blogs

erikafung17
Monochrome & Highlights.

endlessautosalon-blog
Untitled

dankxia
Dankxia

tsundere-biscuit
Isekai dammit
impossibledreaming
Dream On