#download this later
Text

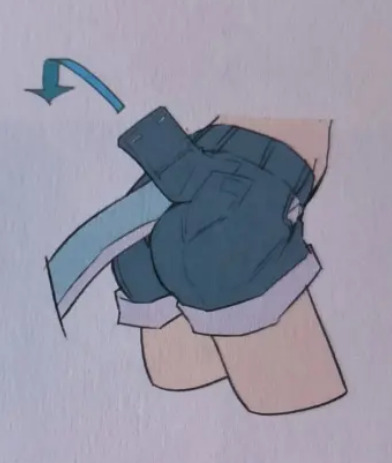
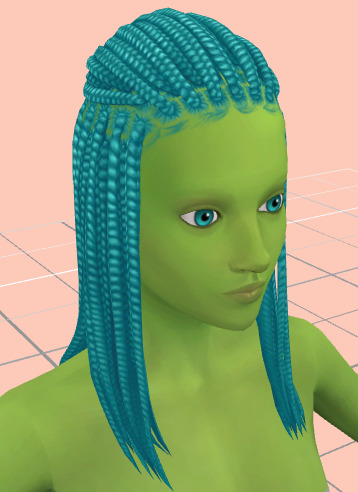
Baby Got Curls - Infant Hair
I wanted to convert one of my old hairs for infants but instead decided to remake the mesh with the new infant front base.
BGC
New Mesh
15 Maxis swatches
Custom Thumbnail
Semi Hat Compatible (depends on the hat)
Any issues please let me know
Enjoyy - Download below the cut
My TOU is open so do whatever pls give credit tho.
Download | SFS |
#ts4#sims 4#ts4 cc#sims 4 cc#ts4cc#sims4cc#s4cc#s4 cc#ts4 download#sims 4 download#shycc#i'll add an alt link later
4K notes
·
View notes
Text
got a worm nibbling my brain. can someone help me find a piece of obscure media?
webcomic/indie comic from the 2010s. basically a sci-fi short story about a young girl (with red hair?) who was being raised by scientists as part of an experiment. she receives a haircut/has her head shaved, in preparation for her annual brain scan/testing. it is revealed that while her body is human, her "brain" is artificial, made of computer implants throughout her skull and spine. at some point her biological mother (also a scientist on the same campus?) encounters her and is repulsed, viewing her as a machine who has murdered her daughter.
it was very poignant and it bruised my heart and i can NOT find it anywhere
#i thought it was made by the creator of 'O Human Star' for some reason but apparently not?#goddammit goddammit goddammit#'i don't have to write down the title of this piece of media i encountered in my formative years bc i'll always remember it'#*cut to ten years later frantic googling*#fun fact 'a.i.' is now a completely useless search term#google in general is useless#and stuff i read 3+ years ago regularly vanishes from the internet#bookmarks are not enough! if you like indie media--download that shit! buy digital/physical copies while you can#save it to the cloud back it up and organize that shit!!!#keep a list of the stuff you read (organized by date/media type and possibly with keywords if you want it to be useful longterm)#(or a spreadsheet even if you're like me and rabidly consume short stories/comics like a pack of amnesiac piranhas on a feeding frenzy)#(that stuff PILES UP over the years ok. if you wanna make sure you'll be able to find it again a decade later--curation is key)#because art WILL touch your soul and then vanish into the void leaving naught but a 404 Error in its wake#i am an old man shaking my fist at the kids on my lawn but the kids on my lawn are me and my longterm digital planning skills circa 2012
3K notes
·
View notes
Text
hey
understand?
#arknights#guess whose tail is this#haven't found a scan version yet but I might download these later and put it to gdrive again#edit: yeah it's utage
1K notes
·
View notes
Text
youtube

HE'S FINALLY HERE!!! happy belated anniversary to deltarune chapter 2, and my favorite big shot spambot!!
words cannot convey just how much i loved making both the model and this animation. spamton is one of my favorite characters ever, and bringing his cartoony antics into the third dimension was WELL WORTH the effort it took.
this is my first attempt at making any kind of rig like this, and i'm pretty pleased with the results and my efforts. keep in mind that this model is absolutely not as well optimized as it could be... but you're free to use it for LITERALLY ANYTHING!
DOWNLOAD PAGE: https://decamarks.neocities.org/spamton.html
#deltarune#spamton#my art#blender#FINALLLYYYYYY I'M DONE. PHEW#if you run into any issues with it feel free to message me! i'll definitely try to fix them#i'll probably fix up the download page a little later but EH. good enough#speaking of which... my website is ALMOST DONE! you can look around if you want if you're willing to ignore some unfinished stuff eheehehoo#3D art
16K notes
·
View notes
Photo
here
#ruby rose#weiss schnee#whiterose#white rose#rwby#my art#GUESS WHO FINALLY GOT A NEW TABLET#man i havent done any digital stuff in such a long time#apparently sai was being weird w/ the pen pressure so i went ahead and downloaded sai2 and it works for some reason#anyway im back bitches!!! sem is over and im ready to vomit wr at y'all#ALSO THE V9 FINALE IM GOING TO BARF ALL OVER THE FLOOR#it was such a goddamn vibe#also why tf does sai2 not have a default blur brush#probably gonna go look around and add new brushes later
4K notes
·
View notes
Text


9-1-1
7.03 ✽ Capsized
#911edit#911#911 abc#911 on abc#911 spoilers#evan buckley#eddie diaz#tommy kinard#*gifs#this download SUCKS lol#i'll make more gifs later with a better quality file#not gonna tag anyone dfskjdfsd
412 notes
·
View notes
Text


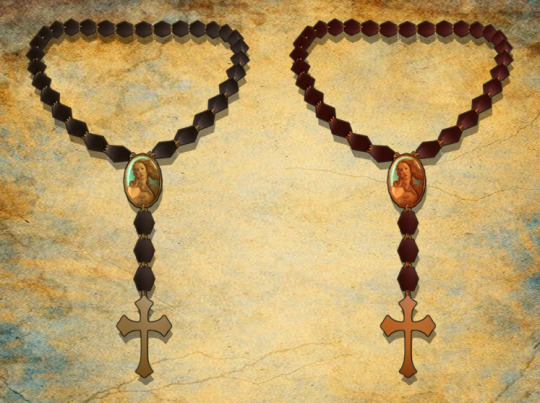
rosario ✰✰✰
Posting this since somebody asked for it, a very simple rosary. Enjoy!

✰ new mesh
✰ 2 swatches
✰ all LODS
✰ 3k polys
✰ disabled for random
✰ Download ✰ (alt) ✰
#the sims 4#sims 4#ts4#ts4cc#ts4 cc finds#ts4 custom content#ts4 cc download#sims 4 custom content#s4cc#sims 4 cc#s4 custom content#my cc#yall dont know how long i spent trying to upload this but tumblr kept fucking the post up#all bc of the color bars i put in the description?? had to go and reuse the ones from an earlier post bc the new one I was trying to put#tumblr just wasnt having it😭#ANYWAYS#i made this in less than an hour like two weeks ago so it might not look super polished#but i like it maybe ill come back later on to make it look better
739 notes
·
View notes
Text
its him, the one and only roach
#call of duty#gary roach sanderson#cod mw2#roach cod#my art#can you tell this drawing is a month old now#you will later#please let him be in the next game i beg#so close to downloading the cod mobile just to rotate them all around akin to being in a microwave#ding! food is served
363 notes
·
View notes
Text
hey son catch

so sorry … .
version where you can behold him
#psychonauts#evil augustus#hopefully nobody has done this before#i think evil augustus is kind of silly i just call him nemesis like omg just give him a cool nickname 🤬#i’ll draw something serious later#thjs is just a warmup#by warmup i mean complete shitpost#trainofthought#dad plesee sotp throwing flaming coubs at me im tyrying to tightrope 🥲🥲🥲🥲🥲🥲🥲#YOU USED TO LIKE TO PLAY CATCH WITH ME#that specific voiceclip is downloaded into my memory#i can replay it at will. in my brain. my brain mp3 player.#i reaally just wanted to do a little doodle of this guy#gay ass little shorts pulled up tooo high
791 notes
·
View notes
Text


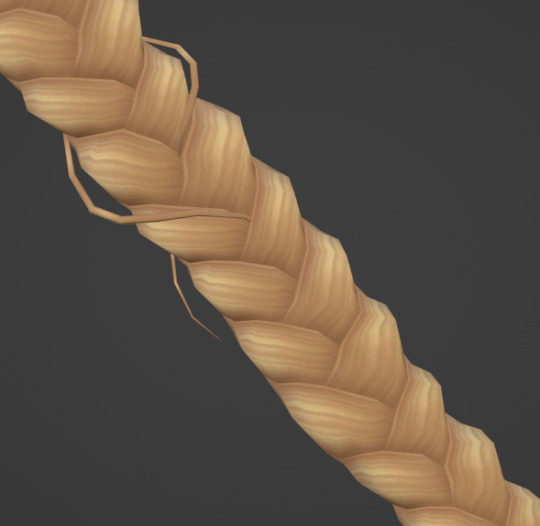
DL (mediafire)
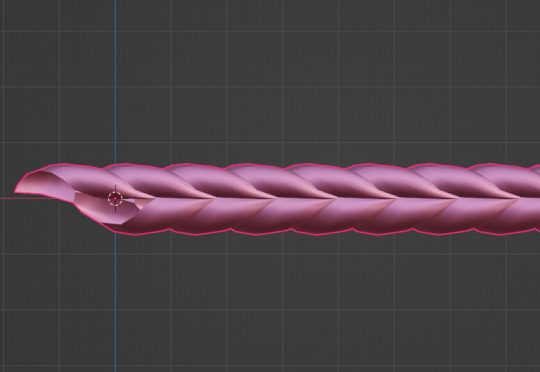
Today I bring you not cc, but a small collection of .blend files for making cc a little easier. If you've ever wanted to quickly put a braid into a custom hair without completely obliterating your poly count*, then these might be able to help.
*braids will still add a LOT of polygons to your hair, but since every single polygon is visible** on these tiling braids, at least you know they're all being put to use, whereas if you were to physically braid 3 strands of geometry, lots of those polygons would wind up inside the braid, just adding to your count without contributing anything to the look
**if some polygons end up inside of other meshes, you may want to delete them to reduce the poly count further. The boolean modifier may be able to help you, but I haven't tried
These are completely hollow, tiling braid "facades". They just look like a braid, without being anything more than a stylized tube. Available in 9 shapes (which are all pretty similar, more or less, but have different 'vibes', and one of them technically doesn't resemble a braid, but if you squint it looks close enough) and 3 polygon counts to hopefully fit in with your project.

TOU: Same as my cc. Read it here. I obviously don't own this concept, so feel free to reverse engineer, make your own braid tiles, etc. Just don't use mine for anything commercial (using them in commissions is fine, just not paywalled final products!)
You will need to be using one of the newer versions of blender, I believe 2.8 and up. These were made in blender 3.6, so the files will not be compatible with old versions like 2.7x.
Quick start guide:
Open your hair wip's .blend
In object mode, 'Append' the 'BraidTile' object of your choice
Select 'BraidPath' and, in Edit mode, position it however you like
Additional info under the cut, because I tend to ramble, and these require a little bit of a primer before use, probably. Unless you for sure know what you're doing, in which case, feel free to just take these and run with them.
THIS IS NOT A TUTORIAL ON MAKING HAIR, OR HOW TO USE BLENDER. Seek that information elsewhere.
Before appending braids, you may want to open up the blender file and look at all the shapes, to decide which one you want to use.
When you first append your braid, or open the blend files, you may notice it does not look like the preview images above, and instead looks like a shiny pink slug. This is intentional! For previews and development work, I use @/simandy's base textures, but your hair will probably be using a different texture, so I have not included a texture at all.
Simply switch the material of the 'BraidTile' to the same material your hair is using, and adjust the uv map accordingly. I'm going to assume if you are making hairs that you know how to do that, so it will not be explained here.
Once you have your braid appended, and have edited the UV Map of the 'BraidTile' piece to your liking, you can also try scaling the tile in the X, Y, and Z axes to change up the look a little. Make sure you select all of the vertices before scaling, to make sure it still tiles. This should be safe to do, and not mess up the tiling at all, but make sure you do it in Edit mode, not Object mode. (If you mistakenly do it in Object mode, you just have to press ctrl+A and select 'scale', and that should fix it)
When you have your braid adjusted, switch over to the 'BraidPath' object, and use edit mode to move the points around however you want. This is just like any other hair strand, if you're used to making hairs with paths and curves then this should already be familiar to you. All the same controls should work.
And, if you already have a curve in your hair that you'd like the braid to snap to instead, you can select the 'BraidTile' object, locate the curve modifier, and switch the curve object to any other curve in your .blend. You'll want to change the curve in the array modifier to the same one, most likely.
If you haven't used curves to make a hair before, here's a couple quick controls you might like to know:
ctrl+T will let you Twist the object around the selected point(s)
alt+S will let you Scale the object around the selected point(s)
selecting the first or last point of the 'BraidPath' and pressing E will Extrude a new point, making your braid longer
Remember to do all of your positioning on the 'BraidPath' object! You do not need to edit the 'BraidTile' at all once you've set up the UV map and adjusted the scale!
It should tile, twist, etc. with little issue, and should get longer or shorter according to the length of your curve with no issue. If it doesn't, make sure both the array and curve modifiers of your 'BraidTile' object are using the same curve. They should be using the 'BraidPath' object by default, but if you changed this manually, ensure that both modifiers match for best results.
Unless you know what you are doing, I do not recommend messing with any other settings in the modifiers, or adjusting the 'BraidTile' mesh in any way besides scaling the entire object at once. Otherwise you could end up with gaps and holes in your braid.
When you are done posing your braid, you can apply the modifiers to turn the whole thing into a regular mesh. I like to make a copy of my 'BraidTile' and 'BraidPath' first, just in case I want to go back and change the shape later. After converting it to a regular mesh, I'd recommend going in with proportional editing turned on and randomly scale and move a few of the pleats just a little, to make the braid look a little more organic. You can even add a couple strands to make it look messier, if you dont mind adding to your poly count even more. But this comes down to your preference and style. The braid below has had some half-assed editing done to demonstrate the concept. (Note: This is actually the low-poly version of this particular braid shape)
Ultimately, it is up to you to decide how you want to blend the braid in with the rest of your hairstyle. I can't tell you how to do that, as it is ultimately going to come down to your own personal preference, workflow, and the hairstyle you are making.
How do I know if I should use Hi, Mid, or Lo poly?
This is largely due to personal preference, and how you're using the braids in your project. I have included the three different poly versions to try and be mindful of the overall poly count of your poor poor meshes, but even a lo-poly braid is going to add an easy couple thousand polygons to your project. Keep that in mind! If you plan on having a LOT of braids, something like this EA hairstyle, for example:
You will probably want to follow their example and use a very simple mesh and just apply a braid texture instead of using these. EA's braids here appear to be a simple box shape painted to look like braids.
If you only plan on having one, maybe two braids in your entire project, especially if they are very large braids, then you might want to go with the hi-poly option. They're the smoothest, roundest choice.
If your braid has a very small diameter, you can probably get away with just using the lo-poly option, and save some polygons you won't need anyway.
The mid-poly version exists as a sort of happy medium. They aren't quite as pointy as some of the lo-poly shapes, and they won't inflate your poly count as much as the hi-poly models, so you may find you prefer them for your applications.
It's all very subjective.
I think that's pretty much everything I wanted to say. If you have specific questions, my inbox is open.
Keep in mind I am not very skilled in blender! There's probably some optimization that can be done if you know what you're doing, and I welcome you to tweak these meshes to your heart's content, if that's you! I made these for me, but I figure they could make someone else's life a little easier too, so here you go.
If you make anything using them you are welcome to tag me! If you don't end up making anything with these then I hope you at least have some fun playing with them!
#simoleon#THIS IS NOT CC DO NOT DOWNLOAD THINKING ITS CC#im going to the store now if anyone has any questions ill answer them later#dl#(as in 'download' not 'delete later')#i dont wanna put this in my cc tag but i also dont wanna lose track of it yknow
204 notes
·
View notes
Text

Shin Soukoku from Animage Magazine 2023 September issue
#Who would have thought that obsessively refreshing on ten different Animage selling sites-#to see if any would have uploaded previews would have actually paid off#atsushi nakajima#ryūnosuke akutagawa#sskk#shin soukoku#bsd#bungou stray dogs#bsd s5#bsd season 5#I extracted a pdf from the viewer but the quality is not as good as the original#I feel like I've tried anything to save it but I can't seem to find a way...#I don't feel like it rn but later I'll probably get to work to screenshot everything and then tie the pieces together#In the meantime I linked the source in case anyone more tech savy than me would like to try their hands at downloading it#and then share it with everyone 🥺🥺
636 notes
·
View notes
Text

Infant Hair Conversions
The fruits of procrastination, i have so much uni work to do so naturally i made some cc.
4 Infant hair conversions
OG links - Jamie | Waves (not active creator) | Shaved (not active creator)| Sherri Curls (by @sheabuttyr back when she was shellywelly)
Big thank you to @yooniesim who helped me figure out an issue with one of the hairs - Its my fave one so thanks for the help :D
BGC
Kinda Hat Compatible (depends on the hat)
15 Maxis swatches
Custom Thumbnails
My TOU is open so do whatever pls give credit tho - but please stick to the OG creators terms if there's any.
Any issues please let me know - Download under the cut
Download | SFS |
#ts4#sims 4#ts4 cc#sims 4 cc#ts4cc#sims4cc#s4cc#s4 cc#ts4 download#sims 4 download#shycc#i'll add an alt link later
3K notes
·
View notes
Text
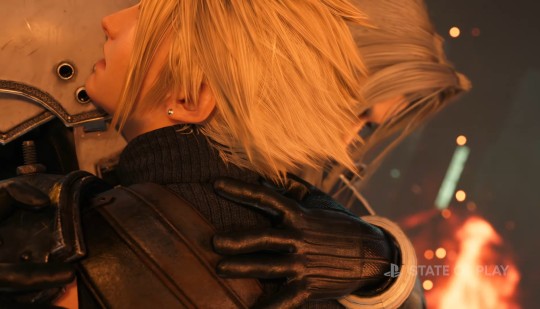
Rebirth trailer cool and all but this is all I can think abt
#the demos out but ill play it later 🫶 mainly bc its still downloading svdjrhdhbd#how we feeling abt rebirth btw#ff7#ff#final fantasy rebirth#final fantasy#final fantasy vii#final fantasy 7#ff7r#sephiroth#cloud strife#sefikura#nothing more romantic than stabbing each other ❤️
388 notes
·
View notes
Photo

🌸 4t2 everyday clutter kit ✨
happy wednesday! as i’m quickly approaching my next milestone, you can consider this part one or a prelude to it lmao. and well, i did not expect to take this long but here are 19 items from the everyday clutter kit by EA. you can check out the rest of the items in the kit here.
please let me know if there’s any issues, enjoy!~ ʕっ˘ڡ˘ςʔ
files are compressed. polycount + add’l info under the cut.
download: [sfs] | [box] ♡
credits: EA.

notes: it’s all deco, however i did manage to make a functional stereo version of the boom blocks. it doesn’t have the fx on purpose, i found the stereo rings to be annoying but rest assured it works just as intended. i really wanted to make the jewelry stand functional, but i struggled immensely with it lol. (believe me, somehow it worked only for it throw errors the next day like ?!) so please, if you have the skills go for it!! i accepted defeat with that haha. most items have subsets, but not all. and for some reason, the functional boom blocks did not like it when i attempted to add subset lol. also, i added a collection file this time around! it made sense being a kit and all. it has the EA Games logo on it. :]
POLYCOUNT:
a slightly creative collection - 323 polys
antique spare watch - 278 polys
beacon of intention active set - 324 polys
boom blocks - 369 polys
coinoctagon - 249 polys
gym in a box - 371 polys
invincible frame tray - 384 polys
mega magazine stack - 134 polys
once a pawn a time chess set - 328 polys
procrastinator’s box of stuff - 271 polys
sealine memories - 885 polys | wall hanging
shine on shine off - 382 polys | mirror
snack pack to go - 218 polys
spare specs - 242 polys
subtle serve makeup kit - 312
the adoringly adorned jewelry stand - 308 polys
the pro-tector - 323 polys
the thirsty thermos - 92 polys | repo’d to gym in a box
trinketville - 74 polys
#ts2 download#ts2cc#4t2#4t2 conversion#s2cc#sims 2 cc#4t2cc#ts2 clutter#ts2mm#ts2 deco#ts2 object#ts2 maxis match#s2mm#ts2 simblr#im way happier w the custom thumbnail for the mirror this time around !!#but very disappointed in myself for not getting the jewelry stand right#hopefully someone else takes it on tho! :]#three days later i'm ready to tap out sdnfsd
2K notes
·
View notes
Text
I feel like I've seen most of what interests me in FiMFiction for the time being, so I read through some good ol' reliable Stardew Valley fanfics last night, only to realize.
Haley x Female Farmer is basically Rarijack. Rarijack adjacent.
#personal#delete later#not art#unfortunate that i'm really not into the BIG popular ships in stardew#like. i downloaded talkohlooey's character sprites for my sdv because the men just look so much better#with talkohlooey sebastian actually looks like a cute guy i'd wanna date. default seb looks like a very very specific white boy.#like. the mod of an anime community discord server.#he looks like every white anime fan i knew in high school who very intentionally tried to look and dress more asian#so unfortunately i'm not really into any of the male bachelors. They are All White.#I went after Alex at first but he's a white bread jock.#So I'm really not interested in ships with Shane or Elliot or Sebastian which make up 2/3 of the romance fics#I do think Harvey is cute he has a lot of personality and he's a sweetheart#stardew expanded has victor AND olivia which is such a fucking win. Asians fuck yeah#I usually pursue Penny. Fluttershy vibes lmao#hopefully chocolatier has some dateable men who Aren't White.#Really can't recommend Talkohlooey's sprites more. Fantastic art style AND character design direction to boot. They made Emily Not#Terrifying Looking which is incredible.#still wish you could date the milfs though who said that#i said it. i'm fessing up. why did concernedape put all these women in unfulfilling marriages with mediocre/crappy men#what are you getting at.
157 notes
·
View notes
Last Seen Blogs

grape-writes
Writing hours

phoenixalmighty
Only technically a blog
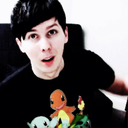
lilaclester
Phanxiety
sourplumjinx
Inferno's gay sex warehouse
lilaclester
Phanxiety