#3d layered design
Text


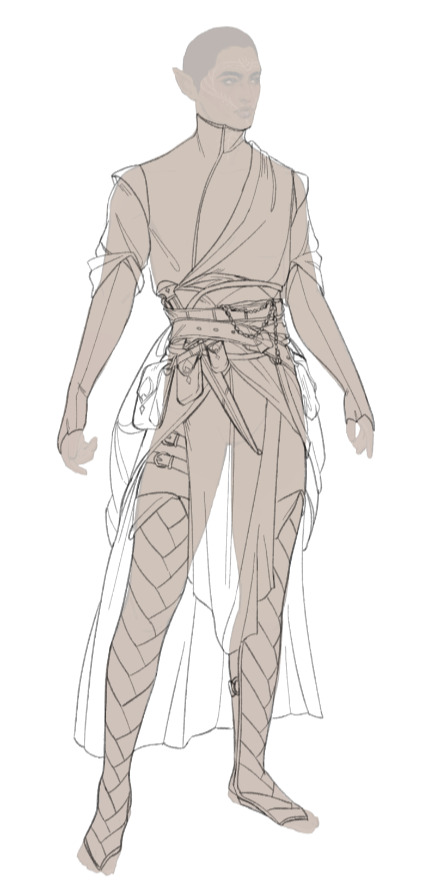
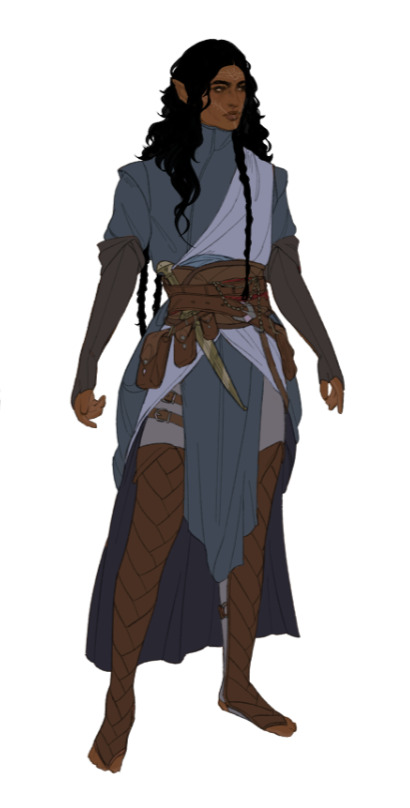
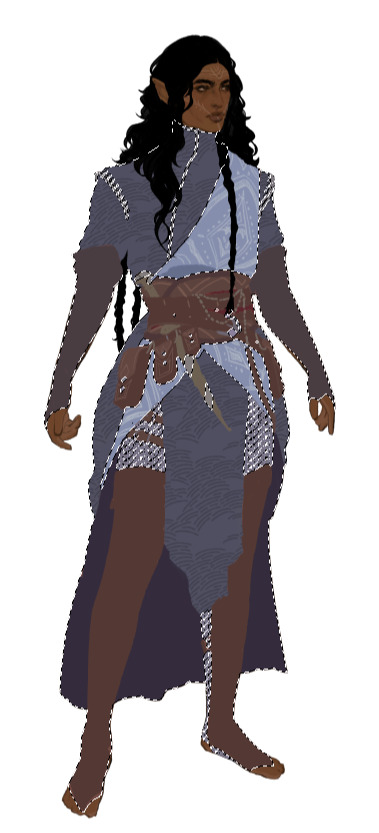
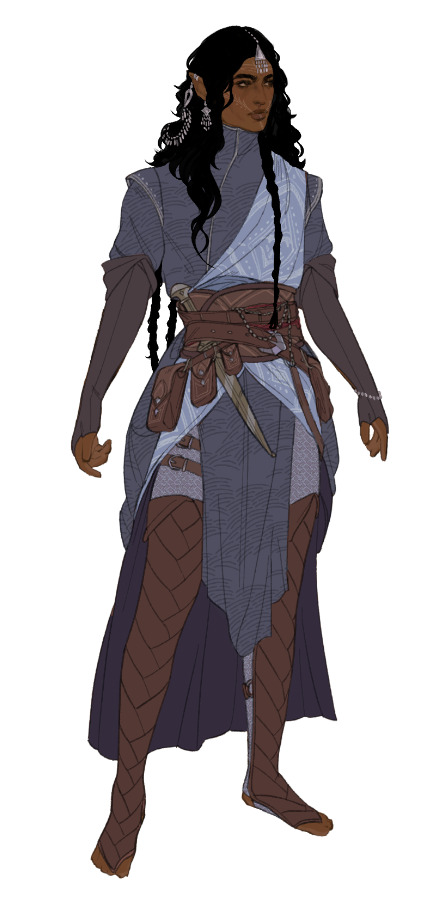
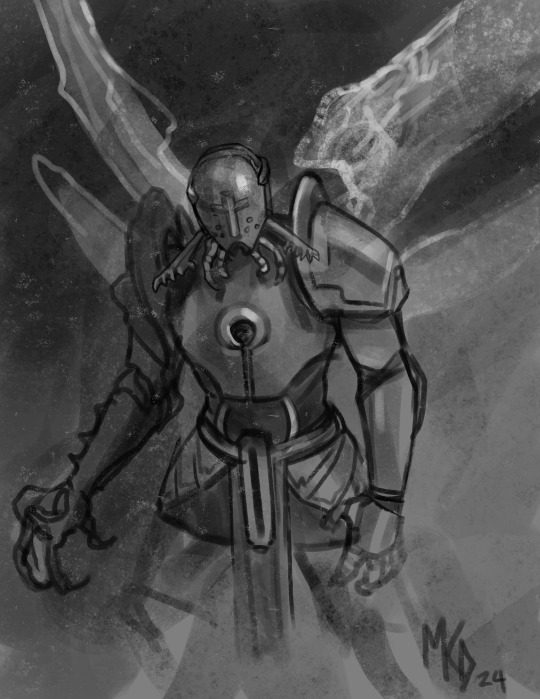
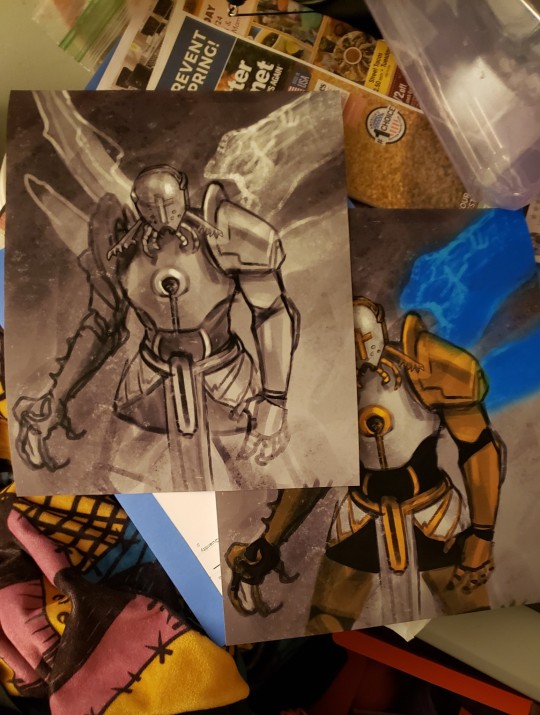
let me be clear that this isnt supposed to be a smug "fix" but rather a quick test of my hypothesis that the main thing making this design not land is the colour scheme. first palette is from a genshin character (since that seemed to be most of the unfavourable comparisons), second is a more typical fire emblem lord palette. feel free to discuss!
#personal conclusion: mixed#its definitely much better but theres still nothing i actively like about it#and too many weird/overly busy/unharmonious aspects#the tie being tucked under whatever that tiny blue underboob wrapping is#the outfit blue not even being the same blue as the hair. or the eyes#eye*#the entire outfit being covered in shiny gold decoration but the circlet being silver#just. so much white. white on white layers#i dislike the design in her 2d artwork as well but the translation into the switch's. well. limited 3d graphics did it absolutely no#favours either#i think theres supposed to be some french inspiration (besides the obvious tricolore) but its so unfocused and uncommitted#which is a shame cuz theres endless material to take from versailles/louis xiv/baroque/rococo/the revolution/etc#and it wouldve fit a 'modernising' step ahead of the classic dragonslayer medieval fe
172 notes
·
View notes
Text
extremely specific work-related gripe that has been playing on repeat in my brain since yesterday:
Mudbox my betolerated, why you save paint layers as .tif's by default
#Mudbox my betolerated#3D artist#3D Art things#Mudbox#look I know Mudbox is the ginger step-cousin of the 3D art world but I can smudge on imported paint layers and the knife tool is so dope#meanwhile Zbrush gives you 32 brushes but all you'll ever need is Dam Standard and even that isn't the Mudbox knife tool#just let me have adjustable falloffs Zbrush PLZ#I imported Mudbox's texture alphas into Substance because they're so dope#Don't worry I use Zbrush for most of my other sculpting work#Y'all have too much loyalty to certain programs istg#.TIF doesn't even make sense in a high-fidelity 3D setting because it was designed for PRINTING#.TARGA if you want a lossless filetype with an actual dedicated Alpha channel jfc#Yeah I know .TGA is from 1980-something but .PNG is from 1997 so its not much better in the grand scheme of things#screaming into the ethernet#work-related screeching
2 notes
·
View notes
Text
noticed two things while cleaning Annette up and gluing her to a base, one, I’m gonna have to print another one of her at some point, or just pay for someone else to, I think mistakes were made clipping supports and maybe I didn’t have her at the best angle (the front’s fine and I can probably do some light kitbashing if the flaws really bug me)
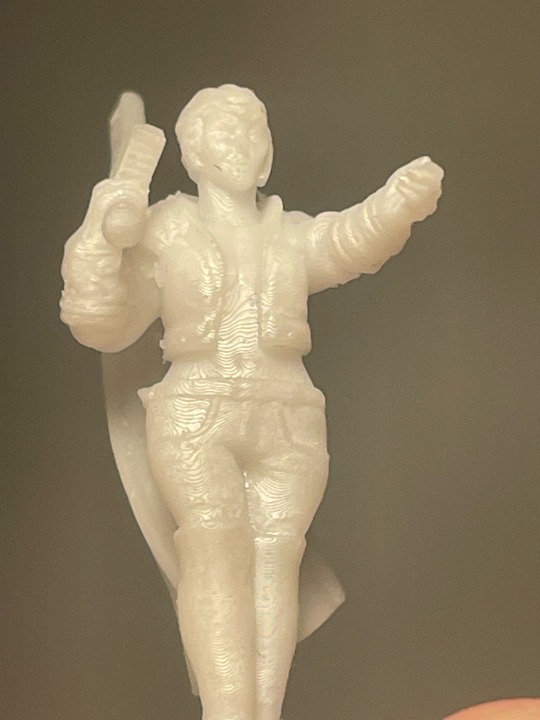
two

she is cheeked. up.
#probably failed to check for that in the ‘making her a bit bigger’ design step before buying the STL#also hello those layer lines#they’ll disappear in painting I’m sure#xcom#xcom enemy unknown#xcom enemy within#annette durand#28mm scale#Heroforge#3D printing
2 notes
·
View notes
Text
MOVIE TITLES - Vol.16 | Text-Effects | TempPack by Sahin Düzgün
#3d#3d text#3d design#3d effect#text effect#layer#smart object#photoshop#mockup#template#psd#logo#design#effect#style#typography#film#movie#fantasy#animation#classic#cinematic#90s#2000s#2010s#aladdin#frozen#disney#toy story#jungle book
3 notes
·
View notes
Text
Uhhh why aren’t the furious 5 in the king fu panda 4 trailer
#what’s going on#trailer looks awful but I’m not too scared bc dreamworks always makes their trailers super juvenile#and they’ve done this franchise especially dirty#I go into them more assessing if the concepts are interesting and I think they are#and I like the design of the new wolf/fox character idk what kind of canid she is#the shapeshifting villain seems really cool and I like the layer of having to take over the characters she is able to transform into#it does seem a bit too similar to the jade zombies from the last movie so I hope they make an effort to thematically differentiate them#if that makes any sense#overall the animation is obviously great but it’s not that much of a step up from the last one#like the quality of the CGI is about the same#I can see a lot of potential for visual spectacle with the villain#and really playing with the animation style#bc one of my favorite thing about the kfp movies is how they do that#like with the 2nd one how they used different art styles to represent different levels of reality?? (ig that’s they best way I could put it)#like the present reality would be in the typical 3d textured animation style#and the dreams were in the 2d style#and the stories were in shadowpuppetry#so yeah overall I’m not to thrilled about them making a 4th bc the og trilogy works so well thematically as a trilogy#with the whole body mind spirit thing#but overall it looks like there’s some promising concepts#but like please don’t push tigress to the background she deserves so much better
0 notes
Text
Designing with Photoshop's 3D tools
View On WordPress
#3D design#3D layers#3D lighting#3D materials#3D modeling#3D object manipulation#3D rendering#3D tools#ahsan mahmood#aoneahsan#Graphic design#Photoshop#zaions
1 note
·
View note
Text
tgcf hualian acrylic charms i designed for my next store launch! they're gonna have a layered 3D effect and hopefully a semi-transparent bg
1K notes
·
View notes
Text
☀️☘️Ich freue mich auf dich ☘️☀️
#mandala #wood #art #psychedelicart #goatrance #artgallery #fractalgasm #artofinstagram #fractal #artforsale #psychodelictrance #psychodelictrip #psychodelicart #psychodelic #mandalas #woodart #woodwork #woodworking #mandalaart #psychedelicartwork #goaart #artworkgallery #fractalart #fractaldesign -
#mandala#trippy#abstracart#mandalaart#art for sale#mandala layered#3d#art#artists on tumblr#graphic design#design
1 note
·
View note
Text
Assembly détails
#design#architecture#interieur#maquette#sketch#architecture model#axonometric#details#layers#models#3d model#rhinoceros
1 note
·
View note
Text
IT IS DONE (for now)

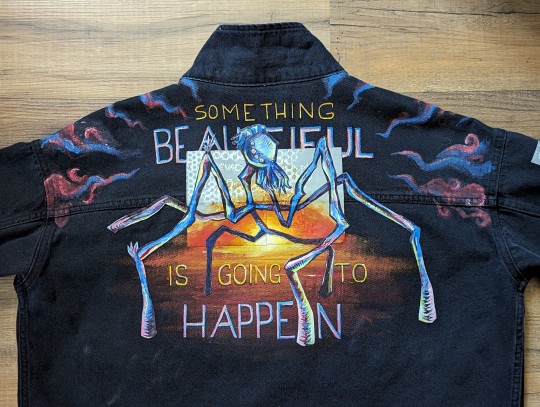
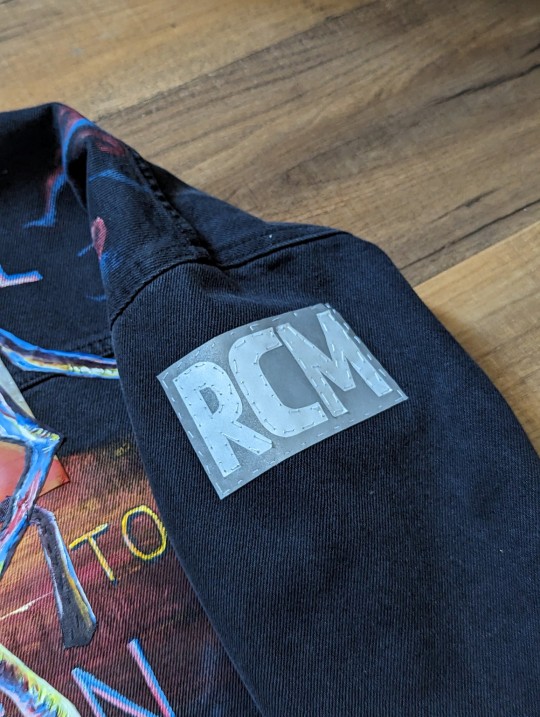
I finished the disco jacket I've been working on for ages. I might still change or add some more details but I'm really really happy how it turned out and I'm looking forward to actually wearing it
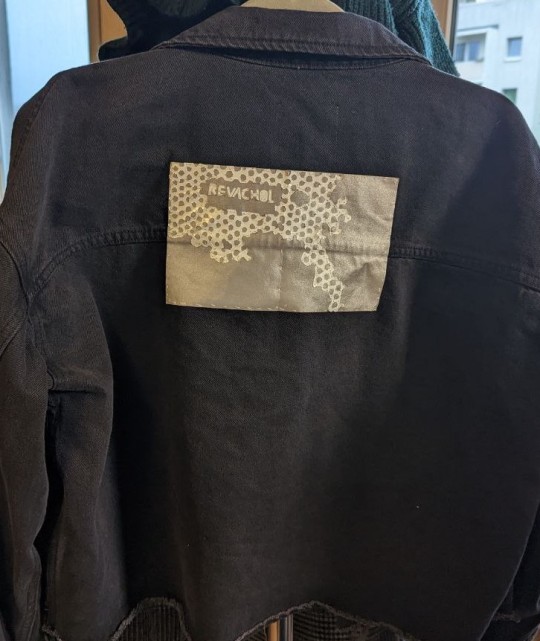
I tried to recreate the halogen watermark effect by using two different types of reflectors, using one as the background, cutting out the design from the other one, and sewing that onto the first one. That leads to a kind of cool effect when taking photos with flash:
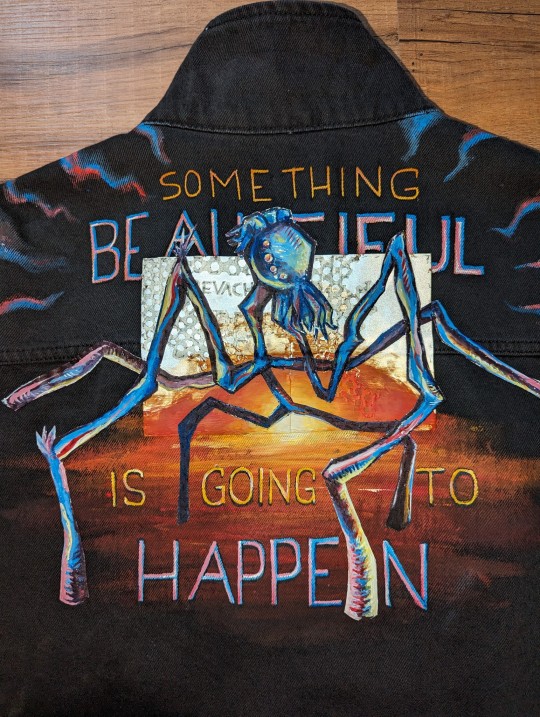
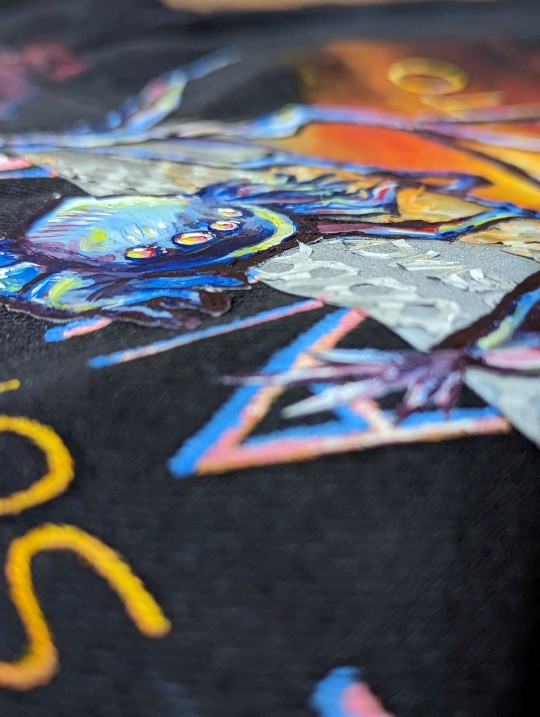
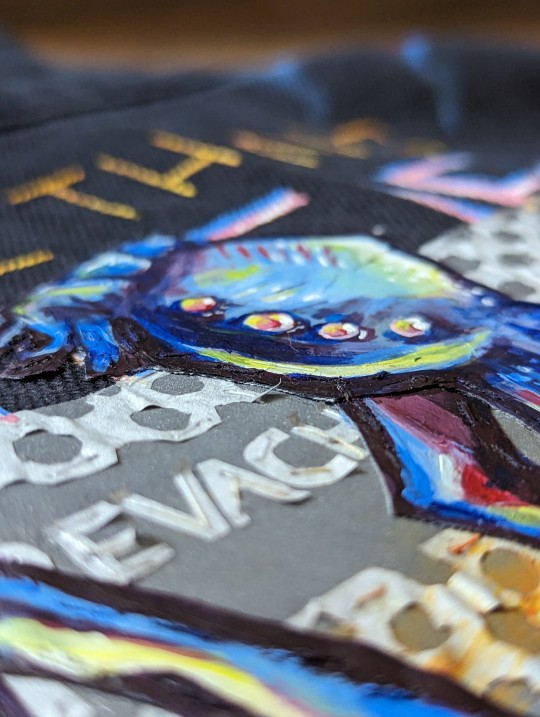
For the phasmid, I cut out pieces from the first reflector material and painted on them with acrylics, then sewed them all together and onto the jacket. That the phasmid is an actual extra layer leads to a nice 3D-ish effect
I probably will add some more stuff, especially in the front side of the jacket -- but that might take me another 8 months, so I'm calling it done for now
I'm also going to take some photos of the jacket actually being worn soon
Some more progress pics under the cut:
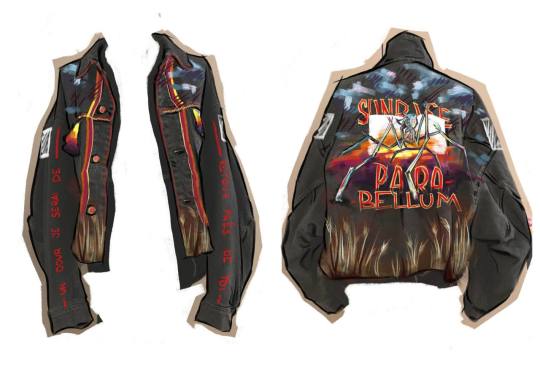
This was my very first plan for the jacket -- I didn't really think about how exactly I wanted to make everything and hadn't even bought the actual jacket at this point so a lot of it turned out to be too much effort to make (for now) -- like the reeds at the bottom and the whole front part. Also I changed the text because A I couldn't find a good way to place the letters of sunrise parabellum and B "something beautiful is going to happen" just sums up the spirit of disco elysium so beautifully to me
Soooo when I finally got the jacket I started by making the reflector patches and then made a new plan for the rest of the jacket:
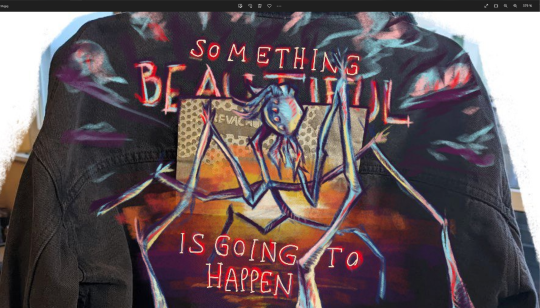
Then it was just a lot of work painting everything and sewing everything together. The reflector material is very sturdy so I hurt my fingers a lot making it, and after sewing on the first version of the phasmid I had to paint over the whole thing again to hide the damage sewing did to the paint as well as possible
I also put some work into trying to make it more durable by heat setting the paint and using some acrylic spray over the whole thing but I'm under no illusion that it would survive a washing machine, so hand wash it is
#disco elysium#disco elysium fanart#insulindian phasmid#fanart#acrylic#i made this art thingy#something beautiful is going to happen
1K notes
·
View notes
Text
I like you [2d-ifies my narrator] (:
ft. @mikothemushroom ‘s fella !!
Here’s a bit of trivia: Did you know that when I first made Laurence back in mid-February of 2023, he had an alternative 2d form to his regular one ?!?!?! Yeah its pretty rad
I thought that since that design was horribly outdated and very old, I might as well make it a bit better and more suitable for Laurence’s current and more deranged self C:
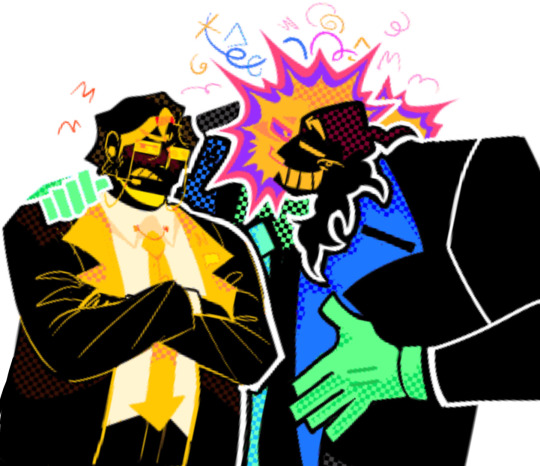
^^ Yellow fellow on the left belongs to @mikothemushroom (as tagged above) !!! They’re idiots, your honor /aff


Some fun facts about the lad (2D Laurence):
- His overall design remains relatively consistent, but his color palette shifts with every appearance! (Excluding the explosion shape’s first… ring…? Layer…? Either way, it’s always pink to match with the hair of his 3D counterpart ^_^)
- The only design changes are located in his trench coat/“clothes”, whether it’s a different tie or different accessories (like pins) or small designs on the lapels of his trench coat
- 2D Laurence is supposed to look similar to my Timekeeper design (which I still need to make proper art of oug)… “for what reason?” you may ask, and to that I say…! [STARTS RUNNING IN THE OPPOSITE DIRECTION]
#art#digital art#fanart#illustration#my art#artists on tumblr#original art#tspud#the stanley parable#tsp#the narrator fanart#the narrator#the narrator tsp#the stanley parable ultra deluxe narrator#tspud fanart#tspud narrator#tspud art#tspud timekeeper#tsp ultra deluxe#narrator tsp#tsp narrator#tsp fanart#tsp fandom#tsp timekeeper#the stanley parable ultra deluxe#the stanley parable narrator#the stanley parable timekeeper#character design#character art#silly
194 notes
·
View notes
Note
Hey! I love your art a lot, and you've helped me learn a lot about other things aswell. I just wanted to thank you for all that! ❤️
(This part is optional: I was wondering if you have any process videos of the full body character designs, you do? Like with the different outfits? I love the texture of that particular style of yours so much and would love to learn to integrate some aspects into my own art, If you would allow for that?)
Hi and thank you! It's much appreciated and I'm glad you stuck around :)
That's totally fine! Unfortunately, I don't think I have any process videos of the character designs (they take me a while and I go back and forth a lot with outfits so I never have space for them on my computer) but I can give a run-through of what I do!
- this is only applicable for CSP -
Step One:
First Image: So I start with the base, I go about these like those paper dolls. I sketch these out, line them, and color them in as I would any other lineart - however I merge the layers after I'm done. They are always bald because if I'm going for an outfit lineup I can change up the hairstyle depending on the clothes. Second Image: After I merge all the layers and lower the opacity, I can sketch the outfits on a different layer - If there are smaller details I want to include I usually sketch them in a different color so I can see it clearly.


Step Two:
First Image: after sketching out what I want, I turn down the opacity for the sketch layer and line over that. I use a really high stabilization because I have shakey hands and it always looks clean with a high stabilization. For things like jewelry, I don't always do line art (mostly depends on how small it is) but I save it for later. Second Image: I don't always do hair as a solid color but In this case, I painted the hair on a layer above both the lineart, base, and coloring layer. Coloring the lineart is pretty standard, nothing fancy (I use the fill tool to speed up time often). Just make sure the colors are differentiated enough so you can use the color gamut tool in the next step.
Step Three:
Images One & Two: With the lineart fully colored, you can select individual colors and add or draw patterns. Most of the patterns I use are from the Csp gallery (bunabi has good ones up I use often). If you have the selection on a different layer, you can change up the layer filter or even do another select color gamut on the pattern and shade/color it yourself (this is how I do metallic fabrics). Once you're done adding patterns, merge everything except the base layer and lineart.

Step Four:
Images One & Two: For things like jewelry that would be too small to line, I freehand a silhouette of the jewelry with a bright neon color, then select the color gamut on the neon color, and then select the color outline so it has the appearance of me doing itty bitty lineart for it. I go back in on the color layer, shade it, and color it as metal, and then bam. You are all done!

Smaller things: After everything is done sometimes I'll go back in with a dark pen and go over some of the lineart where fabric creases just to give it more depth or I'll put a color filter over the final drawing just to make it all a bit more cohesive.
This is the brush I use for softer lineart:
And this is the brush I use for more thin, detailed, lineart:
Hope this helped a little, happy drawing!
167 notes
·
View notes
Text
My commission from @perennialastronaut
I commissioned Marieke aka Perennial Astronaut to draw an "Angels is Bugs" Gabriel during one of her commission streams ( her twitch : https://m.twitch.tv/perennialastronaut). Her steam commissions are extremely affordable given the speed and quality, only 25 CAN which is like 18 USD.
I did a quick color version (since it's already fully shaded, I just put a flat color layer on top and set it to "multiply". No skill involved on my part) and got prints of both done at Walmart.
I designed a photo frame to 3d print so I can hang it up on the wall next to my Gianni print, and am in the process of printing the first part. I'll probably need to do a lot of trouble shooting but hopefully it'll turn out well.
101 notes
·
View notes
Text
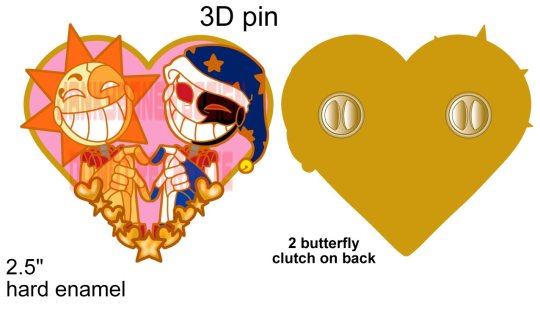
Sun and Moon 3D Valentines Day enamel pins available for pre order now!
LINK FOR PRE ORDER HERE!
Sun and Moon will be a layer above the heart, and the bordering design at the bottom will pop out and be very 3D!
3D pins are a bit more pricey due to how expensive they are to make! I am only selling 50 of these, so get them while you can! They won't arrive until AFTER V day due to production time, most likely shipping late Feb or early March.
#jankyart#fnaf#fnaf sun#sundrop#fnaf moon#moondrop#five nights at freddy's#fnaf security breach#fan merch#enamel pin
128 notes
·
View notes
Text
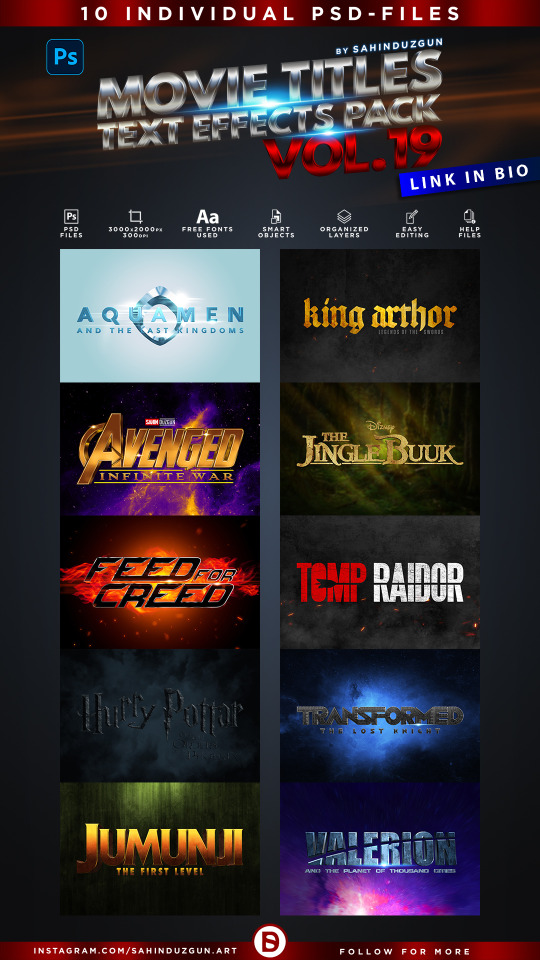
MOVIE TITLES - Vol.19 | Text-Effects | TempPack by Sahin Düzgün
#3d#3d text#3d design#3d effect#text effect#layer#smart object#photoshop#mockup#template#psd#logo#design#effect#style#typography#film#movie#sci-fi#fantasy#horror#superhero#animation#classic#80s#90s#video game#cinematic#harry potter#the jungle book
3 notes
·
View notes
Text
Why Do X-Ray Mirrors Look So Unusual?
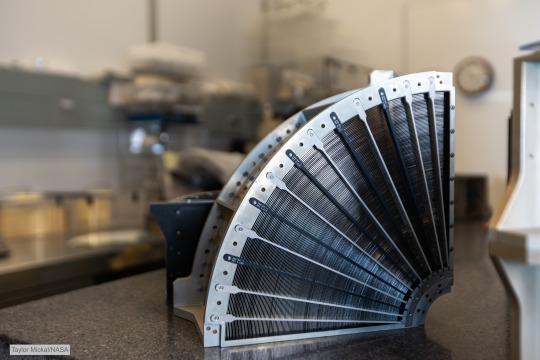
Does the object in this image look like a mirror? Maybe not, but that’s exactly what it is! To be more precise, it’s a set of mirrors that will be used on an X-ray telescope. But why does it look nothing like the mirrors you’re familiar with? To answer that, let’s first take a step back. Let’s talk telescopes.
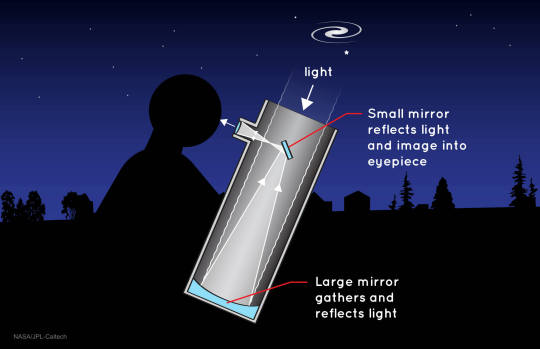
How does a telescope work?
The basic function of a telescope is to gather and focus light to amplify the light’s source. Astronomers have used telescopes for centuries, and there are a few different designs. Today, most telescopes use curved mirrors that magnify and focus light from distant objects onto your eye, a camera, or some other instrument. The mirrors can be made from a variety of materials, including glass or metal.
Space telescopes like the James Webb and Hubble Space Telescopes use large mirrors to focus light from some of the most distant objects in the sky. However, the mirrors must be tailored for the type and range of light the telescope is going to capture—and X-rays are especially hard to catch.
X-rays versus mirrors
X-rays tend to zip through most things. This is because X-rays have much smaller wavelengths than most other types of light. In fact, X-rays can be smaller than a single atom of almost every element. When an X-ray encounters some surfaces, it can pass right between the atoms!
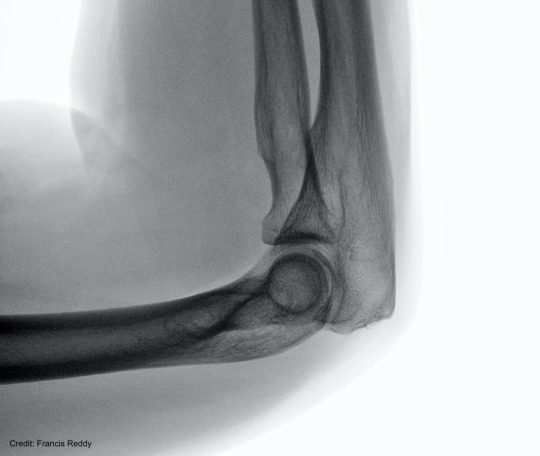
Doctors use this property of X-rays to take pictures of what’s inside you. They use a beam of X-rays that mostly passes through skin and muscle but is largely blocked by denser materials, like bone. The shadow of what was blocked shows up on the film.
This tendency to pass through things includes most mirrors. If you shoot a beam of X-rays into a standard telescope, most of the light would go right through or be absorbed. The X-rays wouldn’t be focused by the mirror, and we wouldn’t be able to study them.
X-rays can bounce off a specially designed mirror, one turned on its side so that the incoming X-rays arrive almost parallel to the surface and glance off it. At this shallow angle, the space between atoms in the mirror's surface shrinks so much that X-rays can't sneak through. The light bounces off the mirror like a stone skipping on water. This type of mirror is called a grazing incidence mirror.
A metallic onion
Telescope mirrors curve so that all of the incoming light comes to the same place. Mirrors for most telescopes are based on the same 3D shape — a paraboloid. You might remember the parabola from your math classes as the cup-shaped curve. A paraboloid is a 3D version of that, spinning it around the axis, a little like the nose cone of a rocket. This turns out to be a great shape for focusing light at a point.

Mirrors for visible and infrared light and dishes for radio light use the “cup” portion of that paraboloid. For X-ray astronomy, we cut it a little differently to use the wall. Same shape, different piece. The mirrors for visible, infrared, ultraviolet, and radio telescopes look like a gently-curving cup. The X-ray mirror looks like a cylinder with very slightly angled walls.
The image below shows how different the mirrors look. On the left is one of the Chandra X-ray Observatory’s cylindrical mirrors. On the right you can see the gently curved round primary mirror for the Stratospheric Observatory for Infrared Astronomy telescope.
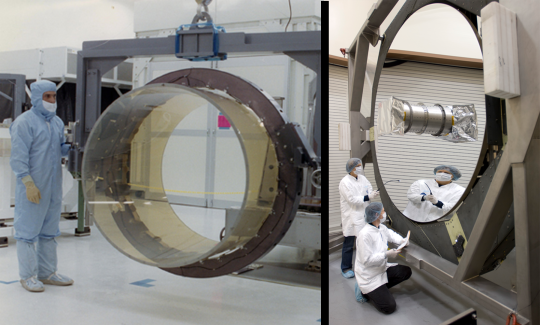
If we use just one grazing incidence mirror in an X-ray telescope, there would be a big hole, as shown above (left). We’d miss a lot of X-rays! Instead, our mirror makers fill in that cylinder with layers and layers of mirrors, like an onion. Then we can collect more of the X-rays that enter the telescope, giving us more light to study.
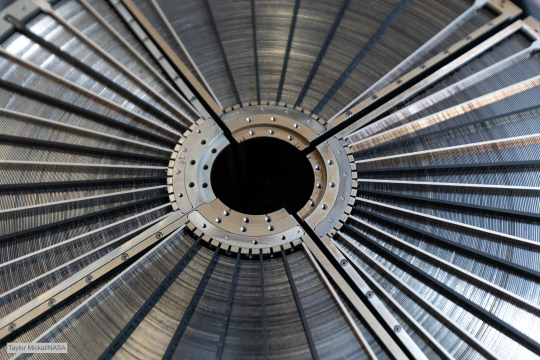
Nested mirrors like this have been used in many X-ray telescopes. Above is a close-up of the mirrors for an upcoming observatory called the X-ray Imaging and Spectroscopy Mission (XRISM, pronounced “crism”), which is a Japan Aerospace Exploration Agency (JAXA)-led international collaboration between JAXA, NASA, and the European Space Agency (ESA).
The XRISM mirror assembly uses thin, gold-coated mirrors to make them super reflective to X-rays. Each of the two assemblies has 1,624 of these layers packed in them. And each layer is so smooth that the roughest spots rise no more than one millionth of a millimeter.

Why go to all this trouble to collect this elusive light? X-rays are a great way to study the hottest and most energetic areas of the universe! For example, at the centers of certain galaxies, there are black holes that heat up gas, producing all kinds of light. The X-rays can show us light emitted by material just before it falls in.
Stay tuned to NASA Universe on Twitter and Facebook to keep up with the latest on XRISM and other X-ray observatories.
Make sure to follow us on Tumblr for your regular dose of space!
#NASA#spaceblr#astronomy#telescope#universe#astrophysics#XRISM#Chandra#x-ray vision#x-ray#space#technology#tech
1K notes
·
View notes
Last Seen Blogs
watchingfairytales
Watching Fairytales
saradigiovanni
Sara Di Giovanni

amai-ra
Amai'ra - Crystalwolf

ncilpcrry
Best Offshore Bank Account

atelier-hmy
illustration by hmy.69