#poseable doll
Photo
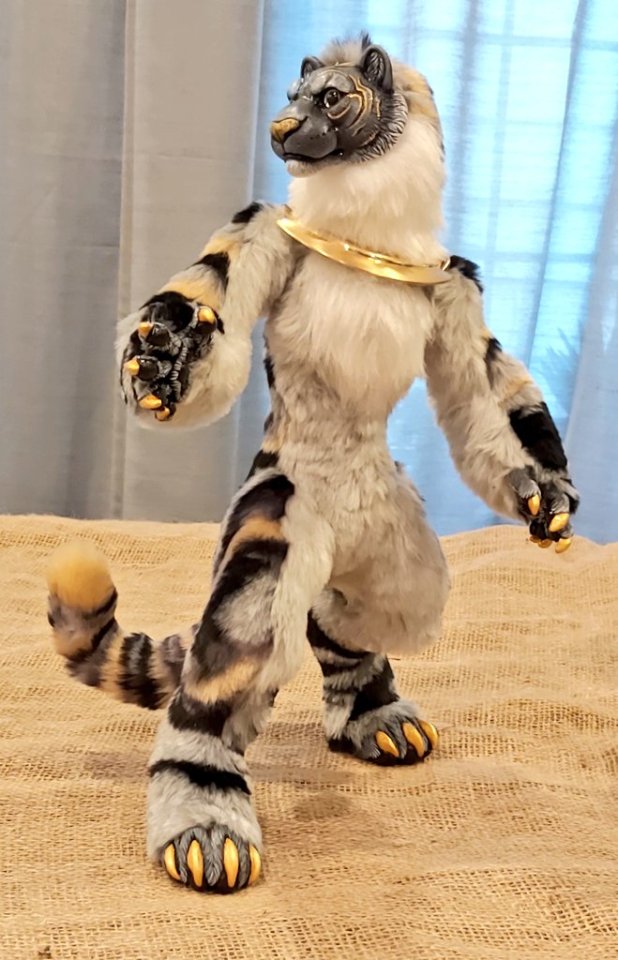
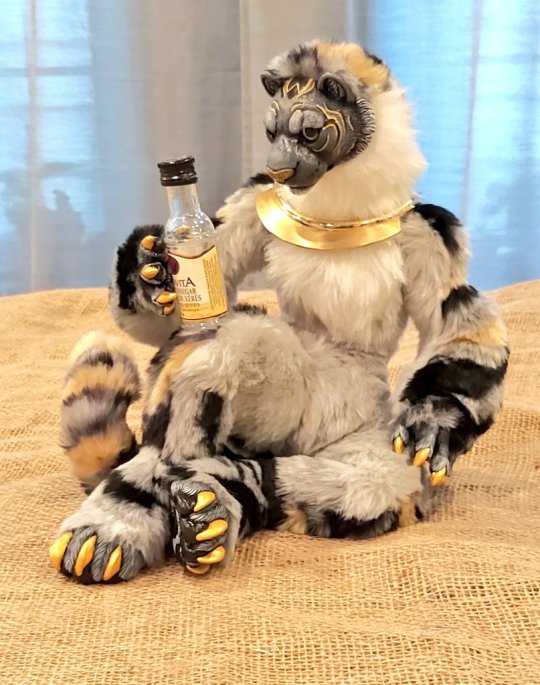


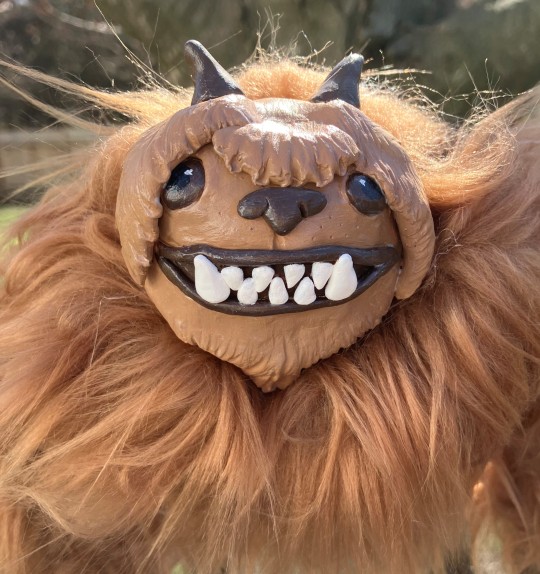
Throwback to this handsome gold striped tiger we did for a client!
#art doll#tiger#weretiger#cat#poseable doll#custom order#handmade#plush#plushie#furryart#anthro#ooak#wormsandbones#homemade horrors
1K notes
·
View notes
Photo


INSTAGRAM | MY SHOP |
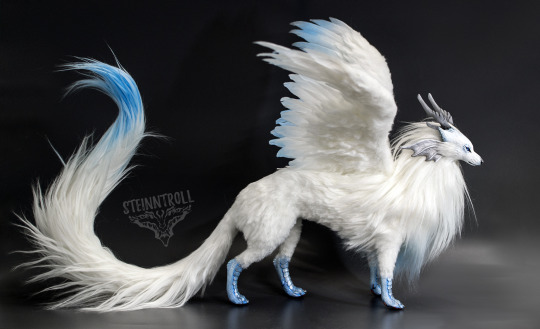
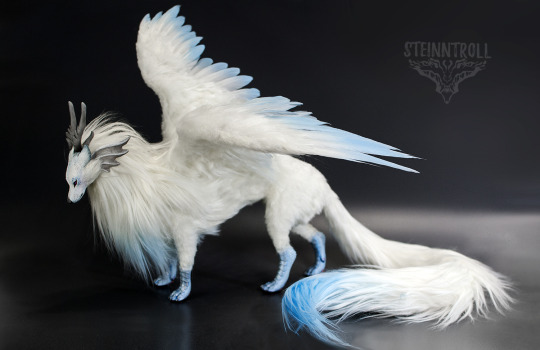
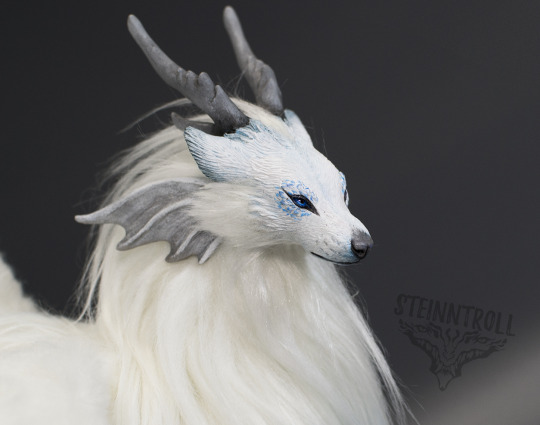
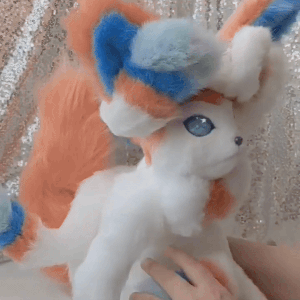
Wolfdragon art doll
Commission
Super sculpey, faux fur, feathers, wire+plastic armature, fabric leather, primer, acrylic paint, varnish. Posable neck has plastic ball-and-socket armature inside and can be posed. Tail and wings are also posable and have wire armature inside. Legs and lumbar also contain wire armature inside, so you can carefully and slightly move it to find perfect balance if you keep the doll on uneven surface.
Size: Doll is around 25cm tall and 70cm length
#art doll#fantasy creature#white wolf#dragon doll#poseable art doll#ooak#craft#traditional art#dragon wolf#winged wolf#figure#poseable doll#animal art
871 notes
·
View notes
Text
cinnamorolls ꩜ hina ichigo (2008)
#2008#flickr#dolls#bdj#ball jointed doll#dal dolls#dal#sanrio#kawaii#doll photography#doll collector#digital archiving#digitalmemoriez#dress up#old web#2000's nostalgia#doll#poseable doll#cinnomoroll
27 notes
·
View notes
Text

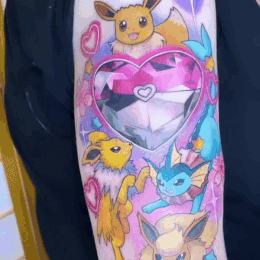

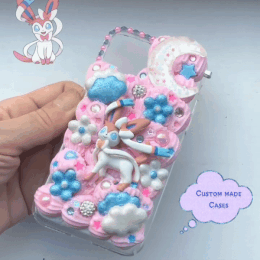
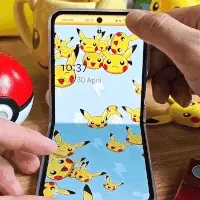

A Pokémon related stimboard with my stim gifs! (I made all of the gifs myself lol)
x/x/x/x/o/x/x/x/x
[GIF 1: Light skinned hands showing off figures of the avian Pokémon Piplup & Rowlet (END ID)]
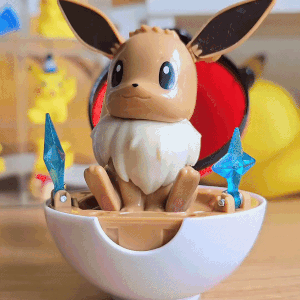
[GIF 2: A person playing with the ears of a figure of the Pokémon Eevee (END ID)]
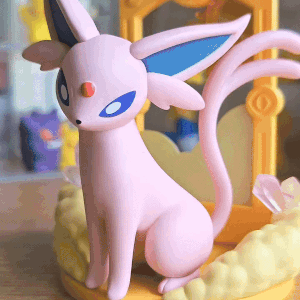
[GIF 3: A camera panning to a figure of the Pokémon Espeon (END ID)]
[GIF 4: A person showing off the details of a poseable art doll of the Pokémon Sylveon (END ID)]
[GIF 5: A camera panning to a person's arm to show a tattoo of the Pokémon Eevee & the original 3 Kanto region Eeveelutions (Jolteon (Yellow), Flareon (Red) & Vaporeon (Blue)) (END ID)]
[GIF 6: A person holding a clothing hanger shaped like the Pokémon Leafeon (END ID)]
[GIF 7: A person holding a statue/figure of the Pokémon Sprigatito (END ID)]
[GIF 8: A person holding a decoden phonecase themed to the Pokémon Sylveon (END ID)]
[GIF 9: A camera panning to a Samsung Galaxy flip phone with an animated wallpaper of the Pokémon Pikachu on it (END ID)]
[IMAGE: The Kirby character Daroach on a yellow/red gradient background with white text w/ a blue outline reading: “Please read my pinned post/DNI list before interacting! Thank you! with small text in heavily stylized pixel font next to it reading “by boba-foxy on Tumblr!” with a small dark red border around the image (END ID)]
#mod boba#pokemon#stimboard#figures#poseable doll#decoden phonecase#phone#visual stim#multicoloured#stim#colours#board#stim board#eevee#sylveon#leafeon#vaporeon#jolteon#flareon#espeon#rowlet#piplup#sprigatito#pikachu
18 notes
·
View notes
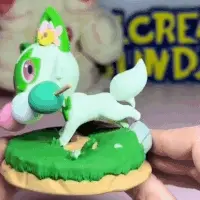
Photo

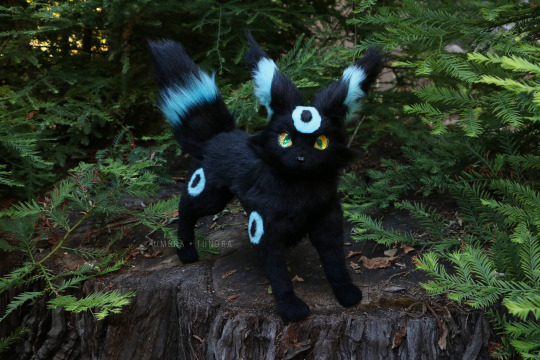
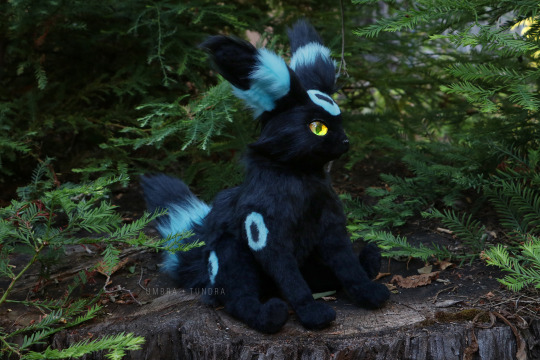
September slot commission was for the much loved Shiny Umbreon 🌒 The first Umbreon I made was a prototype for my large eevees, so I'm glad I was able to circle back and see my progress after 2 years ✌
113 notes
·
View notes
Text
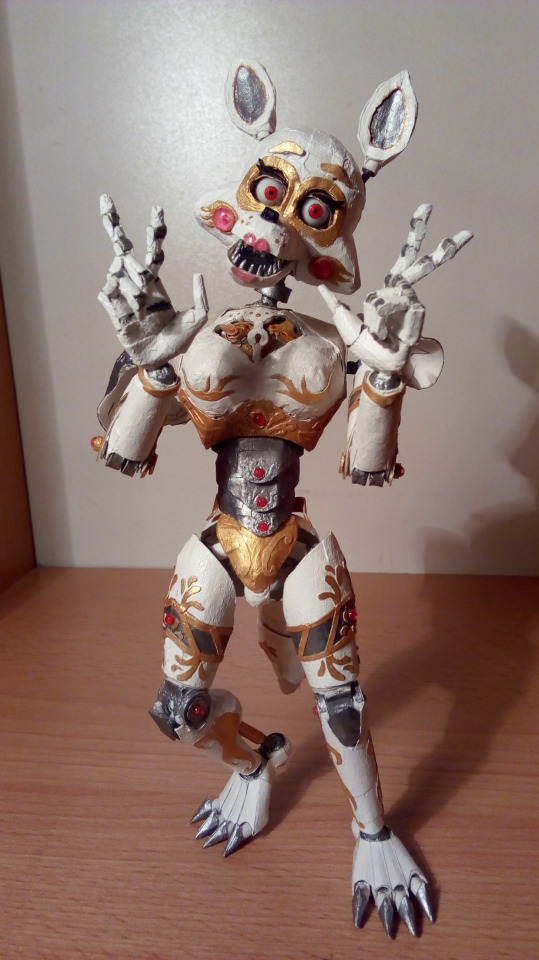
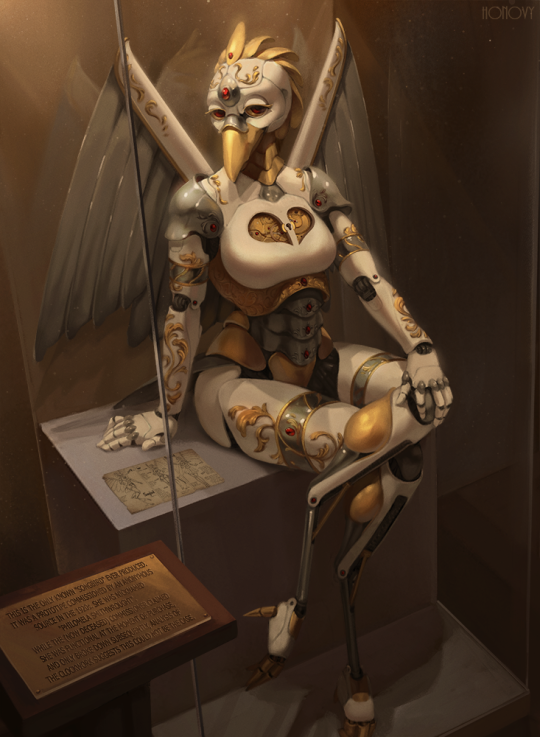
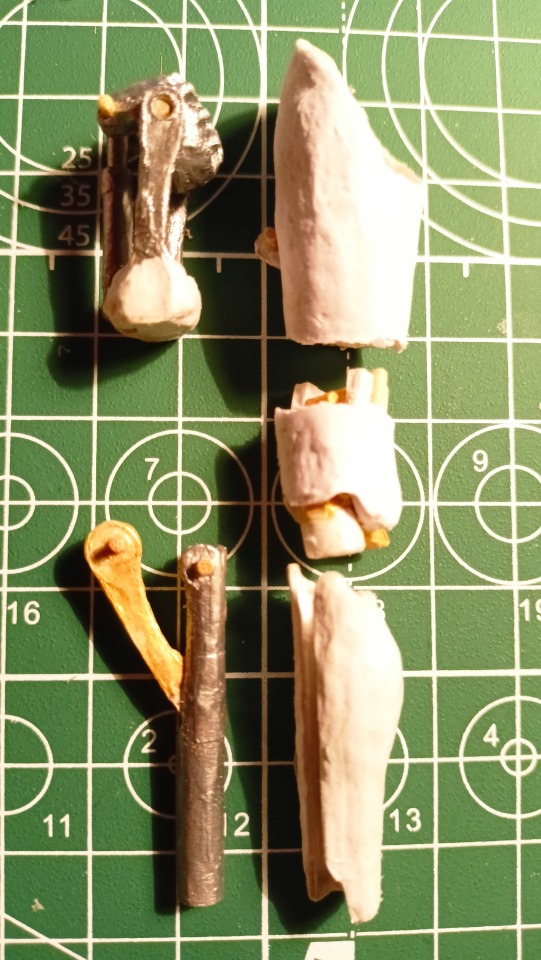
Hello! Many are now at confusion, yes... Foxy in what form it was - no longer exists, it will be redone in a new way. But in order not to throw away the finished parts, after I spent a lot of time on them, I decided to pay tribute and make the one who actually inspired me - Philomela a mechanical bird.
I will immediately warn you that some of the art or drawings are NOT mine and are used only for an example and a general understanding of what I am doing.
More recently, I discovered an expensive, but very effective method. Paper paste (or papier mache) - is finely cut paper impregnated with a water-based adhesive and then kneaded until a homogeneous mass is obtained.
This paste can be used to fill cavities, molds - after hot drying (in my case on a table lamp), this mixture becomes so hard that I can now process it with a file.
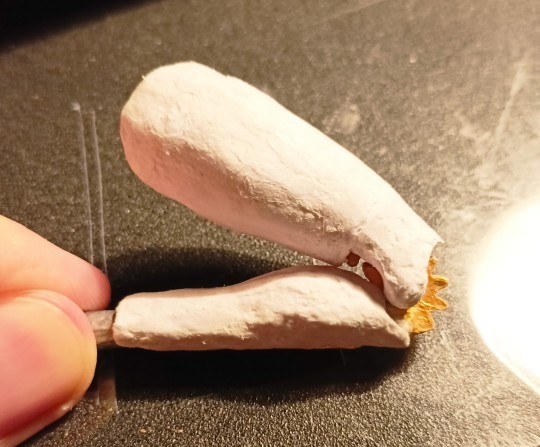
What I did with this hand, before this, clamp it between a vise and start processing part of the joint with a file. I did this trying to make a strong connection between the parts. I inserted the spire, made both holes and covered it completely with paste, let it dry a little, took out the spire and left it to dry completely.
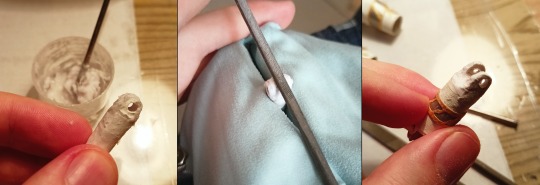
After I processed each part of the arm and slightly improved the connecting part (later I also covered it with paste and dried it), I got a very strong connection.
Now I'm looking for fill shapes to speed up the creation of models and parts for them.

There is a figure less than 20 cm in size, you want to make it close to the original, even parts of it... and you do it.


I couldn’t make the details identical, I had to cheat and simplify, but keep the same functionality.
Instead of a separate movable part to which part of the retractable leg is attached, it has become part of the entire leg.
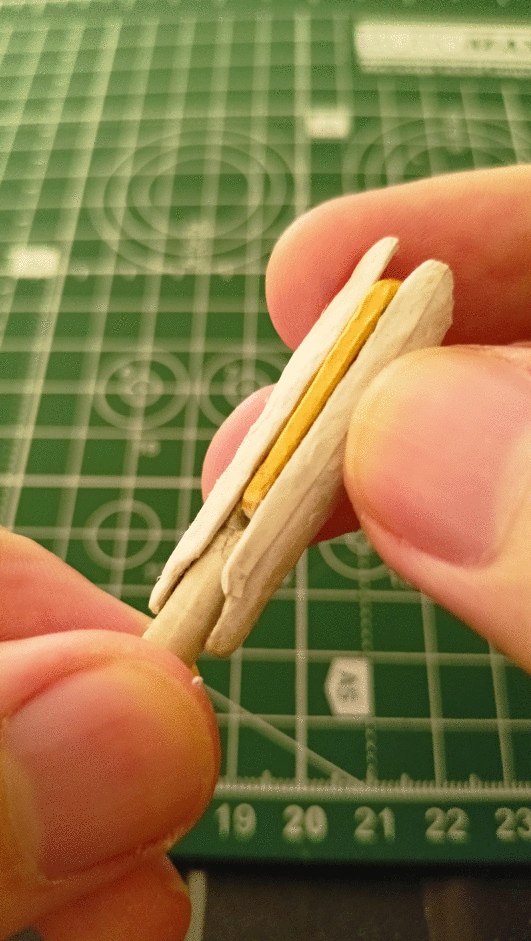
* First, I made the main part itself, a tube with a cutout and a moving part.
* I picked up a tube of a suitable diameter, made a cut along, substituted a half of a thin tube from the side and fixed it. Repeated the same on the other side.
* Part of the leg slides along the edges of these tubes, at the bottom the edges of these tubes are clogged, and thanks to the cutout in the leg, part of the leg bends and the movable part slides up along the tubes.
I couldn't do it without papier mache! Important parts are made using this technique.

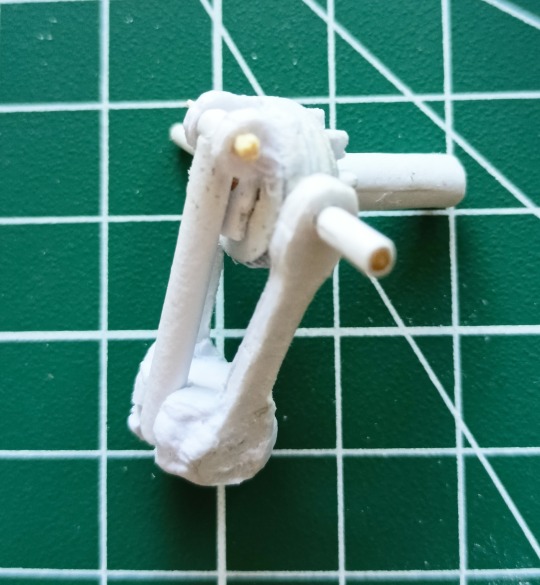
These are the details of the knee. I decided to slightly deviate from the original and try something new.
Was it necessary? No.
Why I did this? Because I can.

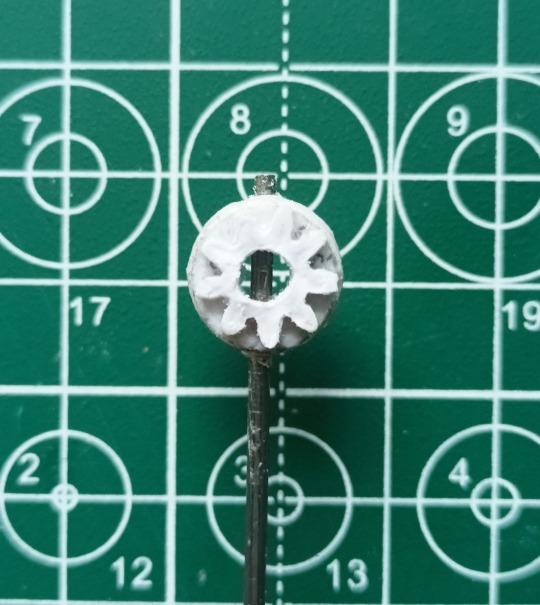
Half of the gear as the base for the knee and the small gear moves with the tilt of the leg.

On the left - this is what I could limit myself to, and on the right - this is what I ended up with:

Here is a little more detail, it has a very complex mechanism in the reed. I decided to do something similar but not quite, in view of the complexity of the detail itself.
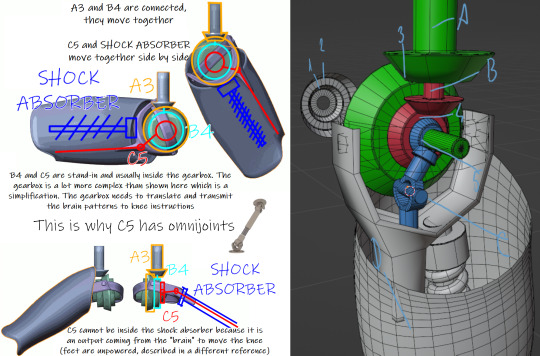
That's how I started to gradually create this mechanism:


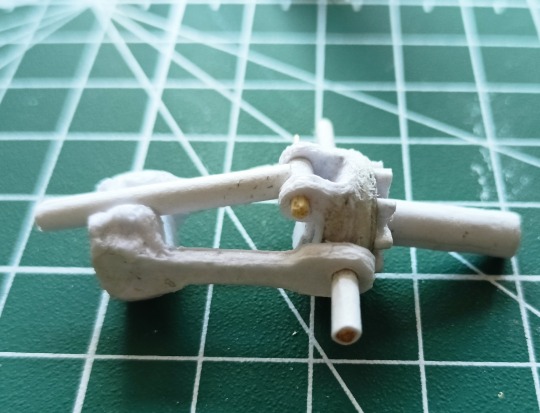

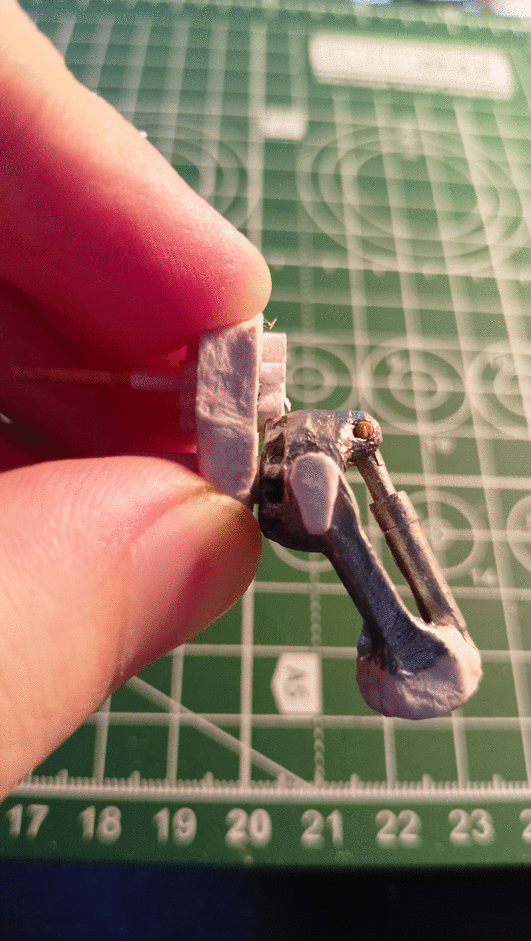
And finally, what the leg itself looks like (so far without a foot)


This is all I can show for now. Yes, I rarely make posts, it's still my hobby, I don't get paid for it)
There is not always time for this, I had an operation last month and put a prosthesis on the hip joint, but everything is already fine with me and so far I walk with crutches.
Thanks everyone and see you soon!
#papercraft#handcrafted#handmade#paper#papermodel#handcraft#robot#poseable doll#mechanical#clockwork#cog#automaton#gif animation#gif#fnaf
7 notes
·
View notes
Text
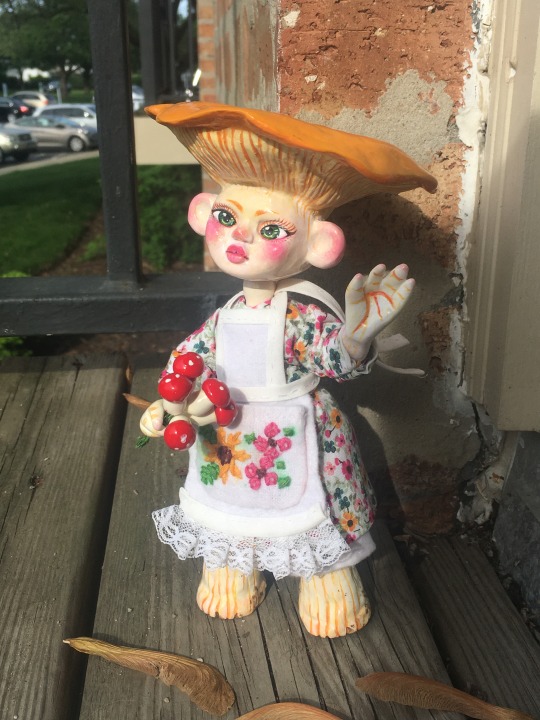
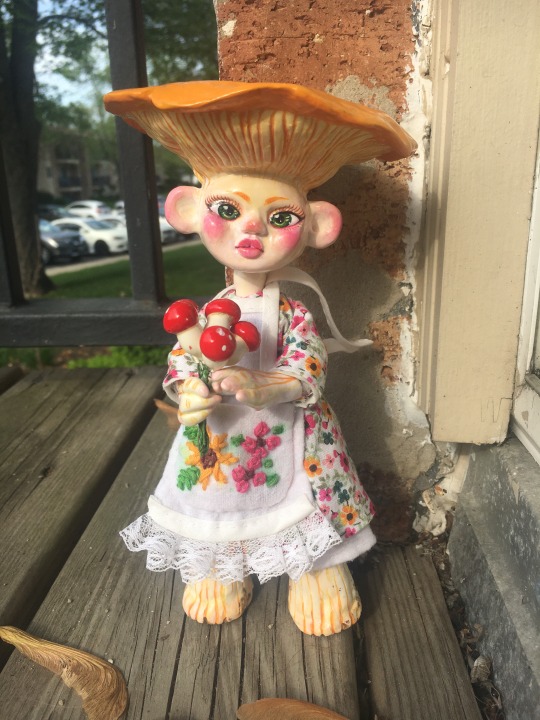
Chanterelle, my second ever doll, is finally complete! im planning on taking her out for a photo shoot in the woods tomorrow but i cant help but share her now bc i love her...
37 notes
·
View notes
Text

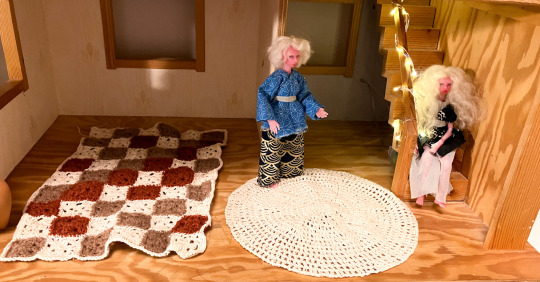
Update: found some old crochet pieces I’ve made in the past and just slotted them in to the dollhouse. Already feeling a lot more cozy.
#bjd#legitbjd#poseable doll#posable doll#skulldog#bjdsvetadolls#luts gelda#luts elf tiny gelda#tantaliahandmade
16 notes
·
View notes
Photo

Sculpted a little troll head only to put him on a strange misshapen body, but I figured I’d post him anyway! He’s a mount from ffxiv!
#ffxiv art#ffxiv#final fantasy 14#art doll#poseable doll#poseable art doll#troll#troll sculpture#sculpture art#polymer art#polymer doll#ffxiv mount#final fantasy#fantasy doll#fantasy art#fantasy creature
3 notes
·
View notes
Text
Dorra Dump
#room guardian#room guardians#art doll#art dolls#ooak art doll#roomguardian#poseable art doll#art#dorra#dorras#stop motion puppet#stop motion#animation#animator
4K notes
·
View notes
Photo

Trying to decide on some anime north colour schemes:
is this guy TOO MUCH, or just right?
#art doll#anime north 2023#handmade#neon#owl gryphon#owl gryphon kitten#poseable doll#plushie#plush#ooak#wormsandbones#homemade horrors#I think he's great but#I know my tastes can be a lil... wild
202 notes
·
View notes
Text
Wolfdragon poseability demo
#posable art doll#art#fantasy wolf#fantasy creature#sculpt#animal art#winged creature#dragon wolf#canine art#poseable doll#fantasy doll#fantasy animal#ooak
319 notes
·
View notes
Text
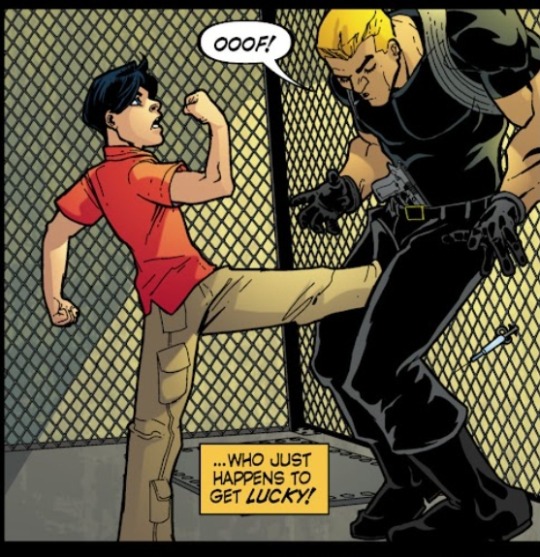
Genuinely one of the funniest Tim panels to me
#tim drake#robin 1993#The cargo pants w the polo...the early 2000s of it all#The awkward kick to the balls...obsessed he looks like a little poseable doll#Robin (1993) 154
319 notes
·
View notes
Text
NEW ART DOLL JUST DROPED
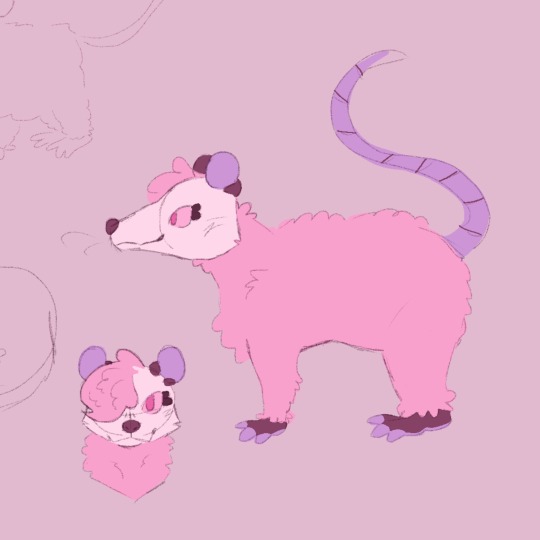


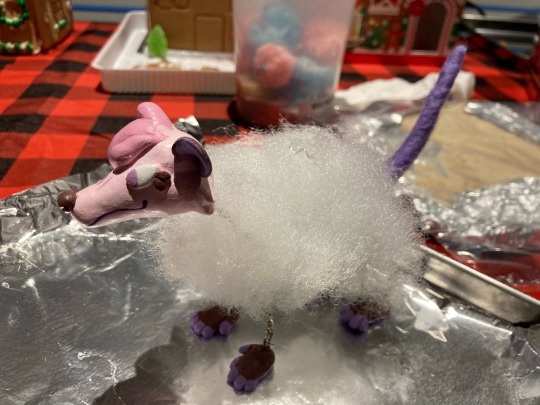


I love her she’s my baby
#art#cute#opossum#opossum art#pink art#hand crafted#handmade#handmade art#poseable art doll#art doll#art process#clay sculpture#clay art#painting#furry art#sfw furry#digital art#digital illustration#procreate#female characters#doll
85 notes
·
View notes
Text
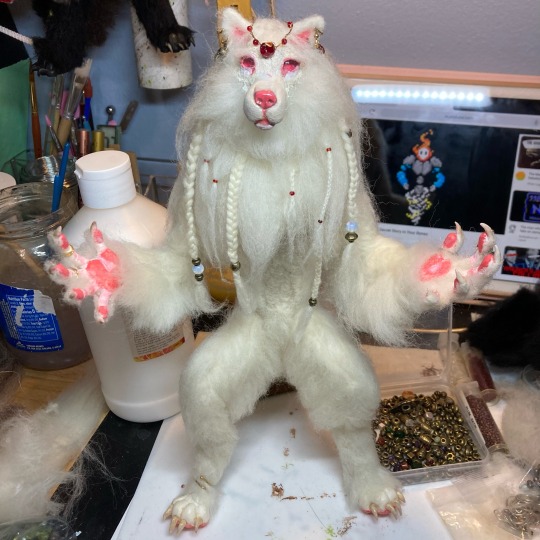
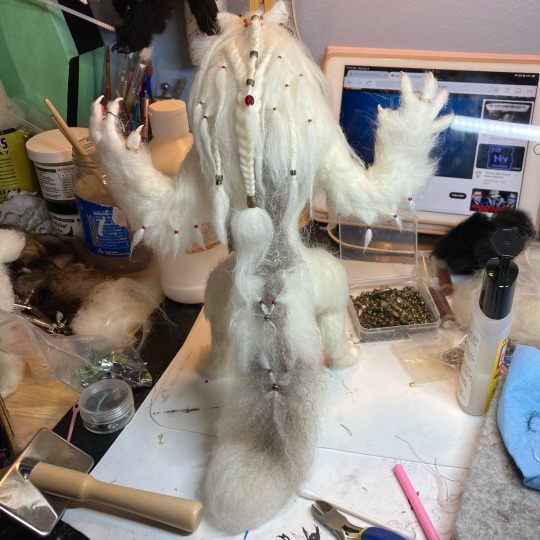
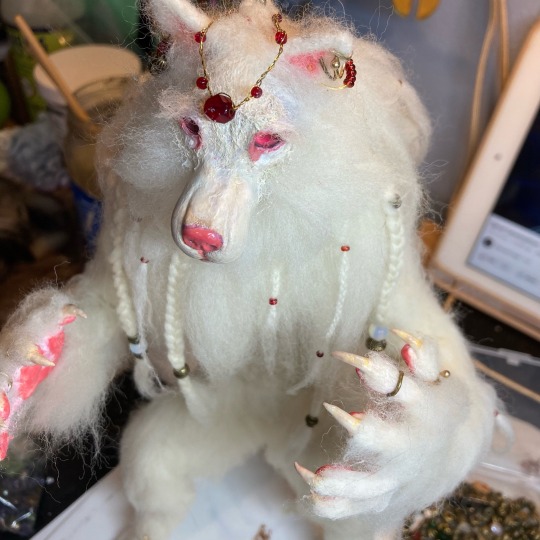
I think this one is completed! 😮💨 I had fun beading and braiding but lord I’m not into manipulating wire. I probably just have shit tools
Anywaysssss this pup is for sale! Fully poseable, including all the fingers. This one can stand on its own with help from the tail! Made from needle felted/hand tufted merino wool, sculpey, aluminum wire armature, and apoxie sculpt. Jewelry is a mix of brass, some rubies (!), and glass.
If you’re interested you can either wait v patiently for me to do all my Etsy listings or hmu on DMs. I’m also happy to answer any questions
If you want a custom feel free to reach out n we can talk!
#monster boyfriend#werewolf#art doll#ooak#needle felting#sculpey#soft sculpture#poseable#albinism#pink eyes
64 notes
·
View notes
Photo

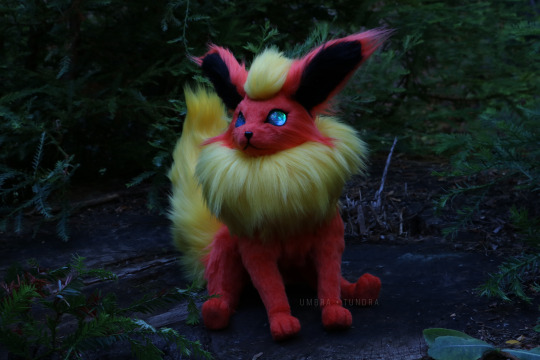
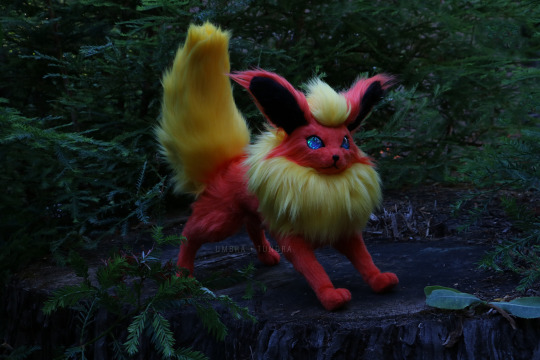
August Flareon commission with classic colors! 🔥
32 notes
·
View notes
Last Seen Blogs
svellsongurr-blog
To Adventure, Willump!

bisexual-queenie
BNHA And Other Stuff IG

lyric-central
The Music That We Choose

cindymancini
a John Hughes production

devod-live
DevoD says: