#fashion tutorials
Text
Fast Fashion to Slow Fashion :: a DIY guide to up-cycling and mending clothing on a budget.
For those of us living on a small income, buying from sustainable fashion brands is often out of reach. I would like to point out that *buying new but ecological garments isn't the only way to cultivate a slow fashion wardrobe*. Here are a few options for transforming *upcycling* your clothing, thus making fast fashion into slow fashion:
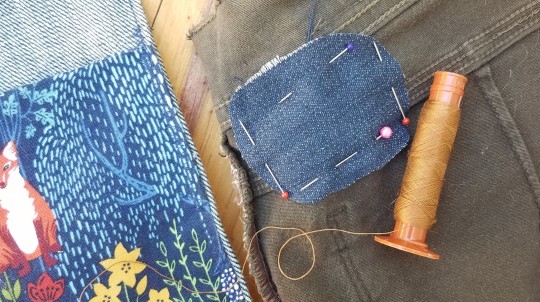
Mend and repair :: patch hand-me-down sweaters, fix holes in leggins from target and other department stores. By giving items a longer life, and preventing unnecessary garbage, fast fashion items become slow fashion! Here are two tutorials I have written on how to mend a torn belt loop on jeans and patch leggings.
Up-cycle clothing that doesn't suit your style :: when preparing for a trip back home and wondering how to acquire some nicer clothing for the trip a friend of mine gifted me a big bag of clothes. Almost all of them were items that we could call "fast fashion" and nearly all also had stains or rips that needed mending. By fixing and adapting these items and then going on to wear them for several years longer, I am keeping them out of the cycle of buy then trash.
Tailor items that don't fit you :: Taking in clothing is quite simple and there are lots of tutorials on how to hem pants and skirts or take in a size or two. I recently made a tutorial on how to take out a skirt, or make a skirt bigger by adding panels.

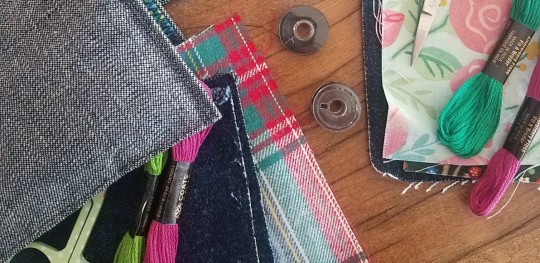
At some point, we must face the fact that a t-shirt is totally worn out and cannot be used for clothing any longer. In such cases here are a couple of crafts to utilize the fabric and other items from the scrap pile:
Create a Quilt :: if you find yourself with a pile of beautiful & memory-filled scraps -- transform them into a quilt as I have done in this post.
Make Twine :: Longer scraps of fabric, especially those from stretch materials like leggings or jersey cotton t-shirts can be made into a thing rope also known as fabric twine. I wrote a tutorial on how to make twine out of fabric scraps.
<<Best of luck in all your crafting endeavors!>>
#upcycled fashion#slow fashion#fashion tutorials#mending#mending 101#mending references#mending masterpost#cottagecrafts#upcycle#repair culture#low waste#zero waste#wasteless crafts
377 notes
·
View notes
Text
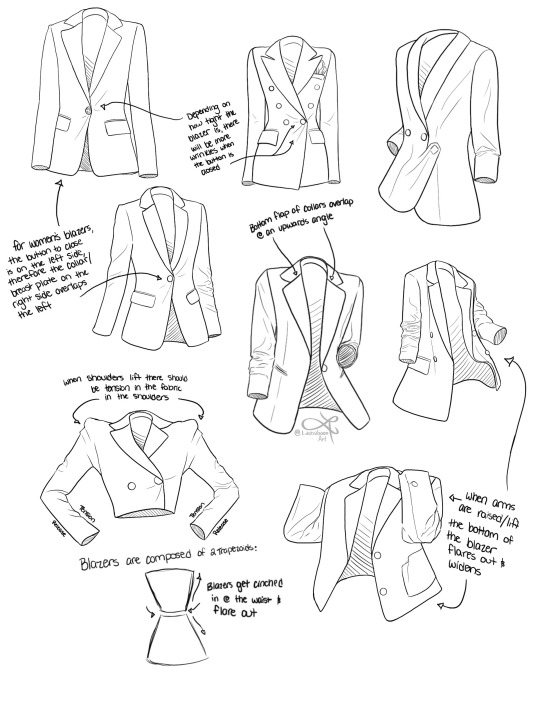
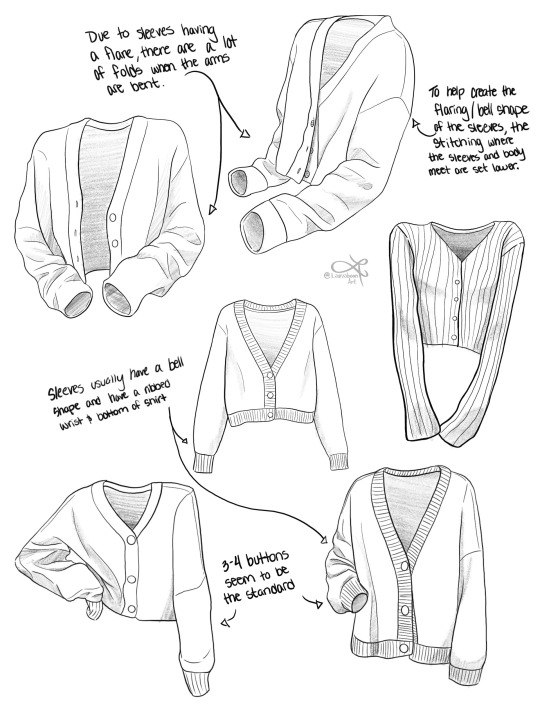
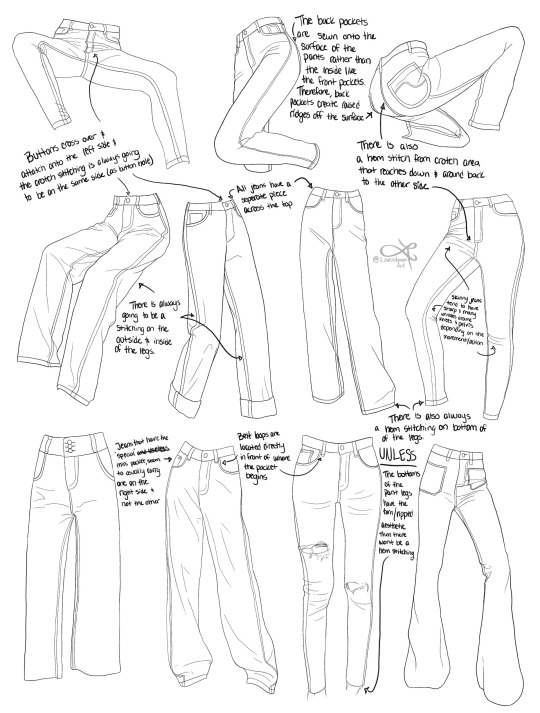
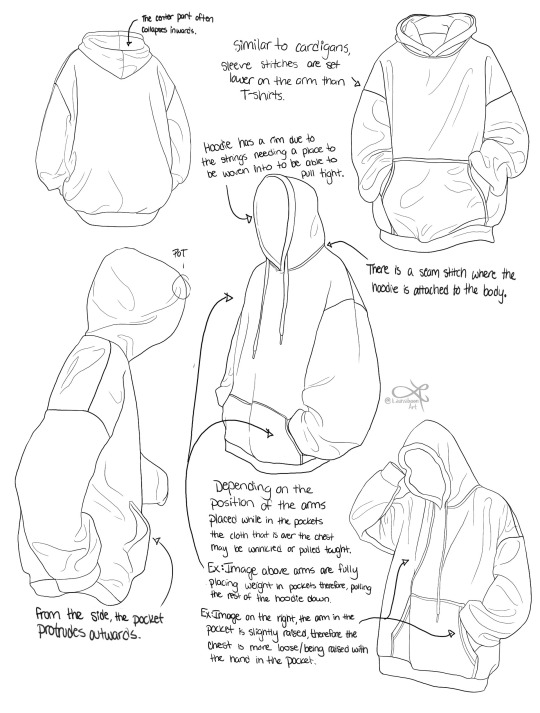
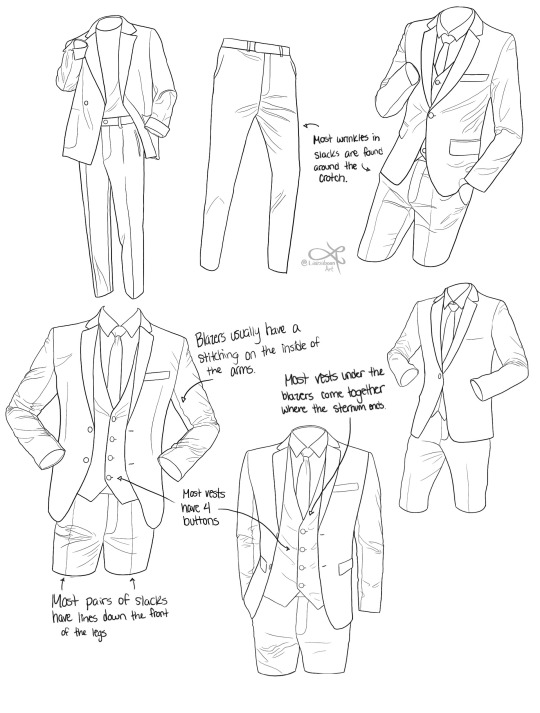
I'm currently doing an online art school program and I thought I'd share some notes on clothing pieces for anyone else whose like me and for some reason can't understand objects with free from lol I hope you find some of these observations/ notes useful for any of your art journeys!
#art reference#reference#art tutorial#art tips#art resources#art advice#drawing tips#drawing reference#clothing reference#how to draw clothes#drawing#how to draw#drawing tutorial#art education#art help#clothing#fashion drawing#art school#artists on tumblr#art community#art study
19K notes
·
View notes
Note
Patch making tutorials?
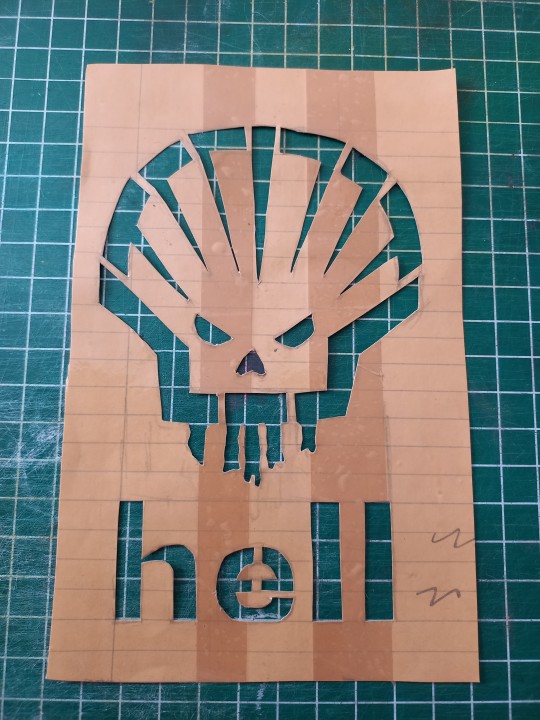
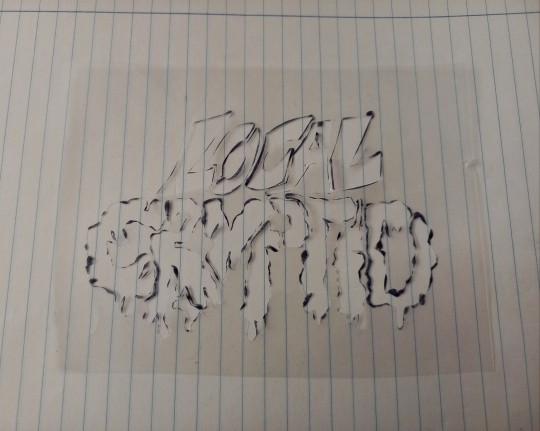
and here i am once again, with a patch making tutorial
how to make stenciled patches:
i'll post a part two in the future which will cover freehanding and stamping ur patches
-
first some general info that might be useful:
i get my patch design inspo from pinterest, etsy, and tumblr. if sell your patches make sure you arent ripping off another artists patch design when using etsy for inspo. anarchostencilism also has tons of stencils both on deviantart and reddit which are free to use.
i use acrylic paint for my patches, but if you can afford it id advise fabric paint. to seal paint into the fabric iron the patches, it helps em last longer. some acrylic paint survives very well in the washing machine, but wash your stuff by hand the first time to see how well it holds up.
if you make your patches multiple colors, dont first make the whole patch one color and then paint over it with the other colors. if the paint starts cracking the base color will show through. (if you like that however then dont mind this)
i paint my patches on jean fabric, cause it makes the patches sturdy yet flexible. but shirt fabric or canvas both work very well too. anything except really plasticy/slippery or textured fabric can be used
i pin my patches down with pins onto multiple layers of taped together cartboard, to prevent the fabric from moving around and distorting the print
-
there's two ways in which i make my stencils
1. with paper covered in tape
2. with the plastic folder you put in your binders
-
option 1:
draw out your design onto some paper, make sure there arent any "loose" parts in the design that will get lost when cutting out the stencil

cover the paper in tape front and back, make sure you can still see your design through the tape
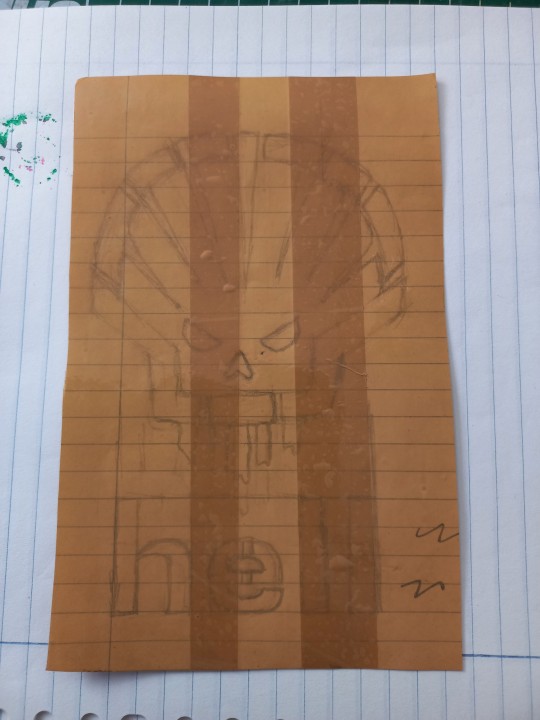
cut out your design, i use scissors and an exacto knife
-
option 2:
draw out your design (you can also draw the design directly onto the plastic folder)
cut a piece of plastic out of the folder big enough to cover your drawing and tape it down.
trace the design onto the plastic with pen or marker (any mistakes can be wiped out)
cut out your stencil
-
continuation from both option 1 and 2
after finishing your stencil you can pin them down on some fabric
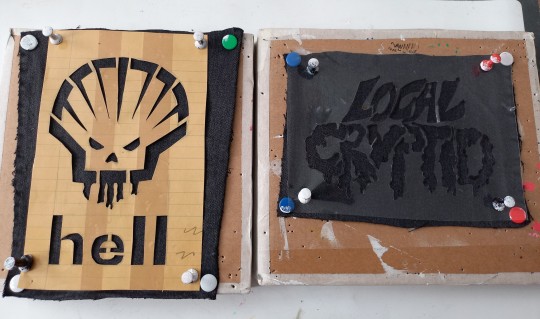
dap on your paint with the point of a big brush or a sponge, depending on the paint it'll take 2-3 layers.
make sure your previous layer dried completely before adding the next one

after the paint has fully dried you can carefully take off your stencil.
!!dont unpin the patch before it fully dried, or the drying paint may cause the fabric to warp!!

thats it, questions are always welcome, now go and make stuff!!
#punk diy#diy fashion#punk#queer punk#diy punk#punk clothes#punk style#punk patches#patches#tutorial#my stuff
2K notes
·
View notes
Text
Lolita Accessory tutorial pages from Japanese mook “Gothic & Lolita Patterns”, 2004
Included are: head dresses, hair clips/ties, camisole pattern, drawers pattern, sock stoppers, multiple bag patterns, detachable collars, and jewelry.
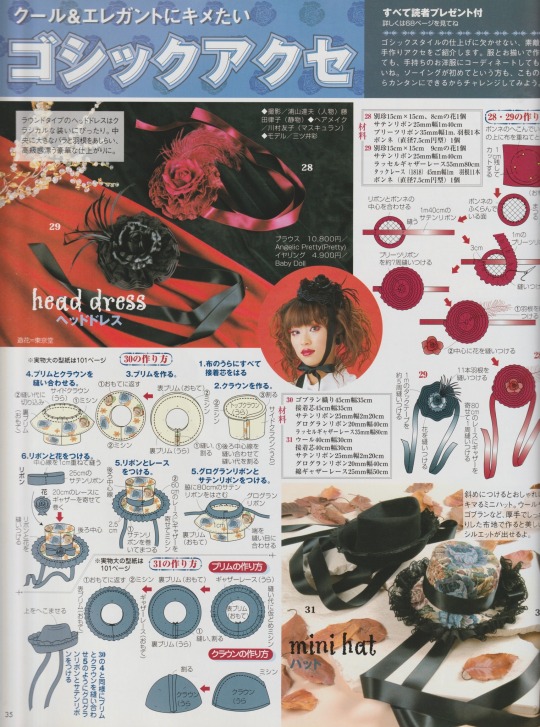
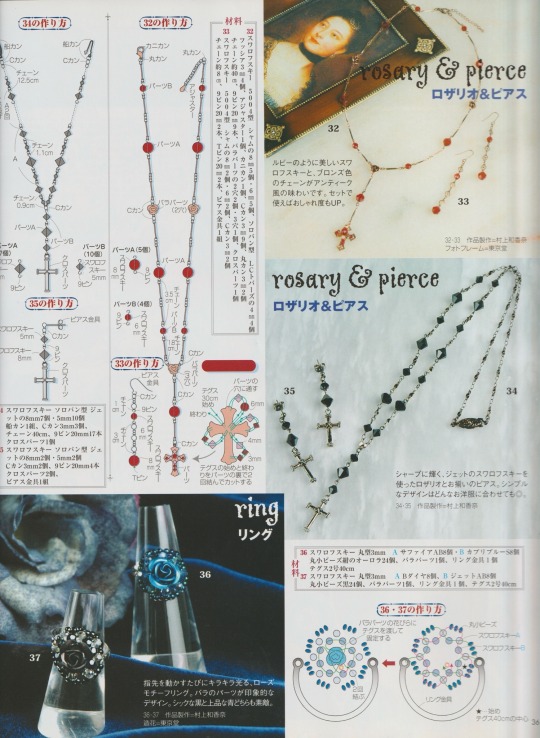
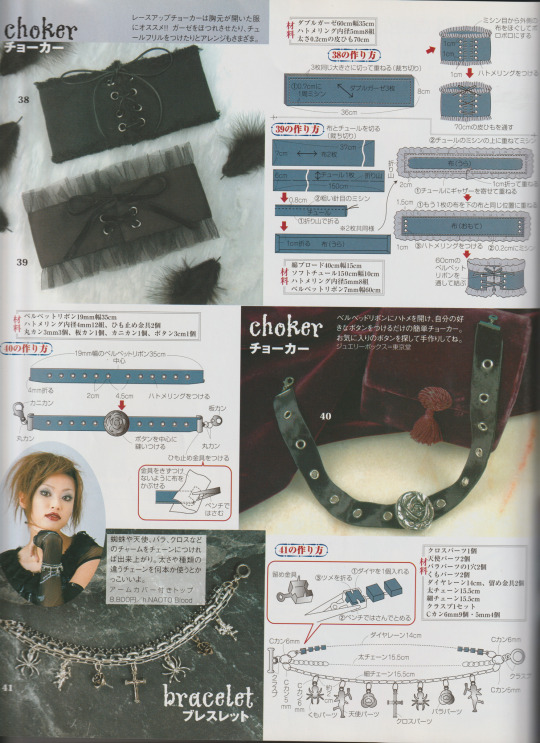
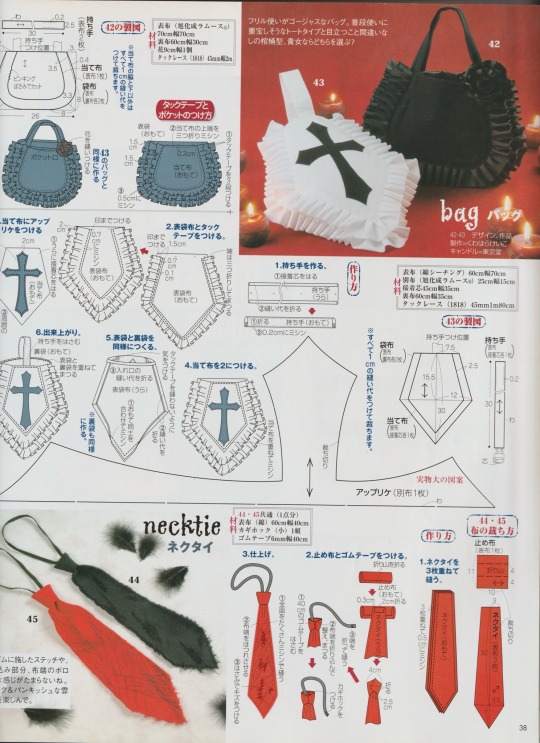
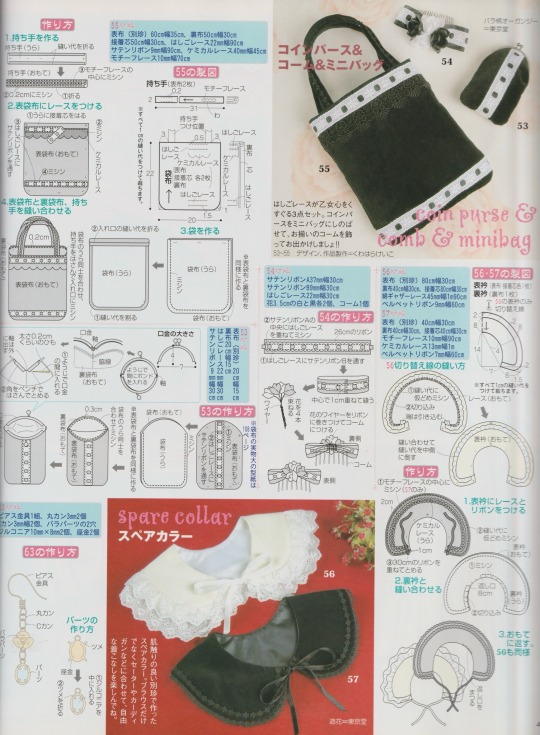
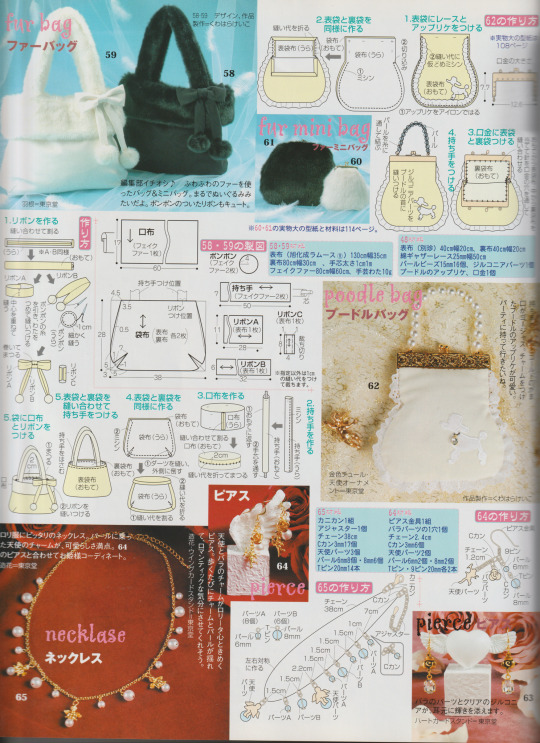
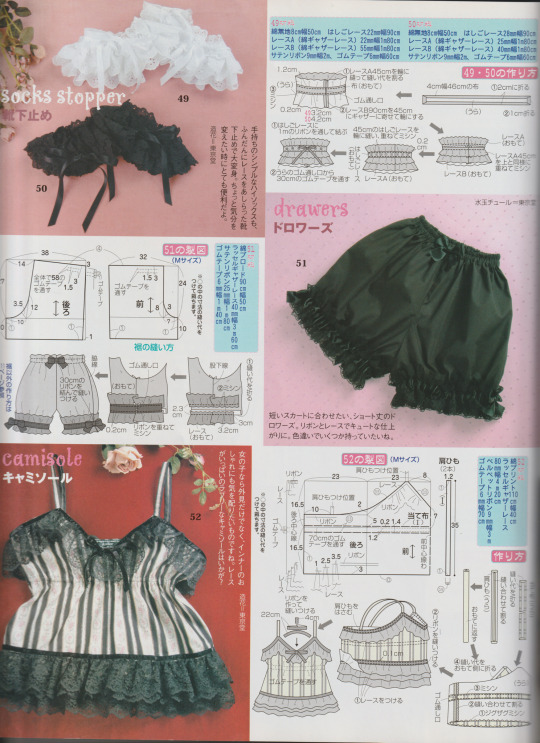
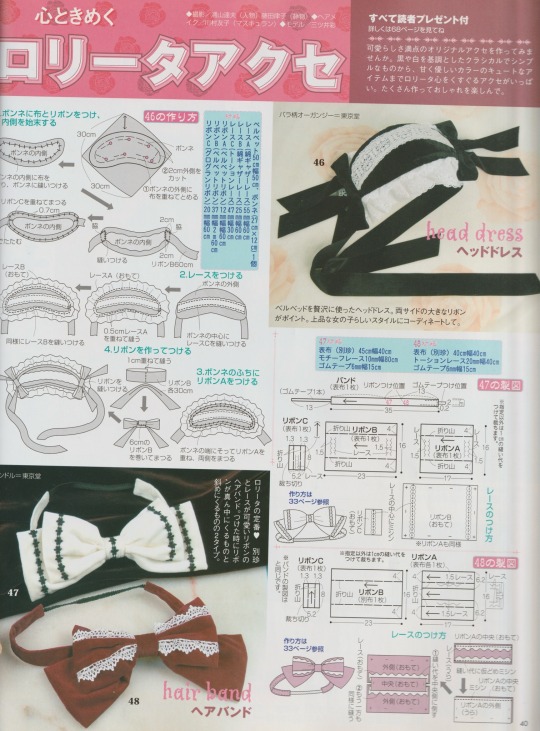
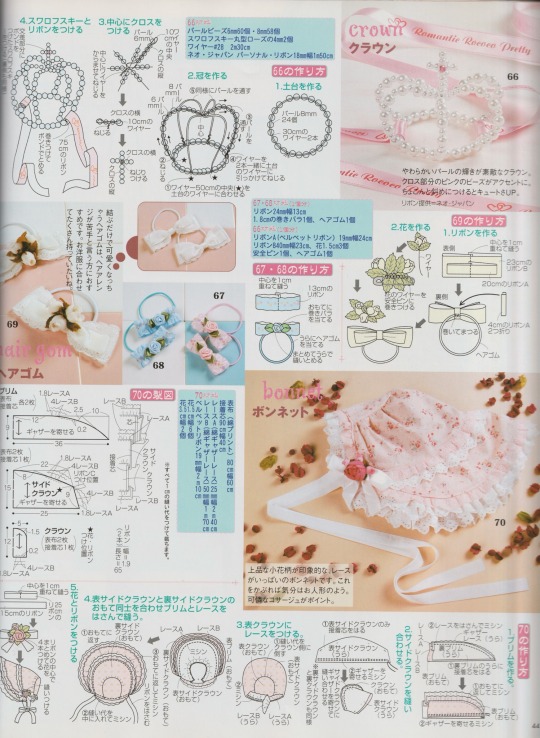
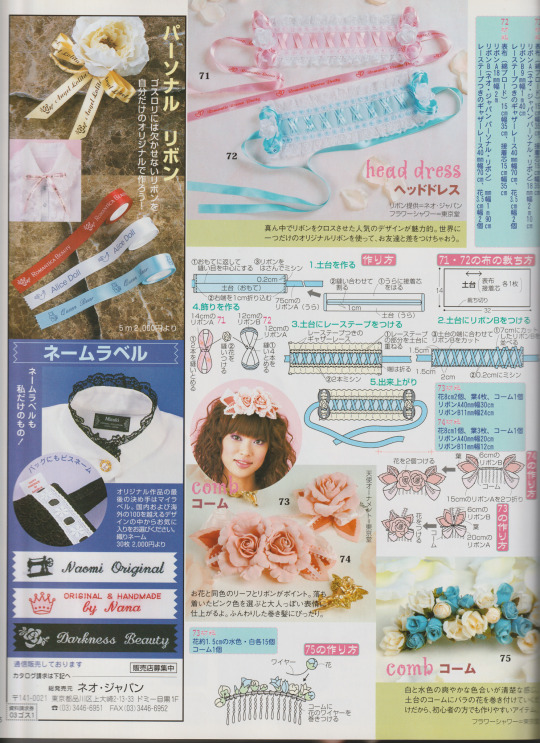
Consider this as my Valentine’s gift to you guys!! Thank you for being very kind about my post ^-^
*Also* If you would like the patterns to some of the tutorials (ie: the mini top hats, pattern 62) let me know so I can make a post later!
#gothic lolita#lolita fashion#j fashion#old school lolita#egl#egl fashion#coord#fashion#tutorial#magazine#sewing patterns#jewelry#goth#archive#my scans#happy valentine's day
720 notes
·
View notes
Photo
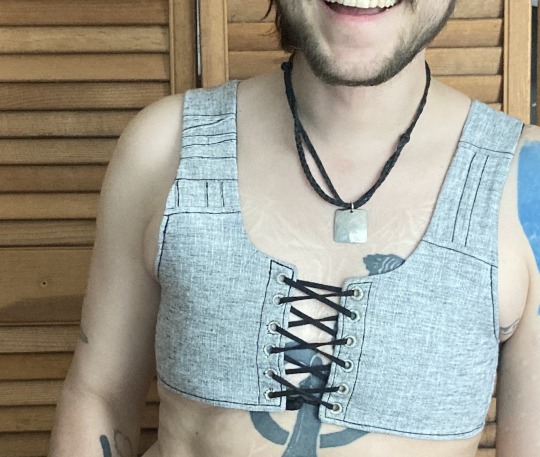
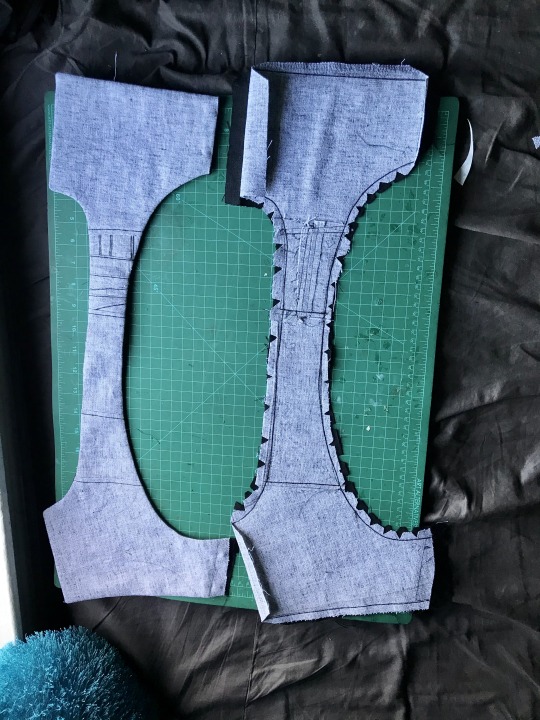
summer binder picture tutorial
this is the third binder ive made for myself recently and the first one i’m writing up. it’s designed to do a few things: 1) allow me to put it on by myself without dislocating my shoulders 2) allow me to breathe well enough to partake in normal activity 3) be cool enough to wear throughout a muggy 90-100F summer 4) not constrict my ribs in a way that aggravates my lack of connective tissue and causes intense pain.
this has become necessary even though i had top surgery many years ago, because when i had it i was extremely skinny and since then i’ve increased in size by about 50%. this has been really fucking good for my health in every single way* except that when my chest is squishy or moves at all it’s So Goddamn Triggering for me. but also since ive had top surgery ive developed and/or been made away of a plethora of chronic conditions that make every single commercially available binding option medically impossible. unbound, my chest is pretty much what you’d expect for a chubby cis guy but venturing out into the world in just a tshirt no longer works for me
*anyone who badmouths weight gain or fat bodies in the notes WILL be blocked
under the cut are a bunch of process pictures and explanations of what they all mean:
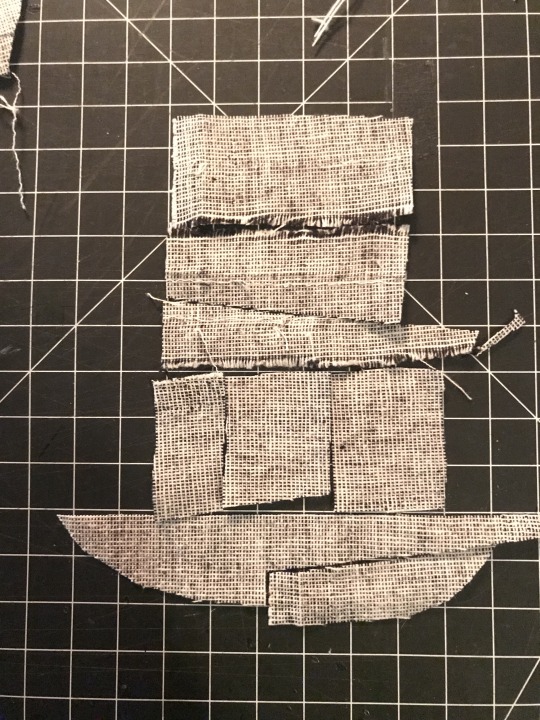
first i’ll give you a look at the pieces and measurements:
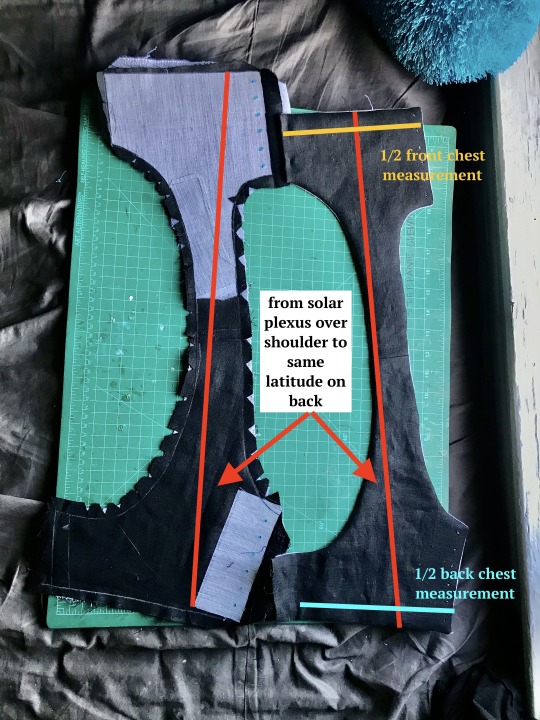
most of the seams are sewn in this picture and one half is turned inside out, allowing you to see both the finished dimensions (right) and the placement of the fusible horsehair canvas that gives this lil scrap of linen any structure at all (left)
to get your chest measurement, you’re gonna have to do some math:
first measure above and below what you want to bind. average these numbers. mine are something like 32 and 34, which average to 33. subtract a few inches--this is to allow the air movement between the laces at center front and back, critical in the summertime. i deleted 3 inches bc i like that number but you can go bigger if you want. the more inches you subtract here, the more youll be able to ratchet all your chest material down later, but at the same time you need to leave enough fabric for a sturdy garment. let’s say a range of 2-6 inches/5-15cm. by taking your measurements this way, you’re essentially measuring the chest you would like to have. that + the horsehair canvas work together to compress any squishy tissue/force anything that doesnt compress up and to the outside (basically into the armpit/lower shoulder--the chest might stick out but it will give a very puffed chest captain america pectoral silhouette)
you can also see how ive clipped my curves and pre-drilled my lacing holes. i used the marlin spike on my knife to open up the holes on the interfacing side, mainly as a way of marking them. this worked well bc the interfacing’s glue kept the linen from raveling
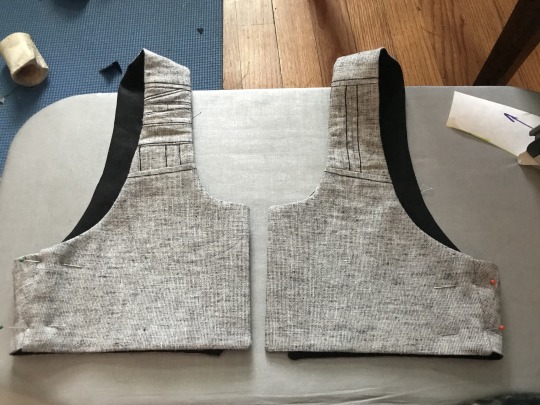
this is the same stage but looking at the non-interfaced grey linen/cotton blend (the black is some 100% linen from my cabbage stash). you can see ive broken the solar-plexus-to-back measurement up into a bunch of pieces to save on fabric but that’s not necessary. my original pattern was just two pieces (front and back) and chopping the straps into thirds on both sides was aesthetic
in the following picture you can really see how this is really just overgrown regency stays:
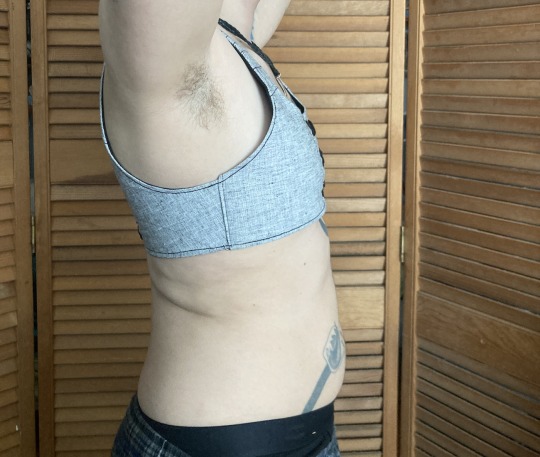
i thought about doing side lacing but didn’t think that would be comfortable for me. on the front, the side seam allowance was pressed inwards before turning to create a finished looking slot. on the back the side seam is left unfinished with an extra wide seam allowance, and is inserted into that slot.
here’s a closeup on it pinned in place (you can adjust the angle of the side seam and the fit during this pinning stage):
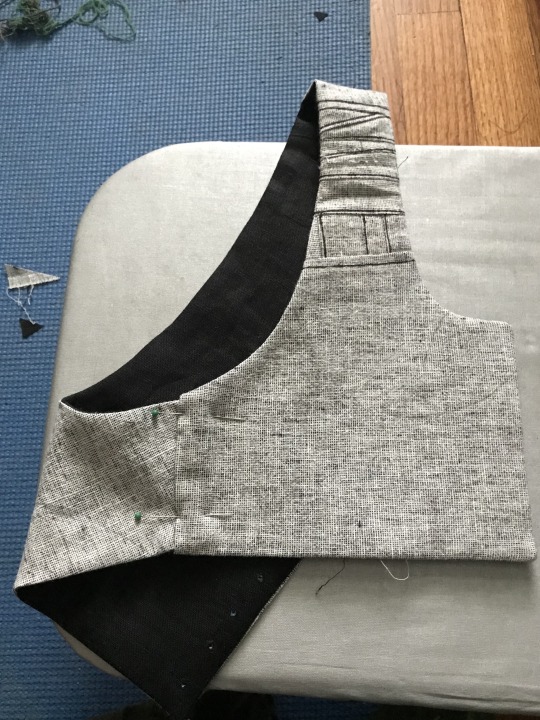
that side seam was just topstitched in place once i had the fit how i liked it, and the armhole was reinforced with more topstitching
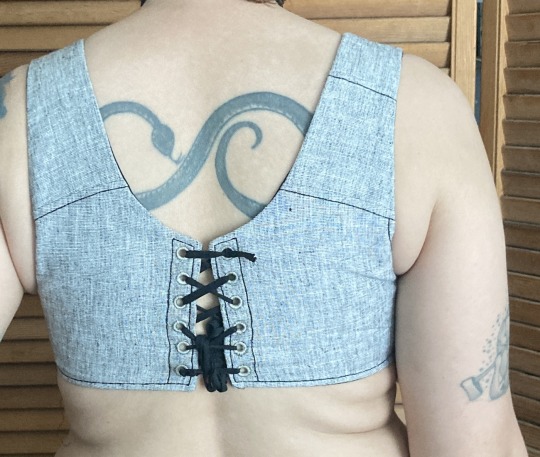
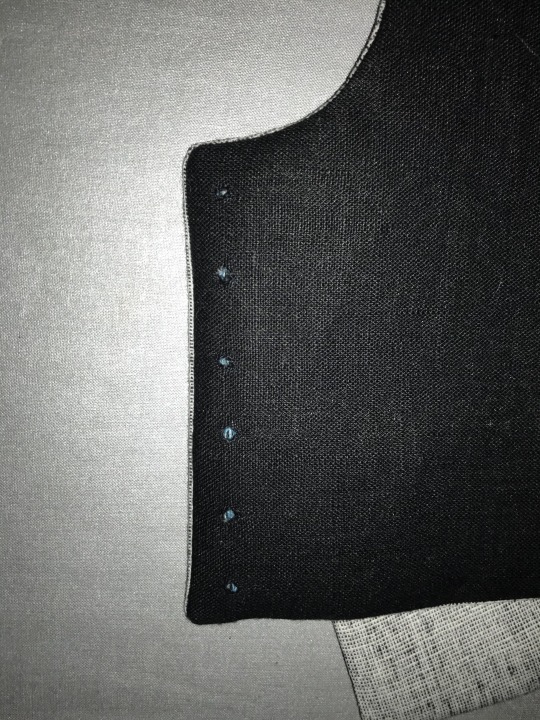
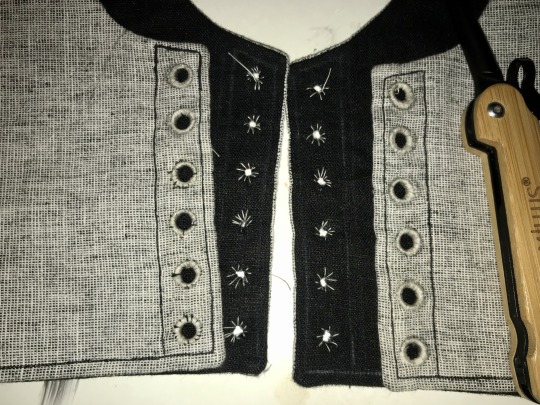
alright, time for eyelets: first, you can see how well the marking worked:
next, two rows of basted eyelets (left), one row of eyelets sewn with a doubled and waxed cotton thread (center right), and one row of eyelets opened and stainless steel rings placed (right).
next time i’m going to mark the eyelets same as i did above, but do this step differently--i’ll mark and baste the steel rings in place BEFORE widening the eyelets. this is bc i had a lot of problems keeping the eyelets on center
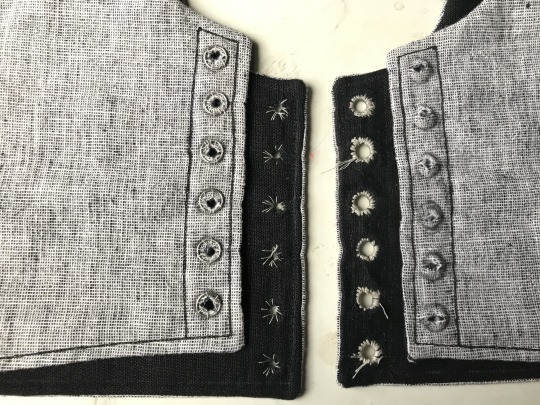
eyelets half done on this one! on the left are eyelets sewn with doubled and waxed cotton thread and on the right eyelets sewn with quadrupled and waxed thread. the center is basting again. i was able to force the holes back in line while sewing the eyelets but it was kinda annoying. adding a second picture that doesnt have great focus but hopefully shows how that process worked and shows the spike clearly

i ended up using this white cotton thread because it’s stronger than my black cotton thread (which the rest of it is sewn with). [eta: after this was first posted, i pressed the whole thing heavily, which effectively de-waxed the thread, and i dyed the whole thing a medium charcoal grey, the thread blends in perfectly on the lighter side and isn’t such a sore thumb on the darker side]
bonus: the piecing layout for that little piece of strap. the whole light gray half of the binder was made from 1/2 of one of the legs i cut off some linen suit pants to make slutty camping shorts last year and i really really didn’t want to break into any of the other three halves for this garment--i have Plans for it
overall the fit of this is incredible. it DOESNT hurt my ribs which every zip-up garment ive been able to find (and it is difficult) does due to really thick elastic at the base. it doesnt aggravate my sensory issues with the synthetic fibers that every commercial option is made of. i can walk up a hill or stairs, or go to pt, without getting too out of breath. i can eat with it tight, or loosen the front easily and without taking it off to make eating easier and less nausea-inducing. it is reversible!
best of all the lacing at the back gives the garment enough movement for me to get it on without dislocating, and the interfacing and steel rings give it structure once it’s on. the shaping comes only from fusible horsehair linen canvas and stainless steel rings like youd use for chainmail, there’s no boning at all, which makes it very quick to sew (except the eyelets, but metal grommets would be sturdy and quick provided theyre of good quality)
there’s a small amount of gaping on the outside of the shoulder strap, which i plan on fixing with a tiny tiny dart in the armpit, i want to add pockets to tuck the laces into, and i need a better lace for the back, but it’s completely wearable in time for the 90 weather next week which is all i wanted. i’ll do a reblog when it’s perfectly finished with an update on the fit but for now it is done enough
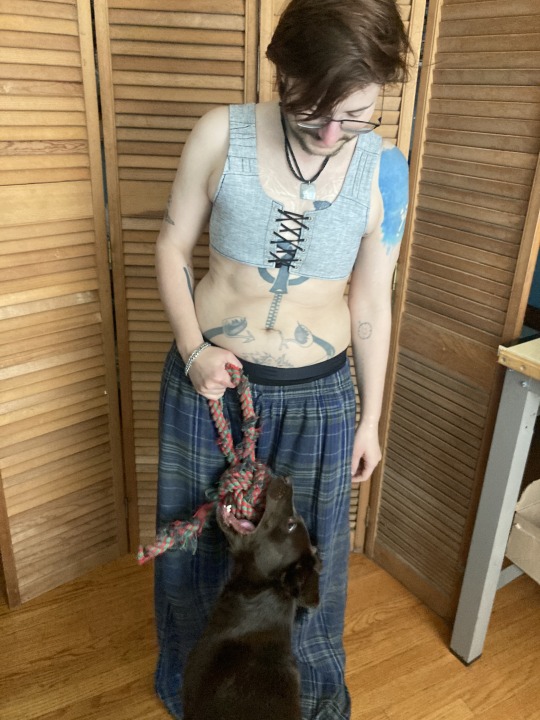
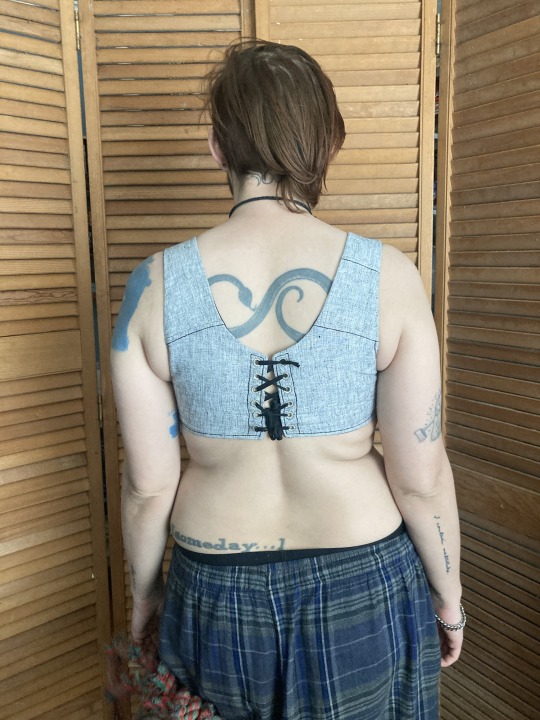
the little ridge where it doesnt lay flat against the shoulder is most visible with just a single t shirt over it. with a flannel or a sweater, it disappears, and by itself, it’s hidden in movement
eta: after dyeing this, i relaced it a bit looser in the back and that gape mainly disappeared. ive decided to leave it in instead of smoothing it with a dart because the loose fabric gives space for my chest to expand when breathing and shapes my silhouette in a way that emphasizes my shoulders
#sewing#trans#trans man#binding#body shaping#cotton#disability accommodations#physical#sensory#eyelets#fusible interfacing#historical fashion#regency#horsehair canvas#lacing#linen#lining#new build#drafted pattern#picture tutorial#piecing is contemporary too#stainless steel#stashbusting#stays#structured garment#treadle machine
1K notes
·
View notes
Text
Crossposting my little video here on trimming fur around usakumya's face to make it cuter!
I think this is a common practice for Chinese and Japanese lolitas, but it seems to not necessarily be too well known overseas. I recall watching a video by Cordelia in the Summer who edited a clip by BABY shop staff about it, and wanted to try myself!
I probably could have trimmed more fur around the mouth but I didn't want to overdo it. Anyways, this particular kumya will be going to it's new home with yuefii!
205 notes
·
View notes
Text
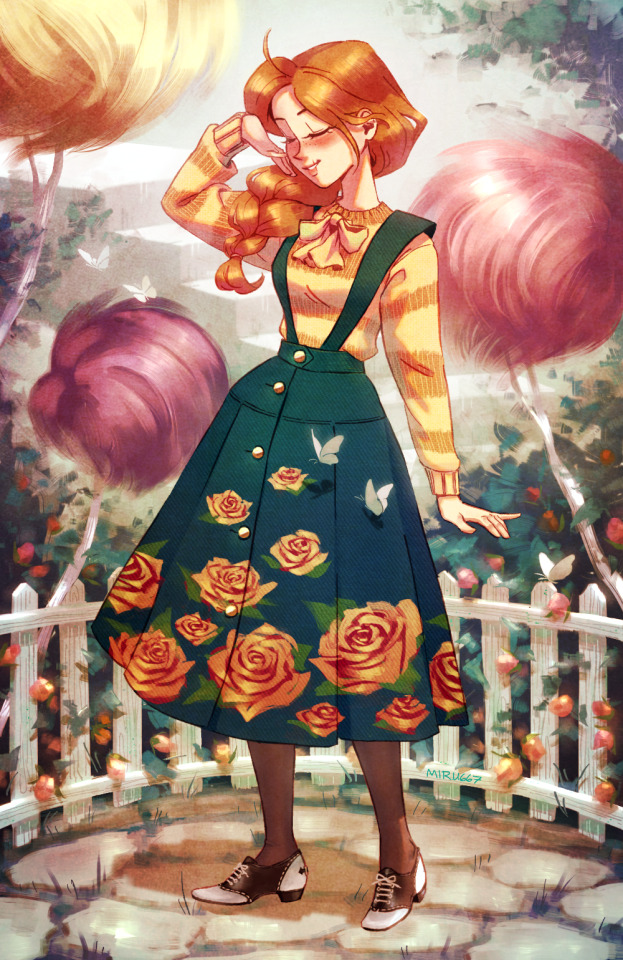
Audrey Grace in a vintage outfit! She went on a shopping trip with friends in a 1950s Thneedville and found some stuff she liked. 😊 I had fun researching dresses, sweaters and shoes, also this piece [link] from the Lies of P OST was the music I listened to the most while painting, I think the vibes fit...🥹 Click the readmore below to see a video of my WIPs!
#i spent literally the entire month of january from the 1st to the 31st working on this omg TTWTT#miru art#audtree#audrey grace#the lorax#truffula trees#thneedville#the rust factory#truffulas#vintage#vintage fashion#artists on tumblr#saddle shoes#saddle oxfords#7 hours on just the shoes#kind of embarrassing but i have so little time to work on art these days aaaa#im proud of me for attempting a background again!!!#tutorial
256 notes
·
View notes
Photo

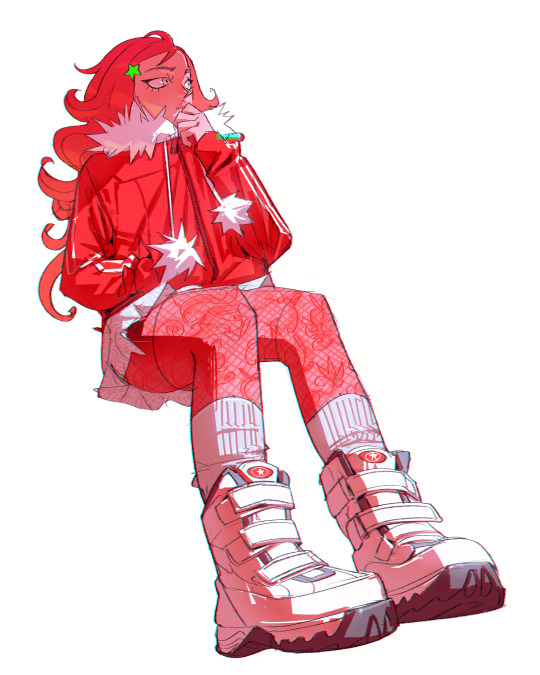
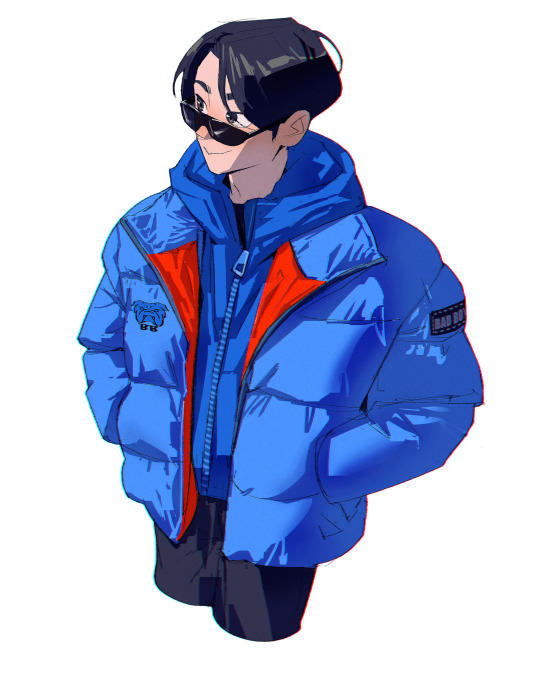

Get access to my brushes, process videos, and files here https://www.patreon.com/ramonn90
#fashion#anime#character design#illustration#color#values#lighting#shadows#art fundamentals#tutorial#digital art#drawing#brushes#photoshop brushes#ramonn90#ramon nunez art#arte#patreon#tips about art#tips about digital art
491 notes
·
View notes
Note
hi! I ADORE your art sm, and was wondering if you had, like, a ref sheet for zuko? im trying to figure out how to draw him :-)
thank youuu! and i did not have one but lucky for you i’m going Thru It (the artblock) and i’m prAYING that doodling zuko will cure it. i hope u can find this helpful too lol


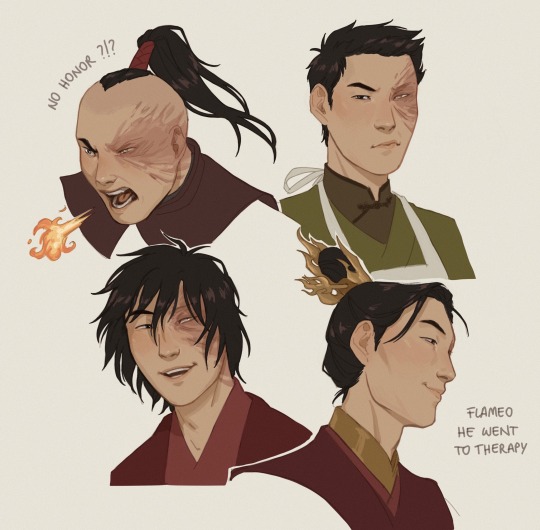
#id in alt text#my son my scrinklo scrimblo my one and only my rotten soldier my sweet cheese#learning the hard way that silly little portraits wit kinda monotonous expressions are my comfort zone hehe#im also working on the clothing tutorial for the other anon it just uhm. might take a bit#trying to break down my art process is DIFFICULT lads idk what i’m doing all of the time i’m serious#zuko#my art#ash replies#ask#also side note. this is the first time i drew ponytail zuko and u know what i take back everything i ever said about that hairstyle#its amazing it’s bold it’s a statement s1 zuko ur a misunderstood fashion icon#ahead of your time
3K notes
·
View notes
Text
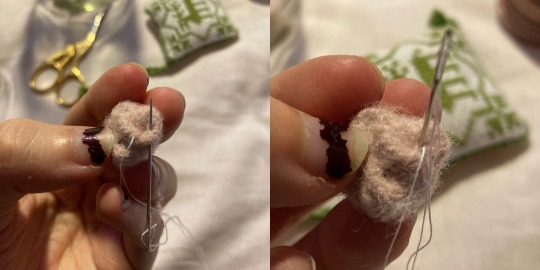
How To Make Medieval Fabric Buttons
You will need:
• fabric (I’m using a medium weight wool)
• a sewing needle
• cotton or silk thread (it MUST be strong)
• a thimble
• dressmakers pins
Using this style of button as a fastening technique was very prevalent in 14th century Europe, on both men’s and women’s clothing. It was used for anything from sleeves and openings on the front of garments, to the iconic liripipe hoods (which is what these are gonna be for!).
They were usually made out of leftover fabric from the same material that was used for the garment they were intended for. As well as using every scrap of material possible, they also save you from having to buy metal buttons, which… aren’t cheap (both now and then).
The trade off is of course having to make them, which can be a painful process (literally - try not to get stabbed by the hedgehog ball at step 4!!). I thoroughly recommend a thimble to push the needle through as you form the ball - this is hard enough without having to pull it through.
Making buttons in my experience is 10% knowledge, 60% spite, and 30% hatred. It is a contest of wills between you (who wants a button) and the fabric (who doesn’t want to be a button). I wish you luck soldier.

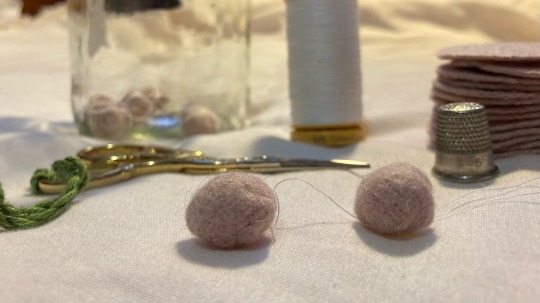
To start with, cut a circle out of your fabric. How big will depend on what fabric you use - if it’s linen, you’d cut a larger circle than you would for wool. Mine is about 30mm.
Using a long long thread, bind on and then sew running stitches around the outside, about 5mm from the edge (may vary with fabric).
Pull this thread tight like a pouch, and turn the raw edges inwards in one direction. Try and tuck them inside the “bag” section. It will likely be more of a squashed oval at this point than a sphere.

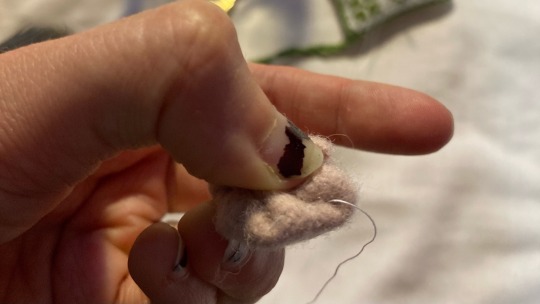
Now, get your dressmakers pins and go absolutely ham. Continue to squish it “inward” (towards where the opening was) as you pin. The button should now resemble a very unfriendly little creature now (good luck with not getting stabbed, it can be a bit of a prick).
Next, basically use your needle to try and get it to stay in that shape. I usually do a bunch of stitches around the edge of the “back” end, and then spend some time criss-crossing the back. Try and put your needle in close to where it came out, so that you don’t get long pieces of visible thread.
Once you are confident that it will hold A Shape ™ (but also isn’t so stabbed that you can’t refine it further!), remove the pins. Your button will most likely resemble a little tiny messy wool brain at this point, but that’s ok!
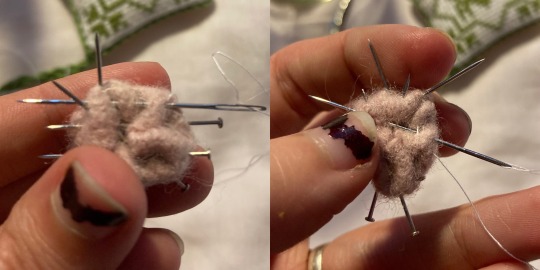
The next step is to use your needle and thread to continue tucking the ball inwards to the centre of where the opening was. Above illustrates how I’ll flip the open part of a fold inward, by coming up through the fold and then levering it downwards so it gets tucked away. You can also just use the thread to pull errant folds inwards. Use the hand holding the button to squash it into form, and then sew it into place.
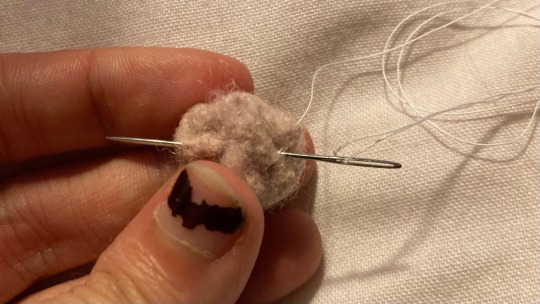
Once the button is actually a ball shape, crisscross the back of it a bit so that everything is firmly held in place. It should now (all things going well!!) actually be a sphere.

Once you’re happy with the shape and firmness, take your thread to stem out of the centre back. Bind off, and then slide the needle off the thread, leaving the long end. This can then be used to sew the button onto the garment.
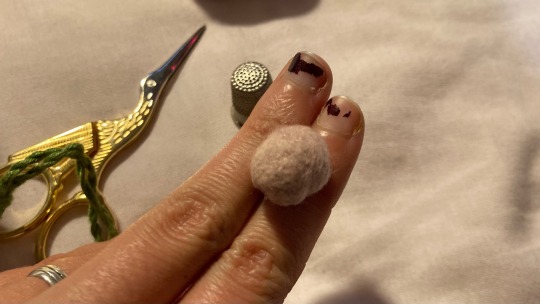
The back will still be somewhat messy, but the front should be smooth, and the whole shape roughly spherical. When the button is sewn on using the remainder of the thread, you won’t be able to see the back!
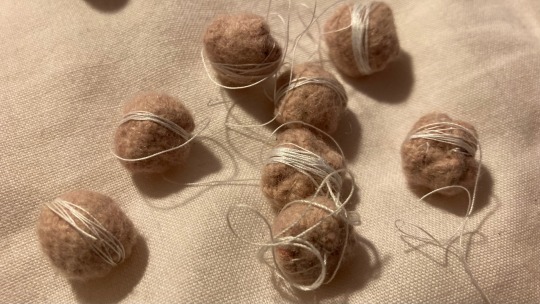
I wrap the remainder of the thread around the finished button so it won’t get tangled, and then pop it in a jar with the rest while it waits to be sewn onto the garment.
Good luck with your crafting! Feel free to ask any questions in the notes, or straight into my inbox :)
#sewing#tutorial#medieval#medieval reenactment#medieval clothing#medieval costume#historical fashion#historical costuming#medievalcore#14th century#buttons#crafting#diy#i’ll be on my merry way now#I have…… sO many of these to do#truly pain torture and misery hours over here
520 notes
·
View notes
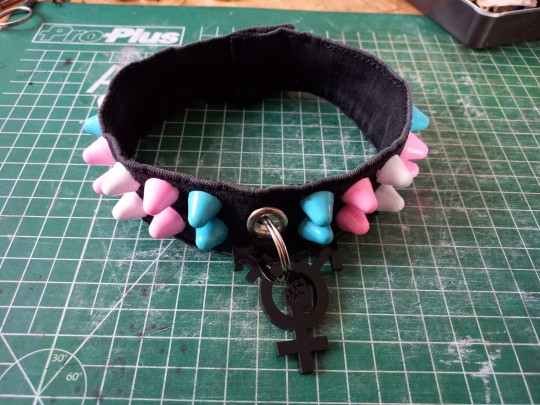
Note
Do you have a tutorial for the denim choker and/or the bat keyholder you made?? They're so cool :0
a tutorial on how to make chokers from some old pants!!


you will need:
-some old jeans
-a button
-strong thread, for these i used emboidery thread
-spikes and/or other decorative stuff you wanna put on the choker
-scissors
-pliers
-sewing needle
-seam ripper or small scissors
•
first get your pair of pants, and cut of the waistband. you can remove the belt hoops with seamrippers (or keep em and sew them on as extra decoration) i always use the part with the buttonhole, it saves on sewing
the band should be a large enough to wrap around your neck plus some extra space


measure and draw on where your button will be placed (on the end where the buttonhole is not) then about 5cm from there, make a small cut in the band and fold the ends in, press together and sew closed. there should be around 2-3 cm of band left next to where youre gonna attach the button (where i drew the white line)


time to gut em!! open the seams on one side (not fully till the ends) and attach your spikes, this prevents the point or screws from pressing/poking into your skin. (i made this part the next day hence the lighting change)
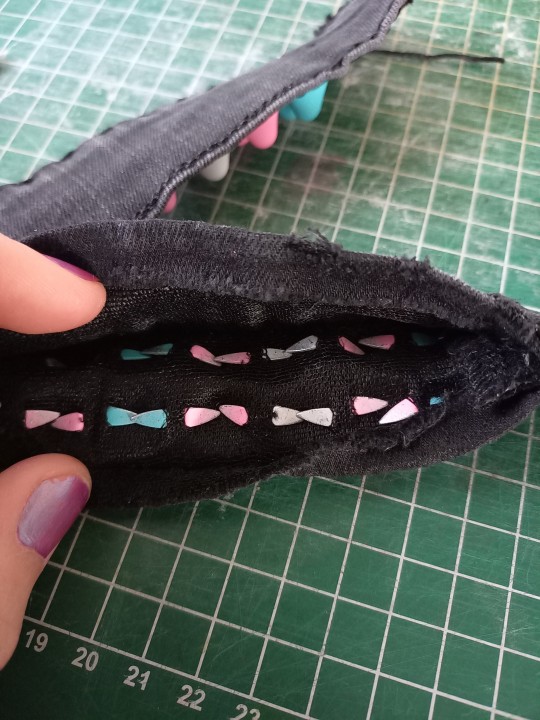
sew em back up and attach your button
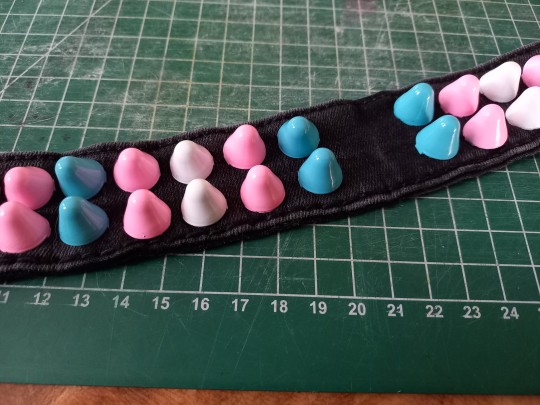

i added an eyelet so i could attach charms to the choker, but you can also attach chains, soda tabs, embroidery or whatever on there. after that youre done! you can also use this exact method to make cuffs, just make the band shorter.
#punk diy#diy fashion#diy punk#punk clothes#punk style#queer punk#tutorial#my stuff#queercore#punk#punx
466 notes
·
View notes
Text
Hair, makeup, & nail tutorials from Japanese mook “Gothic Lolita Patterns Vol.1”, 2004
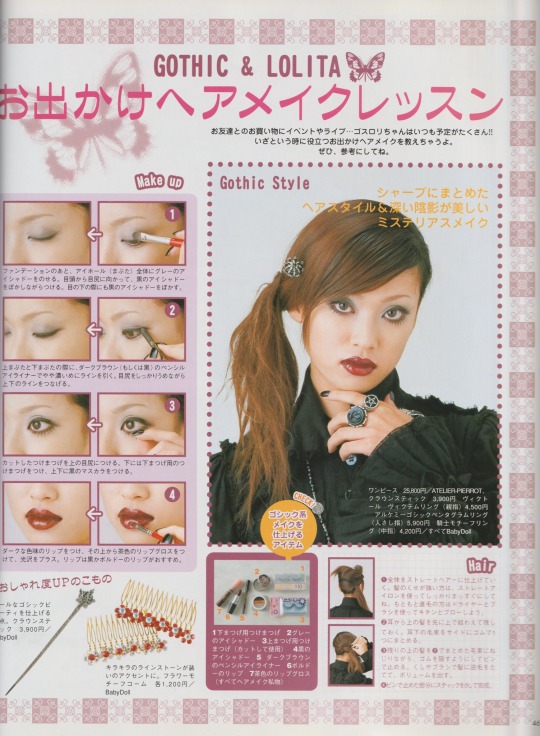
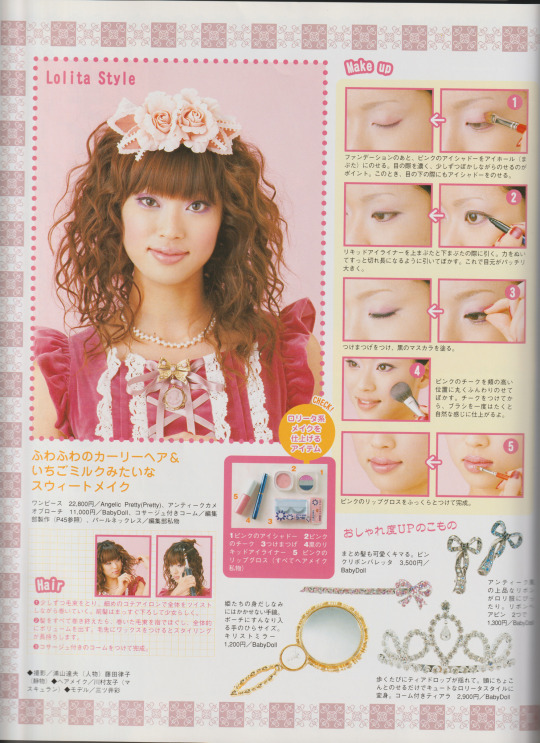
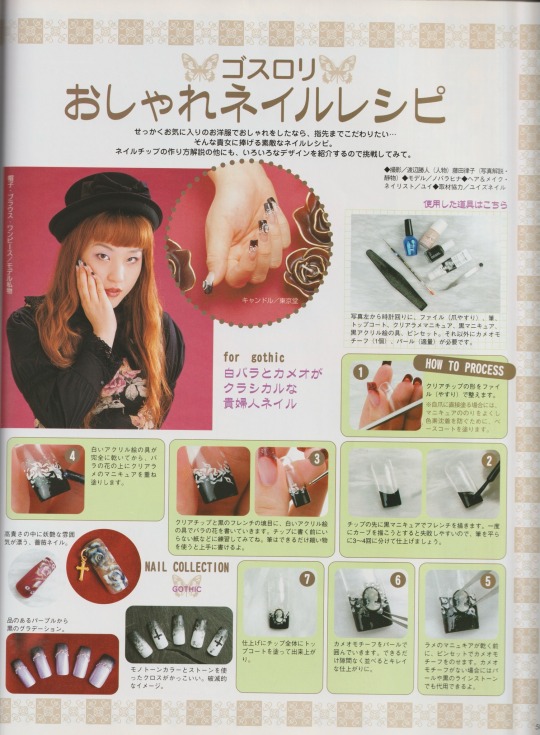
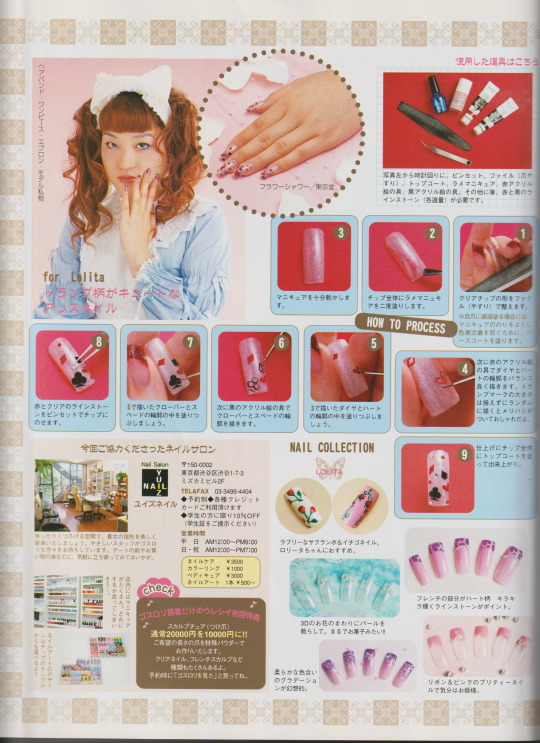
I wanted to do one of the makeup looks for reference, but I am neither pretty nor good at makeup, sorry T-T
#gothic lolita#j fashion#lolita fashion#egl#old school lolita#egl fashion#nail art#cute nails#makeup#hairstyle#tutorial#my scans#archive#i should up my makeup game
236 notes
·
View notes
Text
(It's been entirely too long since we've started a tutorial with a very blurry picture, which is a 20dollarlolita tradition. Am I about to fall over and only staying upright because of a death grip on this trim? Stay tuned to find out)
Let's make a skirt.
There's a lot of lolita fashion that doesn't fit most people. It's me. I'm most people. I'm going to wear it anyway, so I'm going to resize that to fit me.
The hardest part of resizing a lolita skirt (or skirt part of a dress) is that you almost never can get the fabric that the skirt was made out of. Lolita prints are usually pretty limited run. While some dresses will let you redistribute the fabric to have a slightly less full skirt, that's usually a major reconstruction that ends up drifting a bit away from the lolita shape.

x
A ruffled bustle bustle, however, is pretty common. Bustles like this are pretty common in lolita fashion and add an additional detail. In addition, you can make the waist of the skirt several inches bigger without a problem, and without compromising skirt fullness. If you ever want to undo the alteration, seaming the skirt back up is not very difficult. It's not a fully seamlessly reversible alteration, but there's far worse things you could do to the garment (ask me about my AP dress with mesh pits).
The problem is that bustles like this take quite a bit of energy and fabric, especially if you want to have details like lace trim. It's one of the more time-consuming alterations to do.
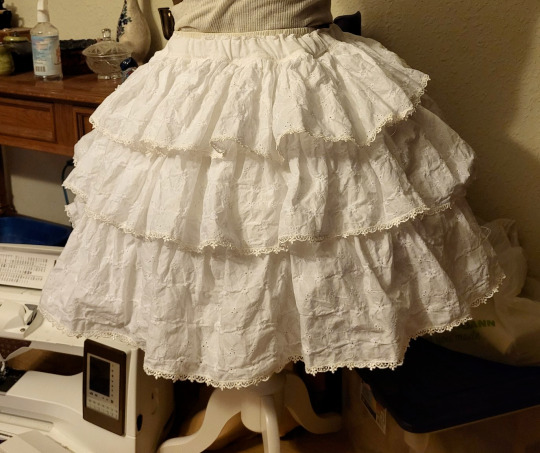
Or you can make one bustle/ruffle underskirt, one time, and wear it with all your skirt and dress modifications. You can splurge and get some nice trim and get some nice fabric, because you only need to buy it once. You can also wear it as a standalone skirt. (Just remember to never, ever steam it before taking pictures. You wouldn't want to look competent)
I put off making one of these for a very long time, because I'd made the process much more complicated in my head than it turned out needing to be. Once I was building this and realized I needed to simplify the fuck down, this became a really easy project.
Materials:
I decided to make the ruffles on my skirt out of eyelet lawn, which is a cotton fabric that has an all-over embroidery. I got this for about $10 a yard on ebay. I don't have a very accurate judgement of how much I used on the skirt. I bought 4 yards and used probably 3.5, but I also wasted a bunch of fabric on an extra tier that I had to chop off. I wanted a fabric with more detail than broadcloth, but that wasn't exclusively going to work with OTT styling.
I got 30 yards of 1/2" Venise lace off cheeptrims.com for $9. I really recommend putting lace on your ruffles if you can. It really adds to the detail level, and you only need to buy it once. You already have to hem all of this so you might as well hem it with lace.
You will also want some fabric for the slip layer (for want of a better term) to attach the ruffles to. My ruffles were a little bit sheer, so I wanted an opaque base fabric for modesty. Depending on the look you're going for, you can also use this layer to add some subtle detailing or changes to the finished look. If you're only wearing it with over-the-top looks, using a base fabric with shine or glitter can stop your ultrabustle from looking too plain. If you're wanting your ruffles to lay flatter, getting a soft fabric with a lot of drape will make the ruffles droopier. I just used some weird cotton plainweave that I got at Green Store for 75% off due to a bolt-long defect.
I used 1" elastic in the waistband here, because this skirt can get a little bit heavy, and then you often have another skirt on top of it adding to the weight.
The other thing that I used that made this much easier was a ruffling attachment for my serger. You don't need to use a serger, but a ruffling or gathering attachment that allows you to ruffle a flat strip of fabric and sew it onto another piece of (not to-be-ruffled) fabric will speed things up considerably. I know a lot of people buy a ruffler or a gathering foot when they start sewing lolita, and then are disappointed when they don't use it very much. There's a very limited number of lolita applications for these attachments, and I'm happy to tell you that this is one of them. If you don't have one, you don't need to go buy one. You can just do the two-step process of gathering the fabric and then sewing it on. But if you wanted an excuse to go buy one, well, you have one.
The Plan:
So I'd previously made a lot of math and calculations for how each tier was going to gather into the previous one, and then realized during the build phase that actually was way too complicated.
What we need is a rectangle with ruffles on it gathered into a waistband. Yes, a rectangle. I know, I was stunned too, but the final result worked the best.
I wanted the tops of the ruffles to be hidden in seams. If you just sew ruffled strips onto a single piece of fabric, it's very difficult to hide all the raw edges and to make sure you're not spreading loose threads all over the place. We're going to make ruffled strips, and sew them to each other. This covers up the raw edges very nicely.
This also will allow you to slightly gather the second and top tiers to each other, if you want to make this skirt in an a-line instead of a bell/cupcake shape.
The Math:

If you know what skirts you're planning on wearing your ultrabustle with, it can help to measure them and get a good guideline.
Generally, you want your ultrabustle to be a number somewhere within these guidelines.
~~Close to the same length of the skirt you're wearing it with
or
~~4"ish longer than the skirt you're wearing it with.
(This depends on if you want the bottom ruffle to stick out. If you're Tallita and all the skirts and dresses you're resizing are also too short, you might want this to double as a ruffled underskirt)
and
~~An acceptable length to wear as a skirt all on its own.
My first run at this ultrabustle was WAY too long, and after chopping off the entire top tier, it ended up being either 1" shorter or 1" longer than the skirts I'm planning on wearing it with, which is a great number for me.
As for the total fullness of the skirt, you have to remember that the ruffles will add visual volume to the skirt. This means that you don't actually need the hemline of your skirt to be super full. All that matters is that your petticoat can comfortably squeeze in there. For this, I measured the hemline of the smallest dress that I had that still fit my petticoat, and used that. It turned out to be about 80" around.
So, what sizes do we cut this at? It's math time.

Here's a worksheet if you want.
You're going to need to know how long you want the finished skirt, how wide you want the hem of the slip (not the ruffle) of the skirt, how many ruffle layers you want, and your waist measurement.
The slip needs to be shorter than the ruffles, so it doesn't show. So total slip length is your skirt length minus 2.5". Divide that by the number of ruffle layers that you have, and you'll have how long to cut each of those. This is slip tier short side.
Each ruffle layer needs to be longer than each slip layer, so that the slip doesn't show. You want each ruffle to overlap the previous one. So, take your slip tier short side and add 2-3" (or more, if you want). This is your ruffle short side.
Your finished slip diameter is your slip tier long side. That one's easy.
If you're a math and planning person, you can determine your ruffle long side measurement. You'll want to take a piece of your fabric, cut to the ruffle short side measurement and also about 45+ inches wide, and a piece of your slip fabric. Run them both through your gathering attachment so that your ruffle fabric is sewn onto your slip fabric. If you like how that looks, you can then measure the finished length of the ruffled fabric and use that to calculate how much fabric you'll need for the ruffles.
There's four places where people mess this up. First of all, if you're using your gathering attachment to sew and gather at the same time (which is the point of that attachment), you want to do all your test runs gathering it onto a fabric. The amount of fabric that goes into a machine ruffle changes depending on if it's onto fabric or just gathering. Second, you want to use your finished fabric, at your finished ruffle length. Different fabrics will ruffle different amounts, and different ruffle widths will look different even at the same gathering amount. Third mistake people make is to not gather a long enough strip. The longer a strip you gather, the more accurately you can measure how much fabric is actually going into your ruffle. And the fourth is to take that measure as an accurate one, and not plan for needing extra fabric. The upside of the gathering attachment is that it will save you so much time. The downside is that you can't be as accurate with knowing how much fabric you'll use. Remember, you can always turn the leftovers into a matching accessory.
Even if you're going to go yolo like I did and not do the math about how many ruffles you need, you will still want to run a check that you like how your ruffling attachment looks. You don't need to measure super accurately, but try to get a feel for how much fabric is going into each ruffle. For example, if your ruffler takes a strip and makes it 1/3 it's flat size, then you'll need more fabric than if your ruffler makes it 1/2 it's flat size.
If you're really on a budget, you can just cut your ruffles at 2.5x your slip long dimension and precisely gather by hand. My time's worth something to me and so it wasn't worth it to do that just to save a yard of $10 fabric.
The last part is just to check that your ruffle long dimension (or it's rough approximation) is still at least 2.75x your waist measure (3.25 is better). If you don't have that, your skirt likely won't look full enough for a lolita silhouette. If that's the case, just add to your skirt dimension until it is.
Actually making it:

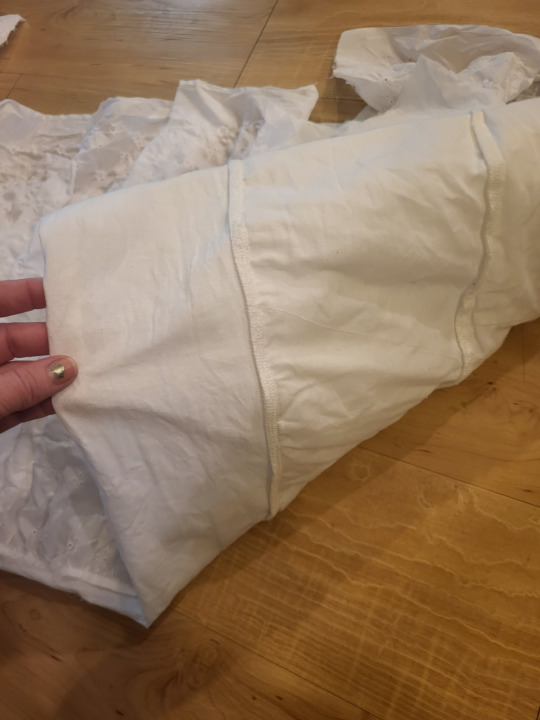
Before you forget, cut out a piece for your waistband. You can decide if this looks better in your ruffle fabric or your slip fabric (I used slip). This piece should be 3ish" longer than the distance around the fullest part of your booty. You need this to be longer than your booty distance so that you can get it on your body. If you're using 1" elastic, you want this piece to be a minimum of 3" wide.
I've found that the easiest way to do this is to start out by making the whole skirt as a single, very long strip. So, I take my slip tiers and cut them all out, and sew them into a long strip.
On my specific fabric, I decided that I wanted the pattern on the eyelet to go lengthwise. So, instead of cutting the fabric across the grain (short side, selvedge to selvedge) like I normally would, I cut down the 4 yard length of the fabric. This meant a lot less seaming. Since I didn't really know how much fabric I was going to use (you know that test I described to check how much fabric you're going to use? Yeah, guess who didn't do that), I just cut them one 4-yard strip at a time. I'd ruffle one all the way, stop, and cut the next one. This did actually save me quite a bit of fabric versus cutting them all at once. I had to go back and sew the sides of the ruffle together once the skirt was done. It was a small price to pay for the convenience I experienced.
I knew what size I wanted the finished ruffle length to be, but I cut my ruffles about 2.5" longer than that. I wanted a little bit of wiggle room once the skirt was done, so that I could do the length adjustment once the whole skirt was assembled.
And then, it's just a matter of letting the ruffler do its work. My serger ruffler works by you putting the item to-be-ruffled on the bottom, and the item to attach the ruffle to on the top, and then just hitting go. Some other rufflers work by putting the to-be-ruffled at the top, so you can see it as you go. Like all sewing machine attachments, if you're not sure, just go on youtube and search "HOW SINGER GATHERING FOOT DO THING NOT LOOK LIKE SHIT?" and someone's probably made a video of it.
So, once you've run all your ruffle through your machine, you should have a nice single strip of slip fabric with a ruffle on top of it. Now, some gathering attachments don't actually sew super strong seams, because you have to adjust tension or stitch length pretty severely to get it to ruffle like you want. The other advantage of putting the ruffles in a seam instead of just topstitching them onto a piece of fabric is that it doesn't matter how strong your ruffle attachment is, as long as it's strong enough to hold until you can put the ruffle in the seam. The seam provides the strength.
Once you have your single long ruffle, cut off a section that's the diameter of your bottom tier.
Now you just need to sew them together (and finish your inside edges). I like to start at the bottom tier and go up.
For each tier, you're sewing the bottom of the slip layer to the top (ruffle and slip) of the tier below. Just pull the ruffle of the higher tier out of the way, put right sides together, and sew.
If you aren't using a serger, you can zigzag over your edges and then trim them down, use an overcasting stitch from your sewing machine, or topstitch some seam binding over the seams. The extra line of stitching on the slip layers in front won't be visible.
One of the other nice things about building this in the way we have is that, when you finish the edges of your inside seams, you're putting three layers together and finishing it as one. This is actually a lot less then 1/3 of the work of finishing them separately, because you'd have to finish the ruffle as a flat piece, which would take way more time. Have I convinced you on the greatness of this technique yet?
Continue cutting pieces off your ruffle layer and stacking them until you have as many layers as you decided you were going to have.
Once you have your layers all stacked up on each other, it's time to sew the skirt back seam. I find that it looks best to hold the ruffles out of the way, sew the slip together, and then go back and sew all the ruffle pieces. Basically now is a good time to just check for any ugly spots and to touch them up.
There's like 50 ways to attach a waistband to a skirt. For this one I used this method (what a blast from the 20dollarlolita past we have there. Also please note that the cost of ruffler feet seems to have gone up from $15 to $60-$100 in the past 10 years and despite working in a sewing machine store, I'm not totally sure why).
Once you've got the whole skirt assembled, it's time for the finishing.
The first thing that I did was put it on and try to judge how short I wanted my top ruffle. I'd cut all my ruffles extra long in the short dimension, so that I could shorten them when they were on the skirt. I picked a length that worked, marked it out, and chopped at that point. I then did this for the other two layers. I found that I wanted my bottom ruffle to be a little bit longer than my top ones, and cutting it long allowed me to make that choice.

I then started just zigagging on my lace. If you don't have a serger, you can use the lace as a hem finish, which also saves you an additional step. The lace really added a lot to this, and since I only need to make this once to wear with a lot of different garments, it was an economical use of nice lace.
I started putting the lace on the top layer first. This is because, if I ran out of lace, having a different (wider) lace on the bottom layer wouldn't look strange. As previously mentioned, I did zero measuring of how long my ruffles are, and had no idea if 27 yards would be enough lace. Don't be like me. Do some tests. Or be like me and choose the life of treachery. Anyway, stick lace on this thing, please. You worked hard and your skirts deserve it.
The only other thing that I did was to cut the slip layer down by about 3" on the very bottom. I did this because I made a mistake, but I like how it looks.

You can take this system of ataching ruffles in rectangles or even a trapezoid and stick it in the back of a skirt (or skirt on a dress). I did that here because I knew that I wanted a pink bustle, not a white one.

I'll do a tutorial for the actual skirt resizing sometime after I actually resize a skirt with this. Here, all I did was slice the back, hem those edges, and then button on some waist ties from another dress. This let me easily add several inches to the back of this skirt, without needing to re-distribute pleats, and without sacrificing the fullness of the shape.
This will all sit a little bit better once I've pressed the skirt, as well. Steaming the top layer of this while the garment is on me/a dress form/a hanger will decrease the poof in the top layer a little bit, and honestly, we could benefit from that in this case.
Anyway, if you have this, you have a very fast way to enlarge existing garments.
So, while this has thankfully very much decreased in the past years, there's still some people with weird opinions on MoDiFyInG bUrAnDo, so let's have a talk.
Lolita clothing is not community owned. If someone who was never going to sell a dress to you modifies it, that doesn't take it away from you. This is a mentality that we tend to have in lolita more than other fashion just because of our high resell scene, but it wasn't ever going to be your dress and so you don't need to have an opinion about what happens to a thing you were never going to personally own.
Things have value more than money, and value is often changed rather than destroyed. AP's Halloween Treats OP has no value to me when sold for $500 on Lacemarket. I don't spend that much money on lolita, ever. But a questionably-altered AP's Halloween Treats OP that I can un-alter has value to me if the price is good. But a questionably-altered AP's Halloween Treats OP has very little value to someone who likes the price, but can't undo the alterations. When someone resizes a dress or skirt, true, sometimes the people who are the size it was originally made can't wear it anymore. You've decreased the value to them, but you've made it more valuable to people who are the size that you've made the garment become. This skirt had no value to me when it's waist measure is 7.5" too small, but now I can wear it, so it has functional value to me.
A lot of people who say that modifying the dress ruins it are either ignoring that also the stress of putting a dress not sized large enough for your body can damage it and not look as great while doing so, or else they have a much worse take. People who say that modifying clothes ruins the garment, but also say that wearing a garment that's too small ruins the garment, what they're actually saying is that wearing that garment is a privilege that should not be extended to larger sized people, and if they say that then they can just, you know, go fuck themselves. We don't need that in the community. Everyone deserves to wear lolita, and some people have to work harder to achieve it, and that's not fair, but everyone deserves it.
So yeah, kiddos! Build a skirt! Go cut up some clothes! Wear the skirts you've always wanted to wear! You can do anything!
And to answer the question we opened this with, yes, I was absolutely falling over.
#handmade lolita#20dollarlolita#lolita fashion#resizing clothes#making clothes bigger#tutorial#skirt tutorial#lolita skirt tutorial#sewing tutorial#bustle underskirt#utilibustle#ultrabustle#the one bustle to rule them all#one bustle to find them
212 notes
·
View notes
Text

.🩶.
#face#hair reveal#it’s just blonder lmao. I feel like Nikki tutorials where she did her hair reveal and it’s really anticlimactic#tattooed girls#alt#goth#girls with piercings#gothic#vamp#alternative#alt girls#y2k#big tiddy goth girl#tumblr girl#goth gf#grunge#metal#content creator#piercings#tattoos#edgy#fashion#pretty#cute#kawaii#emo#model#babygirl#aesthetic#alt gf
66 notes
·
View notes
Text
DIY Punk Mods and Updates
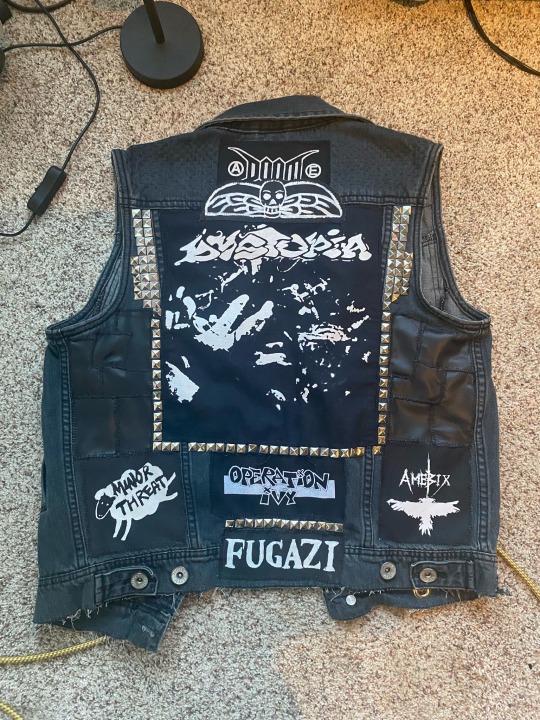

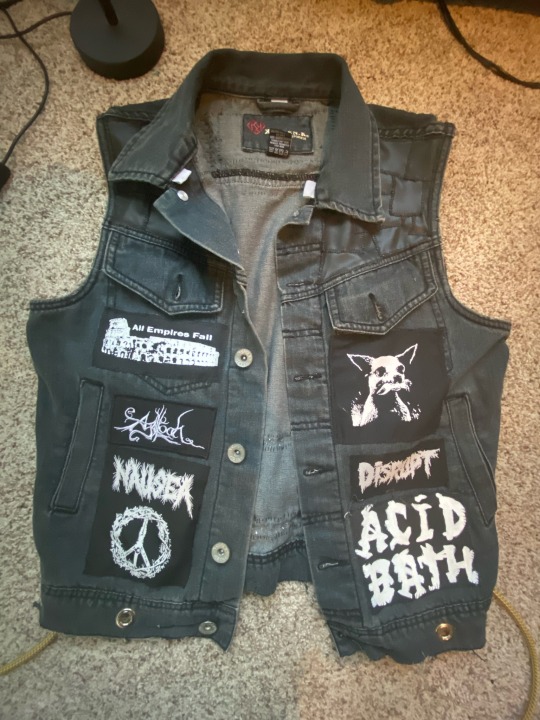
I started beefing up my battle vest!
I cut off the hem for a more flattering look
Added pleather patchwork to the front and back
Added a decorative patch below the Doom patch
Added sashiko stitching so it matches my pants
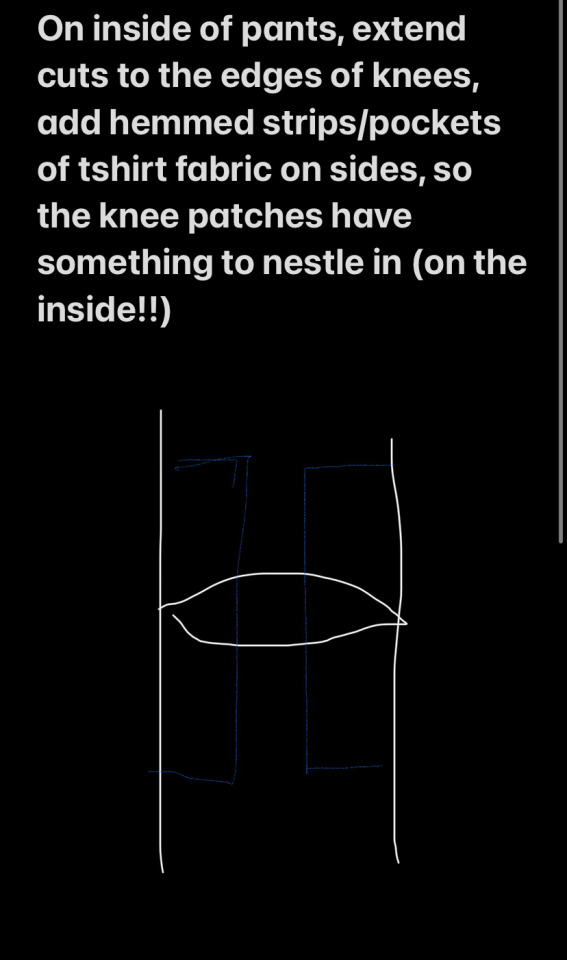
Added grommets at the bottom for keychains
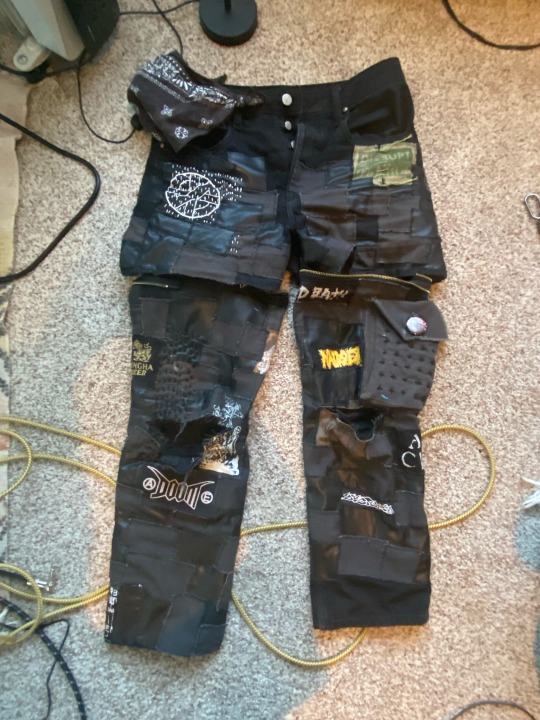
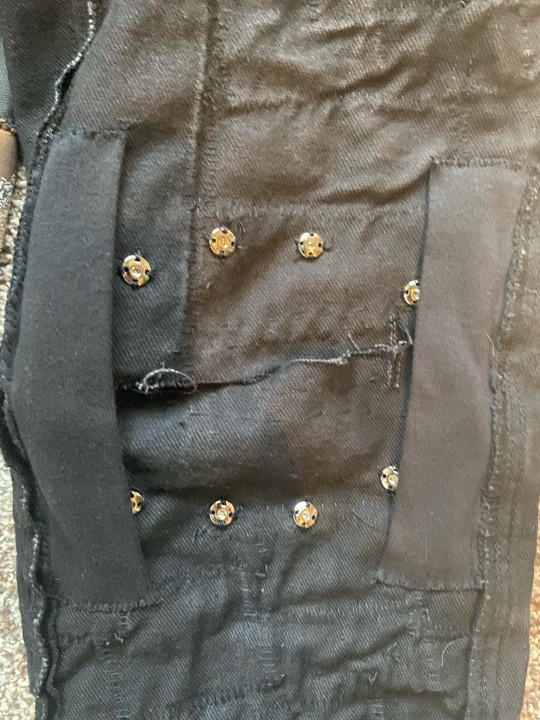

This was a big gamble for my pants, but I’m glad I went through with it. My pants were getting stiff from the amount of patchwork that went into it, so I cut the knees so I could actually bend my legs lol. The issue is that my legs will get cold, so I bought some elbow pads from the craft store, and converted them into knee pads. Using button snaps, I made them removable (last pic). I lined the pads with old t-shirt fabric so my knees won’t chafe, and secured it with fabric glue and a border stitch. The strips of fabric on the inside of the pants are there so that the cuts I made don’t fully expose my legs when it’s cold.
(The half-ass pattern I made at work)
This took me a total of two days, with the sewing, measuring, and all that.
#diy punk#diy or die#punk#punk pants#patch pants#punk fashion#crust punk#anarchopunk#diy tutorial#sewing#punk style#punk aesthetic#crust pants#patches#battle vest#punk vest#spechpunkshit
351 notes
·
View notes
Last Seen Blogs

metaphysicae
something’s waiting on the backroads

gingerthong
Naamloos

just-being-unproductive-blog
So um, hi.

ammar1995
at your service
just-being-unproductive-blog
So um, hi.