#anime gif tutorial
Photo

A little tutorial about how to draw pecs!
Many asked me in the past so I hope it can help many!
32K notes
·
View notes
Text
HOW I ANIMATE 🤌
I couldn’t make individual gifs of this whole this so MADE A VIDJEW FOR YEW GOIS ! I didn’t know what else to make of my animation, so I decided to make it into a little quick tutorial. Hope it helps!
19K notes
·
View notes
Note
I was wondering can u do a tutorial on Sonic eyes and face?
Okay so, my process for drawing Sonic characters usually amounts to 'severely winging it', like so:
I draw a circle, I ignore the circle, you know how it is. I'm not sure I'd be super helpful trying to explain how I do it dfbfh
However!! I can redirect you to this really good tutorial by @tatck! A lot of the techniques in it are stuff I do as well!
#ask#my art#sonic#sth#sonic the hedgehog#amy rose#timelapse#speedpaint#gifs#gif#animated gifs#maybe I'll attempt to do a proper tutorial one day but rn? too tried fbff
612 notes
·
View notes
Text

'ello folks, my Cleanup tutorial is finally done and out!
hope you find it useful
#Animation#Tutorial#Advice#Lesson#The Lion King#simba#animation#Disney#character design#how to#2D#traditional animation#frame by frame#Adobe#Photoshop#Animate#Flash#After Effects#Premiere#Video#Film#Drawing#Tips#Gestures#cleanup#lines#krita#toon boom#procreate#tvpaint
1K notes
·
View notes
Text
Making dynamic poses/animations that adjust to a sims body with Animation Tools by thepancake1
Made this short guide after talking to thepancake1. I haven't seen many people use this feature yet and felt like it might be worth sharing? There are some limitations to be aware of, but I think it's a useful option (for poses as well as animations) 😊
Many thanks to thepancake1 for the tools and for the helpful explanations he provided for this guide.
1. Background and in-game mechanics
The way TS4 handles different body shapes and clothes in animations (for example, in order to avoid clipping) is basically by putting markers (“slots”) on the surface of a sims body that can be then used as (IK) targets with the in-game IK system.
As you probably know, IK (Inverse Kinematics) – as opposed to the default FK (Forward Kinematics) – is a set-up where bones in a chain are influenced backwards. So, for example, when you move a hand, the arm will follow.
In a similar way, what in-game IK does, is assigning a bone or slot to animate relative to. For example, if your sim is posed with hands on the hips, you can assign the hands to the hips slot and the game will then process the pose/animation and perform IK in real time to change the position of the arms and hands relative to the hips.
Note that there are limitations to this system, though, as only hands, feet and the root bind can procedurally target other bones/slots.
Hereby, feet targets and root target are mainly used in interactions with objects, in particular in sitting animations (where, for example, the root is targeting a chair slot).
Hand targets are mainly used for adjusting a pose/animation to a sims body shape and clothes.
The in-game IK always influences the complete arm/leg (chain: foot-calf-thigh/hand-forearm-upperarm).
You can find an article that provides some background information here: https://simsvip.com/2014/08/20/community-blog-the-sims-4-animations/
2. Using the feature in custom poses/animations
Per default, when you make custom poses/animations with Blender and S4S, the relevant information that the game requires to apply in-game IK is not included. And so, you will notice that while a pose might look good with the base rig in Blender, it might not fit other sims with a different shape in game, in particular causing clipping.
You can use TS4 SimRipper to fine-tune a pose for a certain sim, but this might not be the solution you’re looking for, if you share your poses and/or want them to be compatible with different kinds of sims.
The animation tools now include a feature that makes it possible to use in-game IK with custom poses/animation as described in part 1.
Disclaimer:
The animation tools are in development and subject to change.
Currently TS4 SimRipper sims are not properly supported. (Although, imo for the purpose of the task, it doesn't make much sense to use them as models.)
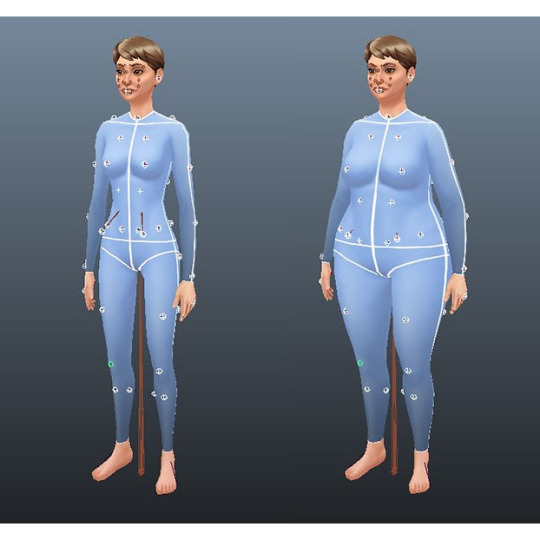
As you can see in the comparison below, there might be some accuracy loss for the flexibility gained. (The position of the arms in the version without IK targets matches exactly the pose I made in Blender but doesn't work at all for the heavier sim causing extreme clipping. At the same time, the version with IK targets deviates a bit from the pose I made, but works for any sim.)

Below a short guide on how to set it up with the example pose I made.
1) You can download the tools HERE. Make sure to check the installation guide and tutorials in the wiki tab for the basics. (Note: The tools were originally made for Blender 3.0 but also support newer versions, in particular Blender 3.3.)
Some additional tips for poses in another post of mine HERE.
After you set up the tools in Blender and have made your pose:
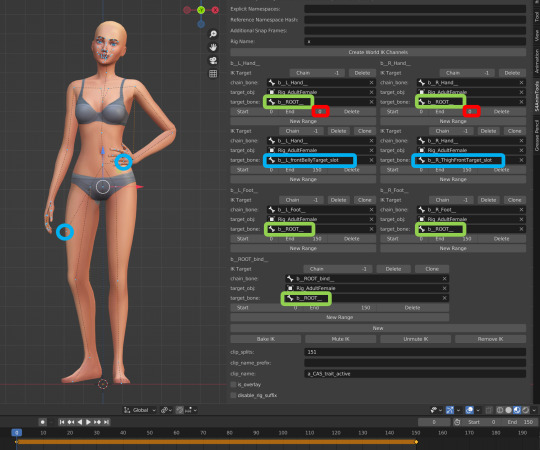
2) Go to the S4AnimTools panel. Fill out rig name, clip splits and clip name as described in the tutorials linked above (also make sure to select “Allow Jaw Animation”).
3) Find & click “Create World IK channels”.

This will create 5 IK channels for the afore mentioned hands, feet and b_ROOT_bind bone. You can also add channels either by cloning the existing ones or clicking “Create World IK channels” again. To get rid of unwanted channels click “Delete”.
4) Set up the targeted bones/slots based on the type of pose you made.
In my example, I created a pose where a sim has the left hand on the hip, and the right hand close to the thigh. Therefore, I added IK channels targeting the “b__L_frontBellyTarget_slot” and “b__R_ThighFrontTarget_slot”.
The slots are marked blue in the picture below. Some notes:
The slots are hidden by default, I made them visible for the picture. You can unhide all bones/slots available by pressing Alt+H. But I recommend doing this on a separate rig/in another blend file or undo it directly afterwards if you don't want all the (unneccessary) bones/slots blocking your view.
The selected slots worked well enough for my example, but you should figure out what is suitable for you. (Fo example, the HandDangle slots seem to be commonly used when the arms are hanging near the body.)
As orientation you can also look up clip files for EA poses/animations via the S4S Game File Cruiser and see what bones/slots are used as targets ("Warehouse" tab -> "SlotAssignments"; IKChainIndex: 0 - left hand / 1 - right hand / 2 - left foot / 3 - right foot /4 - root bind). On that note: The Clip Pack export loses/resets the slot data, but you can use it to find an animation and check its Instance ID to then search for in the Game File Cruiser. (If you know the name of an animation you can also determine its Instance ID by converting the name with the S4S Hash Generator.)
5) To ensure an animation works properly and, in particular, blends with other animations in game, each IK channel should (also) target b_ROOT of the rig.
The bones are marked green in the picture below. This set up was recommened to me by pancake. Another experienced creator mentioned though that it's only necessary to target b_ROOT at the start and end of an animation, in his experience.
Also note that this seems to be a restriction for animations that are made as in-game interactions and might not be necessary for poses or animations used with Andrews Pose player.
6) The start and end frame is set according to the length of the pose/animation (I want to use the pose as a CAS trait pose and set the duration to 150 frames = 5 seconds), except for the b_ROOT target for hands where the end frame is set to 0 in my example, since they are also targeting the slots “b__L_frontBellyTarget_slot” and “b__R_ThighFrontTarget_slot” during the animation.
Note: My example is a static pose. In animations, however, you can also target different slots at different times by setting up multiple IK channels and specifying the start frame and end frame respectively.
7) Bake the animation by pressing “Bake IK”.
8) Export the clip and create a package with your pose/animation as described in the linked tutorials above.
@ts4-poses @thefoxburyinstitute
667 notes
·
View notes
Text
Lil tutorial for how to draw flames!
#art#original art#artwork#illustration#design#artists on tumblr#pixel art#pixelated#pixel graphics#digital aritst#art tutorial#tutorial#my art#old art#pixel animation#pixelart#pixel aesthetic#pixel illustration
146 notes
·
View notes
Text
How does Rover blink?
#i tried reaally hard t export the animation but maybe im too stupid to understand the tutorials#so yeah Im still recording with my phone 🗿#opm#opm fanart#opm rover#silly lil goober I love him so much
87 notes
·
View notes
Note
random question..but how do you animate hair?? as in specifically like mariza's (i think thats her..their??? name?) water hair, with how flowy it is-- i have an oc whose hair is meant to move around like shes in water but i got no clue how to animate that so yeah-
Idk how to words so I hope these visuals would help sdfghjk For the sitting animation I actually used CSP’s liquify tool to mess around with the movement but this is how I usually do it:
I start with 2 keyframes. After drawing the first one I make sure the “bumps” in the second one are in different spots to get that movement

Then I added in-betweens so they would flow together

and then added some more in-betweens to make it smoother

sometimes the flow might not look right so you could always go back a frame to fix a thing or two :0
#I doomed myself by giving her this type of hair but heck it KJSHDG#its Aesthetic(tm)#Mariza#my OCs#my art#animation#tutorial
2K notes
·
View notes
Text
So, someone asked for a tutorial of this animation so, why not?
I need to say first that I'm not a profesional animator, I'm a selftaught artist and I'm terrible at teaching/making tutorials so maybe this isn't the best example of how to animate.
Having said that, this was my process:
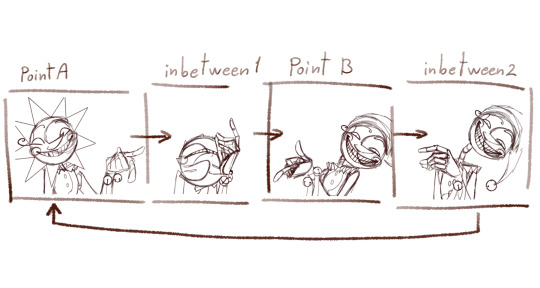
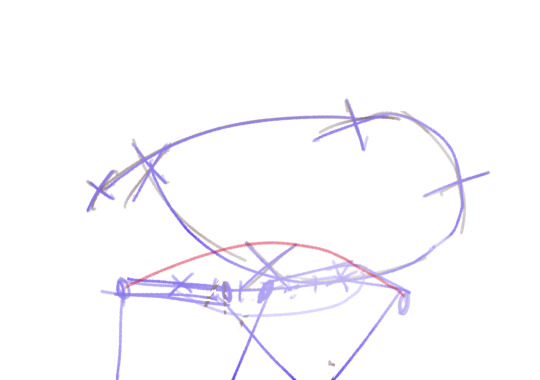
I first drew the important key frames, in other words, where I wanted point A and point B to be. No details, only body and head (I have no save of the original frames but basically no bells or ribons nor ruffles)

Then I needed a frame in betwen to conect them
I added a bounce effect duplicating the images, squeezing and stretching it a little (I have no save of this part but I have a video on my phone from january of last year, sorry it looks a little bad, I had to crop it)
I slowed it down so you can see the bounce
It's just like 3 frames each bounce
Now, to animate all the frames I started from A to inbetween 1,

then later to point B and closed the loop with inbetween 2.
To make this easier I drew a "rute" on the background
It looked something like this
and with the animation

It's a process of trial and error. While you are drawing the frame you don't actually know if it's the correct pose (unless you are some kind of god), so you have to draw the inbetweens, check how it looks in movement, spot where it lack/exceeds frames or where it needs more space between frames... untile it's finished and you get something like this.

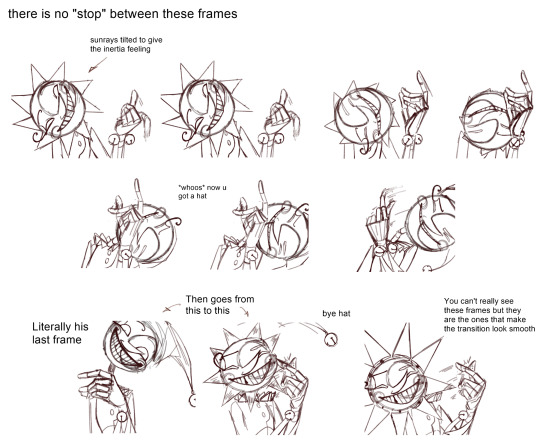
As you can see only 8/46 frames aren't drawn. These 8 frames are little "stops" for the images so the character is still.
Some of these frames has the character still but something else is moving, like Moons hat.
Finally, I got to animate the details: sunrays, hat, bells, etc. Each of these objets has its own physics and this part enters more in how I belive the physics would behave like having in mind the mass of the objet and the inertia.
Example:
The hat has a lot of inertia because fast movement so: it moves faster and it takes time to stop.
The ribons and ruffles has less inertia because even though it is still fast is a slower movement so: it moves fast BUT stops fast.
Note to add: the faster and objet moves the less frames it needs to be drawn, sometimes it may need to draw the character/object deformed to look right. The slower it moves the more frames you'll have to draw and the more precision you'll need to make it look right.
Some cursed frames:
Some "still" frames:

Another note to add: this is animated at 24fps, this means every 1 second has 24 images. Most cartoons and movies are animated at 24-25 fps, this not only aplies to 2d animation but also 3d and stopmotion.
Fun fact: the human eye perceives between 30-60 fps, however animating at 30 fps or more can give an unnatural feeling to the animation.
At last, here is the animation clean up that I never finished

I added a couple of frames to make it a lil' more smooth.
Hope this crapy tutoria helped somehow.
Now I'm going to bed and hope when I see this in the morning it looks decent.
723 notes
·
View notes
Text

wanted something nice for my artfight profile (~Suenden-Hund) so I made myself a little snoozer kabukitty
#genshin impact#fanart#scaramouche#scarameow#kabukimono#wanderer#genshin wanderer#gif#animated#its a bit rough bcs i was too lazy to look up tutorials for the CSP animation tools#and i havent animated anything in a long while#but i still think its cute
217 notes
·
View notes
Text

Another iteration, another new color scheme, extract from this one we originally built 6 years ago in the recording of a tutorial
youtube
#after effects#tutorial#spiral#hypnotic#mesmerizing#loop#motion#retro#moodboard#seamless#gif art#animation#trapcode#trapcodeTAO#Youtube
54 notes
·
View notes
Text

I made this Extremely Basic mouthchart for my students to help them learn what Basic shapes are associated with what sounds. Made with 2d builds in mind, as thats the most common 2d work in my area.
Every single project has its own show style regarding lipsync, so this NOT the be-all-end-all. You and your projects arent beholden to these suggestions, theyre purely a jumping off point.
Happy animating!
#animator#animation#2d animation#animation tutorial#character animation#hand drawn animation#digital animation
885 notes
·
View notes
Text
A friend wanted a few tips on how to animate wings. I went a little ahead and made a tutorial for her. I'm gonna leave it here in case it helps anyone. It is hard for me to express certain things in order for them to make sense, but I hope that the vocabulary and the logic used in this tutorial finds you well.
#tutorial#art#artist#animation#animation tips#tips#pro tip#animation tutorial#animated tutorials#wings#wing#illustration#art tutorial#tumblr art#cute#drawing#draw#illustrators on tumblr#artists on tumblr#draws#writers on tumblr
1K notes
·
View notes
Text
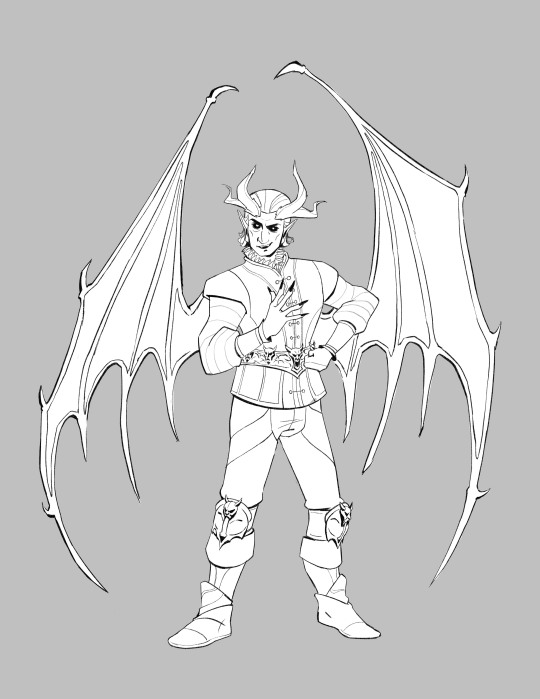
Here are some process shots for this one of Raphael from BG3! That magnificent bastard...

So I started out with a sketch of Raphael. He's got such a charismatic swagger doing the whole "What's better than the Devil you don't know? The devil you do" scene. I just wanted to do a caricature study and have a bit of fun.

Moving from rough sketch to clean line art is always challenging for me as I often get bored or what was originally loose and fun can become stiff.
I had to redo the linework twice because I didn't like how the first one turned out! Second time is always the charm.
I initially only planned to draw the character but I love the design of House of Hope too much, so I went back into the game and took a bunch of screen shots and sketched out the rough bg.
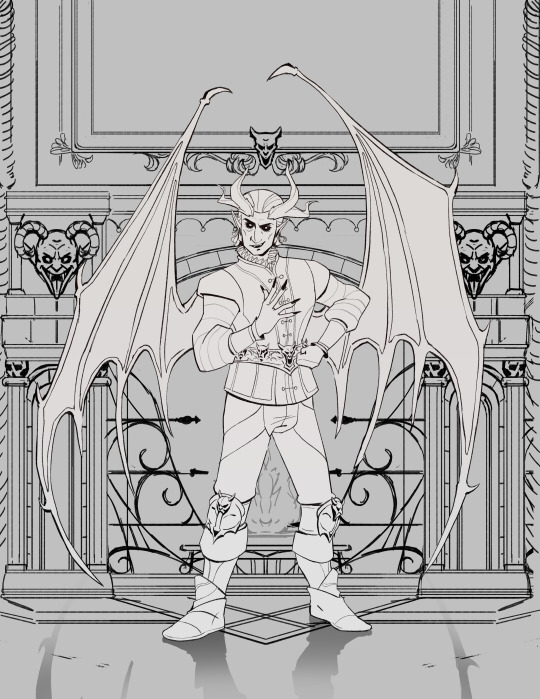
Then I went ahead and cleaned up the bg. At this point is when I group the layers properly, so there is a clear separation between foreground, and background as well setting up the layers for animation. (Making sure the fireplace guards overlaps the walls behind it.)
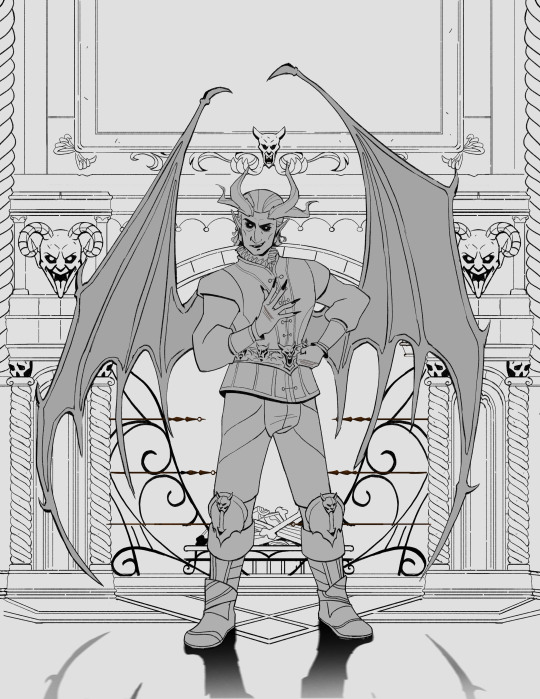
At the next stage I adding in the flat colors. I wanted to keep the style treatment of this piece more on the cell shaded/cartoony instead of super painterly. So I keep the color treatment fairly flat with a small amount of texture with the intention to add lighting as a fx overlapping treatment instead of painted in.
I work on the characters and the bgs at the same time to keep the values and color temp consistant, constantly adjusting as I go. From habit from work, I always paint the entire BG JUST incase I need to make changes or make adjustments to subject in from. Here is the bg all done, with fire painted in as a place holder.

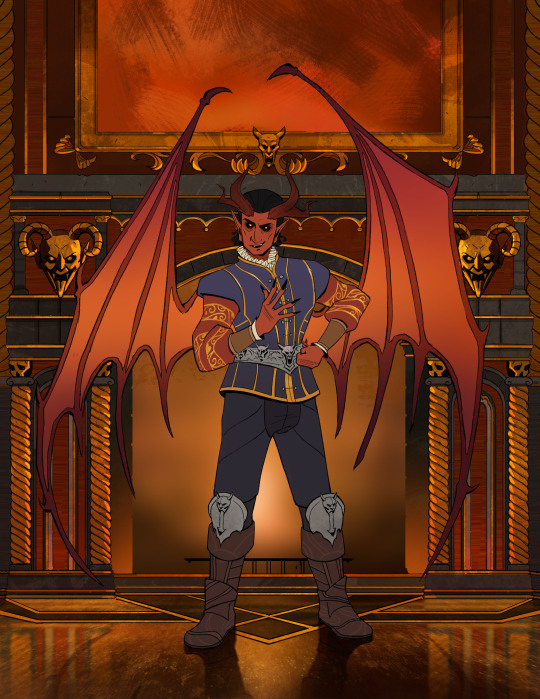
And finally, adding the final lighting layers added on Raphael. I keep it simple here, just a redish/purple multiply player with the areas in the light masked out, and inverse mask on an orange/red overlay layer of the areas in the light.
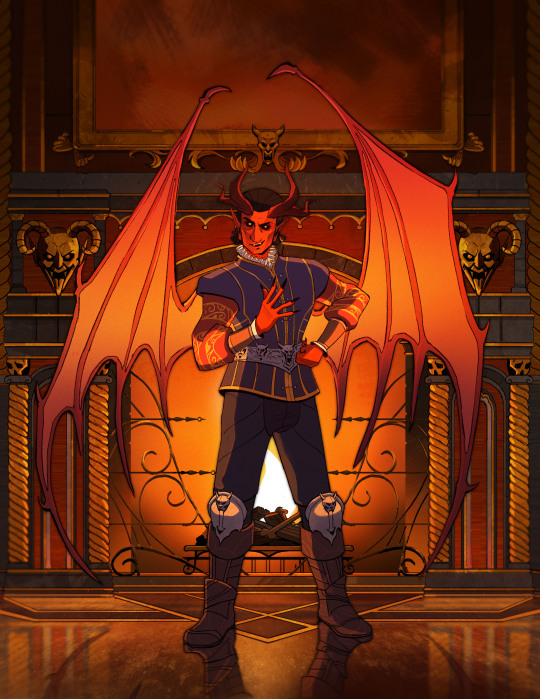
Animating the fire took ironically the longest, the animation tools in photoshop is clunky and I haven't animated since school days. I looked up a lot of references and tutorials! It's not perfect but good enough for me!
#raphael bg3#raphael baldur's gate 3#bg3 animation#bg3#badlurs gate 3#bg3 fanart#artists on tumblr#sketches#drawing#art#artprocesses#art tutorial#bg3 art#art process#art style#animation#bg3 spoilers
131 notes
·
View notes
Text

(instagram)
Tutorial in After Effects under the cut.
ALRIGHT let's get into it. Straight to the point, no nonsense tutorial.
• Create a new composition 1080px x 1080px, let’s call it Design.
• Write some text, turn it into shapes (right-click → Create → Create shapes from text).
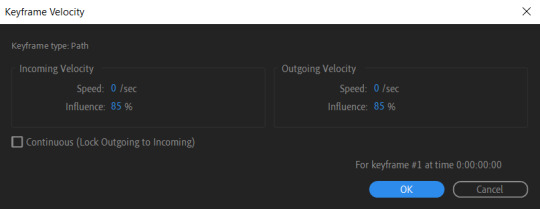
• Animate the path so the text stretches like so in a few seconds time. When animated, right-click on a keyframe and select Keyframe velocity and change coming & going velocity influence to 85%:

• Create another new composition and call it FX. Add your Design pre-comp in this composition.
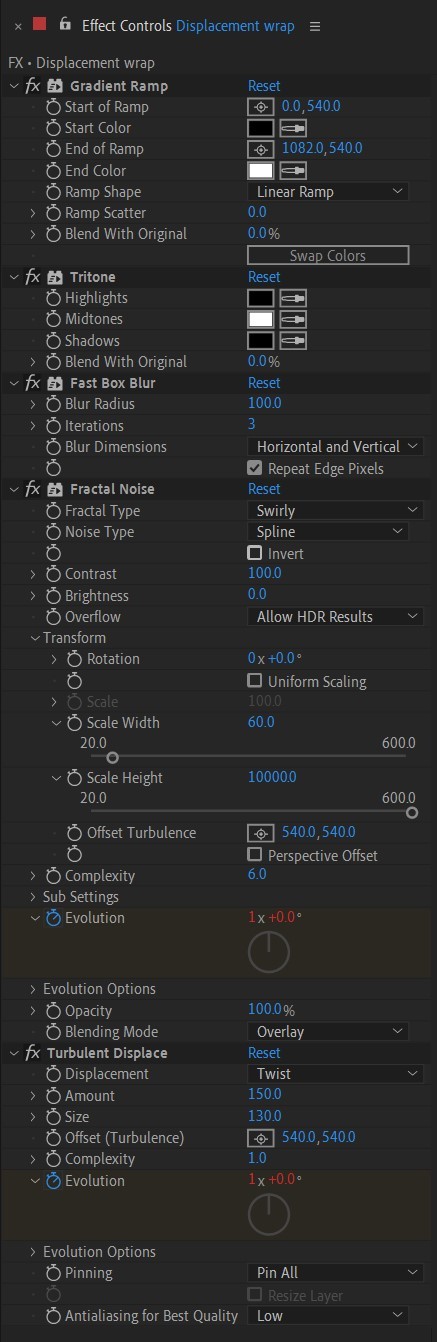
• Add a new Solid layer on top, call it Displacement map. Now we’re gonna add a bunch of effects on that solid layer.
• First add Gradient Ramp. Make it so the white color would be on the right side (End of Ramp) and black would be on the left side (Start of Ramp);
• Next add a Tritone effect and change the Highlights color to black and Midtones color to white.
• Add Fast Box Blur and change Blur Radius to 100.
• Then it’s time to add Fractal Noise effect, and change Fractal Type to Swirly, Noise Type to Spline. Then bring down the Transform panel and uncheck Uniform Scaling, make Scale Width 60, and change Scale Height to a very high number, such as 10000.0.
• Add a keyframe to Evolution at the beginning, and the second keyframe at 2 seconds rotating the slider for one rotation. Add an expression loopOut() on these keyframes so it loops.
• And lastly change the Blending mode to Overlay (at the bottom of the effect).
• The last effect we’re gonna add is Turbulent Displace. Change Displacement to Twist, Amount to 150, Size 130. Add the same keyframes to the Evolution as we did previously on Fractal Noise and loop them with the same expression.
So far your work should look something like this:

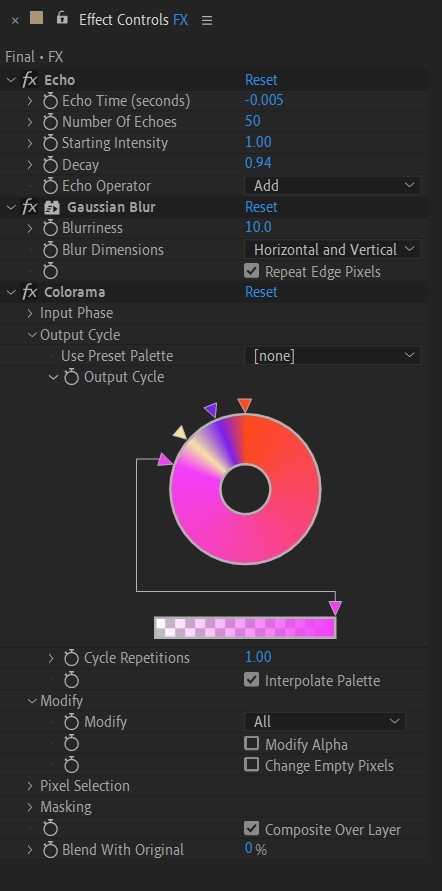
• Then it’s time to add colors! Create another new composition, add your FX pre-comp to it, add a background with a new solid layer (CTRL + Y).
• Then add Echo effect to your FX pre-comp, change Echo Time to -0.030, Starting Intensity to 0.03, Decay to 0.94.
• Next add Gaussian Blur effect, make the Blurriness 10.
• Add Colorama effect, change Get Phase From to Alpha. Then go to Output Cycle and change the color presets (Use Preset Palette) to let’s say Solarize Red (it doesn’t really matter, we’re gonna change the colors, we just need it to have two sliders instead of a lot). Then grab a bottom slider and put it on the left side and choose the lighter color you want. I chose pink.
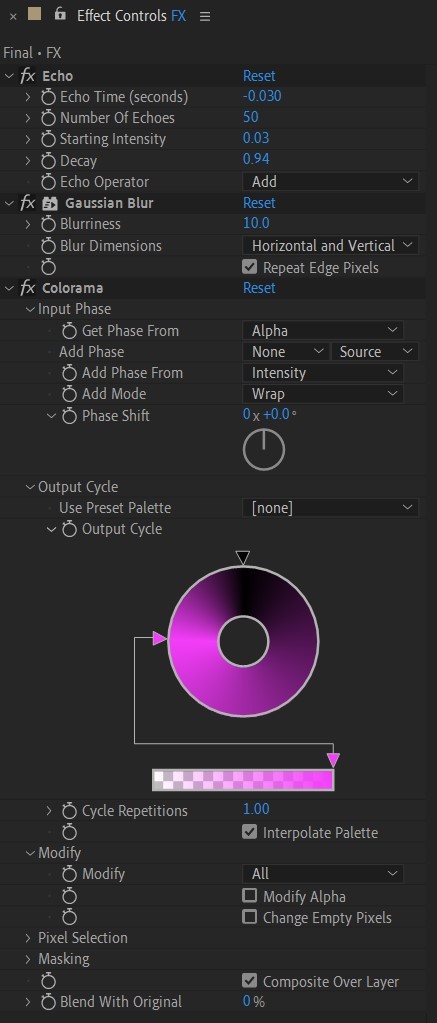
• Now duplicate your FX pre-comp. We’re gonna change some parameters on the effects.
• So the first thing you want to do is change Echo Time to -0.005, Starting Intensity to 1.
• On Colorama go to Modify and uncheck Modify Alpha. Then go to Output Cycle, and add more colors like you see in the screenshot.
• Duplicate your FX pre-comp one more time and delete all the effects on it.
• Last thing to do is add an Adjustment Layer (Ctrl + Alt + Y), add the Noise effect, and make the Amount of Noise 15.0%.
• And you're done!
#art tutorial#tutorial#friday#art#motion design#artists on tumblr#tips and tricks#art tips and tricks#tips#artwork#digital art#gif#animation#visual art#loop#gif tutorial#learn after effects#illustration#2d animation#infinite loop
32 notes
·
View notes
Photo


cute cas animations!
when i make tiktoks i prefer animation to poses but i get tired of reusing the EA trait animations, so i made some of my own! (if you want it to be a different trait, follow this tutorial but skip the blender parts - instead export my animation and import it onto another trait)
replaces the active trait
4 animations total, all in one
download: simfileshare
@ts4-poses
#cas pose#cas animation#create a sim#ts4#s4cc#ts4cc#animation#pose#sims 4#boyfrogsims#my cc#added the tutorial bc i think active pretty commonly has cas poses on it? but i dont have any so this works for me lol#my cas animations#my animation
529 notes
·
View notes
Last Seen Blogs
reverber-arr
kairos

skippykw
ketchup

natasha-world
salt and sugar

hornycouple-237
love my beautiful wife ❤

melissatrivera-blog
Balance your being.