#school tutorial
Text
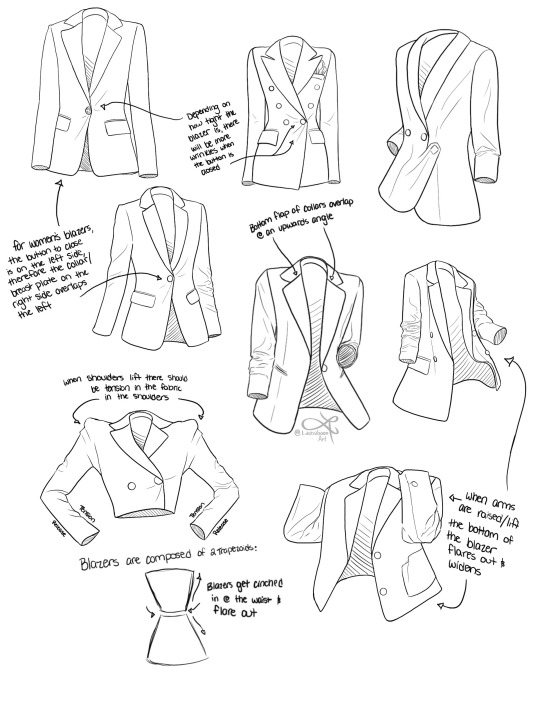
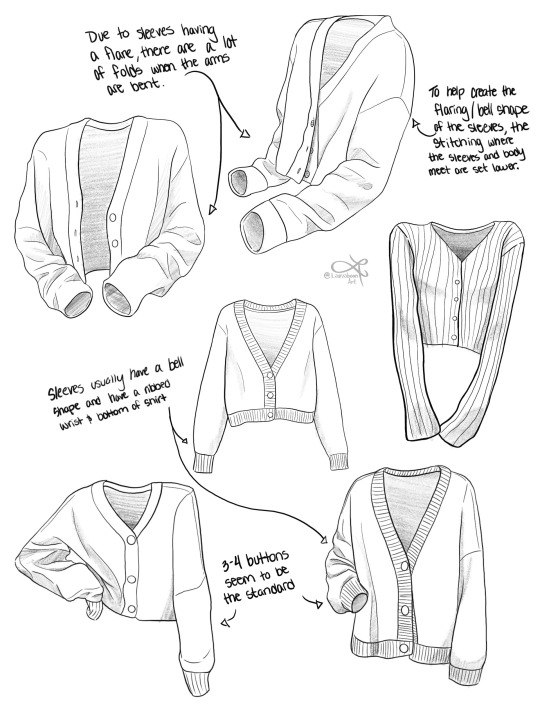
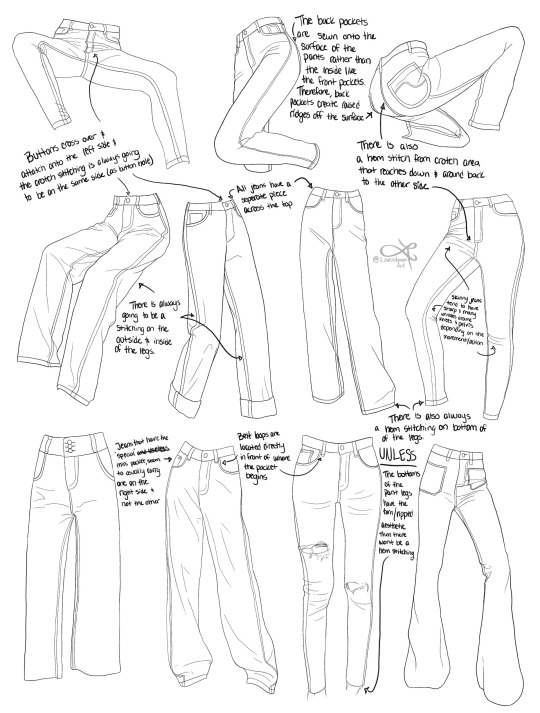
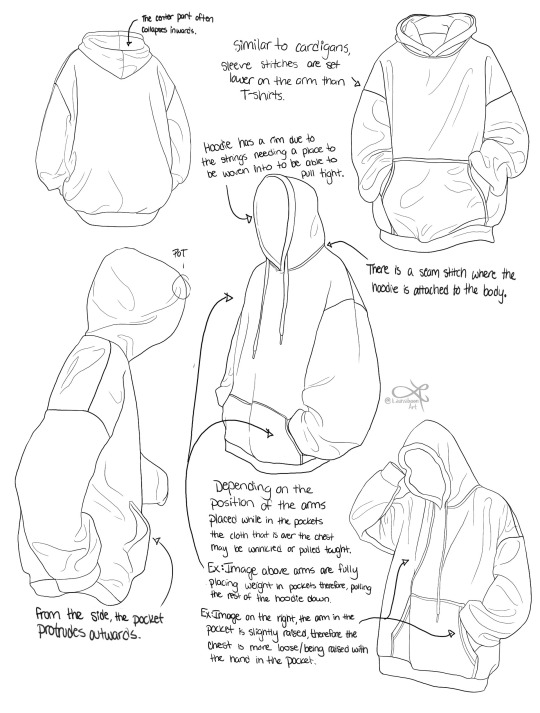
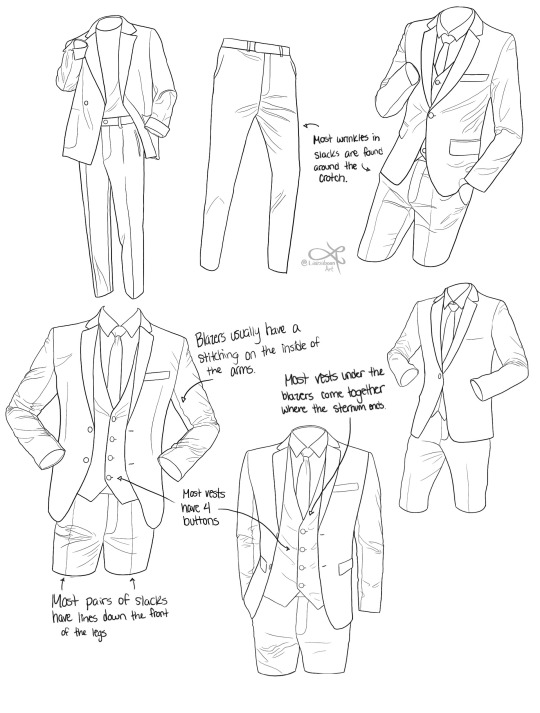
I'm currently doing an online art school program and I thought I'd share some notes on clothing pieces for anyone else whose like me and for some reason can't understand objects with free from lol I hope you find some of these observations/ notes useful for any of your art journeys!
#art reference#reference#art tutorial#art tips#art resources#art advice#drawing tips#drawing reference#clothing reference#how to draw clothes#drawing#how to draw#drawing tutorial#art education#art help#clothing#fashion drawing#art school#artists on tumblr#art community#art study
19K notes
·
View notes
Text
Lolita Accessory tutorial pages from Japanese mook “Gothic & Lolita Patterns”, 2004
Included are: head dresses, hair clips/ties, camisole pattern, drawers pattern, sock stoppers, multiple bag patterns, detachable collars, and jewelry.
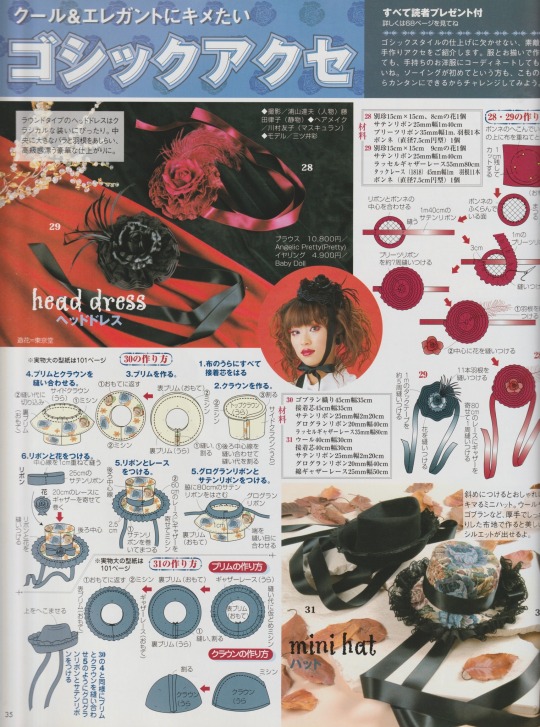
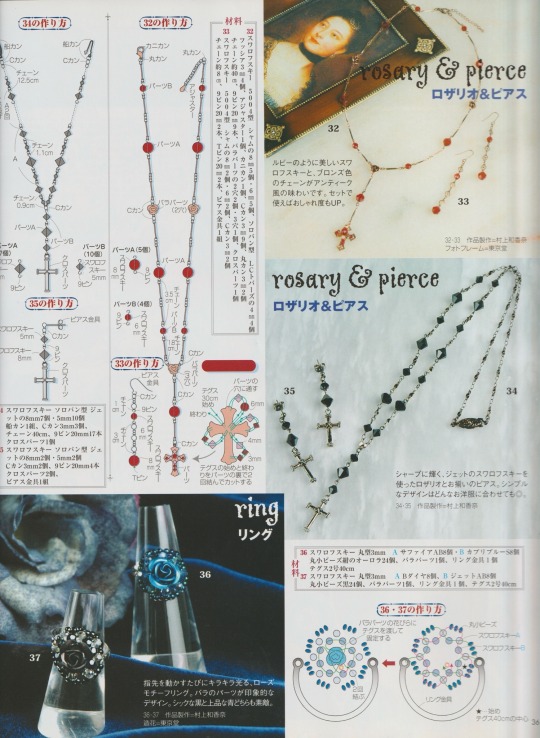
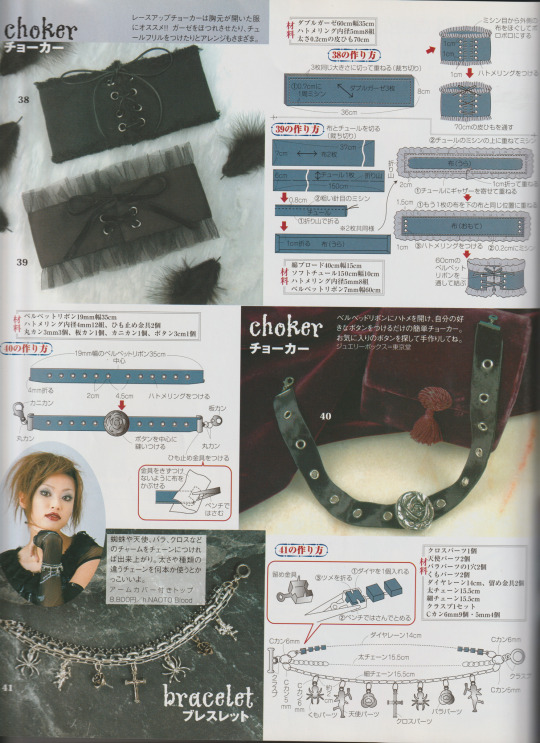
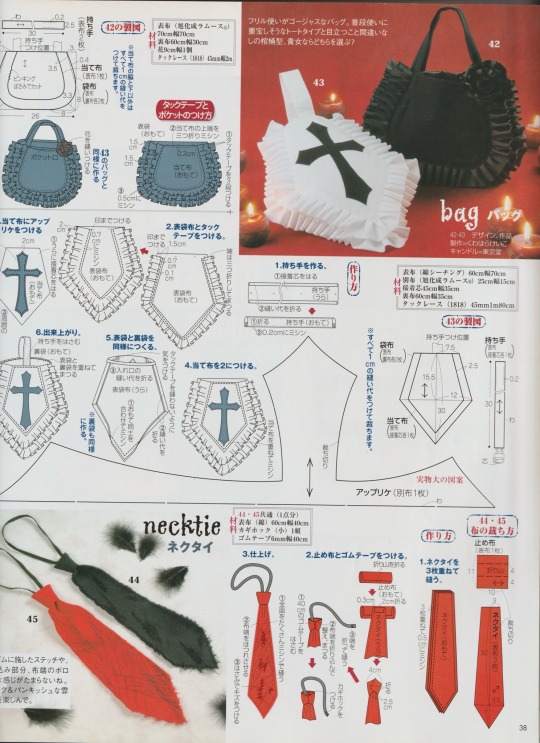
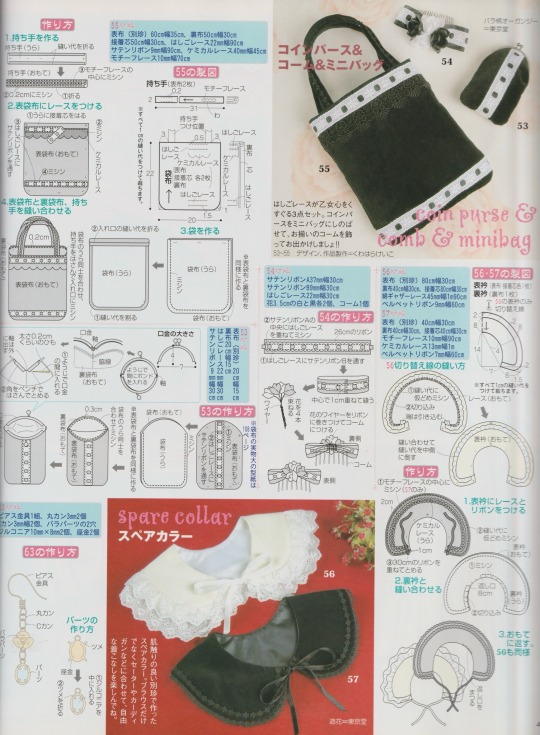
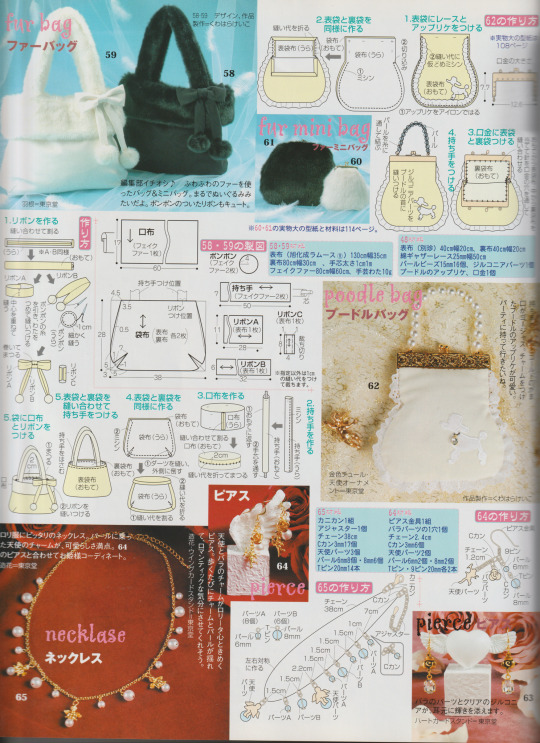
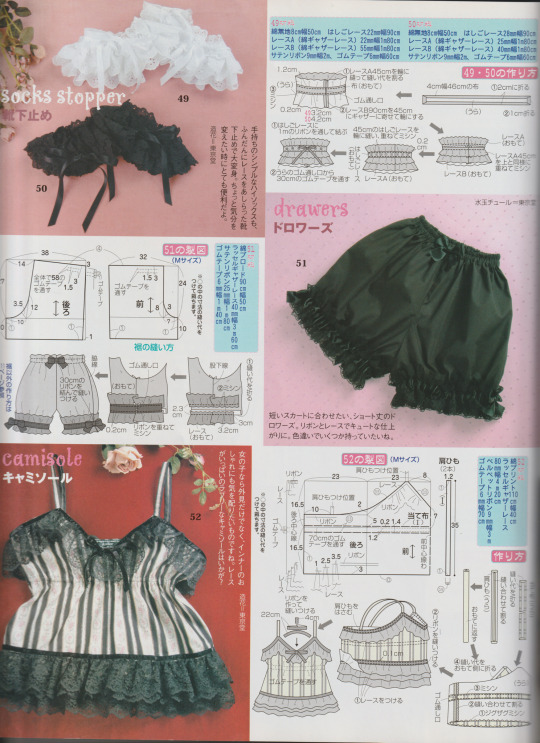
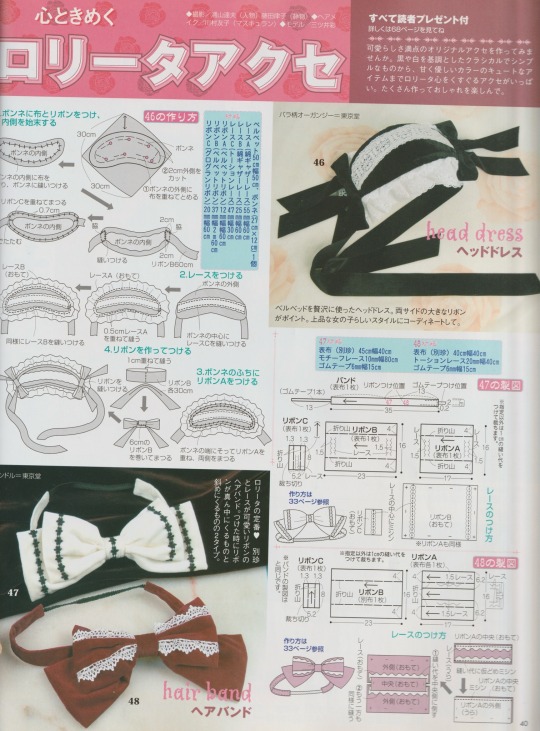
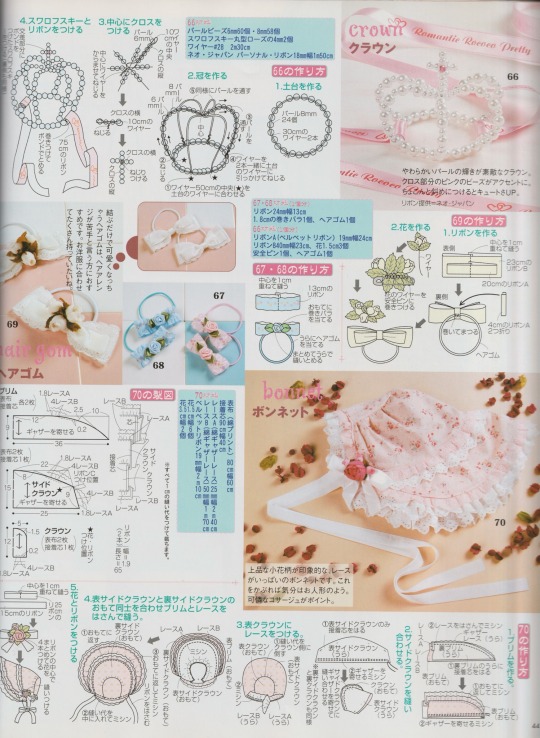
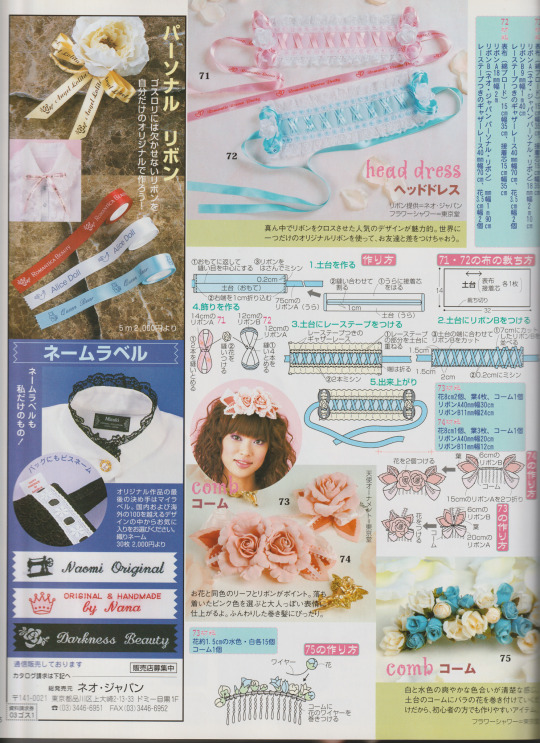
Consider this as my Valentine’s gift to you guys!! Thank you for being very kind about my post ^-^
*Also* If you would like the patterns to some of the tutorials (ie: the mini top hats, pattern 62) let me know so I can make a post later!
#gothic lolita#lolita fashion#j fashion#old school lolita#egl#egl fashion#coord#fashion#tutorial#magazine#sewing patterns#jewelry#goth#archive#my scans#happy valentine's day
800 notes
·
View notes
Note
more joel and sarah or joel and ellie pls pls pls pls plssss PLEASEEEEEbnags fist on tbable
here
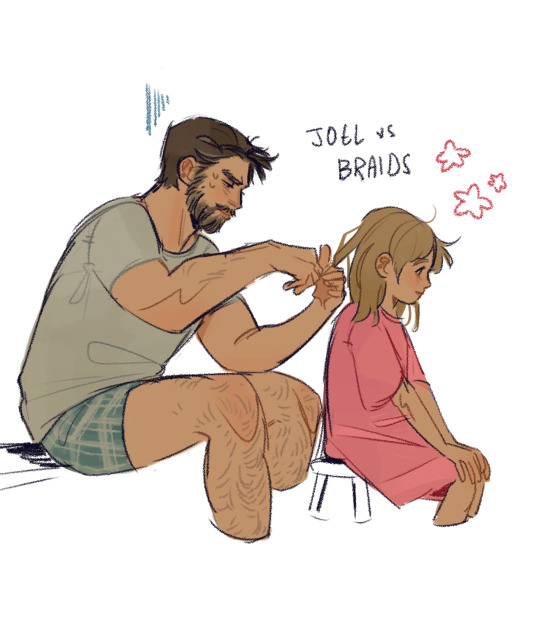
#tlou#the last of us#tlou fanart#joel miller#sarah miller#one day Sarah came back from school talking about how one of her friends wears pretty hair styles#Joel watched 30 youtube tutorials#he’s trying his best
682 notes
·
View notes
Text
I haven't seen any posts about this yet but l've seen some fan art that makes me feel this needs to be said:
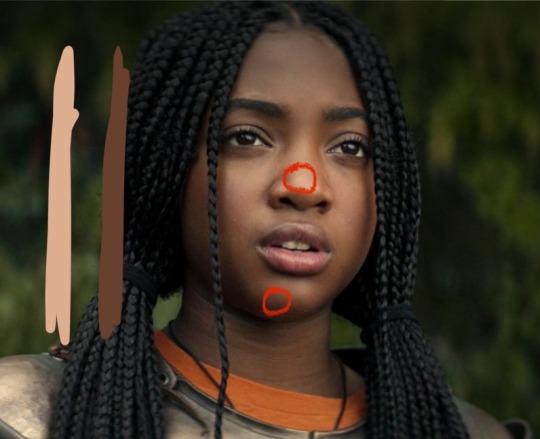
Don't forget Leah Sava Jeffries has darker skin when making Annabeth Chase fan art!

She is much closer to Lupita Nyong'o than Zoe Kravitz when it comes to shading, reflection, and complementary color usage :).
Lighting for dark skin is different on light skin. Light skin gets changed by lighting, and dark skin reflects the lighting. Below is a lovely shot of Nyong'o's character from Wakanda Forever in mourning. The filmmakers emphasize the umber qualities of her skin in contrast to the funereal white and (arguably harsh) light across her shoulder below.

Try to pick spots that aren't directly in or near the light, and try mixing 3 or more! You can put it into a color mixer online, or even color pick, lower the opacity, and lay the shades over each other until you find one that fits. And of course, the more 'realistic' you want to go with shading and lighting, the more shades you're going to want to be able to explore vivaciously :D.
Let's take a look at the same 3 beautiful actresses I mentioned at the beginning, with a bad color picked area and a better-ish color picked area. (Please keep in mind, these are not perfect comparisons, as I was not able to find pictures of all 3 actresses under the same kind of lighting.)
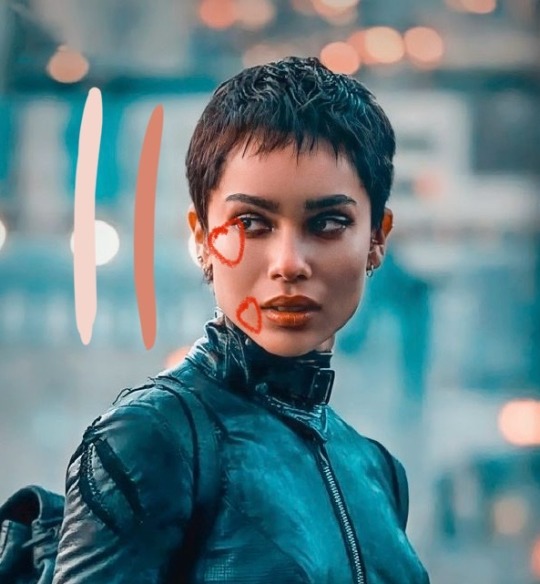
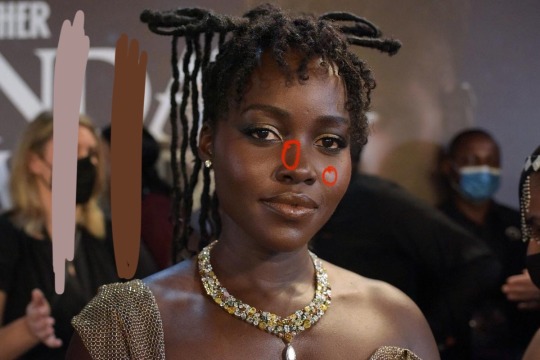
Kravitz's has a clear difference between the two, but they aren't too far apart, in comparison to Nyong’o’s and Jeffries’s. Note the dullness in the poorly picked shades as opposed to the better ones. Also keep in mind that while Kravitz has a rosy undertone (at least in that picture - it’s from The Batman, which has stylized coloring) Nyong’o has a slight cool undertone (I can’t pin down quite what, but the picture is definitely not stylized like Kravitz’s).
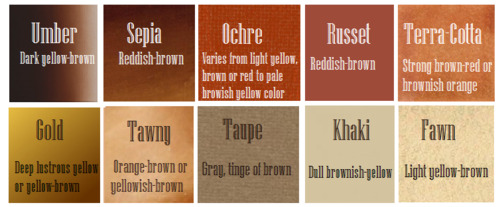
Jeffries runs more ochre or russet, but neither of those are pink. They are more red than terracotta or umber, but to call Jeffries’s face rosy would be wrong. Err more towards the golden when drawing her.
^^saved an image from a writing tutorial long ago, but can’t seem to find it. If someone recognizes it, I’ll link it.
EDIT: it’s from this post. Thanks @autumnrowancollector ! <3
And also, the darker skin gets, the less likely warm undertones are going to appear. Don't be afraid to use blue or purple or even green on occasion!
Additionally, cool lighting on dark skin is always a win imo.

(I was going to use that picture of Jeffries as Annabeth by the lightning bolt, but then I realized the lighting on her face doesn’t quite match up with where it should hit from that angle, and I realized they kind of just turned everything bluer, so screenshot time!)
(Also if you want another really great live action example, check out anything Aldis Hodge is in, like Leverage and Black Adam)(and of course there’s Spiderverse <3 but I want to post pictures of Hodge)

Now, to here’s a list of more experienced people’s advice:
Black facial features & hair
Shading digitally for a (somewhat) monotone Black character
Stylistic choices and places to start looking for inspiration (besides a search engine).
Coloring Black people’s lips
A better coloration tutorial
Also a nice tutorial for Indigenous skin tones, just in case yall want to draw Piper or use this information for other dark skinned characters :).
EDIT: Some actresses who are closer in skintone to use for Annabeth, provided by the lovely @blackfemmecharacterdependency ! If you can’t find a reference for Jeffries in a specific lighting, maybe check out these ladies’ pictures! It’s a reblog, so scroll down.
TLDR: Don’t make Annabeth pink and pale, make her dark and golden.
#Annabeth chase#Percy Jackson#percabeth#leah sava jeffries#pjo#leah jeffries#art tutorial#percy jackon and the olympians#I love superheroes and so of course all of the actors I thought of were from superhero movies lmao#also for the record my advice is mostly from reading others’ tutorials and observation#and I don’t really use it a lot because I stick to lineart a lot lol#like down to mentioning Hodge (love himmmm) as a reference for good lighting on dark skin#there’s another post floating around here that specifically mentions him and Leverage for that#I’m tagging this as an art tutorial but really i want it to be more of a master post#master post so yall can see the tutorials I usually use#but then I ended up writing about Jeffries specifically because I’m dumb#I wanted to go to sleep four hours ago I’m dumb#I really want to draw her and ginger Percy but#irl it’s starting to get busy at school again :/
355 notes
·
View notes
Text
HOLE-DWELLING HOLE-DWELLING HOLE-DWELLING
#i sure hope the video doesnt get messed up#made this on procreate dreams btw!#im so cool that i didnt need tutorials#i totally didnt crash the app like five times because i kept messing with it#chonny jash#angelo tag#i think this took me like four days?#idk i kept getting distracted with school stuff#hello person still reading the tags#shh dont tell anyone but its my birthday today#i only celebrate w family so u are the only one that knows#okay byeeee
239 notes
·
View notes
Text
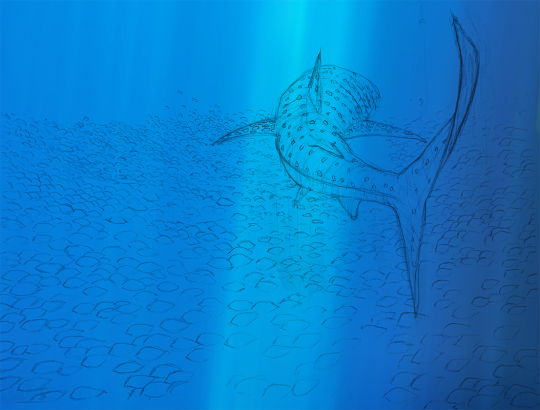
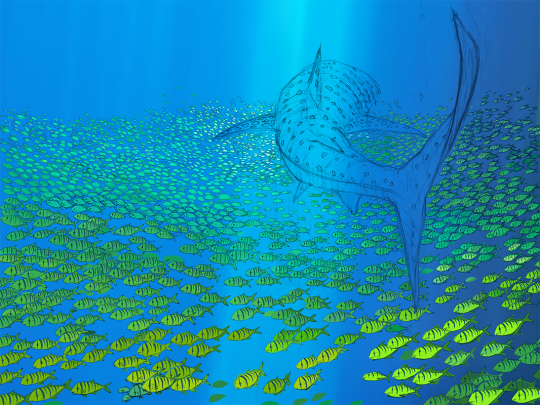

First sketch > Flat Colors > Finish | x
#whale shark#art process#art steps#ocean art#marine#sea life#golden trevally#schooling fish#pilot fish#swimming#diving#sharks#coloring#art tutorial#painting#drawing#artists on tumblr
227 notes
·
View notes
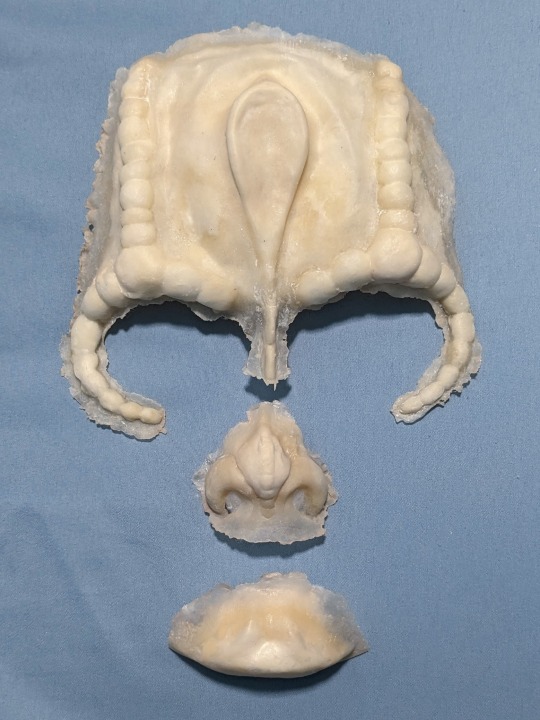
Note
how did you make those holy shit!!!
jfjskdk okay I'll take any excuse I get to talk abt this more
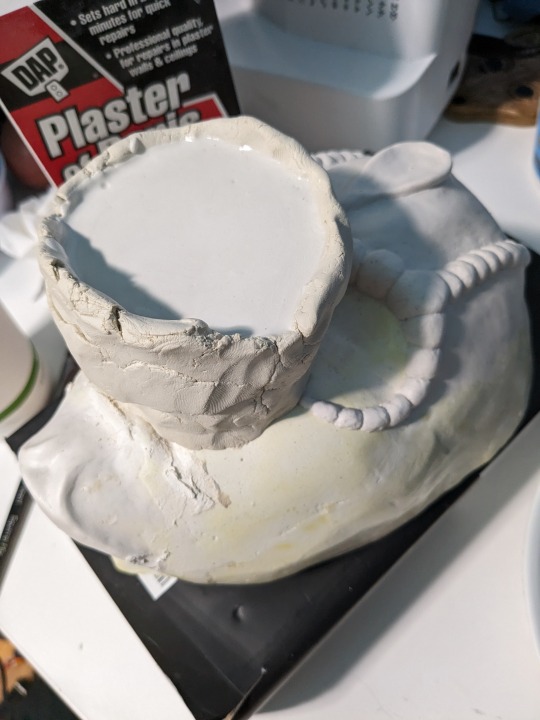
How I made my Cardassian prosthetics
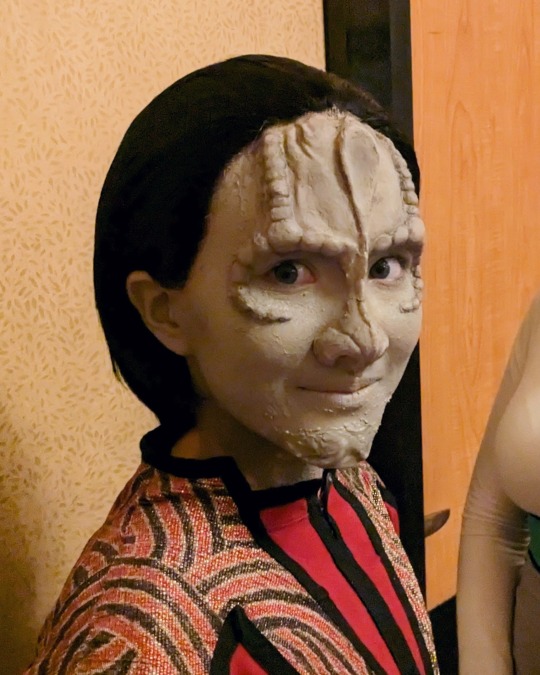
Disclaimer: I'm no expert, it's my first time doing this!! All the resources I used can be found online. In fact, here's a playlist of all the youtube videos I followed, in case you don't want to read the whole post. You can pretty much make any facial prosthetics following these steps, not just Cardassian ones.
What you'll need:

Plaster bandages, plaster of Paris (a lot more than is pictured here), modeling clay, and liquid latex. You'll also need some things you probably already have around the house, like vaseline (or cooking oil), plastic wrap, wood glue, rubbing alcohol, q-tips, cotton balls, and setting powder (or baby powder).
Step 1: Face cast
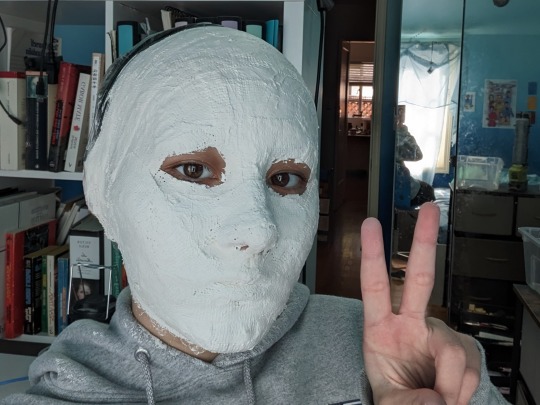
The goal here is to make a plaster copy of your face that you can sculpt your prosthetics on, by covering your face with plaster bandages and then casting that in plaster of Paris. This is the video tutorial I followed for this step. There are many methods, and you'll find tutorials for all of them on youtube, but this is the easiest way if you're doing it by yourself, and it results in a perfectly useable face cast for our purposes. And, if you're cosplaying Garak like me, it's a great way to get into character by experiencing claustrophobia for the first time in your life!! (Jk it's not actually that bad. I lived.)
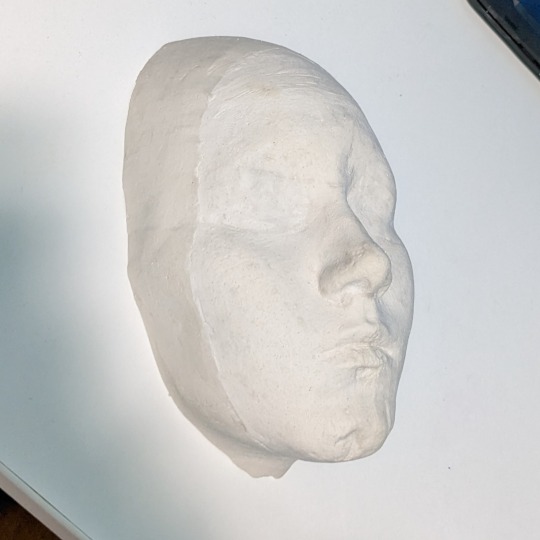
The video explains the process better than I could, but here's some tips I learned from doing it! Wear a shirt that you don't mind ruining. Go a bit closer to your eyes than I did here. When you're propping up your mask in a bowl, make sure you're not squishing any parts of it or tilting it! I ended up with a dent in the chin of my face cast because I accidentally dented the mask while I was casting it. And make sure you have enough plaster of Paris! I probably used 2-3 pounds for this part. Here's what I ended up with, before sanding or sealing it with wood glue:
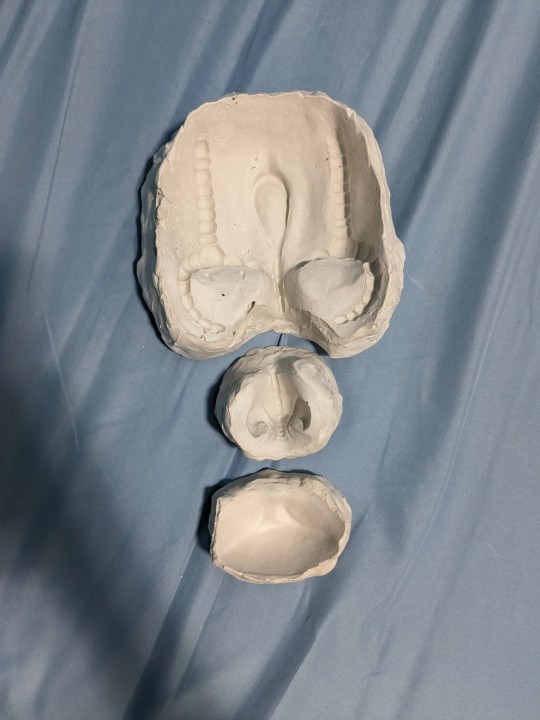
Step 2: Sculpting
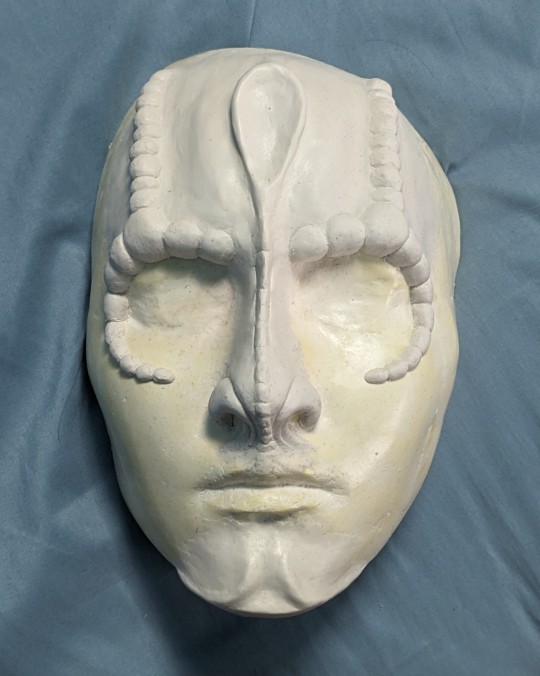
This is pretty self explanatory, but also probably the hardest part. Just use lots and lots of reference photos. I've got a pretty good stash for Garak, if anyone's interested hdjkfhk. I found that gifs made better references than still photos, since they give you a better sense of the 3D shape. You want to make sure you're using modeling clay that doesn't dry. You don't need any fancy sculpting tools! I used my trusty palette knife to get the small details, but you could probably accomplish the same thing with, like, a spoon and a toothpick. It depends on what kind of clay you're using, but you can dip your finger in a solvent to smooth out the surface of the clay and blend the edges into the face cast. I used rubbing alcohol, but I also heard people recommend acetone. Once you're happy with your sculpt, you can move onto the next step!
Step 3: Casting negatives
This step is technically optional. The video I followed also outlines an easier way that skips this step, by simply building your prosthetics directly on the sculpt. But casting negatives allows you to get a lot more fine detail, and a smoother finish on the final prosthetics, so that's what I chose to do. Basically, you pour plaster of Paris over your sculpt, and it hardens into a mold you can use to build your prosthetics on.
Again, the video explains it better, but some tips! If it's possible with your sculpt, do it in small pieces instead of the whole face at once. I did the chin, nose, and forehead separately. If you try to do the whole face, there's a greater chance of it getting stuck or breaking. Of course, if you were doing, say, Odo, then it might not be possible to do it in multiple pieces. Another thing to watch out for:

If your underlying face cast has any "undercuts," or places where it's, like, concave, then if plaster gets into those areas and hardens, your face cast and your negatives will lock together, and you won't be able to use either of them. For me I was worried about the sides of my nose and under my bottom lip. As long as those parts are filled in with clay, then you should be fine. It's okay if your clay sculpt has undercuts! You can see in the (shamelessly stolen) diagram that their sculpt has a lot of undercuts, but that's okay because the clay is soft and won't lock with the plaster, it'll just come off. The video I got the diagram from was also pretty helpful, even if it's meant for casting with different materials than I used. Here are the completed negatives:
Step 4: Making the prosthetics!
Now you have negatives! Your sculpt may or may not be intact, but if your negatives turned out okay then that's fine. This step is also covered in the video for step 3. Using a stippling sponge, foam brush, or q-tip, stipple thin layers of liquid latex onto your negatives. I found that a q-tip worked best, even if it took longer to cover larger areas. Make sure the edges are very thin, so you can blend them into your skin when you apply the prosthetics. Wait for a layer to dry before adding more latex on top of it, or you'll end up with fucked up results like I had:
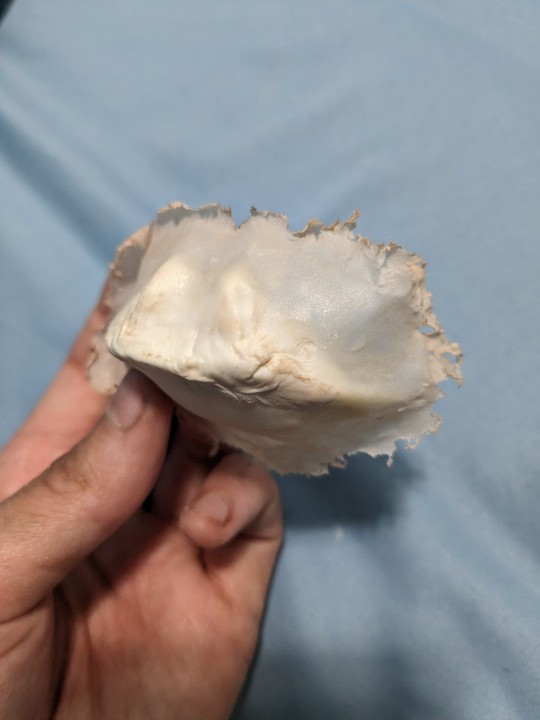
(Left: first draft, where I didn't let it dry enough before layering more. Right: second draft. Much better!)
Build up bulky areas with pieces of cotton balls, then cover the cotton with a thin layer of latex. Emphasis on thin! It'll take forever to dry if you saturate your cotton with too much latex. This step mostly involves a LOT of waiting. When the latex is fully dry, brush everything with a liberal amount of setting powder or baby powder to prevent the latex from sticking to itself as you peel it out of the mold.
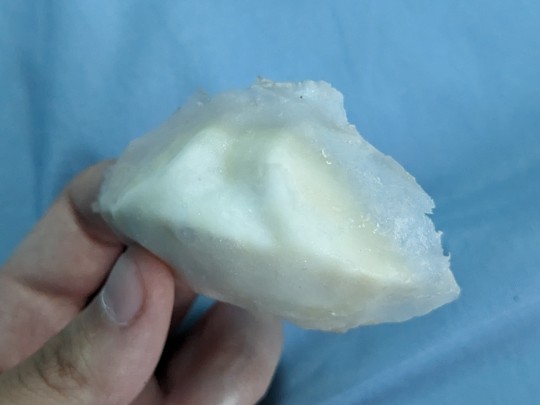
And now you have your prosthetics! You can tear away some of the excess latex at the edges to make it fit your face better. I ended up tearing away almost all of the edges around the eye ridges, so it would blend better and I wouldn't have to get adhesive so close to my eyes. Tear, don't cut! It'll result in a more natural edge that's easier to blend. This video shows how to apply prosthetics. Use whatever prosthetic adhesive you want! I used spirit gum because it's what I had on hand.
Now you can go forth and live out your lizard alien dreams!!
#IDs in alt text#garak prosthetics tutorial is finally here :))#u guys better not let this flop. this is more effort than I put into my entire high school career (which is a low bar tbh)#sorry to my friend I cropped out of the first pic 😭😭 I rly didn't get any good solo shots jdlkjhf#narcissus's echoes#narcissus plays dress up#ds9#elim garak#star trek#garashir#andy robinson#cardassians#star trek ds9#star trek cosplay#deep space nine#star trek deep space 9#garak cosplay
341 notes
·
View notes
Text

So you want to make a sims render: a beginner's guide
But what does that even mean? What do you need to start?
To get started with sims renders, you'll need the following programs:
Blender 3.6 - to render your sims
Blender 2.7 - to export poses, accessories and objects from s4s
Sims Ripper - to rip your sims to prepare them for blender
Sims 4 Studio - to export poses, accessories and objects for your renders
All of these programs are FREE to download and use!
Blender outputs fantastic renders depending on your settings, but you'll probably want to edit them after the fact.
For editing, I recommend:
Photoshop
GIMP
Photopea
I'll be posting editing tutorials in Photoshop, but any of these programs will get the job done.
Stay tuned for in-depth tutorials on using Blender, Sims ripper and Sims 4 Studio!
#salemsims tutorial#render school tutorial#sims 4 render tutorial#sims 4 blender tutorial#blender#sims ripper#sims 4 studio#resources#ts4#sims 4#sims
277 notes
·
View notes
Text
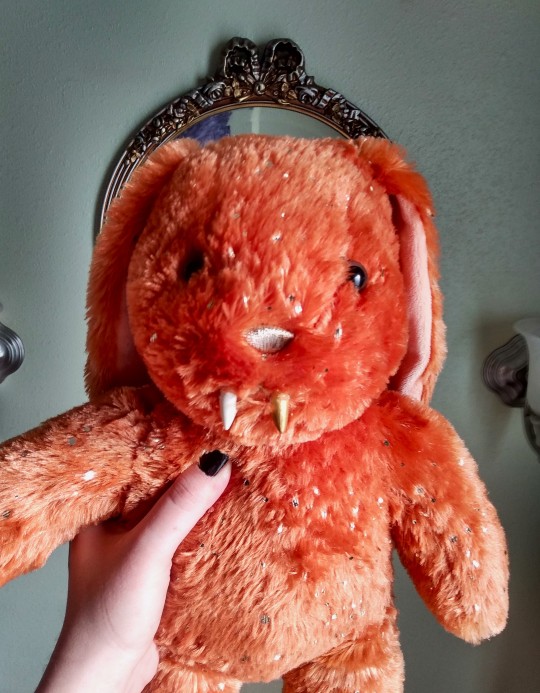
It was my first time performing The Ceremony of the Fangs, so they turned out a little crooked, but I think they still look very nice. I painted one of them gold to match her nose and the gold flecks in her fur. Thank you for the tutorial, Auntie! @gothiccharmschool
#her name is Ordra#short for#Orange Dracula#my favorite store in all of Seattle#although i still haven't made it to the gargoyle store#thank you to auntie jill for the tutorial#hope it's okay that i tagged you#and thank you to my mom for building me the bunny#hi mom#i love you#vampires#fangs#vampire fangs#the ceremony of the fangs#gothic charm school#stuffed animals#plush#build a bear#pumpkin sparkle pawlette
129 notes
·
View notes
Text
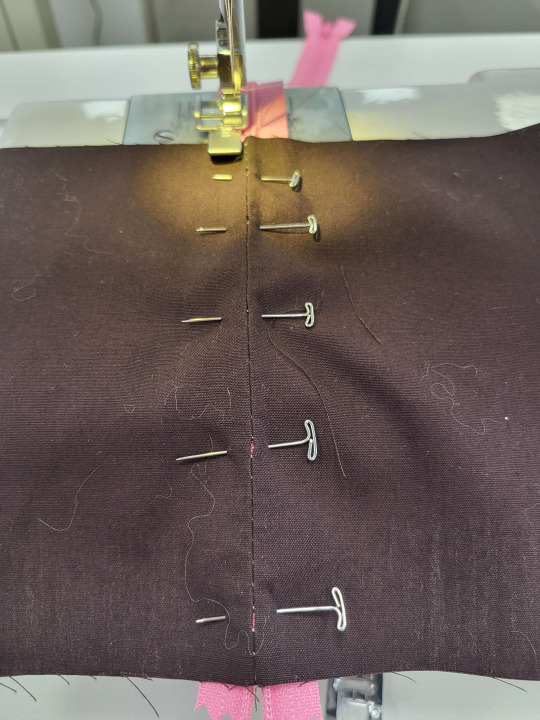
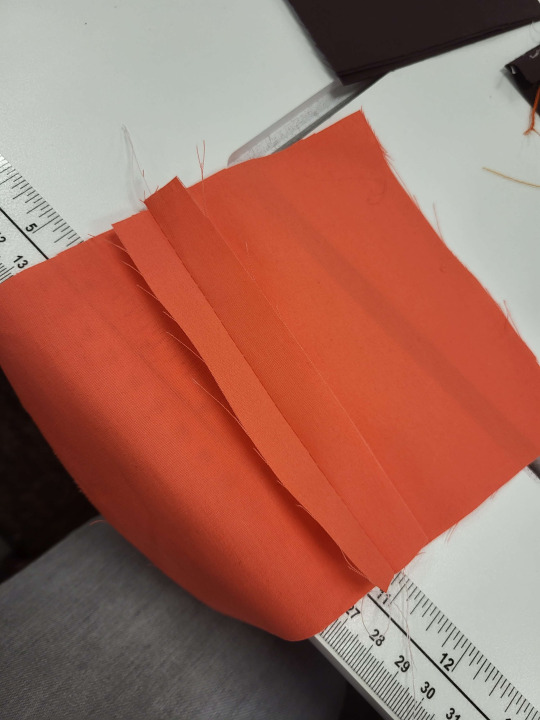
Quick guide to inserting zippers into garments without hand-basting.
Because I know that no matter how many times I tell y'all that you need to hand-baste, you're not going to do it.
Quick note: zippers are ALWAYS easier to put in when the zipper is several inches longer than your seam. This lets you put the slide out of the way when you sew. When you're done, you can pull the slide back down and then cut the excess tape. For every zipper where it's even vaguely possible, I get a long zipper, center the bottom of the tape at the place where you want the zipper to end, and leave extra tape hanging at the top. I don't know why zippers tell you to shorten them at the bottom. It's lies. Don't believe it.
Centered zipper:
You'll use the centered zipper application when you're putting a zipper in the center back or center front of a piece. There's a different application method for side seam zippers, which we'll go into later.

I start all zippers by machine-basting the seam closed. This is especially important on dresses, where you need the seam between the bodice and the skirt to match up. If your seam looks good basted shut, it will look good when a zipper is in there. So set your seam length to the longest, and baste the seam shut.
A note on seam allowances: You need your seam allowances to be big enough for the zipper to fit on. If your garment was made by someone insane and deranged who put a 1/4" seam allowance in a zipper seam, and you're only just not realizing it, you're going to need to sew twill tape or seam binding onto your seam allowance to make it big enough.
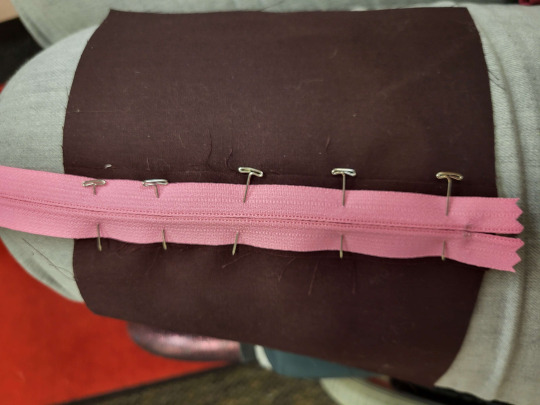
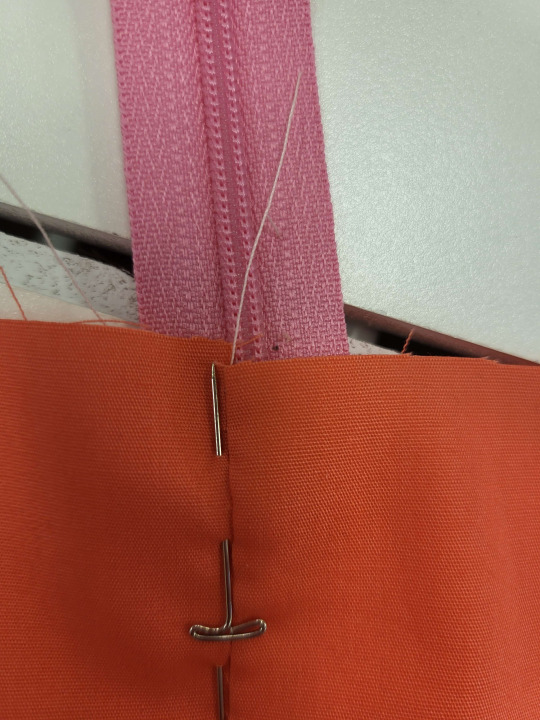
Put the zipper tape onto that seam. You want the center of the teeth to line up with the center of the seam. It's called the centered application for a reason.
When you're pinning from this viewpoint, you're best equipped to make sure that the teeth are perfectly centered. I'm going to recommend pinning with the pins perpendicular to the zipper teeth. You'll see why.
However, you can't actually sew the zipper from this side, with any kind of precision, so you'll need to do the flip.

So, go ahead and flip your garment so that you can access the right side. Next to each pin that you have on the wrong side, put a pin next to it on the right side. You can then remove the wrong-side pin.
And yes, you do need to do it like this and not just pinning from the front. It won't be centered. Trust me. It won't be centered.
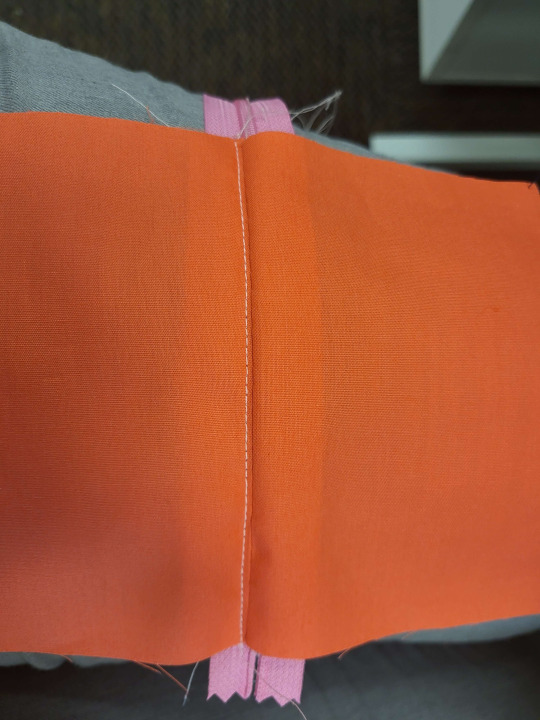
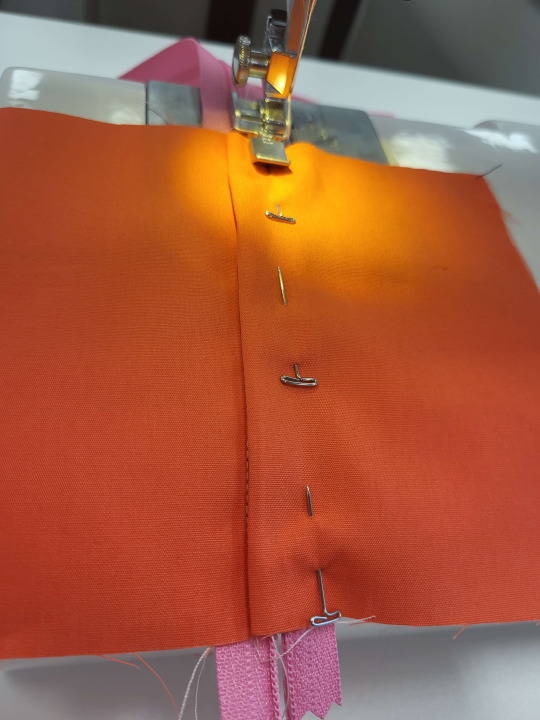
Zipper foot time. When you're sewing a zipper, you will ALWAYS sew from the top to the bottom. Put your zipper on the side of the tape where the points of your pins are.
Quick note: is your machine still set to a basting stitch? Now's the time to change it, and not after you did 13" of sewing. Ask me how I know.
Here's where you're going to decide how wide you want the lap (the fabric flaps that cover the zipper) to be. For a lot of people, this is a style choice. I like mine more narrow, and I like to just eyeball them. As long as it's straight and not stuck in the teeth, all options are fine.
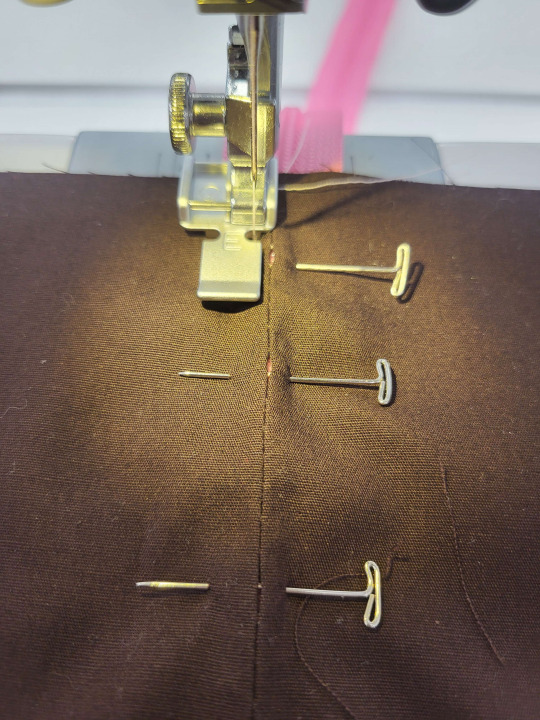
The reason that we're starting on the side with the points of the pins is that you can slide the point of the pin out of the way to sew over them, and then slide them back into place so that they hold the zipper in place for the other side.
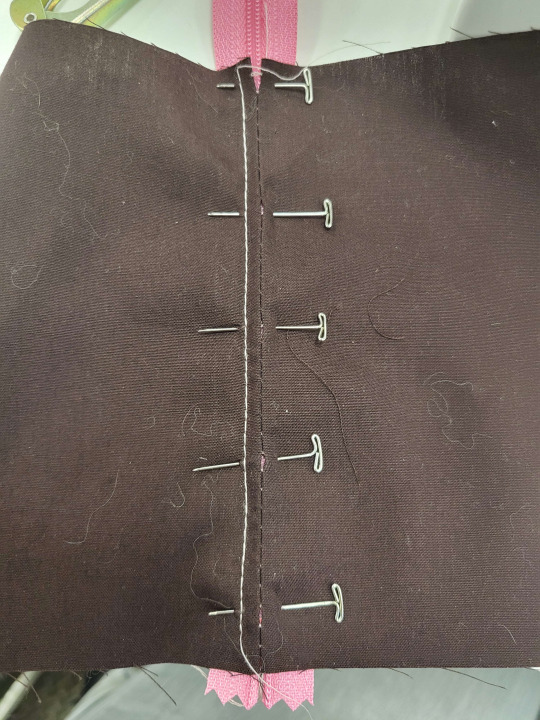

Once you've sewn down one side, cut your thread, bring your foot back to the top, and sew down the other side. (If you keep sewing and go up, your lapping will be wrinkled when you're done).
Once you hit the bottom of your zipper, sew a couple of stitches across the bottom, connecting the two lines of stitching. If you're using a nylon coil zipper, you can just sew straight through it. If your zipper has metal teeth or big plastic ones, sew this connecting stitch just below where the teeth end.
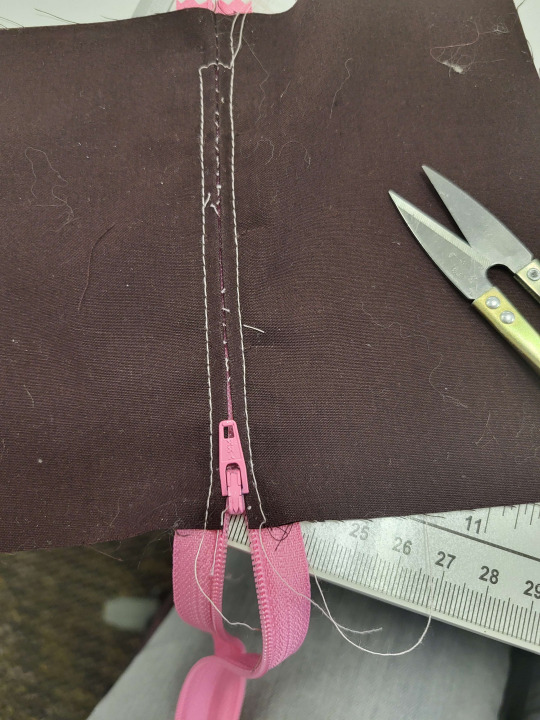
Now you just take your seam ripper and take out the basting stitches, and you're done!
What about that extra zipper tape at the top? Well, if you're putting the zipper in a seam where there will be a top facing, top hem, application of lace, or anything else, you can trim the tape and the hide it in that facing/hem/lace/etc. If there's absolutely no way to hide the top of the tape, you can stitch around the top of the teeth on each side, so that the slide doesn't come off, and then trim the excess tape off.
Side application:
If you're putting a zipper in a side seam, you don't want to center it. I mean, you can if you want to, and it'll probably look fine, but it's not the technically correct application.
In a centered application, both seam allowances cover the zipper tape and hide it from view. In a side application, the front seam allowance is longer, and covers the zipper tape. The back seam allowance is just along for the ride.
Like the centered zipper, this one starts by machine basting the seam shut.
Not everyone starts their side zippers like this, but I think that it's important because it keeps the waist seam even on both sides. People who don't like this method are going to point out that my method here does make your seam allowance 1/8" smaller than what you baste. If you think this will really mess your work up, remember to sew this seam at 1/16th" smaller than you would normally sew it. I don't ever bother with that and it never has made a difference to me. If you don't want to do it like that, you can just hand-baste this in. This is a no-hand-baste tutorial, so you're on your own for that.
You're going to pin this in a different place. On the centered zipper, you wanted the seam to be in the middle of the teeth. In the side application, you want the seam to be right along the edge of the teeth.
You'll also note that I'm pinning differently from how I did the centered version. Here, I have the pins with the points facing the top of the zipper.

So, always sewing top to bottom, we're going to sew down the side seam. We pointed all the pins at the top of the seam because now you can pull them out as you go.
It's hard to tell when you're just doing a sample like this, but we're going down the seam attached to the back of the dress.
Remember that "it takes 1/8" off the side seam" statement? Here's where it happens. We're going to take the front seam allowance, and just sneak it a little bit more over the edge. You're just going to roll it so that it covers that previous line of stitching. Then you're going to pin in place and sew down the other side. At the bottom, just like you did with the centered zip, you're going to turn a right angle and sew along the bottom, closing off the lapping.
I find that my favorite width of this is to sew where the fold of the lap to the line of stitching measures at about 1/2". If you're not good at eyeballing this, some people like to use tape as a topstitching guide.

Just like with the last one, time to take out the basting stitches that hold the seam shut, and there's your zipper.
Invisible zipper application:
NO.
139 notes
·
View notes
Text
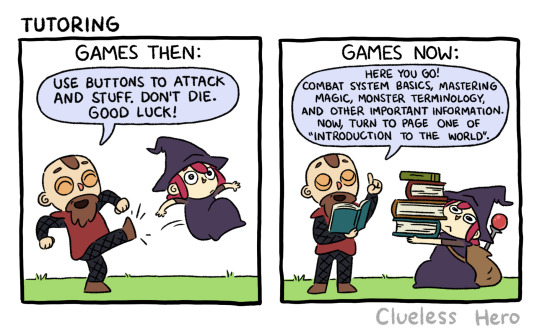
#459 Tutoring
Back in my day, you only needed two buttons
Facebook | Instagram | Shop
#Clueless Hero#webcomic#gaming#video games#tutorials#old school gaming#retro games#modern games#introduction#explanation
79 notes
·
View notes
Text
Hair, makeup, & nail tutorials from Japanese mook “Gothic Lolita Patterns Vol.1”, 2004
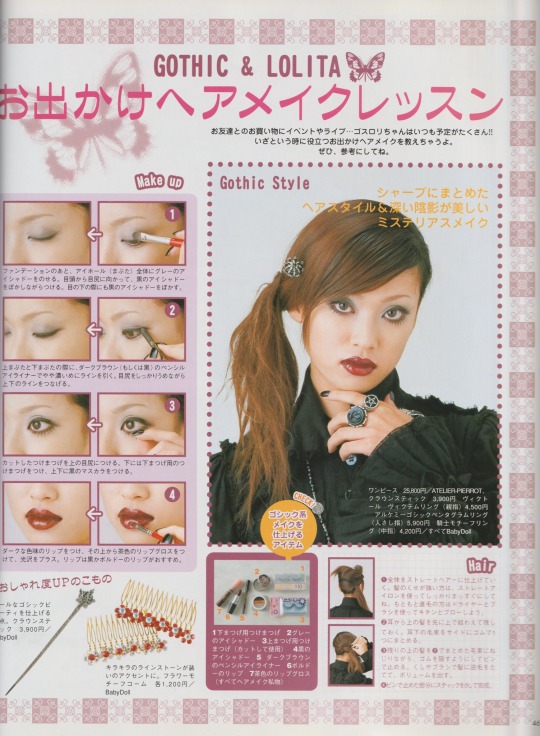
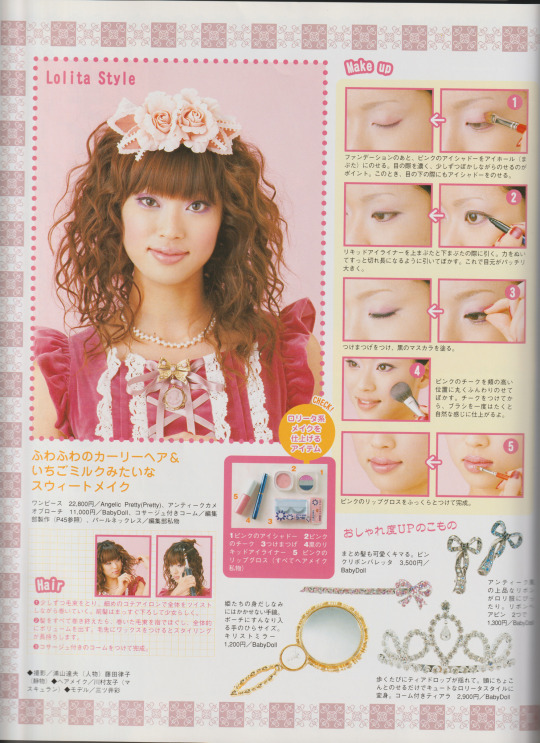
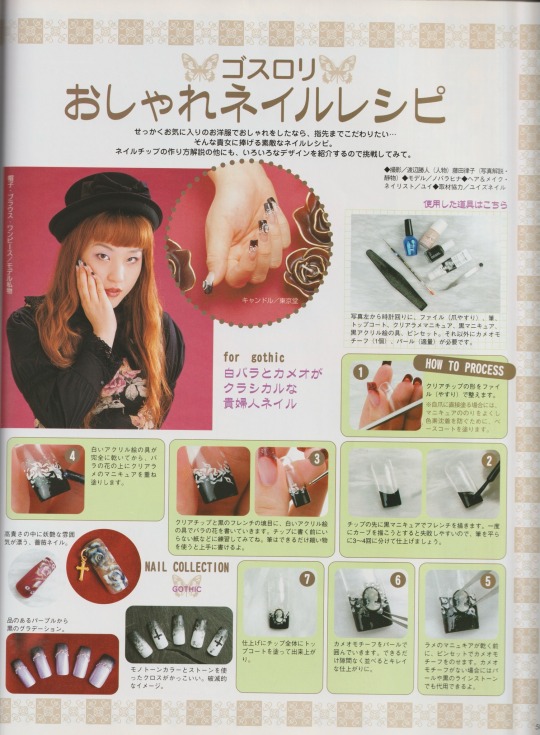
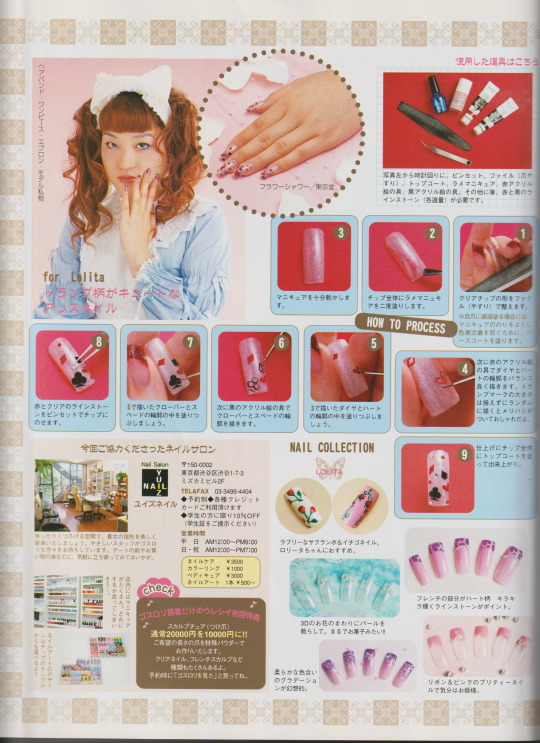
I wanted to do one of the makeup looks for reference, but I am neither pretty nor good at makeup, sorry T-T
#gothic lolita#j fashion#lolita fashion#egl#old school lolita#egl fashion#nail art#cute nails#makeup#hairstyle#tutorial#my scans#archive#i should up my makeup game
250 notes
·
View notes
Text
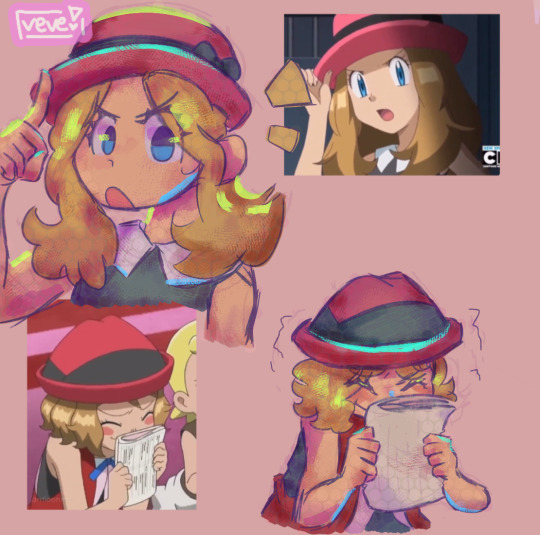
screenshot redraaws of the girl (i am in love with her)
#i had a crush on her in grade school she is so oretty....#uhh i saw another art tutorial on youtubr and immediately tried it out#sorry rushed aa i just wanted to doodle her#pokemon#anipoke#pokemon xy#pokemon serena#veves ultra cool art
79 notes
·
View notes
Note
i wanna start making comics but like. i dont really know how??? are there any tips that you could give me perhaps?
hi!
i've been working on trying to compile a list of resources for people (@aangsfrogs--i didn't forget!) who want to make comics for a long time. It would consist of some of my personal tips and a lot of links to other people's PDFs and youtubes. But that's...a hefty project, so if you had any specific questions for the meantime, my askbox is open!
But, for just beginning, here would be my tips:
Read comics. Read manga and webcomics and cartoons and medical comics. There is so much out there, and reading is such a big way to learn. If you see something you like, take a moment to think about why you like it. Are the expressions or colors appealing? Did it make you feel a certain emotion? Analyze what the artist may have done to get across what they did. (Is it the camera angle? the style they chose to draw in? the paneling? the pacing? the color? etc.) Doing this over time will help you recognize the tools available for telling stories through this medium, and you'll be able to put them in your own work.
Try to think about what you want to make comics about. What moves you? What topics interest you? What ideas or tropes do you love in media or think about often? What do you hate and wish was done better? What characters are you drawn to, or what characters do you want to create? (What about them compels you?) I find it's hard to create an idea out of thin air, but if you start writing down random ideas you have, you'll start thinking about them, and over time, you'll have a bank of things to pull from when you want to create.
Lastly, anatomical skill or knowledge of color does not a comic make! You don't have to know much to begin, and there aren't rules. Just start drawing what is meaningful to you!
This is just cursory and doesn't get into super specifics like paneling or scripts or plotting or colors or thumbnailing or....etc, but I'll try to expand my list of resources and get that out! And, hmu if you have any specific questions on topics!
happy drawing~
Book list under readmore:
Scott McCloud's Understanding Comics and his Making Comics. These books are taught in like, every comic class ever. While not my complete favorite, they do a good job of showing some history and fundamentals, and how easy it is to make comics even if you don't have a lot of drawing experience.
99 Ways to Tell a Story: Exercises in Style by Matt Madden: Really good if you don't know how to start analyzing comics. (Also it's just a fun visual exercise.) It shows the same short story done in 99 different styles with different emphasis on different moods and points of view.
The PreHistory of The Far Side: A 10th Anniversary Exhibit by Gary Larson and The Calvin and Hobbes: Tenth Anniversary Book by Bill Watterson: Two great books with work from my two favorite cartoonists. They both have writings from the author about getting ideas, developing stories, and being a comic artist.
Uncanny Bodies: Superhero Comics and Disability, edited by Scott T. Smith and José Alaniz and Black Comics: Politics of Race and Representation, edited by Sheena C. Howard and Ronald L. Jackson II: These two aren't really about making comics, but they are great collections of analysis about old and new comics alike.
By no means a complete list, but some good ones that I can think of off the top of my head.
There's also the book Webtoon School: Everything you need to know about webtoon creation and story writing. To be honest, I didn't read this completely through because it was a bit more fundamental than I was expecting, but it gives a good cursory look of how to write comics if you're just starting out! It covers some history, how to write stories and arcs, etc.
Also, look to your favorite writers! A lot of webtoon/webcomic artists do tutorials or youtube videos. for instance, velnxi has this great tutorial up I really suggest looking at here.
#how to make comics#mytutorials#comics tutorials#asks#i also want to do a post on how to analyze comics#because analysis is often talked about in english or writing classes#but most dont talk about how to analyze a comic which i think can be a bit different#if people would be interested in that lmk#can yall tell i almost went to school to teach comics lmao. i love talking about this stuff
37 notes
·
View notes
Text
aziraphale: i bought a bookshop
crowley: that's so bookshop buying core
#fearandhatred#should i just fail this module be honest#i already have a backup schedule for if i fail it and have to retake it next year#and honestly mans should not be passing me because i know absolutely jackshit + did not go for any of the tutorials#and i need this module as the foundation for the rest of my minor which i did not even want to take so like.#what's the point of passing if idk anything lmfaooo#apparently it's really hard to get an F because the professor has to write into the school to explain why they're failing you#but shouldn't be hard considering my class participation is ZERO MARKS#idk. idk idk idk regrets regrets regrets regrets#here's part 9#good omens#crowley#aziraphale
24 notes
·
View notes
Note
What was it like for you starting out as a beginner artist? How did you improve?
I mostly just incessantly practiced, experimented, and observed a lot for as long as I can remember. I grew up on a lot of videos going over tips and techniques for beginner artists and mostly just observed their processes and would try to bring them into my art. Othertimes I would just constantly experiment with my artstyle (what if I made the shoulders more defined, what if I changed the size of how I draw eyes, what if tried drawing different body types, what if I tried a pose with a lot more foreshortening etc etc). I tried to push myself a bit further everytime like maybe spending more time on the overall piece, adding backgrounds, drawing multiple people interacting. Drawing challenges also helped a lot I think since they pushed me out of my comfort zone or forced me to approach my art in different way than what I was used to. Things like “draw something using only one line and not lifting your pen from the paper”, or “create a bunch of random shapes using a colored marker and then turn them into characters/objects”, or even just dtiys challenges were great for this. A lot of the drawings I made from these didn’t really end up being things I was super proud of after finishing them, but thats fine since I still learned a lot and they still helped with improving. A lot of it was honestly just not being afraid to draw something I might not be happy with later in the name of getting that practice in and trying new things all the time.
I hope this is helpful, but I’m not too sure so I’m sorry if it isn’t, this is the best way I could think of summarizing it!
#pedia says stuff#asks#not drawing#so sorry it took a while to answer this#i had a bit of trouble putting it into words and was worried i was just defaulting to the usual answer of ‘i practiced’#but this whole thing still might boil down to ‘i practiced’ so. so sorry i tried#i just got excited all the time over learning new things and still do#shoutout to younger me who excitedly got up at 5am to look up fun2draw tutorials so i could work on that before getting ready for school#shoutout to me in middle school who got so stressed out when people would watch me draw#so i just learned to draw really really fast as like a stress thing#also sidenote if anyone ever does the ‘omg you draw?? can you draw me??’#hit them with the ‘sure here are my prices’. 90% of the time they will either back off or actually be willing to pay#i WISHHHHH i knew that in school instead of being too nice to say no
33 notes
·
View notes
Last Seen Blogs

radiobluenote-blog
radiobluenote.

wurmple-on-a-string
Pidove Sympathizer

amit3
Untitled

freedeputycroissantflower
Sem título

aerii-korvatris
Field of Fools