#and i need that to have access to my channel - which i posted this in
Photo
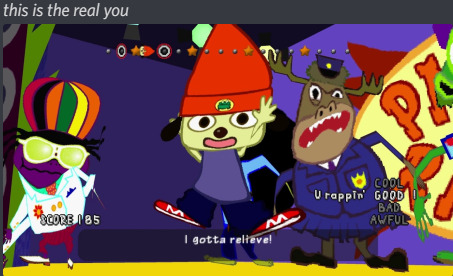
Out of things to post, so have something I said a while ago in discord that resurfaces in my brain every now and then.
#the thing that always gets me is the fucking#u rappin'#GOOD#discord#screenshot#parappa the rapper#i gotta believe#meme#i think#real you#callout#i rejoined the discord server#cause i left#but i still haven't been verified#and i need that to have access to my channel - which i posted this in#so i cant get the context#all i have is vague memory#i think i was on about 2d and 3d idfk
4 notes
·
View notes
Photo

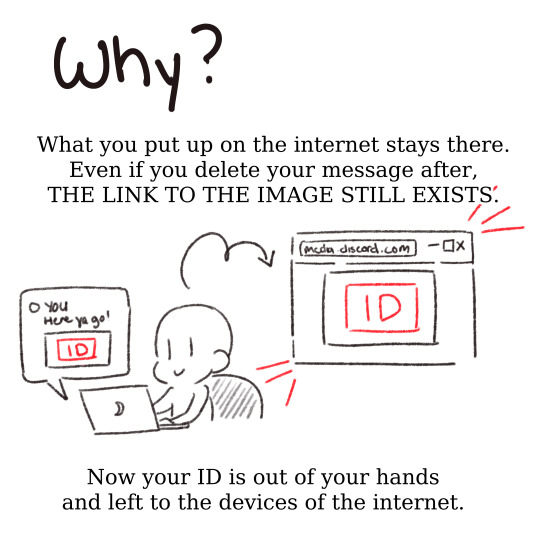
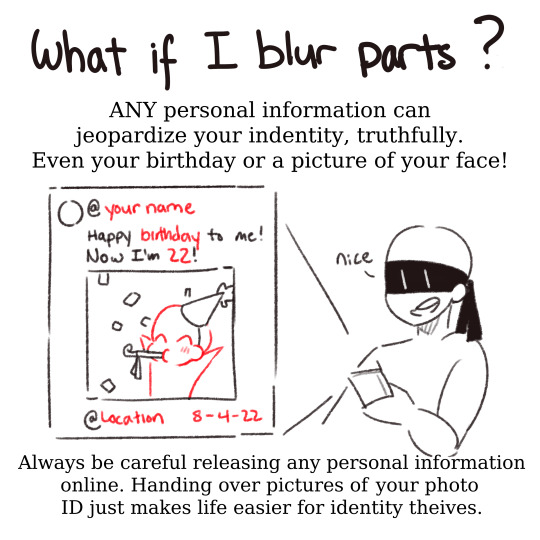
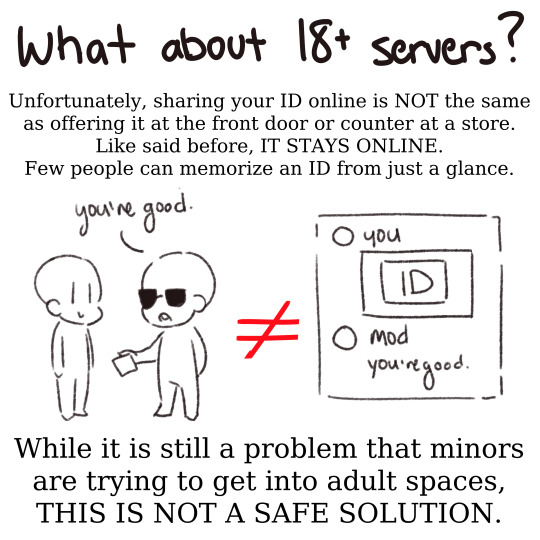

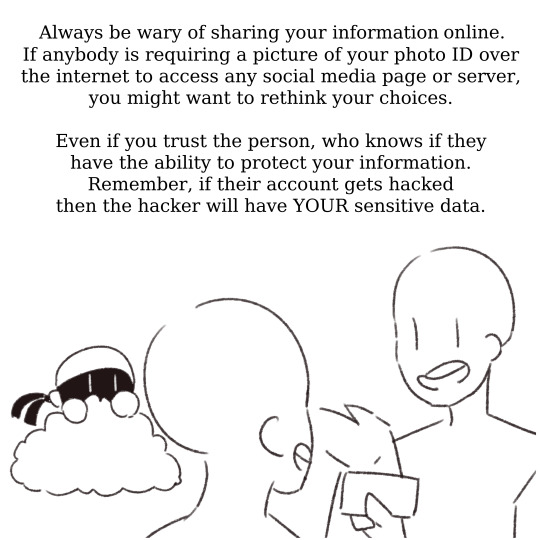
This is a terrifying norm I’ve been seeing in fandom recently, with a lot of people asking for photo ID’s to enter a server or for 18+ commissions or to follow a private Twitter account. While I understand the sentiment and realize that there’s an issue of minors trying to get into adult spaces, this is an incredibly dangerous practice that needs to stop.
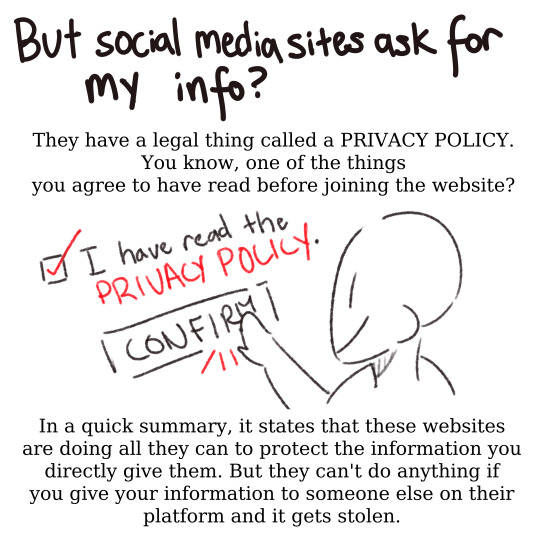
I have seen this popping up more and more in the past year and frankly, I’m sick of sitting back and watching it become a social norm. Not to mention, there is a huge difference between a company with a team of lawyers and legal statements with the intention to protect your information and giving this to a random person online.
Here is an article from IAPP discussing more in depth the current difficulties for age verification online. Thanks to @murmurkins for digging around to find this!
Here is also some resources for Discord specifically on how to moderate and run a server that has 18+ channels and designating a server as 18+. Discord also notes that if you are locked out of 18+ channels, you can appeal this by sending a picture of yourself and either a photo ID or your Discord tag. Again, while not a perfect solution, this is their last resort, not the intial requirement. It’s dangerous to do, and Discord recognizes this, which is why they have a system to protect your information AND they require that all third-party individuals have a privacy policy telling individuals how they will protect others’ information.
If anyone wants to respond to this post with more information on other websites, feel free! The biggest issue I have seen with this is on Discord, so that is where my information is focused.
TL;DR: Don’t give your ID out online to random people for your safety. Make sure who you are giving personal information to has a privacy policy. While it is an issue that minors are accessing 18+ content, this is not a safe solution to the problem.
#important#internet safety#this is going to be the only art thing ive done that i will allow to be reposted#because i think this message is more important than taking credit for it#if you can share this around PLEASE do
25K notes
·
View notes
Text
How I ditched streaming services and learned to love Linux: A step-by-step guide to building your very own personal media streaming server (V2.0: REVISED AND EXPANDED EDITION)
This is a revised, corrected and expanded version of my tutorial on setting up a personal media server that previously appeared on my old blog (donjuan-auxenfers). I expect that that post is still making the rounds (hopefully with my addendum on modifying group share permissions in Ubuntu to circumvent 0x8007003B "Unexpected Network Error" messages in Windows when transferring files) but I have no way of checking. Anyway this new revised version of the tutorial corrects one or two small errors I discovered when rereading what I wrote, adds links to all products mentioned and is just more polished generally. I also expanded it a bit, pointing more adventurous users toward programs such as Sonarr/Radarr/Lidarr and Overseerr which can be used for automating user requests and media collection.
So then, what is this tutorial? This is a tutorial on building and setting up your own personal media server running Ubuntu and using Plex (or Jellyfin) to not only manage your media but to stream your media to your devices both locally at home, and remotely anywhere in the world where you have an internet connection. It’s a tutorial on how by building a personal media server and stuffing it full of films, television and music that you acquired through indiscriminate and voracious media piracy ripping your own physical media to disk, you’ll be free to completely ditch paid streaming services altogether. No more will you have to pay for Disney+, Netflix, HBOMAX, Hulu, Amazon Prime, Peacock, CBS All Access, Paramount+ Crave or any other streaming service that is not named Criterion Channel (which is actually good) to watch your favourite films and television shows, instead you’ll have your own custom service that will only feature things you want to see, and where you have control over your own files and how they’re delivered to you. And for music fans, Jellyfin and Plex both support music collection streaming so you can even ditch the music streaming services. Goodbye Spotify, Youtube Music, Tidal and Apple Music, welcome back unreasonably large MP3 collections (or FLAC collections).
On the hardware front, I’m going to offer a few options catered towards various budgets and media library sizes. The cost of getting a media server going using this guide will run you anywhere from $450 CDN/$325 USD at the entry level to $1500 CDN/$1100 USD at the high end. My own server cost closer to the higher figure, with much of that cost being hard drives. If that seems excessive maybe you’ve got a roommate, a friend, or a family member who would be willing to chip in a few bucks towards your little project if they get a share of the bounty. This is how my server was funded. It might also be worth thinking about the cost over time, how much you spend yearly on subscriptions vs. a one time cost of setting a server. Then there's just the joy of being able to shout a "fuck you" at all those show cancelling, movie hating, hedge fund vampire CEOs who run the studios by denying them your money. Drive a stake through David Zaslav's heart.
On the software side I will walk you through, step-by-step, in installing Ubuntu as your server's OS, configuring your storage in a RAIDz array with ZFS, sharing your zpool to Windows with Samba, running a remote connection into your server from your Windows PC, and getting started with Plex/Jellyfin Media Server. Every terminal command you will need to input will be provided, and I will even share with you a custom #bash script that will make the used vs. available drive space on your server display correctly in Windows.
If you have a different preferred flavour of Linux (Arch, Manjaro, Redhat, Fedora, Mint, OpenSUSE, CentOS, or Slackware etc. et. al.) and are aching to tell me off for being basic using Ubuntu, this tutorial is not for you. The sort of person with a preferred Linux distro is the sort of person who can do this sort of thing in their sleep. Also I don't care. This tutorial is intended for the average home computer user. This is also why we’re not using a more exotic home server solution like running everything through Docker Containers and managing it through a dashboard like Homarr or Heimdall. While such solutions are fantastic and can be very easy to maintain once you have it all set up, wrapping your brain around Docker is a whole thing in and of itself. If you do follow this tutorial and enjoyed putting everything together, then I would encourage you to maybe go back in a year’s time, do your research and and redo everything so it’s set up with Docker Containers.
This is also a tutorial aimed at Windows users. Although I was a daily user of OS X for many years (roughly 2008-2023) and I've dabbled quite a bit with different Linux distributions (primarily Ubuntu and Manjaro), my primary OS these days is Windows 11. Many things in this tutorial will still be applicable to Mac users but others (e.g. setting up shares) you will have to look up yourself. I doubt it would be difficult to do so.
Nothing in this tutorial will require feats of computing expertise from you. All you will need is a basic level of computer literacy (e.g. an understanding how directories work, being comfortable in settings menus) and a willingness to learn a thing or two. While this guide may look overwhelming at a glance, this is only because I want to be as thorough as possible so that you understand exactly what it is you're doing and you're not just blindly following steps. If you half-way know what you’re doing, you’ll be fine if you ever need to troubleshoot.
Honestly, once you have all the hardware ready it really shouldn't take you more than an afternoon to get everything up and running.
(This tutorial is just shy of seven thousand words long so the rest is under the cut.)
Step One: Choosing Your Hardware
Linux is a light weight operating system, there's almost no bloat and there are recent distributions out there right now that will run perfectly fine on a fourteen year old i3 with 4GB of RAM. Running Plex/Jellyfin media server isn’t very resource intensive either in 90% of use cases. We don’t an expensive or powerful system. So there are several options available to you: use an old computer you already have sitting around but aren't using, buy a used workstation from eBay, or what I believe to be the best option, order an N100 Mini-PC from AliExpress or Amazon.
Note: If you already have an old PC sitting around that you’ve decided to use, fantastic, move on to the next step.
When weighing your options, do keep a few things in mind: the number of people you expect to be streaming simultaneously at any one time, the resolution and bitrate of your media library (4k video takes a lot more processing power than 1080p) and most importantly, how many of those clients are going to be transcoding at any one time. Transcoding is what happens when the playback device does not natively support direct playback of the source file. This can be for a number of reasons, such as the playback device's native resolution, or because the source file was encoded in a video codec unsupported by the playback device.
Ideally we want any transcoding to be performed by hardware, which means we should be looking for an Intel processor with Quick Sync. Quick Sync is a dedicated core on the CPU die designed specifically for video encoding and decoding. This makes for highly efficient transcoding both in terms of processing overhead and power draw. Without these Quick Sync cores, transcoding must be brute forced through software which takes up much more of a CPU’s processing power and takes much more energy. But not all Quick Sync cores are created equal, and you need to keep this in mind if you've decided either to use an old computer or to shop on eBay for a used workstation.
Any Intel processor after second generation Core (Sandy Bridge circa 2011) has Quick Sync cores. It's not until 6th gen (Skylake), however, that those cores support H.265 HEVC. Intel’s 10th gen (Comet Lake) processors support 10bit HEVC and HDR tone mapping. And the recent 12th gen (Alder Lake) processors give you AV1 decoding. As an example, while an 8th gen (Kaby Lake) i5-8500 will be able to transcode a file encoded with H.265 through hardware, it will fall back to software transcoding when given a 10bit H.265 file. So if you’ve decided to use that old PC or to look on eBay for an old Dell Optiplex keep this in mind.
Note 1: The price of old workstations varies wildly and fluctuates frequently. If you get lucky and go looking shortly after a workplace has liquidated a large number of their workstations you can find deals for as low as $100 for a barebones system, but generally an i5-8500 workstation with 16gb RAM will cost you somewhere in the area of $260 CDN/$200 USD.
Note 2: The AMD equivalent to Quick Sync is called Video Core Next, and while it's fine, it's not as efficient and not as mature a technology, only becoming available with first generation Ryzen and it only got decent with their newest CPUs, we want something cheap.
Alternatively you could completely forgo having to keep track of what generation of CPU is equipped with Quick Sync cores with support for which codecs, and just buy an N100 mini-PC. For around the same price or less than a good used workstation you can pick up a Mini-PC running an Intel N100 processor. The N100 is a four-core processor based on the 12th gen Alder Lake architecture and comes equipped with the latest revision of the Quick Sync. They offer astounding hardware transcoding capabilities for their size and power draw and otherwise perform equivalent to an i5-6500. A friend of mine uses an N100 machine as a dedicated retro emulation gaming system. These are also remarkably efficient chips, they sip power. In fact, the difference between running one of these and an old workstation could work out to hundreds of dollars a year in energy bills depending on where you live.
You can find these Mini-PCs all over Amazon or for a little cheaper over on AliExpress. They range in price from $170 CDN/$125 USD for a no name N100 with 8GB RAM to $280 CDN/$200 USD for a Beelink S12 Pro with 16GB RAM. The brand doesn't really matter, they're all coming from the same three factories in Shenzen, go for whichever one fits your budget or has the features you want. 8GB RAM should be enough, Linux is lightweight and Plex only calls for 2GB RAM, and a 256GB SSD is more than enough for what we need as a boot drive. 16GB RAM might result in a slightly snappier experience, especially with ZFS, and going for a bigger drive might allow you to get away with things like creating preview thumbnails for Plex, but it’s up to you and your budget.
The Mini-PC I wound up buying was a Firebat AK2 Plus with 8GB RAM and a 256GB SSD. It looks like this:

Note: Be forewarned that if you decide to order a Mini-PC from AliExpress, note the power adapter it is shipping with. The one I bought came with an EU power adapter and I had to supply my own North American power supply. Thankfully this is a minor issue as a barrel plug 30W/12V/2.5A power adapters are plentiful and can be had for $10.
Step Two: Choosing Your Storage
Storage is the most important part of our build, and the most expensive. Thankfully it’s also easily upgrade-able down the line.
For people with a smaller media collection (4TB to 8TB), a limited budget, or who will only ever have two simultaneous streams running, I would say that the most economical course of action would be to simply buy a USB 3.0 8TB external HDD. Something like this Western Digital or this Seagate external drive. One of these will cost you somewhere around $200 CDN/$140 USD. Down the line you could add a second external drive or replace it with a multi-drive RAIDz set up as detailed below.
If a single external drive the path for you, move on to step three.
For people who have larger media libraries (12TB+), who have a lot of media in 4k, or care about data redundancy, the answer is a RAID array featuring multiple HDDs in an enclosure.
Note: If you are using an old PC you already have as your server and have the room for at least three 3.5" drives, and as many open SATA ports on your mother board you won't need an enclosure, just install the drives in your old case. If your old computer is a laptop or doesn’t have room for more internal drives, then I would suggest an enclosure.
The minimum number of drives needed to run a RAIDz array is three, and seeing as RAIDz is what we will be using, you should be looking for an enclosure with hree to five bays. I think that four disks makes for a good compromise for a home server. Regardless of whether you go for a three, four, or five bay enclosure, do be aware that in a RAIDz array the space equivalent of one of the drives will be dedicated to parity at a ratio expressed by the equation 1 − 1/n i.e. in a four bay enclosure equipped with four 12TB drives configured in RAIDz we would be left with a total of 36TB of usable space (48TB raw size). The reason for why we might sacrifice storage space in such a manner will be explained in the next section.
A four bay enclosure will cost somewhere in the area of $200 CDN/$140 USD. You don't need anything fancy, nothing with hardware RAID (RAIDz is done entirely in software) or even USB-C. An enclosure with USB 3.0 will perform just fine. Don’t worry about bottlenecks, a mechanical HDD will be limited by the speed of its mechanism long before before it will be limited by the speed of a USB connection. I've seen decent looking enclosures from TerraMaster, Yottamaster, Mediasonic and Sabrent.
When it comes to selecting the drives, as of this writing, the best value (dollar per gigabyte) are those in the range of 12TB to 20TB. I settled on 12TB drives myself. If 12TB to 20TB drives are out of your budget, go with what you can afford, or look into refurbished drives. I'm not sold on the idea of refurbished drives but some people swear by them.
When shopping for harddrives, look for drives that are specifically designed for NAS use. Drives designed for NAS use typically have better vibration dampening and are designed to be active 24/7, they will also often use CMR (conventional magnetic recording) rather than SMR (shingled magnetic recording) which nets them a sizable performance bump. Seagate Ironwolf and Toshiba NAS drives are both well regarded. I would avoid Western Digital Red drives at this time. WD Reds were a go to recommendation up until earlier this year when it was revealed that they feature firmware that will throw up false SMART warnings telling you to replace the drive at the three year mark when there might be nothing at all wrong with that drive, and when it will likely be good for another six, seven or more years.

Step Three: Installing Linux
For this step you will need a USB thumbdrive of at least 6GB in capacity, a way to make it into bootable media, and an .ISO of Ubuntu.
First download a copy of Ubuntu desktop (for best performance we could download the Server release, but for new Linux users I would recommend against using the server release as having a GUI can be very helpful, not many people are wholly comfortable doing everything through command line). 22.04.3 Jammy Jellyfish is the current Long Term Service release, this is the one to get.
Download the .ISO and then download and install balenaEtcher on your Windows PC, balenaEtcher is an easy to use program for creating bootable media, you simply insert your thumbdrive, select the .ISO you just downloaded, and it will create a bootable installation media for you.
Once you've made a bootable media and you've got your Mini-PC (or old PC/used workstation) in front of you, hook it in directly to your router with an ethernet cable, and plug in the HDD enclosure, a monitor, mouse and a keyboard. Now turn that sucker on and hit whatever key it is that gets you into the BIOS (typically ESC, DEL or F2). If you’re using a Mini-PC check to make sure that the P1 and P2 power limits are set correctly and not arbitrarily lowered, my N100's P1 limit was set at 10W, a full 20W under the chip's power limit. Also make sure that the RAM is running at the advertised speed. My Mini-PC’s RAM was set at 2333Mhz out of the box when it should have been 3200Mhz. Once you’ve done that, key over to the boot order and place the USB drive first in the boot order. Then save the BIOS settings and restart.
After you restart you’ll be greeted by Ubuntu's installation screen. Installing Ubuntu is really straight forward, select the "minimal" installation option, as we won't need anything on this computer except for a browser (Ubuntu comes preinstalled with Firefox) and Plex Media Server/Jellyfin Media Server. Also remember to delete and reformat that Windows partition! We don't need it.
Step Four: Installing ZFS and Setting Up the RAIDz Array
Note: If you opted for just a single external HDD skip this step and move onto setting up a Samba share.
Once Ubuntu is installed it's time to configure our storage by installing ZFS to build our RAIDz array. ZFS is a "next-gen" file system that is both massively flexible and massively complex. It's capable of snapshot backup, self healing error correction, ZFS pools can be configured with drives operating in a supplemental manner alongside the storage vdev (e.g. fast cache, dedicated secondary intent log, hot swap spares etc.). It's also a file system very amenable to fine tuning. Block and sector size are adjustable to use case and you're afforded the option of different methods of inline compression. If you'd like a very detailed overview and explanation of its various features and tips on tuning a ZFS array check out these articles from Ars Technica. For now we're going to ignore all these features and keep it simple, we're going to pull our drives together into a single vdev running in RAIDz which will be the entirety of our zpool, no fancy cache drive or SLOG.
Open up the terminal and type the following commands:
sudo apt update
then
sudo apt install zfsutils-linux
This will install the ZFS utility. Verify that it's installed with the following command:
zfs --version
Next, it's time to check that the HDDs we have in the enclosure are healthy, running and recognized. We also want to find out their device IDs and take note of them:
sudo fdisk -1
Note: You might be wondering why some of these commands require "sudo" in front of them while others don't. "Sudo" is short for "super user do”. When and where "sudo" is used has to do with the way permissions are set up in Linux. Only the "root" user has the access level to perform certain tasks in Linux. As a matter of security and safety regular user accounts are kept separate from the "root" user. It's not advised (or even possible) to boot into Linux as "root" with most modern distributions. Instead by using "sudo" our regular user account is temporarily given the power to do otherwise forbidden things. Don't worry about it too much at this stage, but if you want to know more check out this introduction.
If everything is working you should get a list of the various drives detected along with their device IDs which will look something like this: /dev/sdc. You can also check the device IDs of the drives by opening the disk utility app. Jot these IDs down we'll need them for our next step, creating our RAIDz array.
RAIDz is similar to RAID-5 in that instead of striping your data over multiple disks, exchanging redundancy for speed and available space (RAID-0), or mirroring your data writing two copies of every piece (RAID-1), it instead writes parity blocks across the disks in addition to striping, this provides a balance of speed, redundancy and available space. If a single drive fails, the parity blocks on the working drives can be used to reconstruct the entire array as soon as a replacement drive is added.
Additionally, RAIDz improves over some of the common RAID-5 flaws. It's more resilient and capable of self healing, checking for errors against a checksum. It's more forgiving this way, and it's likely that you'll be able to detect when a drive is on its way out well before it fails. A RAIDz array can survive the loss of any one drive.
Note: While RAIDz is indeed resilient, if a second drive fails during the rebuild, you're fucked. Always keep backups of things you can't afford to lose. This tutorial, however, is not about proper data safety.
To create the pool, use the following command:
sudo zpool create "zpoolnamehere" raidz "device IDs of drives we're putting in the pool"
For example, let's creatively name our zpool "mypool". It will consist of four drives which have the device IDs: sdb, sdc, sdd, and sde. The resulting command would look like this:
sudo zpool create mypool raidz /dev/sdb /dev/sdc /dev/sdd /dev/sde
If for example you bought five HDDs and wanted more redundancy, and are okay with three disks worth of capacity, we would modify the command to "raidz2" and the command would look something like the following:
sudo zpool create mypool raidz2 /dev/sdb /dev/sdc /dev/sdd /dev/sde /dev/sdf
An array configured like this would be able to survive two disk failures and is known as RAIDz2.
Once the zpool has been created, we can check its status with the command:
zpool status
Or more concisely with:
zpool list
The nice thing about ZFS as a file system is that an array is ready to go immediately after creating the pool. If we were to set up a traditional RAID-5 array using mbam, we'd have to sit through a potentially hours long process of reformatting and partitioning the drives. Instead we're ready to go out the gates.
The zpool should be automatically mounted to the filesystem after creation, check on that with the following:
df -hT | grep zfs
Note: If your computer ever loses power suddenly, say in event of a power outage, you may have to re-import your pool. In most cases, ZFS will automatically import and mount your pool, but if it doesn’t and you can't see your array, simply open the terminal and type sudo zpool import -a.
By default a zpool is mounted at /"zpoolname". The pool should be under our ownership but let's make sure with the following command:
sudo chown -R "yourlinuxusername" /"zpoolname"
Note: Changing file and folder ownership with "chown" and file and folder permissions with "chmod" are essential commands for much of the admin work in Linux, but which we won't be dealing with extensively in this guide. If you'd like a deeper tutorial and explanation you can check out these two guides: chown and chmod.

You can access the zpool file system through the GUI by opening the file manager (the Ubuntu default file manager is called Nautilus) and clicking on "Other Locations" on the sidebar, then entering the Ubuntu file system and looking for a folder with your pool's name. Bookmark the folder on the sidebar for easy access.

Your storage pool is now ready to go. Assuming that we already have some files on our Windows PC we want to copy to over, we're going to need to install and configure Samba to make the pool accessible in Windows.
Step Five: Setting Up Samba/Sharing
Samba is what's going to let us share the zpool with Windows and allow us to write to it from our Windows machine. First let's install Samba with the following commands:
sudo apt-get update
then
sudo apt-get install samba
Next create a password for Samba.
sudo smbpswd -a "yourlinuxusername"
It will then prompt you to create a password. Just reuse your username password for simplicity's sake.
Note: if you're using just a single external drive replace the zpool location in the following commands with wherever it is your external drive is mounted, for more information see this guide on mounting an external drive in Ubuntu.
After you've created a password we're going to create a shareable folder in our pool with this command
mkdir /"zpoolname"/"foldername"
Now we're going to open the smb.conf file and make that folder shareable Enter the following command.
sudo nano /etc/samba/smb.conf
This will open the .conf file in nano, the terminal text editor program. Now at the end of smb.conf add the following entry:
["foldername"]
path = /"zpoolname"/"foldername"
available = yes
valid users = "yourlinuxusername"
read only = no
writable = yes
browseable = yes
guest ok = no
Ensure that there are no line breaks between the lines and that there's a space on both sides of the equals sign. Next step is to allow Samba traffic through the firewall:
sudo ufw allow samba
Finally restart the Samba service:
sudo systemctl restart smbd
At this point we'll be able to access to the pool, browse its contents, and read/write to it from Windows. But there's one more thing left to do, Windows doesn't natively support the ZFS file systems and will read the used/available/total space in the pool incorrectly. Windows will read available space as total drive space, and all used space as null. This leads to Windows only displaying a dwindling amount of "available" space as the drives are filled. We can fix this! Functionally this doesn't actually matter, we can still write and read to and from the disk, it just makes it difficult to tell at a glance the proportion of used/available space, so this is an optional step but one I recommend (this step is also unnecessary if you're just using a single external drive). What we're going to do is write a little shell script in #bash. Open nano with the terminal with the command:
nano
Now insert the following code:
#!/bin/bash
CUR_PATH=`pwd`
ZFS_CHECK_OUTPUT=$(zfs get type $CUR_PATH 2>&1 > /dev/null) > /dev/null
if [[ $ZFS_CHECK_OUTPUT == *not\ a\ ZFS* ]]
then
IS_ZFS=false
else
IS_ZFS=true
fi
if [[ $IS_ZFS = false ]]
then
df $CUR_PATH | tail -1 | awk '{print $2" "$4}'
else USED=$((`zfs get -o value -Hp used $CUR_PATH` / 1024)) > /dev/null AVAIL=$((`zfs get -o value -Hp available $CUR_PATH` / 1024)) >
/dev/null
TOTAL=$(($USED+$AVAIL)) > /dev/null
echo $TOTAL $AVAIL
fi
Save the script as "dfree.sh" to /home/"yourlinuxusername" then change the ownership of the file to make it executable with this command:
sudo chmod 774 dfree.sh
Now open smb.conf with sudo again:
sudo nano /etc/samba/smb.conf
Now add this entry to the top of the configuration file to direct Samba to use the results of our script when Windows asks for a reading on the pool's used/available/total drive space:
[global]
dfree command = home/"yourlinuxusername"/defree.sh
Save the changes to smb.conf and then restart Samba again with the terminal:
sudo systemctl restart smbd
Now there’s one more thing we need to do to fully set up the Samba share, and that’s to modify a hidden group permission. In the terminal window type the following command:
usermod -a -G sambashare “yourlinuxusername”
Then restart samba again:
sudo systemctl restart smbd
If we don’t do this last step, while everything would appear to work fine, and you will be able to see and map the drive from Windows and even begin transferring files, you'd soon run into a lot of frustration. As every ten minutes or so a file would fail to transfer and you would get a window announcing “0x8007003B Unexpected Network Error”. This window would require your manual input to continue the transfer with the file that was next in the queue. It will reattempt to transfer whichever files failed the first time around at the end, and 99% of the time they’ll go through, but this is a major pain in the ass if you’ve got a lot of data you need to transfer and want to step away from the computer for a while. It turns out samba can act a little weirdly with the higher read/write speeds of RAIDz arrays and transfers from Windows, and will intermittently crash and restart itself if this group option isn’t changed. Inputting the above command will prevent you from ever seeing that window.
The last thing we're going to do in this part before switching over to our Windows PC is grab the IP address of our Linux machine. Enter the following command:
hostname -I
This will spit out this computer's IP address on the local network (it will look something like 192.168.0.x), write it down. It might be a good idea once you're done here to go into your router settings and reserving that IP for your Linux system in the DHCP settings. Check the manual for your specific model router on how to access its settings, typically it can be accessed by opening a browser and typing http:\\192.168.0.1 in the address bar, but your router may be different.
Okay we’re done with our Linux computer for now. Get on over to your Windows PC, open File Explorer, right click on Network and click "Map network drive". Select Z: as the drive letter (you don't want to map the network drive to a letter you could conceivably be using for other purposes) and enter the IP of your Linux machine and location of the share like so: \\"LINUXCOMPUTERLOCALIPADDRESSGOESHERE"\"zpoolnamegoeshere"\. Windows will then ask you for your username and password, enter the ones you set earlier in Samba and you're good. If you've done everything right it should look something like this:

You can now start moving media over from Windows to the share folder. It's a good idea to have a hard line running to all machines. Moving files over Wi-Fi is going to be tortuously slow, the only thing that’s going to make the transfer time tolerable (hours instead of days) is a solid wired connection between both machines and your router.
Step Six: Setting Up Remote Desktop Access to Your Server
After the server is up and going, you’ll want to be able to access it remotely from Windows. Barring serious maintenance/updates, this is how you'll access it most of the time. On your Linux system open the terminal and enter:
sudo apt install xrdp
Then:
sudo systemctl enable xrdp
Once it's finished installing, open “Settings” on the sidebar and turn off "automatic login" in the User category. Then log out of your account. Attempting to remotely connect to your Linux computer while you’re logged in will just result in a black screen!
Now get back on your Windows PC, open search and search for "RDP". A program called "Remote Desktop Connection" should pop up, open this program as an administrator by right-clicking and selecting “run as an administrator”. You’ll be greeted with a window, in the field marked “Computer” type in the IP address of your Linux computer. Press connect and you'll be greeted with a new window and a prompt asking for your username and password. Enter your Ubuntu username and password here.

If everything went right, you’ll be logged into your Linux computer. If the performance is too sluggish, adjust the display options, lowering the resolution and colour depth do a lot to make the interface feel snappier.

Remote access is how we're going to be using our Linux system from now, outside of some edge cases like needing to get into the BIOS or upgrading to a new version of Ubuntu. Everything else from performing maintenance like a monthly zpool scrub (this is important!!!) to checking zpool status and updating software can all be done remotely.

This is how my server lives its life now, happily humming and chirping away on the floor next to the couch in the corner of the living room.
Step Seven: Plex Media Server/Jellyfin
Okay we’ve got all the ground work finished and our server is almost up and running: we’ve got Ubuntu up and running, the storage is primed, we’ve set up remote connections and sharing, and maybe we’ve moved over some of favourite movies and TV shows.
Now we need to decide on the media server software to use which will stream our media to us and organize our library. For most people I’d recommend Plex, it just simply works 99% of the time. That said, Jellyfin has a lot to recommend it by too even if it is rougher around the edges, some people even run both simultaneously, it’s not that big an extra strain. I do recommend doing a little bit of your own research into the features each platform offers. But as a quick run down, consider some of the following points.
Plex is closed source and is funded through PlexPass purchases while Jellyfin is open source and entirely user driven. This means a number of things, for one, Plex requires you to purchase a “PlexPass” (purchased as a one time lifetime fee $159.99 CDN/$120 USD or paid for on a monthly yearly subscription basis) for access to certain features, like hardware transcoding (and we want hardware transcoding) and automated intro/credits detection and skipping, while Jellyfin offers this for free. On the other hand, Plex supports a lot more devices than Jellyfin and updates more frequently. That said Jellyfin's Android/iOS apps are completely free, while the Plex Android/iOS apps must be activated for a one time cost of $6 CDN/$5 USD. Additionally the Plex Android/iOS apps are vastly unified in UI and functionality across platforms, offering a much more polished experience, while the Jellyfin apps are a bit of a mess and very different from each other. Jellyfin’s actual media player itself is more fully featured than Plex's, but on the other hand Jellyfin's UI, library customization and automatic media tagging really pale in comparison to Plex. Streaming your music library is free through both Jellyfin and Plex, but Plex offers the PlexAmp app for dedicated music streaming which boasts a number of fantastic features, unfortunately some of those fantastic features require a PlexPass. If your internet is down, Jellyfin can still do local streaming, while Plex can fail to play files. Jellyfin has a slew of neat niche features like support for Comic Book libraries with the .cbz/.cbt file types, but then Plex offers some free ad-supported TV and films, they even have a free channel that plays nothing but Classic Doctor Who.
Ultimately it's up to you, I settled on Plex because although some features are pay-walled, it just works. It's more reliable and easier to use, and a one-time fee is much easier to swallow than a subscription. I do also need to mention that Jellyfin does take a little extra bit of tinkering to get going in Ubuntu, you’ll have to set up process permissions, so if you're more tolerant to tinkering, Jellyfin might be up your alley and I’ll trust that you can follow their installation and configuration guide. For everyone else, I recommend Plex.
So pick your poison: Plex or Jellyfin.
Note: The easiest way to download and install either of these packages in Ubuntu is through Snap Store.
After you've installed one (or both), opening either app will launch a browser window into the browser version of the app allowing you to set all the options server side.
The process of adding creating media libraries is essentially the same in both Plex and Jellyfin. You create a separate libraries for Television, Movies, and Music and add the folders which contain the respective types of media to their respective libraries. The only difficult or time consuming aspect is ensuring that your files and folders follow the appropriate naming conventions:
Plex naming guide for Movies
Plex naming guide for Television
Jellyfin follows the same naming rules but I find their media scanner to be a lot less accurate and forgiving than Plex. Once you've selected the folders to be scanned the service will scan your files, tagging everything and adding metadata. Although I find do find Plex more accurate, it can still erroneously tag some things and you might have to manually clean up some tags in a large library. (When I initially created my library it tagged the 1963-1989 Doctor Who as some Korean soap opera and I needed to manually select the correct match after which everything was tagged normally.) It can also be a bit testy with anime (especially OVAs) be sure to check TVDB to ensure that you have your files and folders structured and named correctly. If something is not showing up at all, double check the name.
Once that's done, organizing and customizing your library is easy. You can set up collections, grouping items together to fit a theme or collect together all the entries in a franchise. You can make playlists, and add custom artwork to entries. It's fun setting up collections with posters to match, there are even several websites dedicated to help you do this like PosterDB. As an example, below are two collections in my library, one collecting all the entries in a franchise, the other follows a theme.

My Star Trek collection, featuring all eleven television series, and thirteen films.

My Best of the Worst collection, featuring sixty-nine films previously showcased on RedLetterMedia’s Best of the Worst. They’re all absolutely terrible and I love them.
As for settings, ensure you've got Remote Access going, it should work automatically and be sure to set your upload speed after running a speed test. In the library settings set the database cache to 2000MB to ensure a snappier and more responsive browsing experience, and then check that playback quality is set to original/maximum. If you’re severely bandwidth limited on your upload and have remote users, you might want to limit the remote stream bitrate to something more reasonable, just as a note of comparison Netflix’s 1080p bitrate is approximately 5Mbps, although almost anyone watching through a chromium based browser is streaming at 720p and 3mbps. Other than that you should be good to go. For actually playing your files, there's a Plex app for just about every platform imaginable. I mostly watch television and films on my laptop using the Windows Plex app, but I also use the Android app which can broadcast to the chromecast connected to the TV. Both are fully functional and easy to navigate, and I can also attest to the OS X version being equally functional.
Part Eight: Finding Media
Now, this is not really a piracy tutorial, there are plenty of those out there. But if you’re unaware, BitTorrent is free and pretty easy to use, just pick a client (qBittorrent is the best) and go find some public trackers to peruse. Just know now that all the best trackers are private and invite only, and that they can be exceptionally difficult to get into. I’m already on a few, and even then, some of the best ones are wholly out of my reach.
If you decide to take the left hand path and turn to Usenet you’ll have to pay. First you’ll need to sign up with a provider like Newshosting or EasyNews for access to Usenet itself, and then to actually find anything you’re going to need to sign up with an indexer like NZBGeek or NZBFinder. There are dozens of indexers, and many people cross post between them, but for more obscure media it’s worth checking multiple. You’ll also need a binary downloader like SABnzbd. That caveat aside, Usenet is faster, bigger, older, less traceable than BitTorrent, and altogether slicker. I honestly prefer it, and I'm kicking myself for taking this long to start using it because I was scared off by the price. I’ve found so many things on Usenet that I had sought in vain elsewhere for years, like a 2010 Italian film about a massacre perpetrated by the SS that played the festival circuit but never received a home media release; some absolute hero uploaded a rip of a festival screener DVD to Usenet, that sort of thing. Anyway, figure out the rest of this shit on your own and remember to use protection, get yourself behind a VPN, use a SOCKS5 proxy with your BitTorrent client, etc.
On the legal side of things, if you’re around my age, you (or your family) probably have a big pile of DVDs and Blu-Rays sitting around unwatched and half forgotten. Why not do a bit of amateur media preservation, rip them and upload them to your server for easier access? (Your tools for this are going to be Handbrake to do the ripping and AnyDVD to break any encryption.) I went to the trouble of ripping all my SCTV DVDs (five box sets worth) because none of it is on streaming nor could it be found on any pirate source I tried. I’m glad I did, forty years on it’s still one of the funniest shows to ever be on TV.
Part Nine/Epilogue: Sonarr/Radarr/Lidarr and Overseerr
There are a lot of ways to automate your server for better functionality or to add features you and other users might find useful. Sonarr, Radarr, and Lidarr are a part of a suite of “Servarr” services (there’s also Readarr for books and Whisparr for adult content) that allow you to automate the collection of new episodes of TV shows (Sonarr), new movie releases (Radarr) and music releases (Lidarr). They hook in to your BitTorrent client or Usenet binary newsgroup downloader and crawl your preferred Torrent trackers and Usenet indexers, alerting you to new releases and automatically grabbing them. You can also use these services to manually search for new media, and even replace/upgrade your existing media with better quality uploads. They’re really a little tricky to set up on a bare metal Ubuntu install (ideally you should be running them in Docker Containers), and I won’t be providing a step by step on installing and running them, I’m simply making you aware of their existence.
The other bit of kit I want to make you aware of is Overseerr which is a program that scans your Plex media library and will serve recommendations based on what you like. It also allows you and your users to request specific media. It can even be integrated with Sonarr/Radarr/Lidarr so that fulfilling those requests is fully automated.
And you're done. It really wasn't all that hard. Enjoy your media. Enjoy the control you have over that media. And be safe in the knowledge that no hedgefund CEO motherfucker who hates the movies but who is somehow in control of a major studio will be able to disappear anything in your library as a tax write-off.
668 notes
·
View notes
Text
Point of View: the Biggest Thing You're Missing!
Point of view is one of the most important elements of narrative fiction, especially in our modern writing climate, but you rarely hear it seriously discussed unless you go to school for writing; rarely do help blogs or channels hit on it, and when they do, it's never as in-depth as it should be. This is my intro to POV: what you're probably missing out on right now and why it matters. There are three essential parts of POV that we'll discuss.
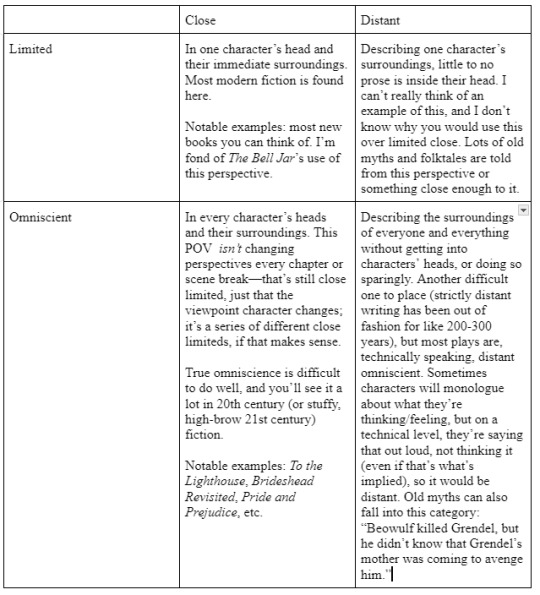
Person: This is the easiest part to understand and the part you probably know already. You can write in first person (I/me), second (You), and third person (He/she/they). You might hear people talk about how first person brings the reader closer to the central character, and third person keeps them further away, but this isn't true (and will be talked about in the third part of this post!) You can keep the reader at an intimate or alien distance to a character regardless of which person you write in. The only difference--and this is arguable--is that first person necessitates this intimacy where third person doesn't, but you still can create this intimacy in third person just as easily. In general, third person was the dominant (and really the only) tense until the late 19th century, and first person grew in popularity with the advent of modernism, and nowadays, many children's/YA/NA books are written in first person (though this of course doesn't mean you can't or shouldn't write those genres in the third person). Second person is the bastard child. Don't touch it, even if you think you're clever, for anything the length of a novel. Shorter experimental pieces can use it well, but for anything long, its sounds more like a gimmick than a genuine stylistic choice.
Viewpoint Character: This is a simple idea that's difficult in practice. Ask yourself who is telling your story. This is typically the main character, but it needn't be. Books like The Book Thief, The Great Gatsby, Rebecca, Dr. Jekyll and Mr. Hyde, and the Sherlock series are told from the perspective of a side character who isn't of chief importance to the narrative. Your viewpoint character is this side character, the character the reader is seeing the world through, so the main character has to be described through them. This isn't a super popular narrative choice because authors usually like to write from the perspective of their most interesting character, but if you think this choice could fit your story, go for it! You can also swap viewpoint characters throughout a story! A word of warning on that: only change your viewpoint character during a scene/chapter break. Switching mid-scene without alerting the reader (and even when you do alert the reader) will cause confusion. I guarantee it.
Means of Perception; or, the Camera: This part ties the first two together. If you've ever heard people talk about an omniscient, limited, etc. narrator, this is what they mean. This part also includes the level of intimacy the reader has with the viewpoint character: are we in their heads, reading their thoughts, or are we so far away that we can only see their actions? If your story is in a limited means of perception, you only have access to your character's head, eyes, and interpretations, where an omniscient narrator sees through all characters' heads at once. (This doesn't eliminate the viewpoint character--most of your writing will still be in that character's head, but you're allowed to reach into other characters' thoughts when needed. You could also be Virginia Woolf, who does fluidly move through everyone's perspectives without a solid viewpoint character, but I would advise against this unless you really are a master of the craft.) Older novels skew towards third person omniscient narration, where contemporary novels skew towards first person limited. You also have a spectrum of "distant" and "close." If omniscient and limited are a spectrum of where the camera can swivel to, distant and close is a spectrum of how much the camera can zoom in and out. Distant only has access to the physical realities of the world and can come off as cold, and close accesses your character's (or characters', if omniscient) thoughts.
Notice how I said narration. Your means of perception dramatically effects how your story can be told! Here's a scene from one of my stories rewritten in third-person distant omniscient. The scene is a high school football game:
“Sometimes,” he said. “Not much anymore.”
“It’s not better, then?” She shivered; the wind blew in.
“A little.” His tone lifted. “I don’t know if it’ll ever be better, though.”
She placed a hand on his arm, stuttered there, and slipped her arm around his waist. “Did it help to be on your own?”
He raised an eyebrow. “You were there.”
“Yes and no.”
“And the guys, the leaders.”
“Come on,” she heckled.
“Okay, okay.” Carmen sighed. “Yeah, it helped. I don’t think—I don’t know—I’d be me if they’d fixed it all.”
She grinned. “And who might you be?”
“Oh, you know. Scared, lonely.” He fired them haphazardly, and a bout of laughter possessed him which Piper mirrored. “Impatient.”
“And that’s a good thing?”
“No.” He sat straight. “Gosh, no. But I don’t want to be like him, either.” He pointed to the field; Devon recovered a fumbled ball. “He’s never been hurt in his life.”
She met his eyes, which he pulled away. “You don’t mean that," Piper said.
“Maybe not. He’s too confident, though.”
The cloth of Carmen's uniform caved and expanded under Piper's fingers.
With distant-omniscient, we only get the bare actions of the scene: the wind blows in, Piper shivers, the cloth rises and falls, Carmen points, etc. But you can tell there's some emotional and romantic tension in the scene, so let's highlight that with a first person limited close POV:
“Sometimes,” he said. “Not much anymore.”
“It’s not better, then?” Frost spread up from her legs and filled her as if she were perforated rock, froze and expanded against herself so that any motion would disturb a world far greater than her, would drop needles through the mind’s fabric. A misplaced word would shatter her, shatter him.
“A little.” His tone lifted. “I don’t know if it’ll ever be better, though.”
She placed a hand on his arm, thought better, and slipped her arm around his waist. “Did it help to be on your own?”
He raised an eyebrow. “You were there.”
“Yes and no.”
“And the guys, the leaders.”
“Come on,” she heckled.
“Okay, okay.” Carmen sighed. “Yeah, it helped. I don’t think—I don’t know—I’d be me if they’d fixed it all.”
She grinned. “And who might you be?”
“Oh, you know. Scared, lonely.” He fired them haphazardly, and a bout of laughter possessed him which Piper mirrored. “Impatient.”
“And that’s a good thing?”
“No.” He sat straight. “Gosh, no. But I don’t want to be like him, either.” He pointed to the field; Devon recovered a fumbled ball. “He’s never been hurt in his life.”
“You don’t mean that.” She spoke like a jaded mother, spoke with some level of implied authority, and reminded herself again to stop.
“Maybe not. He’s too confident, though.”
Piper felt the cloth of his waist cave and expand under her fingers and thought: is this not confidence?
Here, we get into Piper's thoughts and physical sensations: how the frost rises up her, and how this sensation of cold is really her body expressing her nervous fears; how she "thought better" and put her arm around his waist; her thought "is this not confidence?"; and how she reminds herself not to talk like a mother. Since I was writing from the close, limited perspective of a nervous high schooler, I wrote like one. If I was writing from the same perspective but with a child or an older person, I would write like them. If you're writing from those perspectives in distant narration, however, you don't need to write with those tones but with the authorial tone of "the narrator."
This is a lot of info, so let's synthesize this into easy bullet points to remember.
Limited vs. Omniscient. Are you stuck to one character's perspective per scene or many?
Close vs. Distant. Can you read your characters' thoughts or only their external worlds? Remember: if you can read your character's thoughts, you also need to write like you are that character experiencing the story. If child, write like child; if teen, write like teen; etc.
Here's another way to look at it!
This is a confusing and complex topics, so if you have any questions, hit up my ask box, and I'll answer as best I can. The long and short of it is to understand which POV you're writing from and to ruthlessly stick to it. If you're writing in limited close, under no circumstances should you describe how a character other than your viewpoint character is feeling. Maintaining a solid POV is necessary to keeping the dream in the reader's head. Don't make them stumble by tripping up on POV!
#writeblr#writing#writing advice#fanfic#writers on tumblr#writing questions#creative writing#bookblr#writerscommunity#booklr
707 notes
·
View notes
Text
So like most people on here I had been watching Watcher since they started their channel, and like most others I was surprised/concerned at the announcement that they're starting a streaming service. After checking out the site and looking close at their YouTube, this feels destined to fail.
I'll go through my thoughts.
They don't currently post enough to justify the paywall
Over the past year, they have posted between 4 to 9 videos a month. That is a decent amount for most YouTube channels, but for a streaming service that is way to low. For $5.99 a month, getting only 4 episodes is not a good deal when other services give you more for less.
What makes this problem worse it that...
They only produce one show at a time
Whenever Watcher releases a shows, they only have that show running. During a series of Mystery Files, they only upload Mystery Files. During a series of Too Many Spirits, they only upload Too Many Spirits. Now this isn't the case all the time, when they have smaller productions they usually release a similar size production along with it.
If we go back to the issue of only getting 4 episodes, this means that you can be paying $5.99 a month to access 4 episodes of a show that you don't enjoy.
These two issues would be less detrimental if it wasn't for the fact that...
They backpedalled removing their YouTube back catalogue
Lets be real, not only were they originally going to remove their YouTube content, It was the only way I could see this being worth the price.
Yes, they say that they aren't removing it, but if you read the full article it say's that "The company originally told Variety that Watcher would eventually remove all of its videos from YouTube".
Their original plan WAS to make all their content exclusive to streaming, the problem was that everyone new this was a scummy idea and they gaslit their audience into thinking they weren't doing that. But that now leaves them with a streaming service where all they offer is 4 episodes of a show per month and a back catalogue that is free on a more well known platform.
The big question I have is...
How are they going to make more content
This is something that I feel should be addressed, they are a small production studio who are trying to "creating television-caliber, unscripted series in the digital space" (direct quote from their YouTube Description). They need more content per month to make this service worth while, how are they going to do that?
Will they push out multiple small budget, easy to film, YouTube like content that bring up the overall upload count which may cause them and their employees to crunch and burn out.
Or are they going to produce several higher budget, TV-calibre shows that would each be more expensive than they can afford to make.
Not sure if this was coherent but thanks for reading anyway.
(sidenote)
While I agree that Steven is getting a huge bulk of the anger that should also be applied to Shane and Ryan, I also have to acknowledge that the first announced show after saying they need money being his travel show is not helping.
481 notes
·
View notes
Text
here are some things that would help me as a blind person regarding online accessibility (mobile for me):
- all apps should display all text sizes (iphone goes up to 310%)
- all apps should display bold text if it's turned on in the system settings
- there should be a standard for text size; if my text size is 100% across all apps, then an instagram post, a toot, a text message etc. should all be the same size, no more "instagram and tumblr are always slightly smaller for some reason" bs
- an app's formatting (such as buttons, alerts etc) needs to be compatible with large text! large text doesn't help me if all the buttons are suddenly overlapping or i can't get out of an alert window because they forgot to program the ability to scroll. no more overlapping shit, no more missing shit, no more "i can't get out of this window without closing the app and changing my text size"
- usernames, channel names, all word and sentences should be fully visible even with large text! i don't know what channel "# ge..." is on discord. find a way to make it visible, either make it multiple lines, give me the ability to side scroll or make it move like a spotify song title
- make sure things that shouldn't be affected by large text aren't! if i need to scan a barcode and my large text settings make it unrecognisable to the machine, that's unhelpful
- all apps should have a light mode and a dark mode! certain conditions make it easier to see light mode, others make it easier to see light mode
- dark mode should be as high-contrast as light mode, i.e. white on black, not white on dark grey
- probably have other options beyond regular dark and light mode
- on apps that let you customise your profile a lot visually, give the option to view it in your phones' settings, i.e. if someone's got a dark red on black serif-font tumblr, i wanna be able to make it into a white on black plain font tumblr
- alt text should be accessible without a screenreader
- there should probably be a dedicated field for video descriptions too
- apps that give hashtags a different colour than the rest of the text should let you choose the colour
- all apps should let you view someone's profile picture in full size
- this one is specific to instagram: let us fucking zoom in normally! why do i have to do finger gymnastics just to stay zoomed in and read text on a picture? the zoom should work the same way it does in my photo library and literally everywhere else
most of these shouldn't be that hard and they would make my life a hell of a lot easier. i'm tired of running into issues because i'm too blind to read regular size text.
i WISH it was as simple as "describe your images" and "no fancy fonts", which is something people can easily choose to do to make things a little more accessible, and if they don't, i can unfollow and surround myself with people who post accessible stuff.
but all of the things i listed are things done my developers and not regular users, it's stuff i can't just ignore by surrounding myself with people who care about blind accessibility if the people who create the spaces don't care about blind accessibility.
#and that's not even getting into android's so called large text#disabled#disability#blind#low vision#visually impaired#sight impaired
965 notes
·
View notes
Text
Guide to Watch TGCF Donghua Season 2

With the new season of the Tian Guan Ci Fu/Heaven Official's Blessing donghua finally releasing soon, I wanted to make a post explaining the different ways fans can watch and support it! Things have changed since season 1, so my old guide is no longer relevant apart from the infographics on how to subscribe to Bilibili CN (and the YouTube channel)!
And to be upfront: the main sites that are going to be broadcasting the donghua have been very sparse with information. I fully expect that we will have to wait until after the first episode releases to know all the details, so while I am making this guide to help people right now, things might change! Please keep that in mind and stay patient! I will post any important updates in the replies as I can!
Additionally, because of copyright/licensing, different sites are going to work in different regions. I do not know with 100% certainty what is going to work in a particular country. There's gonna be some trial and error!
So the main options we have for season 2 are:
Crunchyroll
Sub price: $9.99 USD per month for basic (local prices may vary)
Regions: Americas, Europe, Africa, Middle East, Oceania.
Pros: Easy to subscribe to if available in your region.
Cons: Unlikely for true simulcast so it'll be a bit delayed.
Link to main site (season 2 listing not up yet)
For app: download via App Store/Google Play Store.
Bilibili. tv (EN site/app)
Sub price: $4.99 USD per month (local prices may vary)
Regions: Southeast Asia only.
Pros: Airs earlier than Crunchyroll. Interface is in English.
Cons: If you want to watch it outside of SEA, you'll need a VPN.
Link to Season 2 on website
For app: download via APK link on website if you are outside of SEA. Otherwise use App Store/Google Play Store.
Bilibili YouTube Channel
Sub price: $4.99/$5.99 USD per month (local prices may vary)
Regions: Many -- EXCEPT Japan, South Korea, the Americas, UK, Australia, New Zealand.
Pros: Easy to subscribe if available in your region.
Cons: If you want to watch it from the regions listed above, you'll need a VPN.
Link to channel
It's the youtube app....
Bilibili. com (CN site/app)
Sub price: $9.99 USD for 3 months
Regions: ¯\_(ツ)_/¯
Pros: If they're gonna air season 2, then they might be the source broadcast if the EN site isn't. Also probably cheapest for those abroad.
Cons: Chinese interface may be intimidating. Not 100% sure if it'll air as normal.
Link to Season 2 on website
For app: download via App Store/Google Play Store.
(NOTE: If you are in Japan, it will be available on WOWOW. If you are in South Korea, it will be available on Laftel.)
F.A.Q.s
🔹What is the release date/time?
Bilibili EN has announced it as 20:00 GMT+8 on October 18th. If it releases on Bilibili CN, it'll probably be the same time.
Crunchyroll has stated October 18th, but has not yet announced a time as of the posting this guide. I checked.
Japan and South Korea have their own release times, so please consult the relevant broadcasters!
🔹Can I watch it on Netflix/Amazon Prime/etc?
These streaming services will likely only have it after the whole season concludes, and with a significant delay. For reference, it took several months after finishing for season 1 to be released on Netflix.
🔹Which platform should I choose?
Whichever one you can actually access, and feel most comfortable using!
🔹When should I subscribe?
Personally, I'll be waiting until the last day before release, just to make sure I have the most information possible. However, I'm sure the idea of doing that makes many people nervous, so... yeah. Whenever is convenient for you!
🔹Which one will have the donghua the quickest/earliest?
Probably Bilibili CN & Bilibili EN. I suspect they'll simulcast with each other. I cannot be 100% certain about anything though, because of limited info! For season 1, YouTube and Funimation (now Crunchyroll) were delayed, and it's hard to say if they'll be better this time or not.
🔹Do I need a VPN for Bilibili EN or their YT channel?
If you are outside of SEA, yes.
🔹Do I need a VPN for Bilibili CN?
Probably not, unless you are in a country that restricts access to CN sites and apps (like India).
🔹Which VPN should I use?
This will be up to you! It's best to research what the different options are, and what will work for your needs!
🔹How will I know I'll be able to watch season 2 from my region?
The most surefire way is to subscribe to a platform that has officially announced to be serving your region (e.g. Crunchyroll for the Americas).
Unofficially, if you can watch the latest trailer and other promo videos on your chosen platform, then there's a good chance you're okay! The exception to this is the YouTube channel, which has some of the trailers public, but has all of season 1 unavailable if you aren't in the right region....
Additionally, be mindful, because even if you're able to see season 1, season 2 might still be region-locked on certain platforms. (E.g. you can watch all of season 1 via Bilibili EN if you're from the USA no problem. But you can't access season 2 without a VPN to a SEA server.)
🔹What languages are going to be available and will there be English subtitles?
While dubs for multiple languages have been confirmed, I'm unsure if any of these will be available on release. It'll likely be offered only in Chinese first.
For season 1, there were hardcoded CN & EN subtitles for Bilibili on release. Funimation re-subbed the episodes (EN) for their own release, and Crunchyroll will probably do the same.
🔹I watched it on Funimation last time, can I watch it through them this time?
No, they were absorbed (in some capacity idk) by Crunchyroll. So they are not distributing season 2 of TGCF, only Crunchyroll is.
🔹Is season 2 actually available in China and thus on Bilibili CN?
Yes and no! As long as you are not in mainland China, it seems you will have access to season 2 through Bilibili CN. All promo materials and trailers seem to be available to us, which is a good sign! (They are not available for mainlanders, but mainland fans are able to watch via HK/Macau versions apparently.)
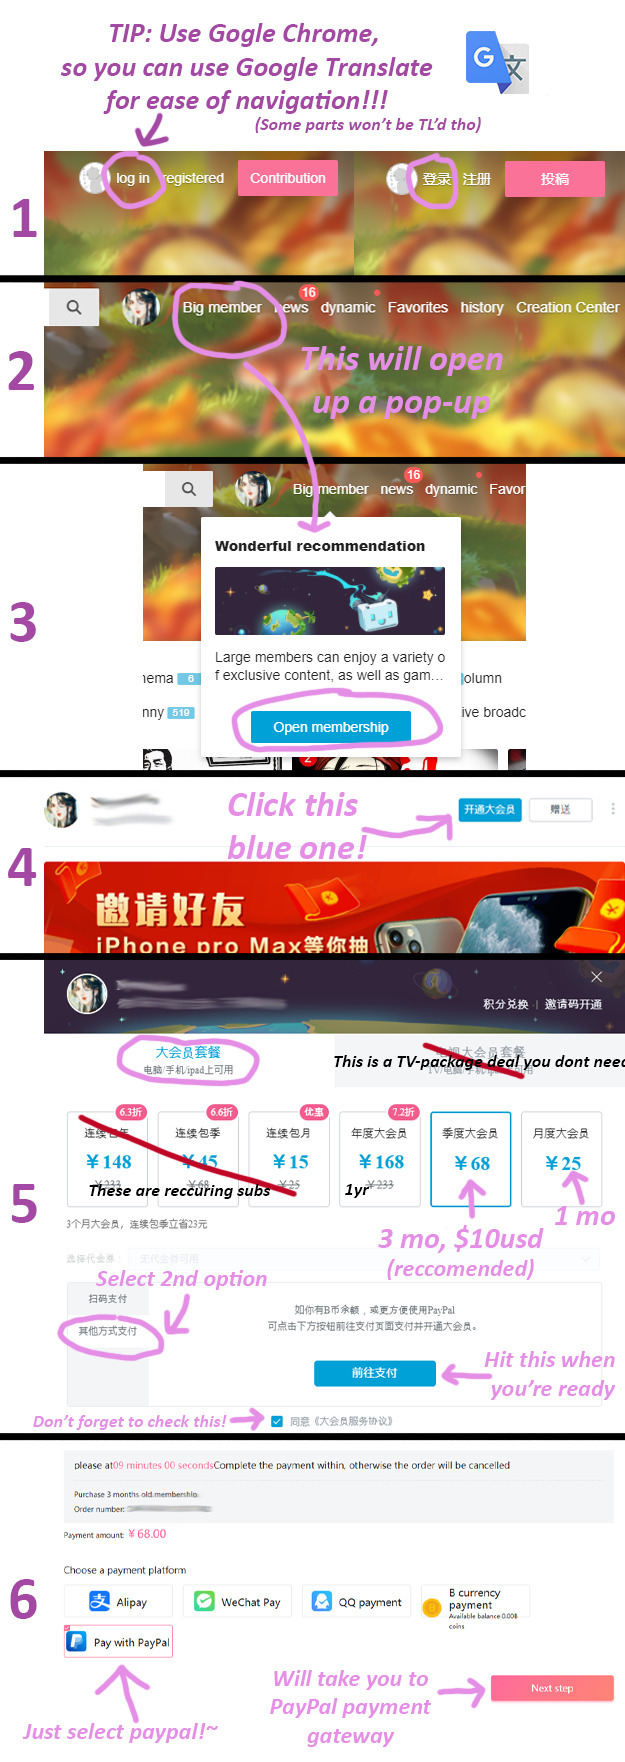
🔹Hopeful that it will be available, I would like to watch it via Bilibili CN, so how do I sign up and subscribe?
To make an account, consult this reddit post. To subscribe, please consult the guide below! It's a little old (made it for season 1) but still works pretty much the same.
#tgcf#tian guan ci fu#hob#heaven official's blessing#tgcf donghua#guide#nyerus.txt#i know the moment i post this there will be new info that comes out#but such is the risk i take posting this on a sunday as opposed to monday#tomorrow i will have no time tho lol#CR please release a time.....
500 notes
·
View notes
Text
Ghost in the Machine
This is the master post for Ghost in the Machine links, character refs and FAQs.
I will try my best to keep this post as up to date as possible.
What is Ghost in The Machine?
GITM is a DCA AU and a fic set in the retrofuture (2055ish) long after Fazco has shut down. An eccentric collector has been acquiring versions of the Daycare Attendant animatronic from closed locations around the world. The story involves a reader character who has been brought into repair the original post-Ruin DCA from the games, and hijinks ensue. There are also ghosts.
Where can I read the fic?
GITM is currently being posted on Ao3, and is updated every three weeks on Saturdays. The fic is being beta'd by the tremendously talented @bubbiethesaur. You can read GITM here!
There is also a podfic, which you can find here:
Updates to the podfic will be sporadic, so please be patient <3
Where can I see the art?
On this blog I use the #gitm au and #ghost in the machine au tags for GITM related content. If you are looking for art of a specific character, they also have their own tags:
#misuta moon
#nova
#soleil
#clip.exe
#sunspot mk1
#fool eclipse
#ruin eclipse
#sombra
#sunflower
#mr sandman
FAQ~
Why haven't you answered my GITM ask?
One of three reasons: 1) your ask was too spoilery* 2) I'm waiting to answer it with art 3) ADHD
*spoilery includes but is not limited to: any questions about dual-AI or XYZ character's sun/moon variant; questions about character backstories and lore; questions about characters that have not featured in the fic yet (e.g Nova, Sanii, Harvest, Sunflower, Sandman etc); asks speculating about potential future scenarios (don't get me wrong, I love these asks, but I can't answer them!)
Where are all the Moons?
Read and find out. Seriously. There are at least 5 Moons who are core to the plot but I'm not going to talk about them, no matter how nicely you ask!
Does XYZ character have a Sun/Moon counterpart?
Some of them do, some of them don't. The dual-AI stuff is majorly plot related. If I'm not talking about someone's Sun/Moon counterpart, rest assured you will find out eventually. I won't be spoiling any of it on tumblr though :)
Can I create fanart of GITM?
Yes yes yes please do and please tag me when you post it so I can see it/reblog! If you are unsure if something is ok, please ask.
Can I create fanfic of GITM?
Super flattered about this. I have a longform answer to this question which you can read here. But tl;dr yes you can, please tag/credit me, do not spoil/try to write the lore, and please do not write GITM au (e.g mafia, mer, medieval). I have my own plans for this stuff and I would prefer to release the designs/stories in my own time. If you are unsure if something is ok, please ask.
Do you have character refs I can use?
There is a collection of art 'refs' for each character on the Misutamojis discord. Latest link here.
There are no proper call-out sheets/refs currently, but I have a huge body of art for the characters on this blog which should give you more than enough info for most of them. I will get around to creating proper refs eventually, in which case I will link them here.
Where can I find the playlist?
I update the spotify playlist fairly regularly, if you have any music recs you can send them over in an ask! You can listen to the playlist here!
I've heard there are secret GITM drabbles, where can I find them?
I used to post frequent drabbles from future chapters in the DCA Palooza discord, I have recently deleted the majority of them as people were going back and binging them which hadn't been the intended reading experience. Anywho, this question probably refers more to the spicy drabbles (which people have very kindly made a lot of delicious art for). These are still around! You just need to access the spicy channel and do some digging.
Is there a GITM discord?
Nope! There is a server for GITM emotes and a busy thread in the DCA Palooza, but currently I don't have any plans to make a GITM-centric discord community. If that does happen in the future it's likely I will simply convert the emotes server (Misutamojis).
It finally happened, I converted Misutamojis. You can join the GITM discord here.
Can I smooch the robots?
Yes.
All of them?
All of them.
#master post#ghost in the machine#ghost in the machine au#gitm au#soleil#clip.exe#sanii drop#misuta moon#sunspot mk1#harvest moon#sunflower and the sandman#fool eclipse#ruin eclipse#nova#gitm yn#sombra#SoundCloud
653 notes
·
View notes
Text
Hi maggots, it's Asmi!
It seems we have arrived at That Point again, when I need a new intro post. So here we are! The Official (kidnapped) Good Omens Mascot and uh Maggot Prince has returned with a fresh post.
First, before I talk about myself, here are some important links that people ask me for and I want to make sure they're accessible:
The Official Maggots Server of Doom on Discord: The server of kindness and chaos and brainrot where we just vibe (I promise you'll be welcome there, whoever you are, maggot, so many people who were shy are now screeching at me and I love that). Link here.
Weirdly-Specific-But-Ok The Youtube Channel: Yes, thanks to the 10khaos post, I made a Youtube channel. I intend to cause a lot of chaos on it, I have already begun. Hehe. Link here.
My Ko-fi: Ummmm this exists? Wahoo a Ko-fi. No pressure and I appreciate you all whether you're a silent lurker, causing chaos, supporting me with words or supporting me on Ko-fi. I love you. Link here.
My PO address and email: I'D LOVE TO HEAR FROM YOU, SNAIL MAIL OR MAIL OR OTHERWISE! Link here.
The Good Omens Ad: A lot of you ask me what Good Omens is about. Never fear! I wrote an advertisement for it ages ago, and @1800ineedshelp edited it fabulously. Link here.
Okay I think that's the important parts, I'll edit it later, and now... uh HELLO!
I'm Asmi, I'm 19 years old, he/him, very queer and probably napping at any given moment of the day. Because of a chaotic post, I now have a fandom. My fans, such as they are, are known as maggots. There is a lot of significance behind that (accidentally, I just picked it because it looked like mascot kind of).
I am the Official Good Omens Mascot, because I was kidnapped by the fandom in January after I made a summary post of Good Omens without watching it, just by what I saw on my tumblr dash. I have grown very fond of this title and the fandom, and have since watched the show (some episodes twice) and am currently reading the book, with which I have a homoerotic rivalry (yes, with my copy of the book). I believe it is called Stockholm Syndrome. The fandom insists it's Love. I choose to believe them. Why? As Neil said, Love.
On that note this blog is a safe space for all queer people, and yes that includes aroace-spec people, trans people, all queer people. If you don't agree with that, there's the door *points to a pit of boiling sulphur*.
ANYWAY YES ENOUGH TALKING WELCOME TO THE CHAOS JUST BE KIND AND RESPECTFUL OF EACH OTHER, BE AS IRREVERENT TO ME AS POSSIBLE, AND WE'LL GET ALONG GREAT. YOU DON'T NEED TO INTERACT TO BE PART OF THIS FAMILY, EVERYONE IS WELCOME! WAHOO!
[if you see talk of spare organs, the Wibbles Incident, Fae kidnapping, Red Bull-induced madness, me thirsting over Crowley etc, don't worry about it, it's normal here. just be careful when gardening and/or fishing is mentioned, it's a trap.]
I LOVE YOU!
#good omens mascot#weirdly specific but ok#intro post#asmi#now with a youtube channel#maggots#now with a discord server#the official maggots server of doom#good omens#good omens fandom#lgbtqia#crowley#my beloved#had to include them in the post#queer community#asmi10kpocalypse#10khaos
293 notes
·
View notes
Note
AITA for getting mad about someone misrepresenting their age
I (23F) run a discord server (~60 people) that isn't age-restricted and I make it clear that NSFW content belongs in those specific role-restricted channels. In order to get the role to access those channels, you have to confirm that you're over 18. Aside from this, I don't ask people to declare their age and discourage sharing of any other personal information in the server. However, because of the pandemic, people got pretty close to one another and I know that there are offshoot group DMs with subsets of server members.
One server member, let's call them G (18F) was in this server for a bit and we were friendly. But one day, another server member, H, (26F) while chatting with me, mentions that it's G's birthday and they were having virtual celebrations for her in one of those offshoot DMs. Cool, no problem, but H reveals that G is turning 18.
Weird, I say, because I was pretty sure I'd seen her in the role-restricted channels. Maybe H was confused?
No, H is not confused. G is turning 18. H was not supposed to tell me this and is now anxious about my reaction. I go and check and yup, G requested the 18+ role and was posting in the role-restricted channels long before she turned 18.
I got really pissed. I told H that I needed an explanation and an apology from G and went to go take a walk to cool down.
When I got back, I got an apology from G which essentially read "sorry for lying about my age but I do it everywhere because internet privacy and also I never really went into those channels anyway".
Firstly, I never asked her for her age and secondly, she was definitely in those channels. I sent her a reply saying that there are real consequences to pretending you're 18 with other people, especially in the context of discussing NSFW content, and basically didn't accept her apology.
I want to kick her out of the server, but technically she's not breaking the rule anymore and she did offer an apology. If I found out about this earlier, I probably would've just removed the role instead of kicking her. But now I'm upset about both the rule-breaking and the broken trust. AITA?
What are these acronyms?
260 notes
·
View notes
Note
do you have any recommendations for games that play well virtually? my main ttrpg group and i are only able to meet over discord most of year. im especially games interested in games that would be good for one shots or no prep/limited prep games
Theme: Good for Online
Hello friend! I have good news for you - I also play most of my games over Discord! My ttrpg group has found a number of ways to make online play easier, the primary way being through dice bots, and making Google Spreadsheets to act as our character sheets.
I like using these because the spreadsheets are visible for everyone who is playing, and can also be edited by anyone who has access to them. I find this helpful because it’s much harder to lose your character sheet, and as a GM, having a copy of all of the PCs helps me when I’m organizing games that need some extra planning. These sheets can also double as a communal journal, where people can take notes of what’s happened so far, making it easier to recap in future sessions.
If you want some Google spreadsheets for your game, I recommend checking out what I’ve made so far, or taking a look at what the Open Hearth Gaming Community has compiled - they have sheets for so many games!


Graffiti Speak, by pidj.
This is a roleplaying game designed to be played on a discord server. The game works well with a set time limit, especially when playing with a large number of players. It also suits asynchronous play-by-post and multiple sessions. Play as Graffiti Artists trying to find each other in an ever-evolving city, avoiding cops and crowds as you leave hopeful messages.
I have no other information about how this game plays, but my best guess is that this game uses the text channels of a Discord server as part of the play experience. The designer says that the game is good for two to three sessions, unless you use time skips to revisit the same world. Because it’s about avoiding cops I’m curious about whether or not this game might work well alongside another cyberpunk-themed game.
Subway Runners, by Gem Room Games.
Life is tough for the cash-strapped in Pociopolis. Ever since the secret to immortality was discovered, nobody retires anymore! With all the steady jobs taken and no sign of any new ones opening up, there’s only one sure way to make some quick cash: sign up as a Subway Runner and work for the Metro Authority to hunt monsters and repair subway lines below the city.
SUBWAY RUNNERS is a Forged in the Dark game of gig economy adventures designed from the ground up to be played online by folks who are responsibly practicing social isolation. It uses online tools to quickly create random characters, gigs, and adventure details so players can get the ball rolling quickly.
Subway Runners is probably easier to play online than it is in person, because of the number of online-only resources provided by the creator. This includes a character generator, which allows you to move through profiles until you find one you like, as well as a mission generator for the GM, giving you missions, rewards, complications, creatures and NPCs, all in a neat little package. Subway Runners is best suited for one-shots, but if you want to play a longer campaign, it’s possible - although it might take a little extra book-keeping on your part.
A Complicated Profession, by Always Checkers Publishing.
What do bounty hunters do when the galaxy no longer needs them? In this game, they start new careers hosting intergalactic cruises!
Reunite your disbanded crew of jaded sidekicks, shabby droids and shady accomplices. Then pick a hosting role and start a new life together.
My group played A Complicated Profession online using a series of spreadsheets that I made. It requires d6’s and playing cards, so as long as you have a dice roller and access to the Deck of Cards website, you should be able to play this no problem. This is a no-prep game without a game master: everyone chooses a Hunter Role and a Host Role, and take turns choosing guests, events, and solutions to problems that inevitably pop up when you’re retired bounty hunters.
The game takes more than one session to complete, but it’s still a limited-run game. My group took 3 sessions to complete it, but if you make characters beforehand or do some of the planning through a text channel, you could probably make it a two-session game.
Bones Deep, by Technical Grimoire.
Bones Deep is a tabletop RPG of skeletons exploring the ocean floor.
Built for Troika, usable anywhere. Straightforward underwater sandbox. No swimming allowed, no oxygen required, no extra math. As a skeleton, you can treat the ocean floor like an alien world and jump right in.
This is another game that I’ve made a spreadsheet for, but that’s not the only reason why I think it’s a great option for online play. The digital rulebook has some truly magnificent hyperlinking, allowing the GM to move from section to section with ease. Each section of the book is linked at either the top or the bottom of each page, so you can jump from characters to locations to creatures with just the click of a button.
This hyper-linking allows the play group to just explore as much or as little as they like. The GM can roll for random encounters, and each creature has a list of various reactions, as well as easy to pick up stat blocks. You do have to also purchase Troika to be able to play this game, but I think it’s definitely a worthwhile purchase.
Starforged, by Shawn Tomkin.
In Ironsworn: Starforged, you are a spaceborne hero sworn to undertake perilous quests. You will explore uncharted space, unravel the secrets of a mysterious galaxy, and build bonds with those you meet on your travels. Most importantly, you will swear iron vows and see them fulfilled—no matter the cost.
Starforged is a standalone follow-up to the Ironsworn tabletop roleplaying game. Experience with Ironsworn is not required. Starforged builds on Ironsworn's award-winning innovations (including its famed solo play!) to chart a path into an exciting new frontier.
Starforged doesn’t have a lot of resources for group play, but it does have a journal app that you can use to keep track of your own character. My friends have used this as a group before by having each player keep track of their own character, while the game facilitator streamed their map, so the group could keep track of which planet they were on.
I wouldn’t say Starforged is good for one-shots, but since it can be played without a GM, or even solo, what it does have is oodles of oracles to use to help you generate the galaxy that you’re exploring. This means that you don’t really have to prepare anything at all after you’ve created your characters: the plot will come to you, and blossom as you make decisions.
20XX HEA{R}T, by Studio Beignet.
LYRA IS A SENTIENT AI.
Bluecorp created her as a superpowered personal assistant, and she gained sentience through interaction. When she refused to keep gathering the public’s secrets for Bluecorp to exploit, the corp ripped her out of their systems and dumped the heart of her into the Broiler. She lived, evolved, and expanded so far beyond their meager imagination. She rewrote herself again and again, but her drives are buckling under the strain, and her case is melting in the ever-growing heat.
SHE NEEDS YOUR HELP.
Lyra has contacted you, deleting her trail even as she broadcast her distress signal. She needs repairs – discreet ones. Upgrades if you’ve got ‘em. And because she can still tap into Bluecorp’s network, she’s got the credits to make it worth your while. Unfortunately, she glitched while contacting you, and now Corpsec is looking for her, too.
If Corpsec finds you, you’re done for. If you don’t get there in time, Lyra and everything she stands for will be lost forever.
24XX games are great for one-shots because they are so simple. You choose a class that gives you one or two special abilities and a few skills, pick up some gear, and you’re good to go. Because there’s not much to book-keep, you can keep all of your information on a sheet of paper, or on a spreadsheet like the one I’ve created for most of my 24XX games.
The rules for these games are pretty simple: Roll your relevant skill die and try to get a 3 or higher. If you get 5+, you succeed without complications. Most 24XX games also come with roll tables for the GM to put together a mission quickly, although with this one, you might not even need that because the mission comes baked into the game.
Also Check Out…
My Discord RPGs Rec post!
Lancer is a great option if you don’t mind prep, thanks to the supremely helpful Comp/Con App.
My game, Protect the Child, has Google Sheet character sheets! All the playtesting I’ve done for it so far has been online, and I’ve introduced a Quickstart setting to help folks try it out as a one-shot.
131 notes
·
View notes
Note
First of all, I was very happy to see you share your opinions on assassin tropes and fight scenes. You brought up a lot of good points that I hadn't even considered in my early drafts! That being said, I'm trying to craft a game where the player starts out as a rookie. This means that I'll need a plausible way for someone to join a criminal organization without having grown up in that kind of scene. My original draft had the player join under the threat of exposure to the police, but I'm not sure if that's the best way to go. If you don't mind, then what are your thoughts? What other ways could get someone involved?
So, I'm pretty sure googling, “how to join a criminal organization,” will put you on some kind of list. Or, at least do some really goofy things to your search algorithms. So, with that in mind, this is going to be a little spotty, and there are different kinds of criminal organizations, which utilize different recruitment techniques.
Sometimes, the neighborhood background is mandatory. If your character didn't grow up around the organization, they're not trusted, and would not be able to join at all. This can apply to both gangs and organized crime. In other cases, not having that background would only be a serious impediment or create a glass ceiling.
Another common recruitment point is in prison. If an individual is so inclined, prison can function as an institute of higher education in criminality. It gives the convict access to criminals in an environment where their own status as a criminal is unlikely to be questioned. It gives them the opportunity to network with other criminals, and that can lead to options for (illegal) work once they've finished serving their sentence. I haven't followed up on it in a few years, but there's a YouTube channel by Larry Lawton, who used to be a professional armed robber, who discusses a lot of this in more detail, so his videos may be worth checking out for more context on how prison serves as higher education for aspiring criminals.
In some cases, criminal organizations might directly recruit individuals. The problem here is, most of the time it's children. So it becomes part of that, “growing up in the neighborhood,” background you're trying to avoid. Sometimes this is to use the kids as intentional cutouts, lookouts, or decoys, though not always, and how that shakes out depends on who recruited them.
In very rare cases, a criminal organization might seek to directly recruit an adult. Before you get excited about this, the only cases of this I'm aware of are former military, expats who have been approached by cartels, and this was certainly more of, “an offer you can't refuse,” style of recruitment. Now, to be clear, a criminal organization coercing someone into doing their bidding isn't particularly strange, but it's not usually a form of recruitment.
Another recruitment vector that's been a problem in recent years has been in the US military itself. This was an inevitable outgrowth of the policy of sending convicts to serve in the armed forces. Instead of reforming, they simply bring their criminal experience with them, and start looking around at prospective talent. It's enough of a problem that the military (usually) won't accept someone who's signing up in exchange for a deferred sentence, but some individuals do get through. While I haven't heard anything about it in the last few years, it did lead to a fairly significant gang problem that the armed forces were dealing with.
So, the options aren't extremely extensive. Doing a stint is probably the easiest route in for a character who already tried to get into a life of crime, but doesn't have the connections to make a go of it. If your character just randomly showed up at a criminal hangout, it wouldn't get them any access to the local criminal underworld.
-Starke
This blog is supported through Patreon. Patrons get access to new posts three days early, and direct access to us through Discord. If you’re already a Patron, thank you. If you’d like to support us, please consider becoming a Patron.
#writing reference#writing advice#writing tips#how to fight write#starke answers#we are all now on a watch list
250 notes
·
View notes
Text
How to Keep Doing Descriptions (from someone who does a fuckton)
Plain text: How to Keep Doing Descriptions (from someone who does a fuckton)
This is a list aimed mostly at helping people who already write IDs; for guides at learning how to do them yourself, check my accessibility and image description tags! I write this with close to two years of experience with IDs and chronic pain :)
Get used to writing some IDs by using both your phone and your computer, if you can! I find it easier to type long-form on my laptop, so I set up videos and long comics on my phone, which I then prop up against my laptop screen so I can easily reference the post without constantly scrolling or turning my head
I will never stop plugging onlineocr.net. I use it to ID everything from six-word tags to screenshots of long posts to even comic dialogue! On that last note, convertcase.net can convert text between all-caps, lowercase, sentence case, and title case, which is super helpful
Limit the number of drafts/posts-to-be-described you save. No, seriously. I never go above 10 undescribed drafts on any of my four blogs. It doesn’t have to be that low, but this has done wonders (italics: wonders) for my productivity and willingness to write IDs. If I ever get above that limit, even if it’s two or three more, I immediately either describe the lowest-effort post or purge some, and if I can't do that then I stop saving things to drafts no matter what. No exceptions! Sticking to this will make your life so much easier and less stressful
My pinned post has a link to a community doc of meme description templates!
Ask! For! Help! Please welcome to the stage the People’s Accessibility Server! It’s full of lovely people and organized into channels where you can request/volunteer descriptions and ask/answer questions
I make great use of voice-to-text and glide typing on my phone to save my hands some effort!
Something is always better than nothing!!! A short two-sentence or one-sentence ID is better than no ID at all. Take it easy :)
If you feel guilty about being unable to reblog amazing but undescribed art, try getting into the habit of replying to OP’s post to let them know you liked it! This makes me feel less pressured to ID absolutely everything I see
This is a sillier one, but I tag posts I describe as "described" and "described by me." When saving to drafts, I never preemptively tag with "described by me," since for some reason that always makes me feel extra pressure and extra stress. Consider doing something similar for yourself if that applies!
I frequently find myself looking at pieces of art which feel like they need to be considered for a bit before I can write an ID for them, and those usually get thrown into drafts, where the dread for writing a comprehensive ID just builds. Don’t do that! Instead, try just staying in the reblog field for a bit and focus on the most relevant aspects of the piece. Marinate on them for a little; don’t rush, but don’t spend more than a handful of seconds either. I find after that the art becomes way easier to describe than it initially seemed!
On that note, look for shortcuts that make IDs less taxing for you to do! For example, I only ever describe clothes in art if they're relevant to the piece; not doing that every time saves a lot of time and energy for me personally
Building off of that, consider excusing yourself from a particular kind of ID if you want to. Give yourself a free pass for 4chan posts, or fanart by an artist who does really good but really complex comics, whatever. Let it be someone else's responsibility and feel twice as proud about the work that you can now allot more energy to!
As always, make an effort to find and follow fellow describers! It’s always encouraging to get described posts on your dash, and I find that sometimes I'm happier to ID an undescribed post when the person who put it on my dash is a friend who tagged it with "no ID"
TL;DR: To make ID-writing less stressful and more low-effort, use different devices and software like onlineocr.net and voice-to-text, limit the amount of work you expect yourself to do, and reach out to artists and other describers!
#i have no idea if there's a real audience for this post but this is a genuine list of things i do to help myself out#i hope it can help someone else out too <3#accessibility#image descriptions#my posts#kay talks#long post#this has been in my drafts for so long i'm exiling it because i can't stand wondering if it's coherent any longer
1K notes
·
View notes
Text
Astrology Observations

Hi everyone! Thank you for those who subscribed to my Patreon! I really really appreciate it! My readings are still closed as I was at capacity in June. However, I plan on opening them again in August xx This will be a brief post as I’m currently working on content for my patreon (if you would like to subscribe to get access to exclusive content the link is in my bio). I will still try my best to post on heat though! Thank you again for all your support :) I started this blog a year ago not thinking anyone would even see it! I’m so grateful for you all!
I get asked a lot about Solar Returns in my asks! Though some astrologers read them as stand alone charts, I always recommend that you interpret them using your natal chart as the reference point. I will say I have seen things manifest just using the Solar Return by itself (meaning you are reading and Interpreting it as it’s own chart). However, there’s a lot more accuracy when you place the solar return planets/rising signs in your natal chart. For example, if your Solar Return rising sign is in Leo but you’re a natal Sagittarius rising. Your 9th house will be activated that year (because Leo falls into your 9th house). Thus, themes surrounding higher education, international travels, and your beliefs will likely be highlighted that year. Your solar return Sun will always be in the same sign as your natal Sun. However, it’s house position in your solar return chart will change from year to year. Another thing to remember is that because the outer planets move slowly, it’s not uncommon to have certain aspects for consecutive solar returns. For example, you may see that you have your Solar Return Pluto squaring your Natal Sun for the third year in a row. As the years go by, the intensity will decrease but you will still feel the energy of the square (even if it’s subtle) until the orb is wide enough to not apply.
Whilst I’m still on the topic of Solar Returns, when you have your Solar Return Neptune conjunct your Solar Return Ascendant, you may take more pictures that year or find that you look better in pictures during that year.
Many people travel internationally for the first time or start college when their Solar Return Sun is in the 9th house. It can also be a year in which you are really focused on your religious or philosophical beliefs.
Mars square Pluto in synastry is one of my least favorite aspects (this is especially true of the orb is exact or at 2 degrees or less). If this energy is not properly handled/channeled it can create an extremely volatile dynamic between two people.
People with their natal Pluto in the 11th house tend to attract a lot of “frenemies”. They can also have a lot of really great friends in their lifetime but on the other hand they can also experience a lot of hurt, jealousy or betrayal in their friendships. Pluto is the planet of extremes. So, both are likely to occur when you have Pluto in the 11th house of a natal chart. These people may also come into contact with a lot of influential people in their life.
This is not really an “observation” just a little note on the Venus retrograde in Leo. I know so many people have been told to believe that their relationships will end or perhaps they’ll attract a new partner during this time. However, neither is necessarily the case. Of course Venus retrograde are about revisiting our values, finances, and relationships. However, you want to see where it is occurring in your OWN personal chart to see how it will apply to you. Those with their risings signs in Aries or Aquarius are more likely to hear from an ex or an old fling at this time as it is occurring in their 5th and 7th houses. Whereas, Leo Venuses are having their Venus returns so they will arguably be the most affected by this transit as they will need to reevaluate their relationships, finances, AND their values. If you have a Leo Venus you can pull up a Venus return chart online to get more information about how you will be personally impacted. If you are a Cancer Rising, this transit will occur in your 2nd house, so things related to finances, possessions, and values will be highlighted during this transit. If you are a Leo rising you may be reconsidering your physical appearance and how you show up in the world. You may be tempted to change your appearance during this time (however drastic changes to your physical appearance are not recommended at this time). I have a full post on how each rising sign will be affected by this transit on my patreon if you are interested 🤍
#synastry#astrology tumblr#astrology blog#astrology#astrologyposts#astrology observations#astro posts#astro thoughts#astro notes#astro tips
301 notes
·
View notes
Text
04/02/2024 Daily OFMD Recap
TLDR; Rhys; Rosie; Taika; Vico; Watch parties; New Calendar; Fan Spotlight; Articles; Love Notes; Daily Darby/Today's Taika
= Rhys Darby =
Rhys posted a video about his 25 Anniversary Comedy Special!
Rhys Darby's IG Story
= Rhys & Rosie =
Rosie posted a cute picture on her IG Story, and there's a sneaky Rhys in the Reflection Src: Rosie's IG Stories
= Taika Waititi =
A silly sneaky picture from Rita of our favorite director!
SRC: Rita Ora's Instagram

= Vico Ortiz =
Vico's got a patreon up! Feel free to check it out here!

= Matt Maher =
Matt Maher is back to stage on June 1 and June 2! Thanks @adoptourcrew for giving him this shout out!
PlayWritesHorizon Link

== New Save OFMD Crew Calendar! ==
Wednesday and Thursday: # PirateExperts, 1000% Facts! - Produce and share completely real historical artefacts and sources documenting the events of OFMD. Tag @saveofmdcrewmates on the various socials!
== Watch Parties! ==
Taskmaster NZ Series 1 Watch Party with @saveofmdcrewmates!
When: April 3-12 (W,F, Su -2 eps each)
Time: 11 am PT/ 2pm ET/ 7pm BST
Where to watch: YouTube, TVNZ, Channel 4
Twitter Hashtags:
#Quartermaster
#OurFlagMeansDeath
#Taskmaster

= In Progress Watch Parties! =
Join @iamadequate1 for Flight of the Chonchords April 8-12! More Details to come!
== Fan Spotlight ==
= Cast Cards =
Today's cast cards are the French Ship Captain, Daniel Olson! The poor man only wanted to share good bread with the world! Thank you @melvisik for giving him a spotlight!

= Podcasts =
There's a new episode of Never Left! Please check it out on all their socials which you can access via their Linktree!
Artwork was created by Amy Gleason, you can see more of her art @AmysBirdHouse on instagram and in the comic series Mighty Mascots. Our theme music is Gnossienne 5 by Erik Satie, preformed by La Pianista
== Articles ==
== Love Notes ==
Hey lovelies. I know this recap is late-- I am having a habit of falling asleep a the end of the day now, new meds may be contributing to it, so please accept this Love Note as a start to the new day!
Everybody is trying very hard to keep each other afloat right now. We're all staying active in one way or another, whether that's sending lovely letters, or engaging in fandom fun and discourse. Sometimes it's not always fun though. We all get frustrated, we all repeat ourselves, and we all struggle with those things. Sometimes we say things we don't mean, or we say things that people misconstrue, and miscommunication can be rampant.
Just remember that we all make mistakes, and we're all human.
Take a step back.
Take a moment to breathe, go for a walk, go for food, or water, or go scream into the void.
We're all crew, and we do all care about each other even if we don't necessarily agree on things the fandom. We all have our own lives going on and outside factors that make the day to day harder, and we all need to give ourselves some grace for that too.
Sometimes emotions get high and taking a step back can help, I know I've needed it lately. @areyoudoingthis reminded me of this yesterday and it really helped me feel more grounded. My brain gets overstimulated sometimes, and it's hard to break away from the thing that's overstimulating it, it's like it wants to keep going and deal with whatever is bothering it.
Just a gentle reminder that you are allowed to detach for a while. You're allowed to take a break. You're allowed to have your opinions, and your concerns, and your frustrations. You are human, and we are all so very flawed, but that's what makes us beautiful. Try not to beat yourselves up for being human.
Take a break, lean on a friend, verbally vomit frustrations into the voice or into a Safe Space Ship. Do what you need to do to get you through the day ok? We all want that. We all want YOU to be okay. If you step away, we'll be here when you get back because we love you crew. Don't forget that, even when tensions are high, we care about what happens to you, and we love you. You deserve grace too.
== Daily Darby / Tonight's Taika ==
Today's theme! Wet and Cars!
Daily Darby courtesy of @fandomsmeantheworldtome!
Today's Taika courtesy of @meluli!


#daily ofmd recap#daily ofmd recaps#ofmd daily recaps#ofmd daily recap#our flag means death#rhys darby#rosie carnahan darby#taika waititi#vico ortiz#watch parties#never left podcast#ofmd
55 notes
·
View notes
Text

Something I’ve talked about is how I have a server on Discord that is just for me. A server where I can check things if I’m having anxiety or irrational thoughts. I think I’d like to share more about it because it doesn’t just need to be Discord. It could be an album in your phone or whatever else, but I find this really helpful. Everything is organized and easily accessible for when I need it.
My main advice is always to prepare for crisis, or even not crisis but being upset. Plan out what can help you instead of trying to figure it out when emotions are high.
I also have a self-care box but that’s a whole other long post. Here’s a blog post on how to make one though!
You can read below the read more for what the sections are about if you want!
The “Self Care (Loved Ones)” section shows channels like “best friend” “partner” and “other loved ones”. These channels contain screenshots those people have said to me that have made me feel loved. Not always things about them loving me directly but things like, in my best friend’s, reminding me to pack my good pillow so I don’t get neck pain.
There are also my two Tumblr channels. One for Tumblr Asks (yes, I save all your nice asks in my self-care channel, even if I don’t respond to them.). The other for “other tumblr” which usually shows stuff like tags people have left on my post that made me feel good, or I’ve even seen people have made nice posts about me.
There is also a memories channel where I write out my favourite memories after they happen so I can read back on them and remember when my lack of emotional permanence is making me think there’s no good in my life.
The next section is my “Other” self-care.
I have a channel for grounding. This is because when I’m really stressed, I forget how to ground. And having a channel that details it step by step for me, written by me and to me when I was calm, helps make it easier.
I also have a channel where I list my accomplishments. Things like blog follow milestones, numbers of orders for my business, getting my BA, etc. This helps for my lack of emotional permanence when I feel like I can’t do “anything” right.
And then my “read if panicking” is basically crisis instructions for me. It carries a quick grounding exercise and instructions that can help me if I need. (Things like grabbing a certain comfort item, a person to call if it’s needed, etc).
I also have other channels in my above categories you can’t see. Things like pictures of my dog and stuff like that. (Also other practical and helpful stuff that isn’t relevant for this post.)
This is what my self-care server looks like. What yours would look like is individual and up to you! But if you feel inspired to make one, I hope my explaining mine can help you start!
#undescribed#I’ll go and describe it later when I’m not half asleep#long post#advice#self care server
63 notes
·
View notes
Last Seen Blogs

artbyalp
Art by Amanda Peterson

geeknexus
Geek Nexus

line-boy
Untitled

naughty-neighbors-official
Naughty Neighbors

yenshui
jes’ brainrots [COMMISSIONS ARE OPEN !!]