#dessert recipe
Text
Wednesday, November 22.
Dessert.
For those that save the best until last. Dessert is trending, and this can only be a good thing. Perhaps the very sweetest thing. So, in that spirit, behold this array of sweetest things to help you on your way, this Wednesday, November 22.
We invite you this morning, those sweet of teeth, to peruse our wares of the finest sugary delights: macarons, cakes, doughnuts, and croissants. All of it too pretty to eat, but too tasty not to.
@lustingfood
#today on tumblr#dessert#cookies#chocolate#dessert recipe#dessert art#food#foodblr#food porn#foodie#food tw#food mention#recipie#dessert aesthetic#dessert cakes#pancakes#yum#tasty#delicious#comfort food#tw: food#tw food
851 notes
·
View notes
Text
Thousand Layer Apple
RECIPE:
Makes 1:
1 large honeycrisp apple
3-4 tbsp melted butter
1 tbsp dark brown sugar
1 teaspoon cinnamon
Peel and core your apple, then carefully slice into 1/16” slices with a knife or mandoline (the one we used here is linked on our amazon page).
Combine melted butter, sugar, and cinnamon in a medium mixing bowl. Coat each slice with melted butter mixture and stack in a ramekin until you reach the top. Be sure to press down on the layers a few times throughout stacking and pour out the excess liquid back into your bowl.
Once you’ve reached the top of your ramekin, move to a 400˚F oven for 10 minutes. After 10 minutes, carefully pour out the excess liquid in your ramekin and top your stack with a piece of puff pastry brushed with egg wash. Return to the oven for 20 minutes.
For best results, let it cool completely before serving. Loosen your stack from the ramekin with a butter knife, and serve upside down with ice cream.
{watch}
474 notes
·
View notes
Text

Your guests will think you really fussed with these Mini Pumpkin Cheesecakes! Individual creamy, dreamy mini pumpkin cheesecakes are topped with sweetened whipped cream and a gingersnap cookie topping. They’re super simple, so impressive and versatile!
https://www.fromachefskitchen.com/mini-no-bake-pumpkin-cheesecakes/
#cooking#food#recipe#chefblr#chef#fromachefskitchen#kitchen#pumpkin#pumpkin recipes#dessert#dessert recipe#easy dessert
296 notes
·
View notes
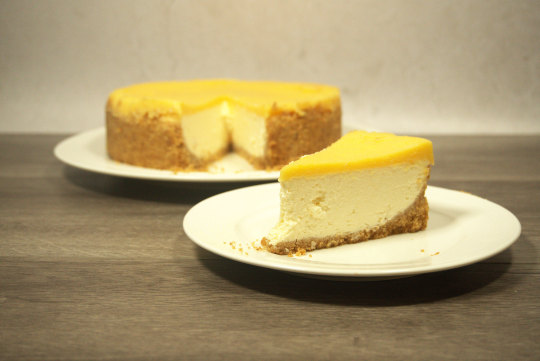
Text

Cheesecake Recipe˚ ༘ ೀ⋆˚
I don't know if you know this but I adore baking. I always try to make time in the month to bake something in the kitchen. I'll share with you the first recipe I learned by heart, no bake cheesecake!
Ingredients
For the cookie base
400g of regular biscuits
2 or more tablespoons of butter
For the cream
400g of cream cheese
200g of cream (not low-fat I made that mistake before the result isn't pleasant)
100g of (preferably powdered) sugar
Half a teaspoon of vanilla extract
Toppings
You can use anything as a topping! Fruit, chocolate, jam, you name it!
Instructions
Crush biscuits into powder and put them in a bowl.
Melt the butter, either in the microwave or in a pot
Mix biscuits and butter and lay mixture in a pan. It can be one of those where the sides come off or any regular one.
Place pan in the fridge for a little bit
Mix cream cheese, cream, powder sugar and vanilla extract
Take pan out of the fridge and place the mixture on it. Put it in the fridge for 30 minutes
Take it out and place any topping you wish. Redrigirate overnight
Tip! Don't hesitate to use a lot of butter! Make the mixture look like dough. If it is too powdery, the cream mixture will stick to it and they will mix together instead of spreading.
I really hope you enjoy this recipe if you try it out! It's very very easy and very very delicious! Have a good day/night!!

#self care#self growth#selfcare#productivity#self love#girlblogging#daily blog#love#bakinggoodness#baking#baking recipes#cheesecake#recipe#dessert#dessert recipe#delicious#sweet#bake with me#aesthetic#cute#text post
52 notes
·
View notes
Text
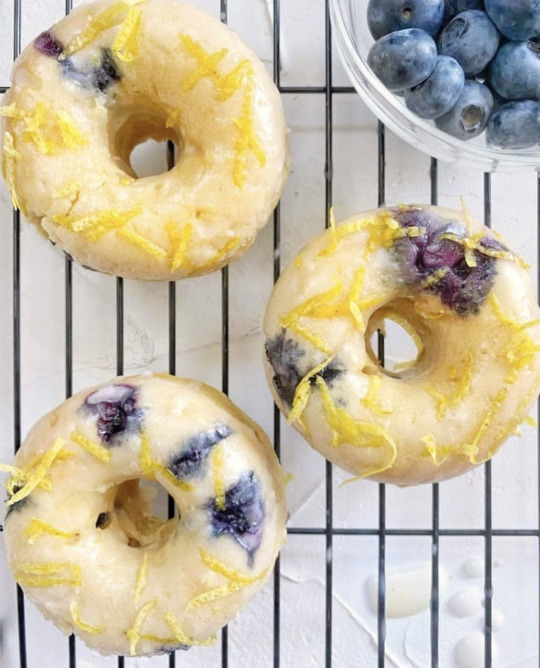
Lemon-blueberry donuts (x)
#it’s spring so I’m back on my blueberry lemon bullshit#blueberry lemon donuts#lemon blueberry recipes#lemon donuts#lemon donut recipe#blueberry donut#blueberry donut recipe#lemon blueberry donuts recipe#lemon blueberry#lemon#blueberry#lemon recipe#blueberry recipe#donuts#donut recipe#homemade donuts#homemade baked goods#baked goods#baking blog#baking blogger#food#food blog#recipe#yum#baking#dessert#breakfast ideas#breakfast#dessert recipe#breakfast recipe
39 notes
·
View notes
Text
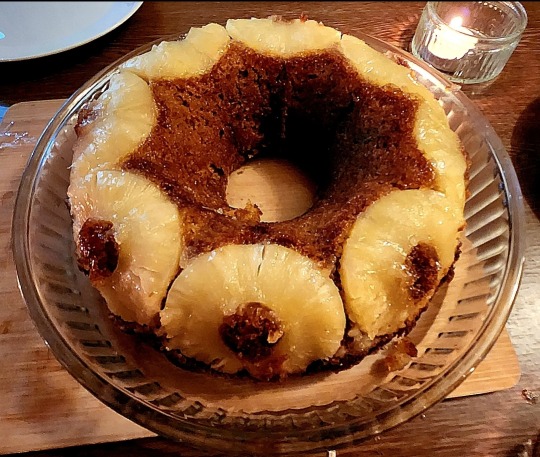
Bantha Pineapple Cake
The Feast of the Tiger is a holiday celebrated by the people of the Banthan Jungle of Hammerfell on 14th of Last Seed. As a thanksgiving celebration, desserts are certainly plentiful, like this upside down pineapple cake. Its appearance has lent the cake its nickname: the sweetroll of Hammerfell.
You will need:
2 tbsp butter, melted
3 tbsp sugar
1 can (6) pineapple rings, well-drained
225g butter
225g flour
225g sugar
1 tsp baking powder
3 eggs
1 tsp vanilla extract
1 tsp cinnamon
Method:
Preheat your oven to 180C/356F.
Whisk the melted butter with the 3 tbsp sugar and use a basting brush to coat the inside of a large bundt tin. Lay your pineapple rings side by side until the tin is fully lined.
In a large mixing bowl, beat together the butter and sugar until light and fluffy. Add the eggs one at a time until totally combined. Sift in the flour, baking powder, and cinnamon and vanilla extract.
Beat the cake mixture until uniform in texture, it should be rather thick and batter-like. Spoon the cake mixture over the pineapple rings and use a spatula to even out the surface.
Wrap the tin with aluminium foil and bake on the middle shelf for 45 minutes. When the timer's up, leave the cake to rest for about 10-15 minutes before placing a large plate on top and quickly but firmly flipping your bundt tin over. The cake should come out easily.
Leave to cool for a further 10-15 minutes before serving. Great with custard or ice cream!
#the elder scrolls#tes#food#cooking#Cake#Recipe#Recipes#cake recipes#Dessert#dessert recipe#Hammerfell#Bantha#Pineapple#World building#Worldbuilding
164 notes
·
View notes
Text
Hey y'all, here's my recipe for Apple Blackberry Crisp! It's great warm or cold, by itself, or with ice cream or yogurt. Somehow I managed to make it sweet enough to please my partner's massive sweet-tooth, but not make it too sweet for me. Link to recipe, and it's under the cut. (Both imperial and metric measurements are given.)
Apple Blackberry Crisp
Significantly modified from the apple crisp recipe in The Oh She Glows Cookbook by Angela Liddon
Filling:
about 4 cups / 1 L peeled and chopped apples
about 3 cups / 750 ml cut blackberries
(In total you need 6–7 cups / 1500–1750 ml of fruit, but it doesn’t need to be exact. I used 2 granny smith, 1.5 gala apples, and 2.5 packages (½ pint / 170 gm) of blackberries to get the amounts above)
1 tablespoon / 15 ml cornstarch or arrowroot powder
1 teaspoon / 5 ml ground cinnamon
¼ cup / 60 ml brown or raw or coconut sugar
(or ⅓ cup / 75 ml if you want it sweeter)
1 tablespoon / 15 ml lemon juice
Topping:
2 cups / 500 ml rolled oats
½ cup / 125 ml almond flour/meal
(you can also use regular flour, I just like how almond flour tastes in the topping)
1 teaspoon / 5 ml ground cinnamon
¼ teaspoon / 1.75 ml fine grain sea salt
¼ cup / 60 ml butter or margarine or coconut oil, melted
(they all work well, so pick whatever you have on hand or prefer)
3 tablespoons / 45 ml maple syrup
(or ¼ cup / 60 ml if you want it sweeter)
Instructions:
1) Wash and dry the fruit.
2) Preheat oven to 375 F / 190 C.
3) Grease an 11 x 9 inch / 2.5 L baking dish with butter, margarine, or coconut oil.
4) Measure out the dry ingredients for the filling and the topping in two separate bowls. Put whatever fat you’re using for the topping in a heat-proof bowl and set it by or above where the oven vents to melt it. (Or melt it in the microwave just before you mix the topping.)
5) Peel and chop the apples, cut up the blackberries, and place them in a large bowl. I cut the apple pieces fairly small and the blackberries in two to four parts, depending on how big they are. But go with whatever size you want as long as it’s fairly consistent.
6) Add part of the dry filling ingredients and part of the lemon juice to the fruit and mix, repeat a couple more times until it’s all thoroughly mixed together, then put into the prepared baking dish, spreading evenly.
7) If you haven’t set the fat for the topping to melt by where the oven vents, then melt it in the microwave. Thoroughly mix the maple syrup, and the fat into the dry topping ingredients. Spread overtop the fruit mixture in your baking dish.
8) Cover with aluminum foil with some holes poked in with a fork or knife. Bake for 35 to 45 minutes, or until the apples are just fork tender. Remove the foil and bake for another 10 to 15 minutes, or until the topping is a nice golden brown.
9) Once removed from the oven, let it stand for 10 to 20 minutes before serving so the juices firm up some and it’s not so runny.
10) Keeps well in the fridge for a few days, though it probably won’t last that long! It tastes good cold, but you can always rewarm it in the microwave, or cover it with foil and put it back in a 375 F / 190 C oven for 10 to 20 minutes, until warmed through.
Note: Play around with other fruit combinations, or just go with classic apple. Though you probably want to use a little more cinnamon if it's just apple. Try cardamom or ginger instead of cinnamon. If you try apple cranberry, I suggest you use less cranberries than the amount of blackberries I called for, and use the larger amounts of sweeteners. The larger amounts of sugar and maple syrup are what the original recipe called for, but I have a low tolerance for sweet so I reduced it a bit. My partner, who has a huge sweet tooth, still loved it.
#I made this New Year's Eve and typed up the recipe but forgot I was going to post it lol#ngl when we fished this off a few days after I made it both my husband and I were sad!#I've served this to guests a few times and it's always a hit!#sometimes I have it for breakfast with plain yogurt and some hemp hearts which is delightful#apple blackberry crisp#recipe#dessert recipe#baking#vegan recipes
21 notes
·
View notes
Text
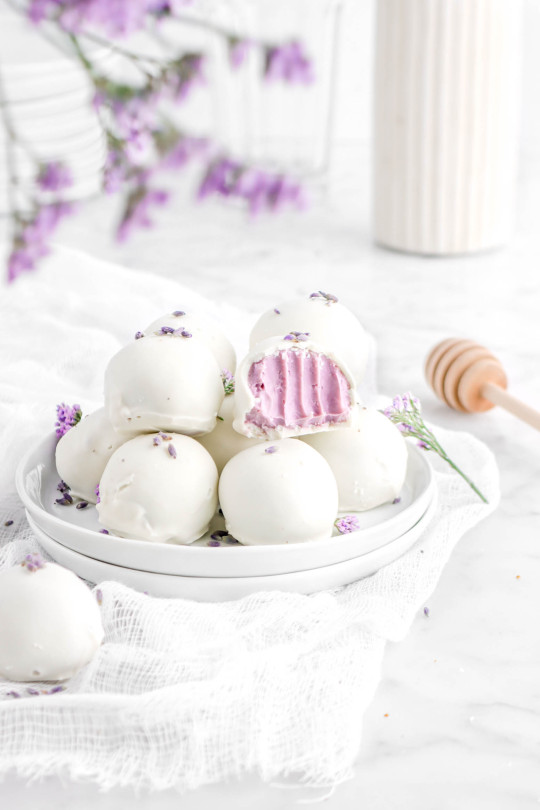
Honey Lavender White Chocolate Truffles
#truffles#truffle#white chocolate#chocolate truffles#lavender#ganache#chocolate#no bake desserts#no bake dessert#no bake#dessert recipes#dessert recipe#desserts#dessert#gluten free foods#gluten free#honey#foodie#food#delicious#sweets#bakertable
585 notes
·
View notes
Text
11 notes
·
View notes
Text

#crock pot recipes#slow cooker recipes#crockpot recipes#crockpot#brownies#dessert recipe#crockpot dessert#slow cooker dessert
8 notes
·
View notes
Text
Stovetop Chocolate Cake
130 grams (1 cup) all-purpose flour
29 grams (⅓ cup) cocoa powder
1 teaspoon baking soda
¼ teaspoon table salt
198 grams (1 cup packed) light brown sugar
2 large eggs
1 teaspoon instant espresso powder
1/2 cup sour cream
6 tablespoons (¾ stick) salted butter, melted
1 1/2 teaspoons vanilla extract
01
Cut an 18-inch length of foil and gently scrunch together to form a snake about 1 inch thick. Shape into a circle and set on the bottom of a large Dutch oven. Add enough water to reach three-quarters up the coil. Mist the bottom and sides of a 9-inch round cake pan with cooking spray, line the bottom with a round of kitchen parchment, then coat the parchment. Place the prepared pan in the pot on top of the foil coil.
02
Sift the flour, cocoa powder and baking soda into a medium bowl, then whisk in the salt. In a large bowl, whisk the sugar and eggs until slightly lightened, about 30 seconds. Whisk in ½ cup water, the espresso powder, sour cream, butter and vanilla. Add the flour mixture and whisk gently until just combined.
03
Pour the batter into the prepared pan. Cover and heat on high until the water boils. Reduce to low and steam, covered, until the center of the cake is just firm to the touch, about 23 minutes.
04
Turn off the heat and remove the lid. Let stand until the cake pan is cool enough to handle. Transfer the pan to a wire rack, then run a paring knife around the edge of the cake to loosen. Let cool completely. Invert the cake directly onto the rack, lift off the pan and remove and discard the parchment. Re-invert onto a serving plate. {read}
#tiktok#recipes#recipe#tiktok recipes#177 milk street#cake#chocolate#chocolate cake#cake recipe#dessert recipe
64 notes
·
View notes
Text
[source]
snickerdoodles by bdyllanhollis
#snickerdoodles#bdylanhollis#dessert recipe#if someone can type out the recipe i am eternally grateful!#thesixthcrow
43 notes
·
View notes
Photo
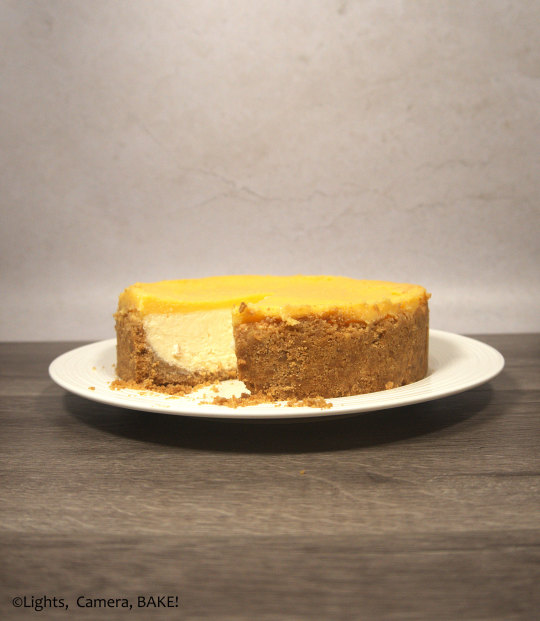
Baked Lemon Cheesecake
https://www.lightscamera-bake.com/baked-lemon-cheesecake/
#lights camera bake#baking#baking blog#blog#blogger#food blog#Food Network#lemon#lemon cheesecake#lemon curd cheesecake#cheesecake#baked cheesecake#baked lemon cheesecake#lemon cake#vanilla cheesecake#lemon curd#dessert#dessert recipe#recipe#dessert images
28 notes
·
View notes
Video
| Strawberry Cheesecake Cookies | Recipe
#food#food video#cooking#cooking sounds#cooking asmr#cooking stim#food asmr#real cooking sounds#baking#sweets#cookies#strawberry#strawberries#desserts#dessert recipe#recipe#tasty#yummy#delicious#tiktok
185 notes
·
View notes
Text
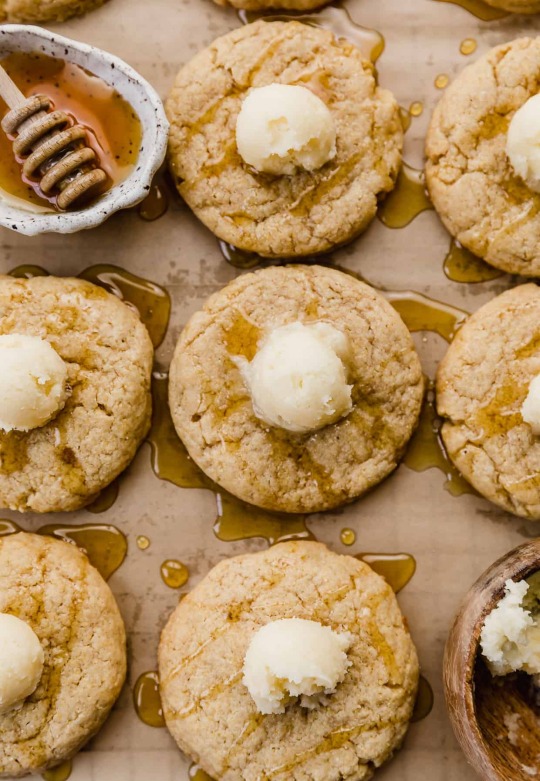
Crumbl Cornbread Cookies Copycat (x)
#crumbl cornbread cookies copycat recipe#Crumbl cornbread cookies recipe#cornbread cookies recipe#cornbread cookies#Crumbl cookies#Crumbl cookies copycat#copycat recipe#copycat#cornbread recipe#cornbread dessert#dessert recipe#cookie recipe#cookies#honey#honey butter#honey butter recipe#cornmeal#butter#recipe#dessert#dessert recipes#food#food blog#yum#baking#baking blogger#baking blog
27 notes
·
View notes
Text
Chilli and Manuka Honey Balsamic Strawberries

These Chilli and Manuka Honey Balsamic Strawberries make a delectable Summer dessert where the fragrant fire of Piment d'Espelette is balanced by the suave sweetness of Manuka Honey! "Another French and Kiwi marriage made in Heaven," Ava said!
Ingredients (serves 2):
1 cup small, ripe Garden Strawberries
1/4 teaspoon Piment d'Espelette or ground chilli
1 heaped teaspoon pure raw Manuka Honey
1/2 tablespoon Modena Balsamic Vinegar
Thoroughly rinse Strawberries under cold water. Drain them well in a colander; set aside.
In serving bowl, combine Piment d'Espelette and Manuka Honey, stirring well until blended. Gradually stir in Balsamic Vinegar until well-combined.
Halve Strawberries, and add to the bowl, tossing well to coat in sauce. Chill in the refrigerator, at least an hour.
Serve Chilli and Manuka Honey Balsamic Strawberries cold, on their own, or as a topping to Greek or thick yoghurt or Ice Cream!
#Recipe#Food#Chilli and Manuka Honey Balsamic Strawberries#Chilli and Manuka Honey Balsamic Strawberries recipe#Chilli and Manuka Honey Balsamic Strawberry recipe#Strawberries#Garden Strawberries#Fresh Strawberries#Piment d'Espelette#Chilli#Chilli Powder#Manuka Honey#Honey#Pure Honey#Balsamic Vinegar#Modena Balsamic Vinegar#Quick recipe#Easy recipe#5 Ingredients or Less#Dessert#Dessert recipe#Summer#Summer recipe#Date Night#Date Night recipe
5 notes
·
View notes
Last Seen Blogs

riseseason3fanproject
ROTTMNT: A New Age

onehourgameplay
One Hour Gameplay

beeclops
Badgerclops


captainkamui
Kamek