#beginner recipe
Text
Easy Cooking, Egg n Pasta
Full title: Easy Cooking in detailed steps, boiled Egg & Pasta.
(For one person).
Note: This recipe might look long and complicated, but I promise it’s an easy recipe. I just broke down the steps into many smaller ones, in order to make them as easy to understand as possible for people - even if they should be complete beginners at cooking.
For this recipe you will need:
A smaller saucepan, 2-3 Eggs, a pinch of salt, a spoon, random smaller bowl, water, and half (0,5) of a cup of pasta. Also, an alarm. (Most people can set alarms on their phone, but alternative alarms work as well).
Total cooking time: 10-20 minutes, depending on how quick your stove is.

[Picture ID: Example of a cup to use for the pasta. If you can’t see the cup in the picture, use a cup roughly the same size as your fist. Picture ID Ended.]
Tip: The spoon you will need in this recipe is for some slow mixing and in order to take out the eggs from the boiling water. I recommend a wooden spoon for this, because wood doesn’t lead heat. However, if you don’t have a wooden spoon you can still use a normal one. Just be careful not to burn yourself on the water.
.
Recipe Steps:
. Read through the entire recipe before starting for real.
. Use the toilet before you start to cook, and then wash your hands thoroughly.
[ That way you don’t need to run in the middle of cooking. ]
. Take out everything you need (see the list above), and place where you cook.
(NOT on the stove though. It could cause scratches to the stove and/or start a fire if you’re unlucky.)
. Lightly rinse 2-3 eggs below running water.
. Place the 2-3 eggs into a fairly small saucepan.
. Fill the small saucepan with just enough water to cover the eggs.
. Add a pinch of salt in the saucepan with water.
. Place the saucepan with water on the stove. The saucepan should just barely cover the stove hob, or as close as possible. (The “circles” on top of your stove.)
. Turn on the heat for your chosen stove hob. Use the heat-stage before the hottest on your stove. (Usually 8 of 9, or similar.)
. Prepare half (0,5) of a small cup of pasta. If you’re hungry you can fill it almost all the way up.
. Prepare a timer for 6 minutes. (Do NOT turn it on yet).
This alarm is to give you medium to hard-boiled eggs. If you prefer looser eggs, set the alarm a bit earlier, but I’m going to use 6 minutes for this recipe.
. Once the water start to bubble, to boil, turn on the alarm.
- - - - If the water hasn’t started to boil after 10 minutes, check/make sure you didn’t accidentally turn on the oven or the wrong stove “circle”.
. Pour the Pasta into the boiling water and eggs.
. Slowly blend/mix the pasta and eggs once in a while.
. Lower the heat on the stove one (1) step.
[ Example, now 7/9 instead of 8/9. ]
. Read the pasta package or have someone tell you how long the pasta needs to boil. This will usually be around 6-12 minutes, but it depends on the kind of pasta you’re using. If you don’t know how long the pasta needs to boil, assume it needs 8 minutes.
. When the alarm sounds, turn it off and immediately set a new alarm for the remaining time of the pasta. Assuming you set the alarm to 6 minutes for the eggs, the pasta should now have roughly 1-4 minutes left depending on what kind of pasta you used.
. Immediately after you set the new alarm, use the spoon to CAREFULLY! take out the eggs from the boiling water, and place the eggs in a small bowl with cold water.
. When the pasta alarm sounds, turn off the alarm.
. Turn off the stove.
. Peel off the egg shell(s). - They should have cooled down enough to do so now, but if not, change their water to give them cold water again for a few seconds.
. Once the eggs are peeled, carefully drain/pour out the water from the pasta into the sink.
. Pour the pasta onto your dinner plate/into your dinner bowl.
. Place the peeled eggs on top of the pasta. Time to eat, you’re done.
. Optional: If you want to eat this as a simple soup instead, pour a cup of milk into your bowl and add some spices of your own choice.
And/or you can add a vegetable/fruit to eat alongside if you want to, but this is a basic recipe you can cook to at least get both needed calories and protein into your body.
.
Possible Questions you might Have:
. “I need to use the toilet (again), but the water is boiling! What do I do?” - Answer: If you just need to take a quick pee, lower the heat two (2) steps and Run to make sure you get back before the alarms goes off. Rise the heat two (2) steps when you get back again and maybe add a count to 20 to the time after the alarm goes off. Alternatively, if you live with someone else you can ask them to guard the food while you’re in the toilet.
. “The boiling water is overflowing! What do I do!?” - Answer: Carefully lift the saucepan off the “circle”, so the saucepan now only stands half-way on it. Lower the heat one (1) step, count to 20, and then blend/mix the water at a slow pace as you place the saucepan back fully onto the stove “circle”.
. “Why should we add salt to the egg water?” - Answer: Without going into the detailed science behind it, the salt makes the water start to boil quicker. It also acts as a light “spice” for the pasta. If you choose to add more spices later, the salt also acts as an enhancer to the the spices.
. “Why did you make this?” - Answer: I keep seeing people on Tumblr who don’t have any idea on how to cook and/or are too worried to try. This is a basic recipe, sure, but I broke it down to smaller steps to make sure even complete beginners have a chance to follow along. We all start somewhere.
Cooking is a life-skill, and we all need to know some basics.
“Why pasta and eggs of all things?” - Answer: Because they’re cheap food who cover a lot of nutrients your body needs. Boiled food in general also has a lesser risk of becoming BAD and/or dangerous to eat even if you screw up a little bit. If you’re a beginner, this takes off a lot of pressure, because the vast majority of times you can still eat the boiled food you screwed up a little.
.
If you have any questions, feel free to ask.
I’ll be happy to help if I can. 👍🏽 //Jezzica.
#Cooking#Easy Cooking#Recipe#Beginner#Real Life#Real#Life#Life Skill#Pasta#Eggs#Beginner Recipe#Boiling#Food
4 notes
·
View notes
Text
What-You-Have Hash
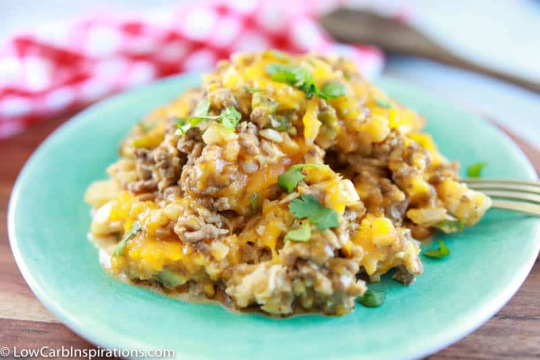
image source
•┈••✦ ❤ ✦••┈•
Ingredients:
Ground Beef or Turkey
Any Rice
Garlic Powder, Onion Powder, and Season All Salt
1-2 Eggs
Grated Cheese
Optional: Salsa
Optional: Onions
Optional: Peppers of any kind
•┈••✦ ❤ ✦••┈•
This recipe utilizes your leftover ingredients and staples most people usually have. An interesting dish my boyfriend showed me, that has fed us well in our down bad days.
Steps:
Prepare your rice and set up the rice cooker. Of course, stove top rice can be used, it's just way easier in the Cooking rice takes the longest and is susceptible to sticking to the pot, making clean up a hassle. I always clean my rice with 2-3 scrub. If not the starch will bubble out the pot's steam hole. It takes around 15min for the rice to cook this way.
Optional: Chop any veggies you would like to add. Sometimes we dress ours up with chopped green onions or mini sweet peppers.
Prepare your meat of choice. Every meat we cook, we use powdered onion, powdered garlic, and season all salt. Mix your seasonings and meat together and pan fry it. I usually keep the knob around 7 and 8 or between high and med. You'll know when the meat is done because it will go from red/pink to a rich brown. If you're not sure, smash a chunk open and see if there is pink still inside. This can be done while the rice is cooking and will be finished by the time the rice is.
Add your eggs. Turn the heat down to about a 5 or between low and medium, you don't need too much heat for the eggs and the future cheese. I usually just add the eggs directly into the pan with the meat after draining the fat. I then mix well enough that the egg yolk breaks. Once they're cooked you can add the other ingredients.
Add optional: veggies. If you are adding veggies, let them cook a little with the meat and eggs to get softer and spread their flavor.
Add Rice and Cheese. Mix everything together in the pan. When everything is evenly mixed you're ready to serve.
Optional: Top with salsa. To give a little more flavor and some spice, salsa is a great addition to mix in when eating.
1 note
·
View note
Text

50 KITCHEN WITCH TIPS TO MAKE YOU FEEL MORE WITCHY
(And other useful things I've learned over the years)
Hi! This is a list of dos, don'ts, tips, tricks, and other fun things that I've learned over the years. I always love finding more effective and efficient ways of doing things so if you have any cool things you'd like to add, leave them in the comments or reblog. I'd love to read it.
Anyways... On with the list ^_^
Light candles around your kitchen space (just make sure nothing flammable is near you)
Annotate your cookbooks with the correspondence of the ingredients.
Mediating is really good to calm the mind before cooking.
Cut oranges and lemons thinly, dry them, and hang them with twine around your kitchen
Need a cleansing tip? Open all your windows near your kitchen. Let some fresh air in.
Cutting sigils into apples, pie crusts, and carved potatoes.
Save lemon and orange rinds, freeze them, and then use them to clean the garbage disposal.
Make infused oils and honey: Things like garlic honey, lavender honey, herb oil, sun oil, moon oil, dandelion oil, and other different edible oils are very fun and useful to make.
Hid sigils in pages of your cookbooks and kitchen witch journals.
Add some plants! Snake plants and spider plants don't need too much light, and growing your own herbs in your kitchen is awesome too. Basil, lavender, thyme, aloe vera, rosemary, etc. are good fits. You could also add some plants that require more sunlight on the kitchen window sill. Like cacti and succulents.
Bring crystals into your kitchen space such as rose quartz, clear quartz, amethyst, or whatever you want the space's intentions to be.
I keep a small money tree on the sill, along with cacti for luck and protection.
Make a simmer Pot! Mostly because it makes the whole house smell good, easy, and fun.
Stir clockwise for best results!
Learning how to pickle things is actually pretty witchy. Plus, anyone could do it as it requires absolutely no kitchen experience. You could pickle any vegetable, even if you don't like pickles. I originally learned this after having to take shelter from a natural disaster. A person brought a bunch of stuff and taught us how to pickle things with different spices and herbs. Very fun!
Decorate your kitchen with your favorite stuff. Crystals, decor, heat mits, that cool mushroom cake stand you've been eyeing at the World Market for the past 2 weeks, cool looking curtains, sun catchers. Why stop there? Paint the walls, hang shelves full of marked-up cookbooks that are a little too well-loved and thumbed through.
Wanna be the person that has the amazing-smelling house every time people come over? Syrups take some time to simmer down, it's actually a pretty good time to leave it on the stove to simmer. Since syrups have a lot of aromatic ingredients, it acts as a really good-smelling simmer pot.
Hang up herbs to dry with twine from cabinets that are rarely used.
Invest in that new set of plates and cups.
Homemade jams, butter, sauces, and syrups are your best friend.
Crochet or knit your own dish rags, pot holders, etc.
Don't pour extremely hot things into a glass that's not Pyrex, it will break, and you will be very sad about it.
Don't cook anything while extremely upset or emotional (For safety reasons)
Make recipes you want to make, not just because you'll like the effect. Make it because you think it's tasty.
Chinese Five Spice works in place of herbs for protection and luck spells a lot of the time! It's cheaper to buy 1 spice than 4 different spices that total up to 15 dollars when you could just spend 3-4 dollars.
Take a shower before cooking (I don't know how to explain this one other than it makes you feel better)
Don't use microfiber/plastic material clothes on hot burners, it will fuse to the burner and melt. It is VERY hard to get off.
I don't know if I need to put this one but I did see someone do it so nonstick pan = wooden utensils and plastic utensils, metal pan = metal utensils. Do not use a metal spoon in a nonstick pan, please. It can make you very sick.
Keep your pets away from hot oil, open ovens, and hot pans.
You can proof bread dough in the fridge overnight if you don't have the time to bake, or want to eat fresh bread right in the morning.
Need a quick witchy meal for dinner in 12 minutes? Use premade tomato pasta sauce and doctor it up with thyme, rosemary, and garlic, for protection and distilling stagnant energies. Serve with pasta of your liking.
You can substitute Butter for Crisco/shortening, buttermilk for 1 cup of milk + 1 tbsp apple cider vinegar or lemon juice, and heavy cream for 1 cup of half and half plus 2 tbsp of butter.
Use leftover animal bones to make bone broth
Teach yourself the art of bread scoring (It's fun, and you can show it off to your loved ones!)
Collect and hoard your own and others' family recipes.
Sometimes the food doesn't have to be a spell, sometimes it just makes you feel good and you don't know why.
Listen to your favorite music in the kitchen, it makes the monotonous things like chopping veggies move faster.
Invest in a vegetable chopper if you don't like chopping vegetables.
Find a really good hot cocoa recipe and make it once a week. Master it. Just for your own happiness because hot cocoa is really good. You could also be the friend/family member that makes the best hot cocoa ever.
Focaccia Bread Lasts a very long time, and it's very easy to make!
Keep a first aid kit near where the oven is, in case of burns, cuts, or serious injuries where time is everything.
Quick Bread and no-rise loaves are simple for beginners, tasty, and take little time. They also feel very witchy to make.
Study a bit of Herbalism! It's fun and really helps better understand the herbs you're putting into your food.
While something is boiling, put your wooden spoon over the pot to minimize the chance of something boiling over.
Try a bit of coffee magick, it's simple to get into, and gives you a boost of energy to take on the day!
If you're over 21, wine-making is a very interesting way to celebrate the sabbats. Just with that, make sure you KNOW what you're doing. With anything fermented, there's always a risk if you don't store things correctly. Apple wines, strawberry wines, dandelion wines, etc. all very cool to experiment with. If you're not over 21, vinegar is a similar way to experiment.
Hang up some witchy things, sigils, photos, cool magnets, and other things that give you joy on your fridge. (Sometimes if you are lucky they have some fun magnets at five below)
If you live in the US, for some reason, there are a lot of books in the book section dedicated to witchcraft and spirituality. At least where I live. And they are all under 5 dollars!
Teas are the cheapest and easiest things you can practice being a kitchen witch.
#witches#witchy#kitchen witch#witch#magick#witches of tumblr#kitchen witch recipes#modern witch#modern witchcraft#food#witchcraft#witchblr#food blogs#witch aesthetic#witchy vibes#wicca#baby witch#beginner witch
3K notes
·
View notes
Text
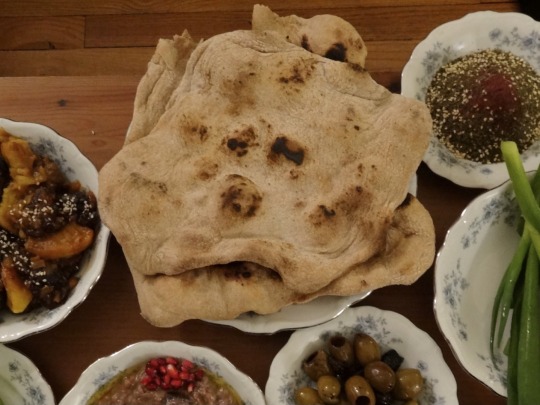
[ID: A plate of light brown bumpy flatbread with blackened spots, surrounded by za'tar and green olives. End ID]
خبز طابون / Khobz taboon (Palestinian flatbread)
Khobz taboon ("taboon bread") is a soft, chewy Palestinian flatbread. It may be eaten with olive oil and za'tar, but it is best known as the base of مسخن (musakhkhan), where it is topped with spiced aromatics and perhaps chicken.
Khobz taboon gets its name from the vessel it is traditionally cooked in—an outdoor, shallow conical oven with an opening at the top and a clay or metal cover to trap heat. Taboons may also have an opening at the side through which the fire can be stoked, especially in the east of Palestine. These ovens were historically made from a mixture of local clay and hay, but have more recently also been constructed from clay treated to be sturdier, or from metal.
A taboon is used by packing flammable material, such as hay, fabric, animal dung, wood, and charcoal, around the outside of the oven and letting it burn overnight; the fire transfers thermal energy to the clay, and to the river stones, sand, glass, or flint stones (صوان, "ṣawwān") that form the base of the oven. The ash is then brushed away, and the flattened dough is placed on the stones or stuck to the walls of the oven to cook. The clay and stones will continue to release thermal energy and cook things throughout the day. The clay and ash give a distinctive flavor to anything cooked inside the taboon, making this method a source of nostalgia for many people who have transitioned to cooking in indoor ovens.
Khobz taboon was traditionally made with whole wheat flour. Most people today use a blend of around two parts white flour to one part whole wheat, or else all white flour; they may even add milk or milk powder to ensure a very soft dough. This recipe uses a blend of flours to combine the nutty flavor of whole wheat dough with the pliancy of white dough. It also begins with an optional pre-ferment to mimic the traditional Palestinian method of including a piece of dough from the previous day's bread into each new batch (like a pâte fermentée) giving a rich and slightly sour flavor to the final bread. It calls for the use of rocks to imitate the bottom of a taboon; the rocks give the khobz its distinctive dimpled texture, and ensure that no interior pocket forms in the bread.
In the years following 2007, the siege Israel had imposed on Gaza caused a shortage of cooking gas that led to a resurgence in the use of taboons. The ovens were used to bake bread and to grill sweet potatoes during the time of their winter harvest. Meanwhile, in the West Bank, Israeli military forces repeatedly destroyed taboon ovens and assaulted villagers who tried to defend them, as Israeli settlers from nearby villages complained about the smoke that the ovens produced. Some of these ovens had been used to bake bread for entire families of 40 or more people. Palestinians continue to build, use, and defend these ovens, despite the fact that Israeli law de facto forbids Palestinians in the West Bank to build anything.
Today, Israel is deliberately targeting and destroying bakeries in refugee camps that had been supplying bread to tens of thousands of people in Gaza, continuing a long campaign of starvation of the Palestinian people.
Support Palestinian resistance by calling Elbit System's (Israel's primary weapons manufacturer) landlord; and donating to Palestine Action's bail fund.
Equipment:
A large, shallow mixing bowl, like a Moroccan qus'a
A large (12"), shallow clay cooking vessel, such as the bottom of a Moroccan tajine (one that is rated for very high temperatures), or a large baking tray
Assorted smooth river rocks of varying sizes, from 1 to 3" in diameter.
Make sure that your rocks have been thoroughly cleaned, and that they do not contain any fissures, cracks, or veins that could contain water (this water, once heated in the oven, could cause the rocks to crack open). Instead of river rocks, I used lava rocks designed for use in a clay tanoor. You just need something to provide thermal mass and give a bumpy texture.
Ingredients:
Makes 3 large breads.
For the pre-ferment:
140g whole wheat flour
1/2 tsp active dry yeast
140g water
You may also use a pâte fermentée that you already have (just adjust the ratio of white to whole wheat flour added later accordingly), or a sourdough starter. The hydration of the starter doesn't matter, since you will be adding water by eye later.
For the bread:
330g bread flour or all-purpose flour
30g whole wheat flour
5g salt
Water
If you skipped the pâte fermentée step, add 170g (rather than 30g) of wheat flour at this stage, as well as 1/2 Tbsp of active dry yeast. I have not tested the recipe this way.
Instructions:
For the pâte fermentée:
1. Mix flour and yeast in a small mixing bowl. Add water and stir to combine. Cover and leave out at room temperature for a day, or in the refrigerator for up to three days. At the end of the rising time, it should be about one and a half times its original size.
For the bread:
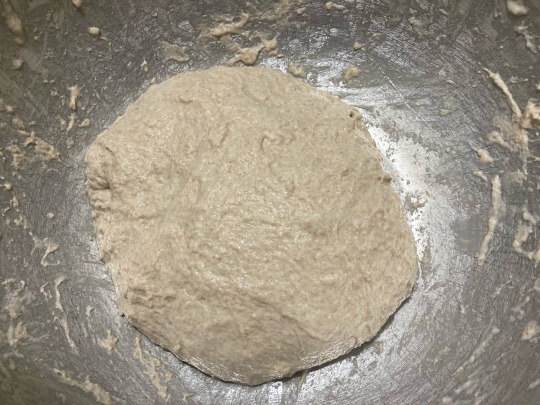
This recipe makes a high hydration dough that will need techniques such as slapping and folding to knead effectively.
1. Mix flours and salt in a very large, shallow mixing bowl. Add your pâte fermentée and mix to combine.
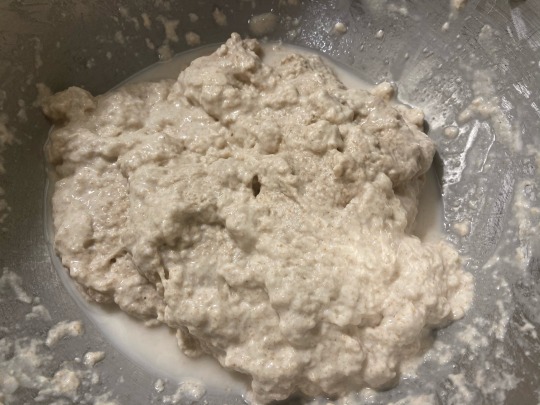
2. Add water until the flour comes together into a soft, sticky dough and continue keading. Have a bowl of water on your workstation. Every time the dough starts to stick to your hands or the sides of the bowl, wet your hands and rinse down the side of the bowl with some water. This will gradually add water to the dough.
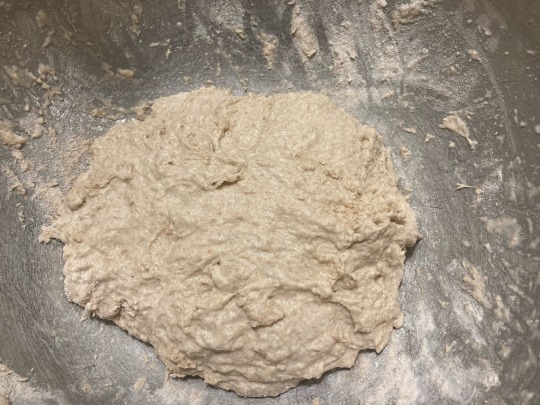
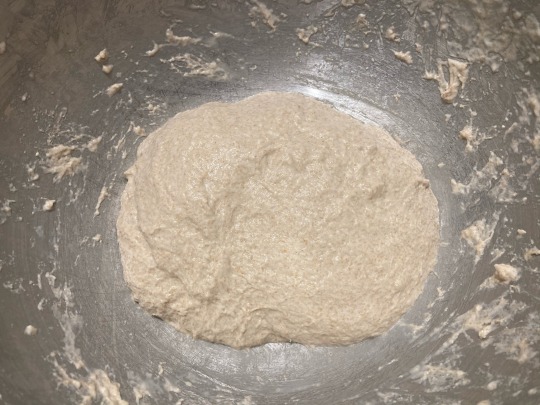
3. You will notice the dough growing smoother and laxer. At this point, start kneading by repeatedly folding the edges of the dough in towards the center. Do this by occasionally wetting your hands, then running a hand along the side of the bowl and under the edge of the dough to unstick it from the bowl; then fold. You will get stuck less often if you try to touch the dough as lightly and briefly as possible. Every few folds, dimple the surface of the dough all over with your fingertips. You will have been kneading for about 10 minutes at this point.
The dough should become more smooth and less bumpy—you will notice it holding its shape and becoming more stretchy as gluten forms. It should form into a ball when you fold the corners in and hold its shape for a minute, but then gradually expand to take the shape of the bowl. I added about 2 1/2 cups of water total (in dry conditions) during steps 2 and 3.
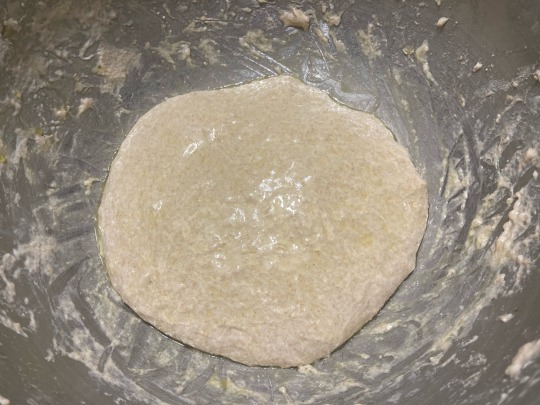
4. At this point, the dough is wet enough that the slap and fold method is the best way to knead. Wet your hands and again unstick the dough from the sides of the bowl. Hook your hands under the dough and quickly pull it all up into the air; fold the hanging bottom part of the dough under, and plop the dough back down, folding it on top of the part you plopped down earlier. Give the bowl a quarter turn and repeat. Do this continually for another few minutes.
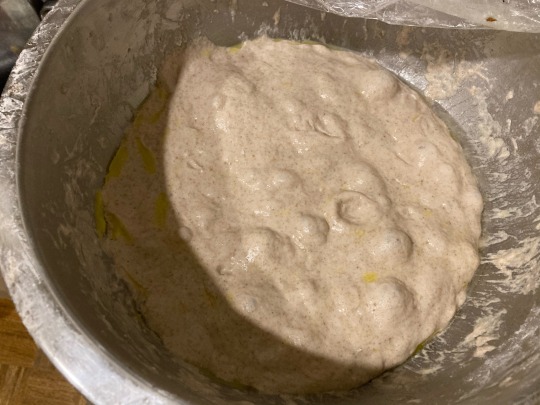
5. When the dough is very smooth and lax, smear some olive oil on the sides of the bowl and under the dough, and pat some oil on top.
6. Cover the bowl and bulk ferment the dough at room temperature for 8 hours, or for 16-24 hours in the fridge. At the end of the rising time, you should see bubbles beginning to form on the surface of the dough.
To shape and bake:
1. Place a layer of rocks at the bottom of a clay cooking vessel or baking sheet. Put the sheet in the top third of the oven and preheat your oven to 550 °F (290 °C), or as hot as it will go.
2. Meanwhile, fold the edges of the risen dough over into the middle a few more times with damp hands. Pinch off a large piece of dough (about the size of two fists), and fold the sides over into the middle to make a neat packet.
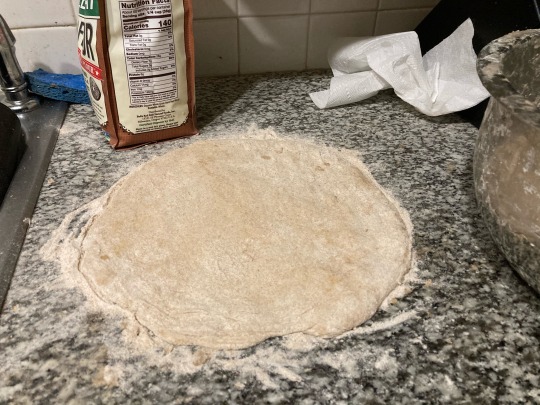
3. Drop the packet of dough onto a heavily floured surface, and flip to flour both sides. Pat the dough flat, then throw it back and forth between your hands, catching the edge each time as you spin it through the air, like a pizza crust, to stretch it into a circle about 1/4" (1/2cm) thick with a diameter of about 10" (25cm).
You may also stretch and pat the dough out on a flat surface.
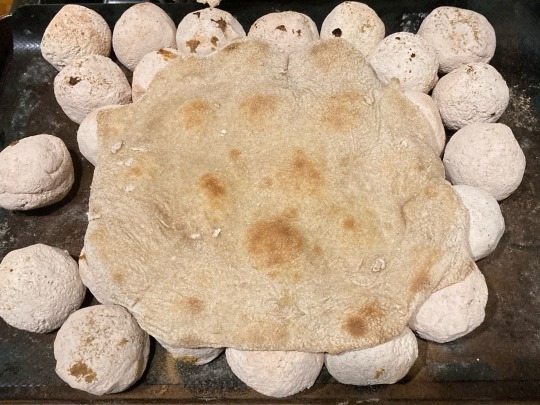
4. Remove the tray from the oven. Flip the dough circle over the back of your hand to transfer it and lay it down over the hot rocks. Re-stretch it into a circle, if necessary.
5. Place the tray back in the oven and cook for 5-7 minutes, until the top of the bread has golden brown spots. Repeat with each piece of dough, leaving the rocks in the oven for a few minutes between each one to allow them to come back up to temperature.
6. (Optional): Hold each flatbread directly over a gas flame for a minute or two to blacken a few spots and mimic the flavor that a wood-fired oven would give to your khobz.
You may also use a method similar to the dhungar technique to smoke your bread. Place each piece of bread one at a time into a large vessel with a closely fitting lid, alongside a small bowl. Light a piece of wood on fire and drop it into the bowl; then cover the vessel with the lid as you allow the wood to smoke for a minute or two.
#note that I do not recommend this recipe to anyone who is not experienced with making bread#I'll have another Palestinian flatbread recipe up soon which will be more beginner-friendly#Palestinian#bread#khobz#flatbread
341 notes
·
View notes
Text
Hot take? Maybe yes. Maybe not.
YOU DON'T NEED EXPENSIVE TOOLS, HERBS, ETC FOR WITCHCRAFT!!!!!
in my personal opinion witchcraft doesn't have to be fancy! It can even just be you hoping and manifesting for a good day, for money, for better health, etc! Of course you can make it fancy if you you need to! I've seen some people use fancy materials when working with deitys because they feel it's more respectful and I RESPECT YOU FOR THAT!!
Witchcraft is about you and how you experience it, work with it, etc. It's YOUR craft! Don't let others fancy dancy stuff make you wish you had better. You are good and your tools and materials are good enough!
Much love :D ❤❤
#witchcraft#witchy#green witch#kitchen witch#witch#witchcore#baby witch#magick#witches#crystals#beginner witch#cottage witch#crystal witch#kitchen witch recipes#kitchen witch spells#male witch#pagan witch#witchblr#witches of tumblr#spells#spell#spellwork#spellcraft#spellcasting
214 notes
·
View notes
Text
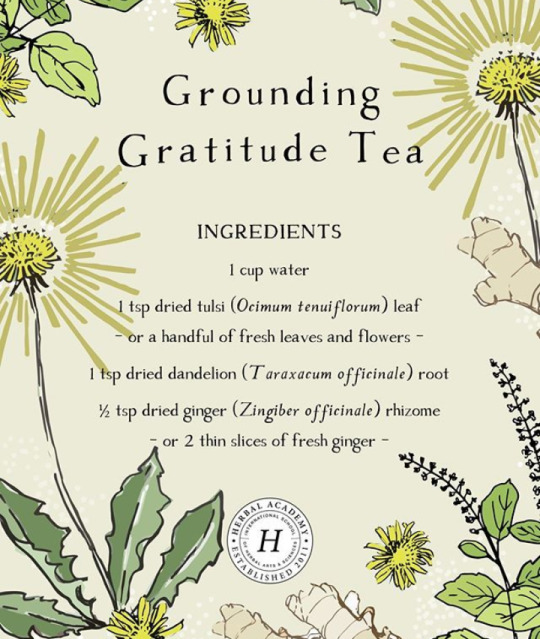
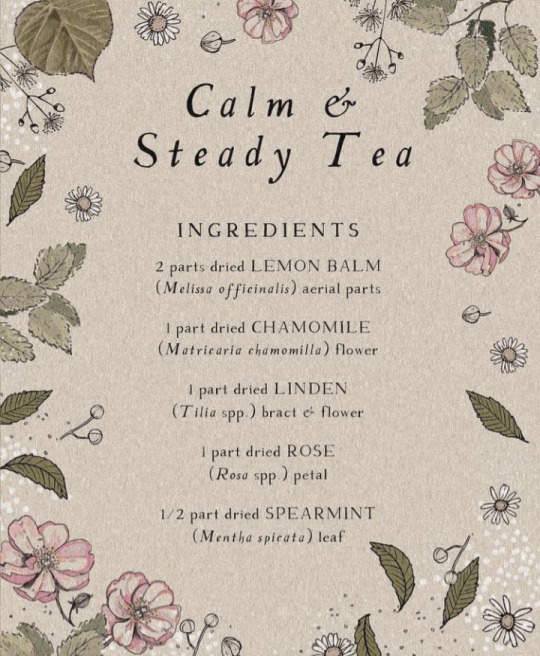
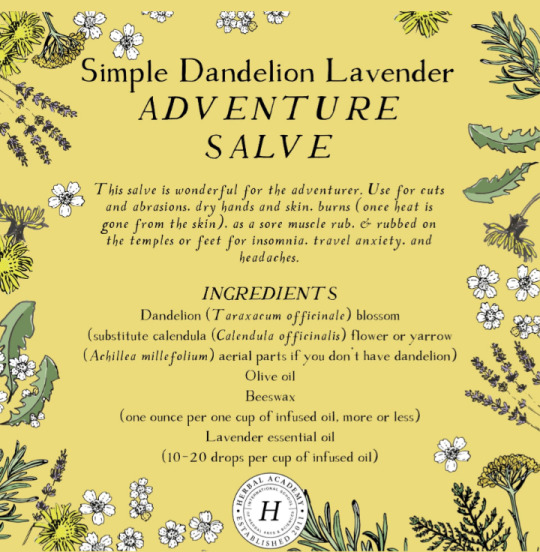

#witchy recipes#witchcraft#witchyvibes#witch community#green witch#kitchen witch#witchblr#witchy#witchy tips#paganlife#pagan witch#witches of tumblr#beginner witch#baby witch#herbs#tea
1K notes
·
View notes
Text

Morgan Baley ıstagram
#witch#witchcraft#witches#minerals#grimoire#grimore#witchblr#witchboard#witchy vibes#witchy#spells#witchery#kitchen witch recipes#kitchen witch#paganism#beginner witch#wicca#wiccan#wichcraft#bruja
99 notes
·
View notes
Text
Learning to Cook Like a Witch: From Recipe to Spell
Cooking and spellwork have a lot in common. Just as a witch might craft a spell from disparate odds and ends, so too might a cook create a meal. It's not such a jump to consider that any food, no matter how simple, can become a spell.
In my practice, the thing that differentiates a mundane action from a magical action is the doing. If I'm doing something just to do it, it may have a magical effect. But if I do the same thing with the understanding that it may have that magical effect, it will have that effect.
Therefore, to go from recipe to spell is a simple act: Cook with purpose. The particulars are a bit more involved, of course, as most things often are as you become more advanced.
You have to know what your ingredients are for. When cooking, you can't just throw things together and expect them to taste good with no technique or thought. What does a particular ingredient add to the mixture? Is it for flavor? Does it add or change the texture? Does it bind the other ingredients together or provide a base to be added to?
The same idea applies to spellcrafting. You can't just throw random things together and expect it to work. There has to be a pattern, an understanding, a purpose to what you include. If your materials don't apply to your goal, how on earth will they work?
Success in spellwork comes from the intersection of purposeful doing and appropriate material selection -- just like in successful cooking.
The art of taking a recipe and turning it into a spell is rather simple when it comes down to it. It requires two fundamental cooking skills:
Recipe reading and comprehension
Understanding how and when to make substitutions
If you'd like the food you make to still taste good, as well, you have to also understand what various ingredients taste like. Rosemary and mint might both be good for cleansing or purification, but they taste so vastly different that replacing one with the other will wildly alter your food.
You've got to choose wisely and within the bounds of your tastebuds. Cooking up magic is no good if you can't eat what you make!
If you'd like to read the extended version of this post, including an inside look at my method for turning recipes into spells and an exclusive recipe, check out my Ko-Fi! For as low as a one-time contribution of $1, you can get extended and early access to my work.
Or, if you'd like me to take a recipe of your choice and turn it into a spell or write you a recipe spell from scratch, I offer commissions!
#home witchcraft#practical witchcraft#recipes#spell recipes#my spells#my recipes#witchblr#kitchen witch#kitchen witchcraft#hearth witch#witchcraft#witch community#learning to cook#witch tips#beginner witch tips#food magic#food spells#food#fireball apple fritters#aese speaks#a glimpse into my everyday practice#now i'm off to make a pork roast for dinnerrrrrrrrrrr#ok BYE
67 notes
·
View notes
Text
🍲✨ Stirring Up Some Kitchen Magic! ✨🍲
Hey there, witches! Did you know that your kitchen can be a magical playground for spellcasting? That's right—whether you're brewing up a batch of soup or baking a loaf of bread, you can infuse your cooking with intention and energy to manifest your desires. Here's a beginner-friendly recipe to get you started:
🌿 Magical Herb-infused Soup 🌿
🥣 Ingredients:
1 onion, diced
2 cloves of garlic, minced
2 carrots, sliced
2 stalks of celery, chopped
4 cups of vegetable broth
1 can of diced tomatoes
1 cup of cooked beans (your choice) - i really enjoy pinto or white beans in soups
A handful of your favorite herbs (such as rosemary, thyme, or basil) - i love basil and thyme (i use the Italian Seasoning blend and just focus my intent on that because college budget)
Salt and pepper to taste
🔮 Instructions:
Heat a bit of olive oil in a large pot over medium heat. Add the diced onion and minced garlic, stirring occasionally until they're soft and fragrant.
Toss in the sliced carrots and chopped celery, letting them cook for a few minutes until they start to soften.
Pour in the vegetable broth and diced tomatoes, bringing the mixture to a gentle boil. Reduce the heat and let it simmer for about 20 minutes, allowing the flavors to meld together.
Add the cooked beans and your chosen herbs to the pot, stirring gently to combine. Let the soup simmer for another 10 minutes or so, until everything is heated through and flavorful.
Season with salt and pepper to taste, adjusting as needed to suit your preferences.
As you stir the soup, focus on your intentions—whether it's promoting health and vitality, attracting abundance, or fostering love and connection. Visualize your desired outcome coming to fruition with each swirl of the spoon.
Once your soup is ready, serve it up with a sprinkle of magic and a side of gratitude. Take a moment to appreciate the nourishment it provides for your body and soul.
As always, the most important ingredient in any magical recipe is your intention. So get creative, experiment with different flavors and ingredients, and have fun infusing your kitchen creations with a little dash of witchy charm! 🥄🔥
if you make this recipe, post it and tag me in it with #magickkate so I can see it! 🤍
#queue the magick#witch#witchcraft#witchblr#reference#kitchen witch#magickkate#sigils#green witch#witchy#soup#kitchen witch recipe#kitchen witchcraft#kitchen magick#kitchen magic#witches#baby witch#beginner witch
32 notes
·
View notes
Text
Turns out the chocolate version of these granola cups is even better, I’M OBSESSED😮💨 they literally taste like cookies😍🍪
🍪chocolate granola cups🍪
(Makes 6 cups)
🌟ingredients🌟��
- Half a ripe banana
- 120g oats (1.33 cups)
- 1 tbsp ground flax seeds (or chia seeds)
- 1 1/2 tbsp cacao powder
- 80g maple syrup (1/4 cup)
- 1 tbsp coconut oil, melted
- Pinch of salt
🌟method🌟
1. Mash the banana and mix all the ingredients in a bowl until well combined.
2. Transfer the batter into cupcake liners and form your little cups.
3. Bake at 180°C for 25-30 mins.
4. Let them cool down completely before removing them from the cupcake liners.
5. Finally add your favorite toppings!
#breakfast #breakfastideas #breakfasttime #breakfastlover #breakfastrecipes #veganbreakfast #veganbreakfastideas #healthybreakfast #healthybreakfastideas #veganrecipes #veganmealideas #healthyrecipes #granolacups #chocolategranola #funbreakfast #swissvegan #veganschweiz #vegansofswitzerland #swissblogger #healthyfood #plantbased #breakfastplatter #brunchideas
#cooking#cookbook#cooking at home#cooking basics for beginners#pizzalover#recipes#pizza tower#pizzahead#good pizza great pizza
20 notes
·
View notes
Text
I made some new protection oil for the shop 🌞
#celtic witch#witches#tumblr witches#celtic paganism#witch recipes#witch oil#baby witch#beginner witch#green witch#morrigan#brigid#artio
45 notes
·
View notes
Text
Cajun pasta;
Spice mix; 1 teaspoon each of the following.
Smoked paprika
Onion powder
Garlic powder
White pepper
Black pepper
Sea salt
Oregano
This will be used to season any chicken, sausage, shrimp or tofu You’re adding to the dish as well as the sauce.
In a large skillet cook and season your choice of protein, cook fully and set aside. While your choice of pasta boils, finely dice a shallot.
Roughly Chop and de-seed whole yellow or red bell pepper along with a fresh tomato, I remove the core, seeds and skin from my tomato before chopping.
Drain your pasta and set aside to cool. In a LARGE heated skillet melt some butter about tea-tablespoons worth along with a teaspoon or a squeeze worth of tomato paste and the diced shallot. Let it cook down for five to ten minutes depends on how hot your pan is.
Add in a cup and a half of heavy cream, your protein, and your vegetables. Let the heavy cream come to a steady bubble stirring occasionally before adding 2/3 cup of Parmesan cheese and the rest of your spice mixture. Mix and let it come to a bubble again before adding in your pasta and mixing it very well together.
Boom baby it’s literally that easy! Pro tip I used pre cooked grilled chicken from the grocery store and just seasoned it up in a pan at home.
#witchtok#baby witch#pagan witch#witchblr#witchcraft#witch#witch community#witches#beginner witch#aphrodite#pasta#pasta recipe#easyrecipes#easy recipes#cheap meals#cheap recipes#vegan recipes#vegetarian recipes#HTFDICTIBASVV#how the fuck do i cook that i’m broke as shit#learn to cook
14 notes
·
View notes
Text
Yule/Litha Masterpost

Northern Hemisphere
The History of Yule
Yule Facts
Yule Correspondences
Yule Crystals
Yule Colors
Yule Plants
Yule Incense & Oils
Yule Animals
Yule Foods
Yule Ritual & Magick
Yule Deities
Yule Altar
Yule Activities
Last Minute Yule Ideas

Southern Hemisphere
Litha History
Litha Facts
Litha Correspondences
Litha Crystals
Litha Incense & Oils
Litha Colors
Litha Plants
Litha Animals
Litha Foods
Litha Deities
Litha Altar Ideas
Litha Ritual & Magick
Litha Activities
Last Minute Litha Ideas
#litha#yule#summer solstice#winter solstice#litha correspondences#yule correspondences#crystal magic#incense magic#essential oil#pagan#wicca#witch#witchblr#beginner witch#the noaidi#color magic#plant magic#animal correspondences#food#recipe#deities#sabbat#altar ideas#ritual#magic
20 notes
·
View notes
Note
Your recipes always intrigued me but I am a complete beginner in cooking and have no idea where to begin. Would you happen to have any suggestions of recipes for newbies? I hope I'm not bothering you, your blog is always a pleasure to have on my dash (when tumblr doesn't tumblr and remove you from my followed blogs, at least)
Hello! Everyone has to start somewhere with cooking, but I recommend soups and stews to beginners as there's a lot of room for experimentation and it helps you grasp basic kitchen techniques. Also very hard to botch!
Ashlander nix-hound chilli, potato soup, and a basic omelette are good places to get started! Best of luck! ~Talviel
22 notes
·
View notes


Last Seen Blogs

pajamafox-blog
Sly Ass Fox


nipacks
k-pop packs

freenorthnow
Northern Independence Party

bbcufa-blog
B&B Cufà