#bottle jewelry
Text
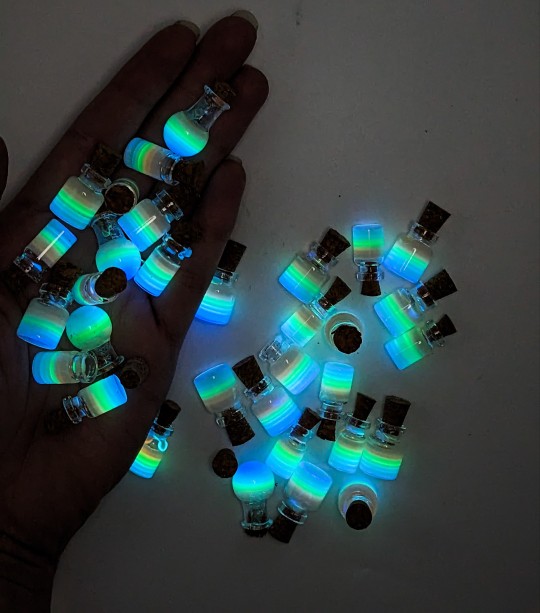
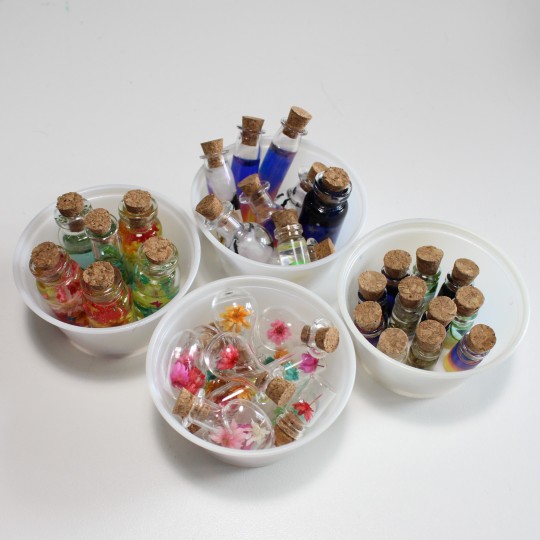
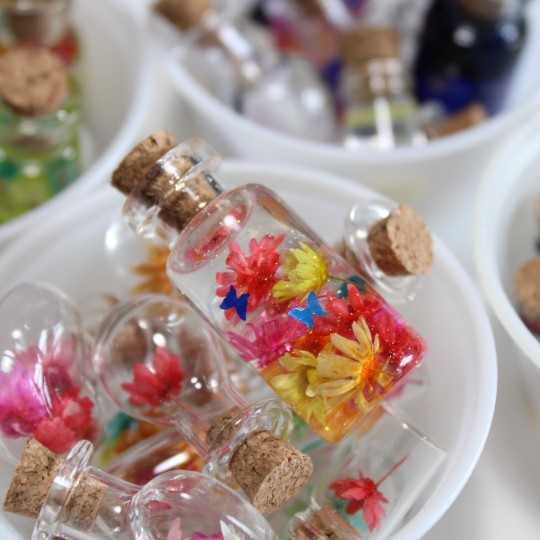
Just finished a fresh batch of rainbow glow in the dark potion bottles! Available in my Etsy (link in bio) as pendants and earrings. These take almost a week to make because I have to do the colors one at a time and let them dry overnight in-between, but it's worth it!
#rainbow jewelry#glow in the dark#glow jewelry#glow in the dark jewelry#potion bottles#magic potion#bottle jewelry#tiny bottles
39 notes
·
View notes
Text
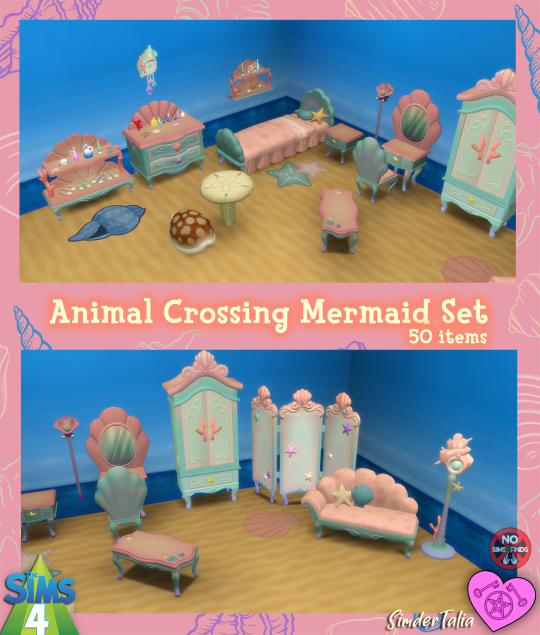
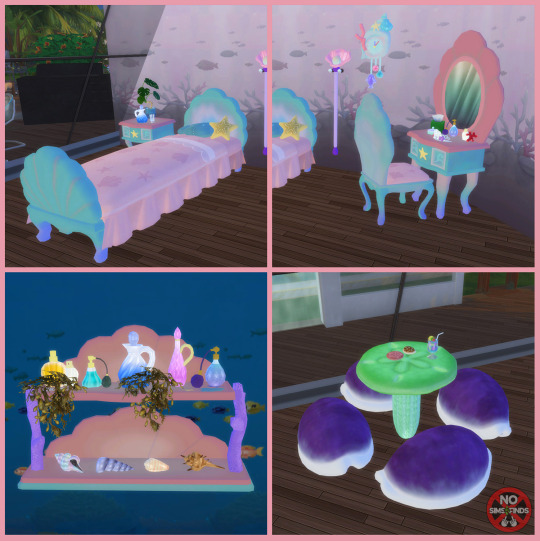
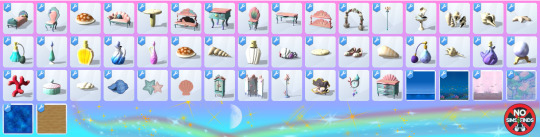
🐚 ACNH Mermaid Set 🧜♀️
50 items | Sims 4, Base game compatible.
Type “ACNH Mermaid” into the search query in build mode to find quickly. You can always find items like this, just begin typing the title and it will appear.
Always suggested: bb.objects ON, it makes placing items much easier. For further placement tweaking, check out the TOOL mod.
Use the scale up & down feature on your keyboard to make the items larger or smaller to your liking. If you have a non-US keyboard, it may be different keys depending on which alphabet it uses.
Remember that you can resize items in game with your keyboard! Note that if you have a non-USA keyboard, that it may be different keys, but it still works.
I hope you enjoy!
Set contains: (Buy Mode)
-Bed | 1 swatch | 2420 poly
-Chair | 2 swatches | 1226 poly
-Coffee Table | 1 swatch | 2406 poly
-Divider | 1 swatch | 2388 poly
-Dresser | 1 swatch | 1671 poly
-Fainting Sofa | 1 swatch | 2347 poly
-Fountain (I forgot to get pics 🙃) | 18 swatches | 2690 poly
-Lamp (functional, turn brightness down) | 1 swatch | 1217 poly
-Nightstand (made by me) | 1 swatch | 628 poly
-Rugs (cone, scallop, & starfish) | 1 swatch each | 630, 558, & 994 poly
-Sand Dollar Table | 10 swatches | 2204 poly
-Seashell Arch (I forgot to get pics 🙃) | 6 swatches | 3589 poly
-Seashell "Screen" | 6 swatches | 2410 poly
-Seashell Seat | 9 swatches | 1188 poly
-Shelf (floor) | 2 swatches | 1506 poly
-Shelf (wall) | 2 swatches | 690 poly
-Vanity Table | 1 swatch | 901 poly
-Wardrobe Closet | 1 swatch | 1208 poly
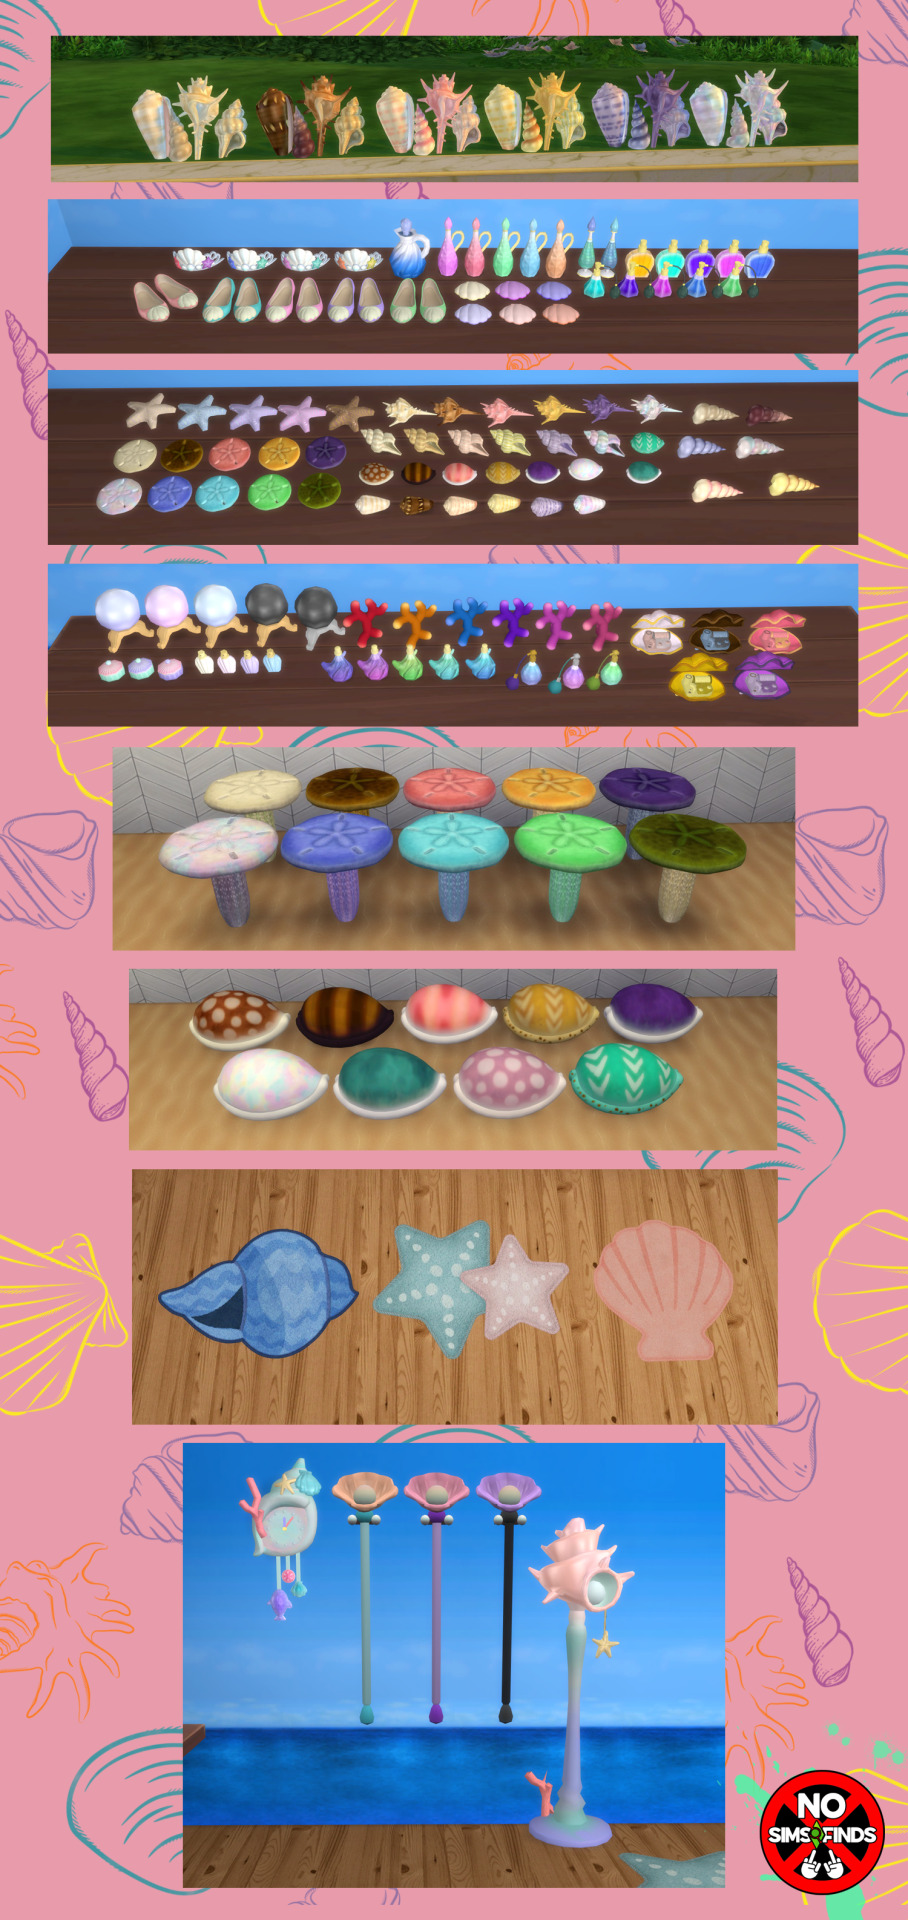
-Bottle 1 | 5 swatches | 186 poly
-Bottle 2 | 7 swatches | 227 poly
-Clock | 1 swatch | 1882 poly
-Compact | 6 swatches | 220 poly
-Coral Decor | 6 swatches | 618 poly
-Cowrie Shell Decor | 11 swatches | 1180 poly
-Crown Decor | 4 swatches | 1212 poly
-Crystal Ball | 5 swatches | 298 poly
-Music Box | 5 swatches | 1077 poly
-Perfumes 1-6 | 3, 4, 5, 2, 5, & 5 swatches | 208, 93, 280, 175, 88, & 210 poly
-Sand Dollar Decor | 10 swatches | 1716 poly
-Shell Decor 1-4 | 6 swatches each | 494, 484, 1024, & 462 poly
-Shoes Decor | 5 swatches | 800 poly
-Starfish Decor | 5 swatches | 274 poly
-Trinket Box | 3 swatches | 78 poly
-Wand Wall Decor | 3 swatches | 748 poly
Build Mode: 1 swatch each
-Floor Pastel
-Floor Sand
-Floor Underwater
-Wall Pink
-Wall Sea Horizon
-Wall Underwater
I offer anyone who wants to, to add proper vertex paint to the lamp item. My vertex paintbrush in Blender doesn't work the way it is supposed to, no matter what I try. If anyone wants to add the vertex paint I will update the file with the fixed version & credit to the person who added it. Without this paint on the mesh, the whole item illuminates strangely when turned on, so turning the brightness down can remedy that issue until it is fixed. I am also working on figuring out why I'm having this issue in Blender.
📁 Download all or pick & choose
(SFS, No Ads): https://simfileshare.net/folder/198833/
📁 Alt Mega Download (still no ads): https://mega.nz/folder/RspmSYRS#sjQNNOMvBK3CdKgt3E3IeA
📁 DL on Patreon
Will be public on September 4th, 2023
Happy Simming!
✨ Some of my sets will be early access from now on. If you like my work, please consider supporting me:
★ Patreon 🎉 ❤️ |★ Ko-Fi ☕️ ❤️
Thank you for reblogging ❤️ ❤️ ❤️
@sssvitlanz @maxismatchccworld @mmoutfitters @coffee-cc-finds @itsjessicaccfinds @gamommypeach @stargazer-sims-finds @khelga68 @suricringe @vaporwavesims @mystictrance15 @public-ccfinds
#s4cc#ts4cc#sims 4 mermaid#sims 4 nautical#sims 4 fantasy#sims 4 underwater#sims 4 furniture#sims 4 bed#sims 4 nightstand#sims 4 vanity#sims 4 table#sims 4 shelf#sims 4 arch#sims 4 wedding arch#sims 4 lighting#sims 4 lamp#sims 4 seashells#sims 4 seashell#sims 4 sea#sims 4 perfume#sims 4 bottle#sims 4 coral#sims 4 nature decor#sims 4 shoe clutter#sims 4 crown#sims 4 jewelry clutter#sims 4 music#sims 4 music box#sims 4 shells#sims 4 rug
549 notes
·
View notes
Text
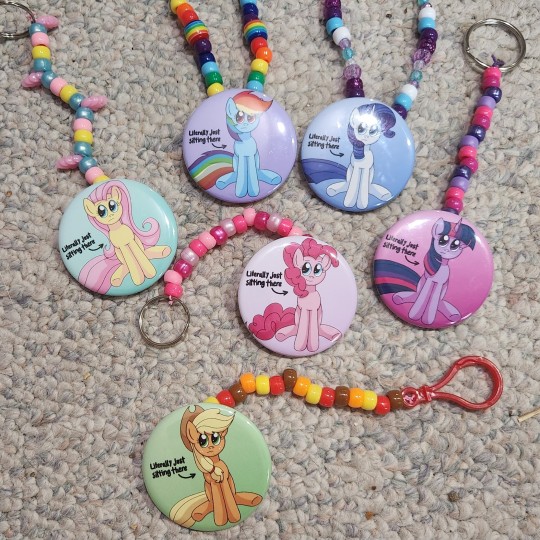
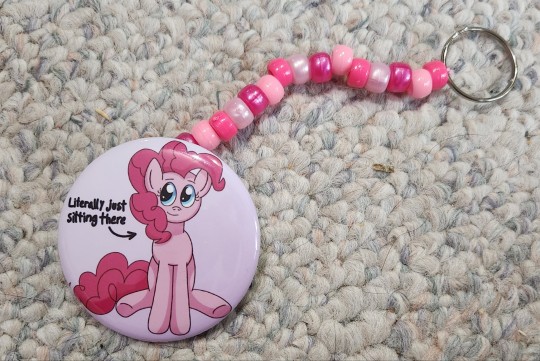


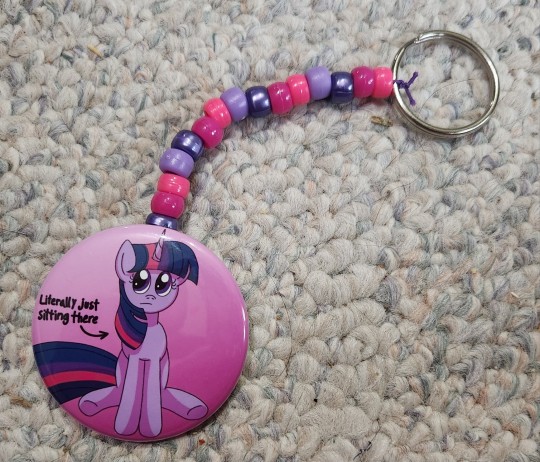


X
#mlp#my little pony#mlp g4#pinkie pie#applejack#fluttershy#twilight sparkle#rainbow dash#rarity#canon#fan made#made by me but not mine#made by me#keychains#bottle openers#necklaces#jewelry#my stuff
168 notes
·
View notes
Text

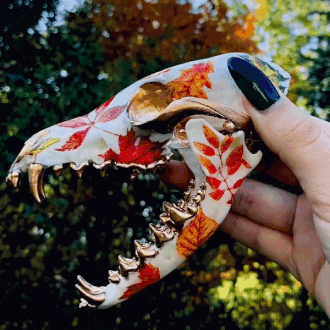


✨ the name asmara 🥀
for anon~
🥀-✨-🥀 / ✨-🥀-✨ / 🥀-✨-🥀
#stim#stimboard#names#asmara#sfw#red#gold#white#orange#yellow#potion bottles#skulls#bones#nail polish#nail art#nails#candles#fashion#jewelry#dice#flowers#fabric#shiny#liquid#long nails#hands#necklaces#butterflies#ishy gifs#requests
158 notes
·
View notes
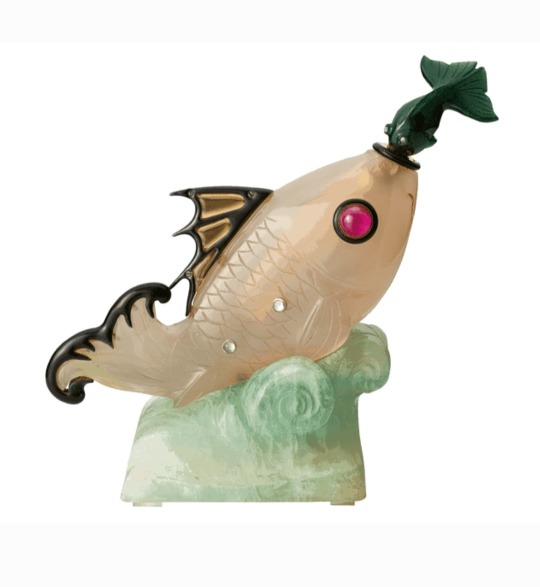
Photo


Perfume Bottle Magical Flask 14K Gold Rainbow Gem Multistone Pendant Sputnik Cab ebay jewelry_secrets
278 notes
·
View notes
Text
Cartier Paris Perfume Bottle, Circa 1925
Medium: Yellow Gold, Platinum, Enamel, Agate, Citrine, Fluorite Crystal, Moonstone, Nephrite, Ruby and Diamond
Source: robbreport.com
Photo: Cartier
#cartier#cartier paris#perfume bottle#vintage perfume#vintage perfume bottle#work of art#roaring twenties#yellow gold#platinum#enamel#agate#citrine#fluorite crystal#moonstone#nephrite#ruby#diamond#multi gem high jewelry#gemville
1K notes
·
View notes
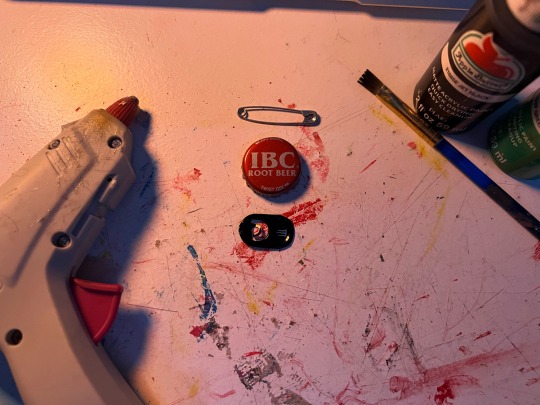
Text
[ DANNY'S TUTORIALS: BOTTLECAP PIN ]
Hi there!! I'm gonna teach you how to make a bottlecap pin since I've gotten a lot of questions about where I got mine from baby punks and others who just find them cool! I've found that a lot of people buy their pins online from companies that overprice and over-process their designs, and often times steal them from smaller businesses. Punk has been gentrified over the years, so this tutorial acts as a way to reconnect to the roots of DIY fashion made by people with limited resources and time. This is a great way to show your interests, pride in your community, and pretty much anything else you want even if you don't have a penchant for traditional art. Don't worry about it looking good, just try to have fun! At the end of the day, the shittier the job, the more punk it is.
[ Step Count : 6 ]

Here's what you're gonna need! (optional materials have a star next to them instead of a regular point):
-> hot glue gun (in replacement of pliers)
-> safety pin
-> bottlecap (unbent, preferably a twist off)
-> can tab
✮ pencil/pen
✮ sandpaper
✮ paint & paintbrush/posca pens
✮ regular Elmer's glue
STEP 1:
Gather your all of your materials and place them on your workspace. I'm going to paint mine, so I got the sandpaper, paintbrush, and paints as extra materials.
STEP 2:
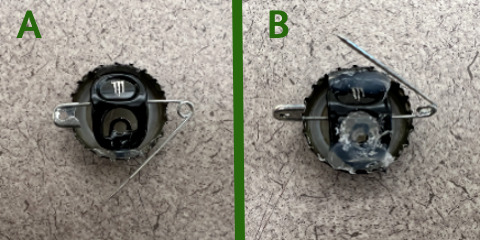
If you're not going to paint yours, go ahead and skip to step 3. Otherwise, get your sandpaper and your bottlecap, then sand down the surface (A). Paint your base, draw a design with the pencil/pen, and fill it in with your paints/posca pens (B)! After I'm done painting I'll usually seal it in regular Elmer's glue to make sure it doesn't get messed up anytime soon (C). I chose a little green skull since the person I'm gifting this too likes and spooky stuff and green is their favorite color :]

[ Also sorry for the change of scenery, I had to finish at the library cause I was studying. Visiting, donating, and helping your local library is Punk As Fuck. ]
STEP 3:
What you're going to do now is set your bottlecap aside, and take out your can tab. I have joint problems and I can't use pliers, so I bend it over the edge of a table by holding it half over the edge and pushing down to bend the metal. But try not to bend it too much so your safety pin stays in place!
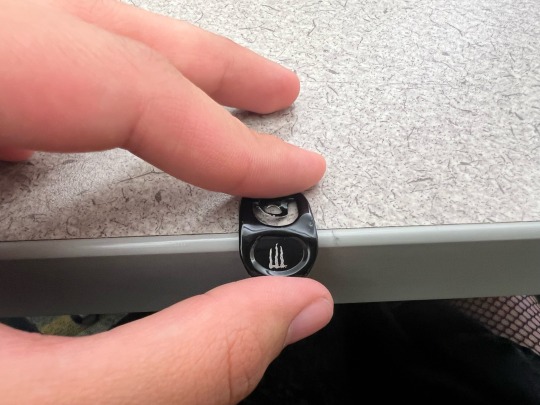
STEP 4:
Okay, here comes the tricky part. Like I said, I have joint issues, so I can't use pliers because they hurt my hands. Instead I'm going to set aside my now bent can tab and bring back my bottle cap, then flip it over. Place 2 hefty drops of hot glue on the bottom and top of the pin, then get your safety pin and open it so you can place it on the back horizontally.
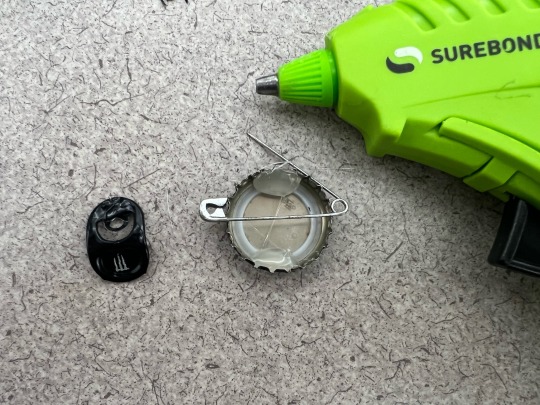
STEP 5:
Now, place your bent can tab on the back of the pin and over the open safety pin, pressing it into the hot glue drops and letting it dry for a little bit (A). If you like, you can also put two more drops of hot glue on the tops of the bent can tab for extra security (B). I also put some hot glue in the middle of the tab's opening for extra security on the safety pin. Please pardon the absolute dogshit photo quality it wasn't cooperating for some reason LMAO
STEP 6 [FINAL]:
Wait for it to dry, then you're all done!! Your very own bottlecap pin. You can attach this to bags, jackets, shirts, pants, and pretty much any material that a safety pin can glide through.

Here's the finished product, as presented by my friend D at the library (everybody say thank you D for modeling)!!
[ -> Next (coming soon:]) ]
#punk#diy punk#bottle cap pin#diy tutorial#punk rock#bottlecap#bottle caps#punk tutorial#diy#diy jewelry#diy accessories#danny's tutorials
473 notes
·
View notes
Text


punk spot and goth sarah stuff 🫰
i also made playlists of the kind of music i think they'd listen to :') you can listen to spot's here. most tracks fall under the hardcore subgenre, but there's also a good amount of ska and pop. generally has a chaotic, garage, and/or dated kind of sound, really wanted the kind of stuff that scratches my brain in a specific, rough way
there's also sarah's playlist, which i'm less confident about because i'm wayyy more immersed in punk subculture and music. but. i tried! some gothic rock, mostly punkabilly and gothabilly. i feel like she'd be into music that has that campy slasher feel, so that's the overall mood i was gunning for
#newsies#92sies#uksies#sarah jacobs#spot conlon#drawings#confession idk anything about uksies this is purely based on vibes bcuz the concept of a pinoy nonbinary spot has charmed me#anyways more nerdy stuff ahead i am so sorry >>>#i heart thinking about what characters would be like if they were punk it is so fun#i view sarah as punk usually so it's interesting to compare & contrast her and spot#like sarah i personally cant see modifying her hair or her body much. she'd mostly stick to diying clothes and jewelry#so while she IS punk she's not the kind of punk that most people auto think of#but spot feels like someone who'd /really/ want to lean into all the trappings of punk. being intimidating AND cool#so they're spiky all over. hair piercings jacket are sharp#sarah's battle jacket is a comfortable corduroy material. it's colorful and has random scraps of fabric bcuz the goal is#to make the original jacket last as long as possible#whereas spot's has more inflammatory patches and is strictly black and white and has the sleeves cut off#and has non fabric stuff attached like the spikes and studs and also soda can tabs#because they also strike me as someone who collects random odds and ends. hence the bottle caps repurposed as pins#i also wanted to play around with adding chains and safety pins onto their jacket but alas#ultimately had to prioritize readability#same thing w sarah i wanted to give her layered necklaces and more maximalist elements to her outfit but it ended up muddying everything up#anyways. im insane but specificity is very important to me for punk stuff just because i think#'punk versions of xyz' tend to water down what punk actually is by prioritizing the aesthetics of rebellion without being specific#in What they are rebelling against. which is why these headcanons lack inflammatory political ideas and punk bands#or like they'll just have the circle A sign and it's like ok but do you know what anarchism is and what anarchist praxis looks like#also spot would not be an anarchist tbh they read as more of a commie#they are not doing nonhierarchical based organizing iykyk
27 notes
·
View notes
Text
step 1: get a really big jar
step 2: put WEIRD STUFF into THE JAR
#rocks and shells and bones and teeth and dried flowers and jewelry exes gave you and bottle caps and corks and melted wax and idk. others.#i love my jar. everyone should have a jar.#broken glass: also good.
38 notes
·
View notes
Photo

Four Red Glass Perfume Vials Connected in the Form of a Cross. Each vial has its own silver screw cap. The topmost cap appears to have an additional metal loop for hanging the cross from a chain or cord.
(Source: collection.sciencemuseumgroup.org.uk)
#perfume bottle#scent bottle#glass bottle#vessel#vial#jewelry#pendant#amulet#antique#decorative arts#silver#glass#engraved#red
413 notes
·
View notes
Text

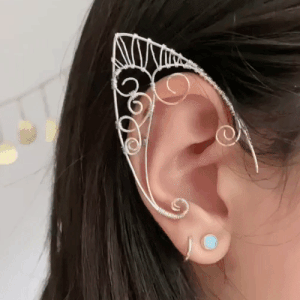


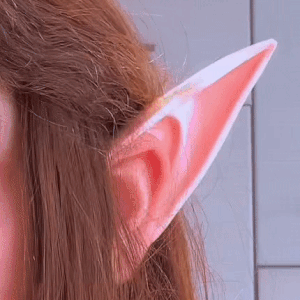

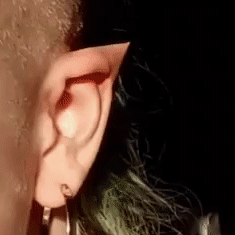
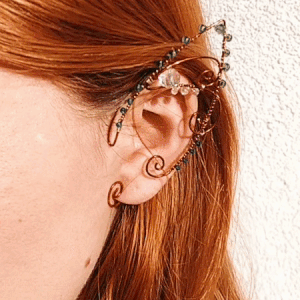
gifset with elf ears for @catboy-on-main!
🧝|🧝|🧝
🧝|🧝|🧝
🧝|🧝|🧝

plus one extra gif. i couldve put this and gif #4 in their own gifset but i didnt feel like it
#talos gifs#stim gifs#stim#elf ears#irl people#irl hands#elfcore#fairycore#elfkin#metallic#jewelry#shiny#wire wrapped#earrings#charms#bottles#teal#pink#gold#stars#green#hair
228 notes
·
View notes
Text
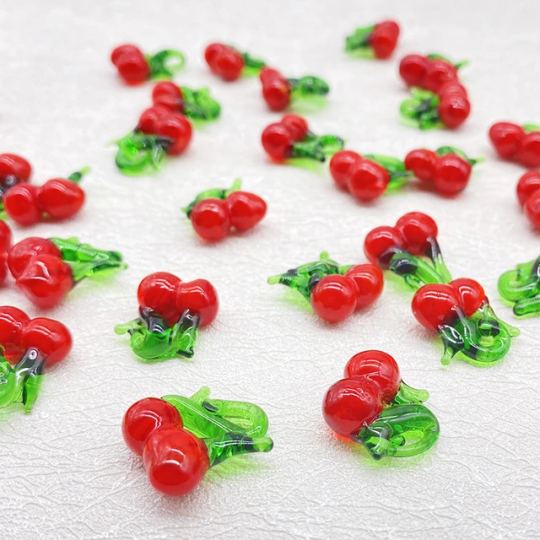
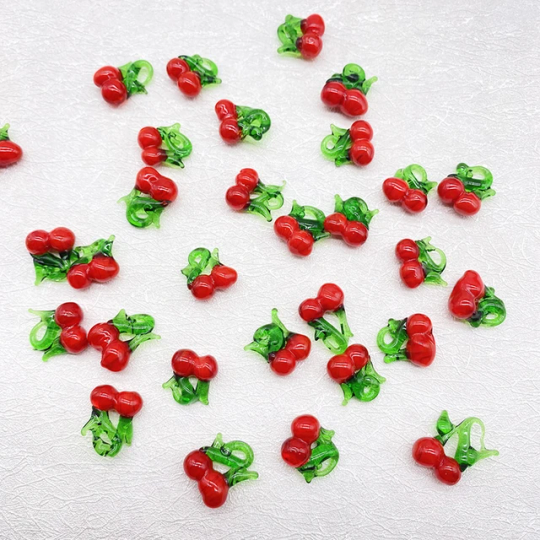

Lampwork Cherry Beads Pendant For Necklace Making DIY
#cherry tomatoes#cherry blossom#cherry rambles#cherry talks#sprinkles#cherries#frosting#cherry magic#strawberry#blueberry#glass art#embroiderydesign#wood#vase#bottle#texture#glass mask#glass onion#glass beads#lamps#glass animals#jewelry art#accessories#necklaces#jewlery#jewellery#jewelry making#jewelry design#jewelry bonney#jewelry buyer
8 notes
·
View notes
Photo


Working on putting together some new bottle-themed jewelry today. Got everything poured, now I just gotta get some cords or chains attached :)
57 notes
·
View notes
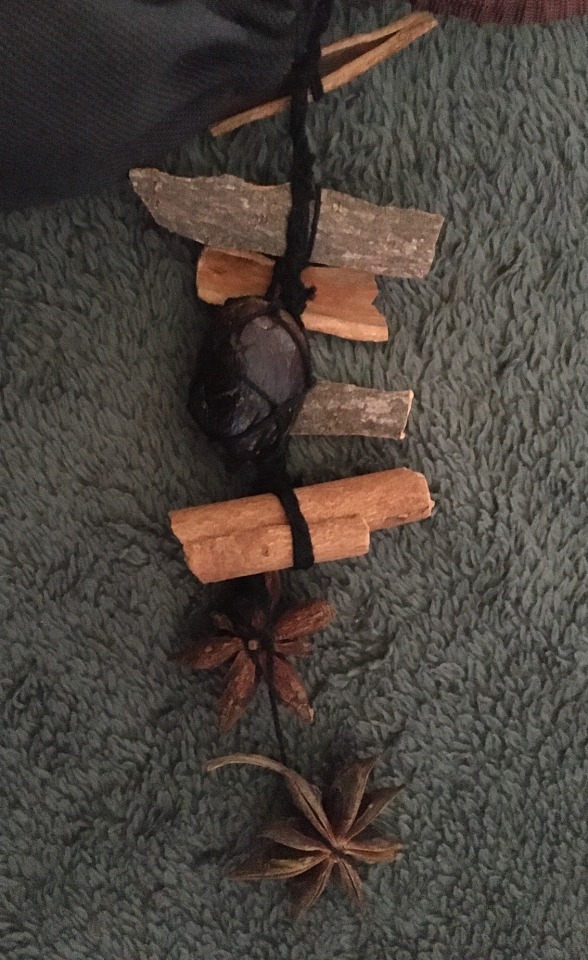
Photo
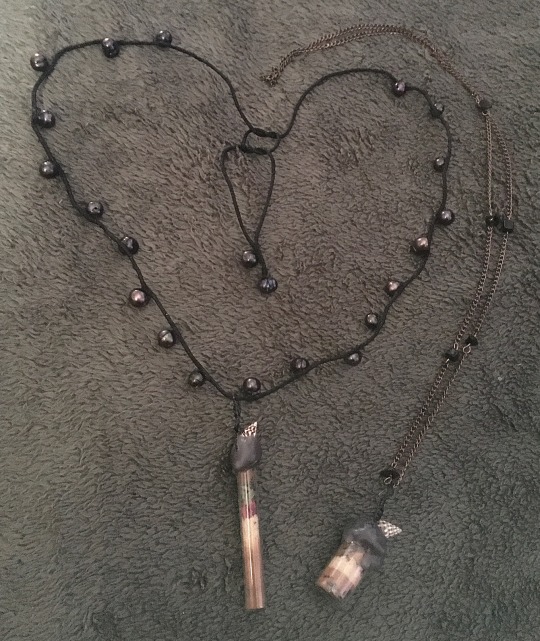
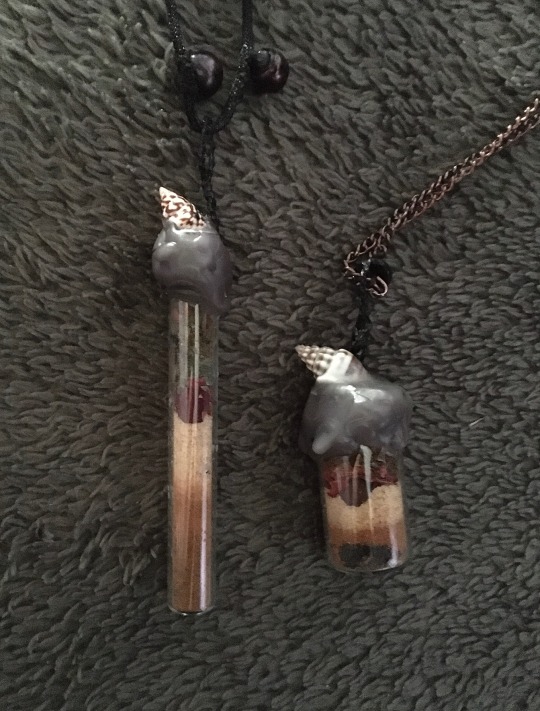
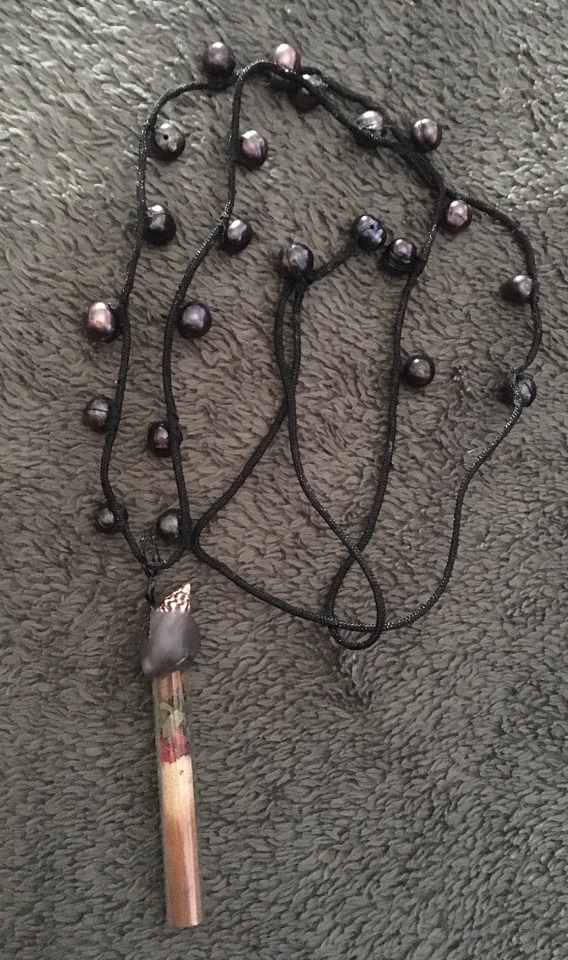


Some witchy things I did recently! <|:^D
I made a couple jar charms for love (for self love and just general love and niceness). I used the same ingredients for both of them: black salt, cinnamon, brown sugar, bits of dry rose petals, pieces of magnolia leaves and cloves, these were all things that I had around the house (mostly in the kitchen) or that I harvested from outside in my yard.
I also made both of the jars into necklaces. I made the string with black pearls (a lot of them have bit of a brownish, reddish tint to them as well) specifically for one of the jars, and then used another chain that I sort of made a while ago (I added the black jasper beads to it).
I also made a spell pouch for prosperity and good fortune, it’s got a charm thing hanging on the outside made of cinnamon sticks, nutmeg and star anise.
#witchcraft#witch#my post#my photos#witch crafts#witch altar#altar#sea witch#sea witchcraft#ocean witchcraft#ocean witch#witchy#spell jar#spell bottle#witch jewelry#witch jewellery#love spell#love witch#love charm#love magic#love magick#lovecore#forestcore#gremlincore#witch charm#aphrodite witch#aphrodite altar#aphrodite devotion#aphrodite deity#aphrodite devotee
204 notes
·
View notes
Text
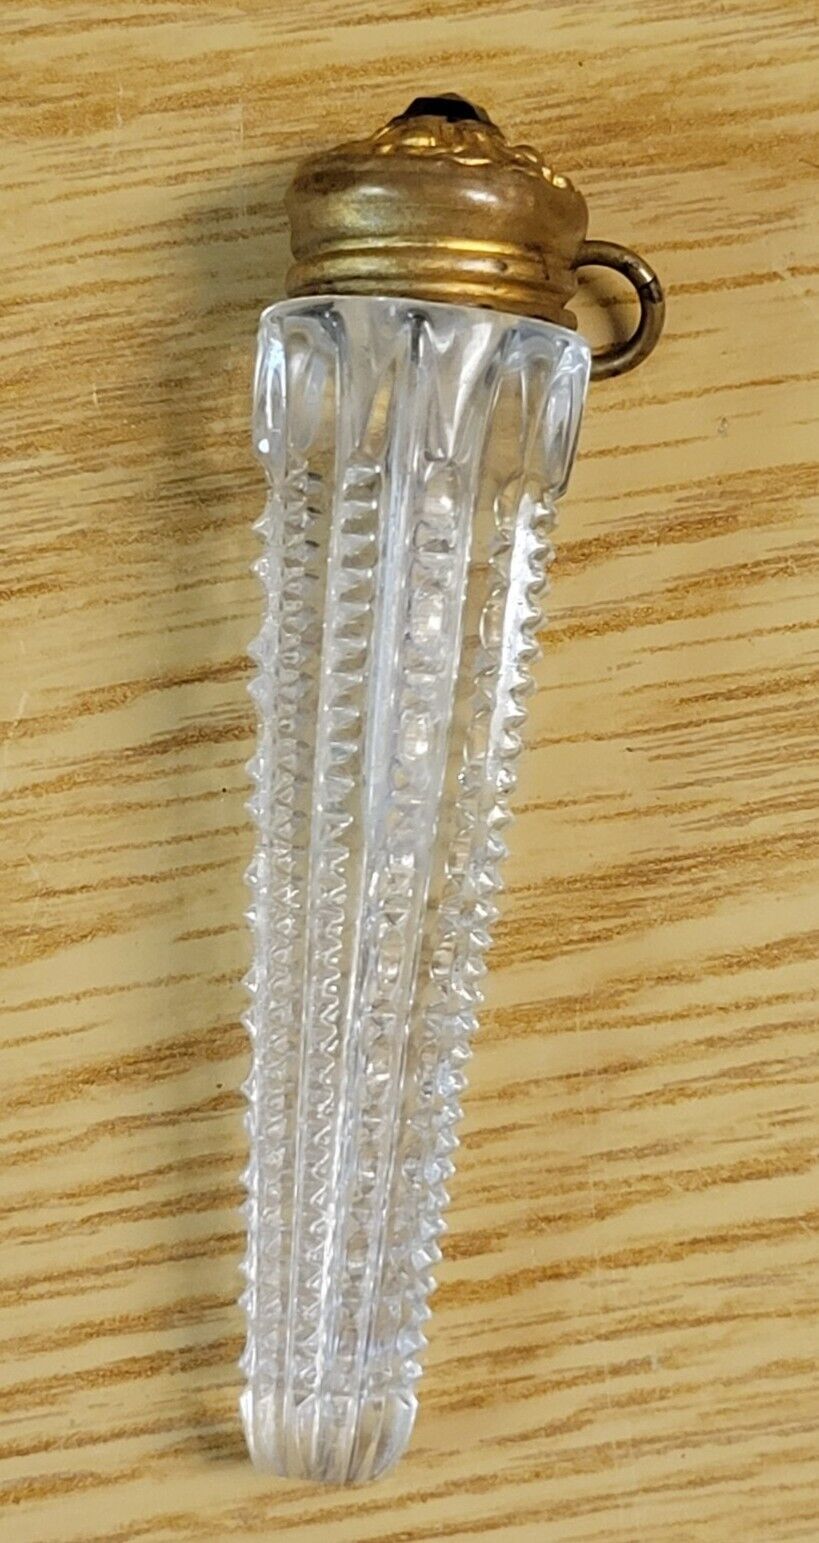
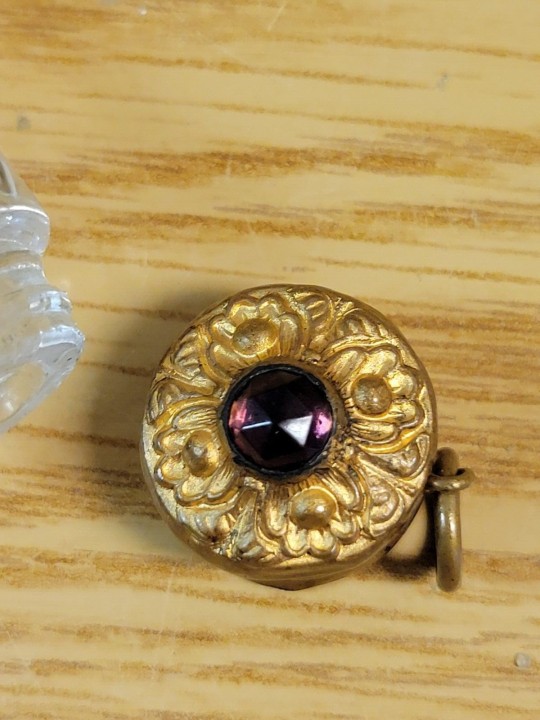
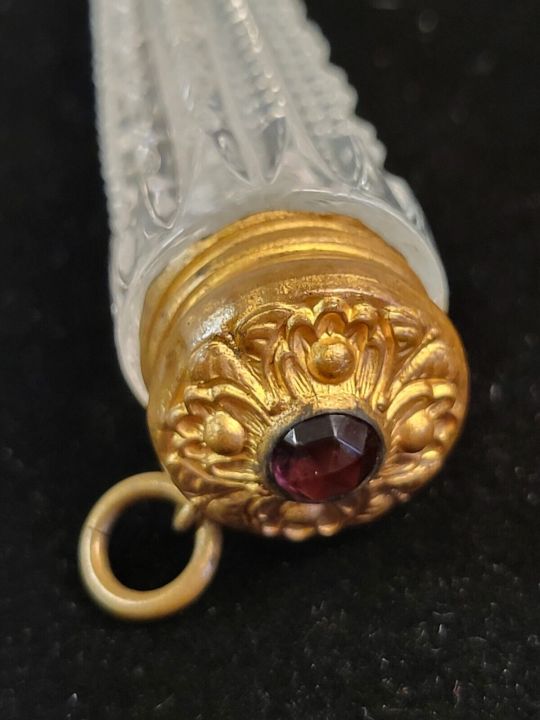
Antique 1890’s Victorian Chatelaine Cut Crystal Perfume Bottle wAmethyst Top ebay hiddentreasuresmn
19 notes
·
View notes
Text


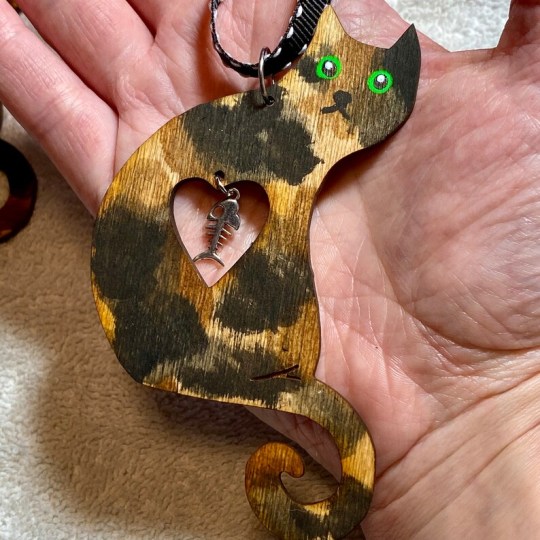

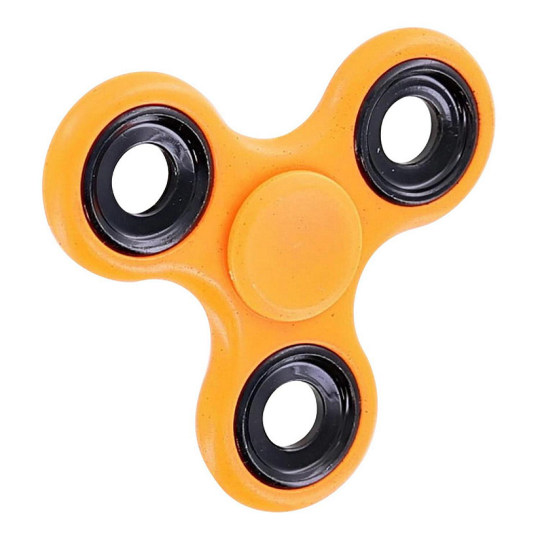
Tortoiseshell stim set
×/×/× ×/× ×/×/×
#text#autismposting#pic#stim toys#stim tools#worry stone#thinking putty#crazy aarons thinking putty#tangle jr#tangle#fidget toy#fidget toys#fidget#stim toy#sensory jar#sensory bottle#glitter bottle#jewelry#keychain#fidget cube#fidget spinner#kittyposting#tortie#tortoiseshell cat#orange#black#gold#stim set#shopping
6 notes
·
View notes
Last Seen Blogs
tugou-dog
土狗Tugou
hit--n--run
ღ ﻮค๓є ๏ภ, ς๏ςкรยςкєгร
crowning-art
Xena- I have a potato for a brain -_-

overclassy
o v e r c l a s s y