#lgbtq quilt
Text
Finished a quilt for my friend, shipping it out tomorrow. So happy with how it came out
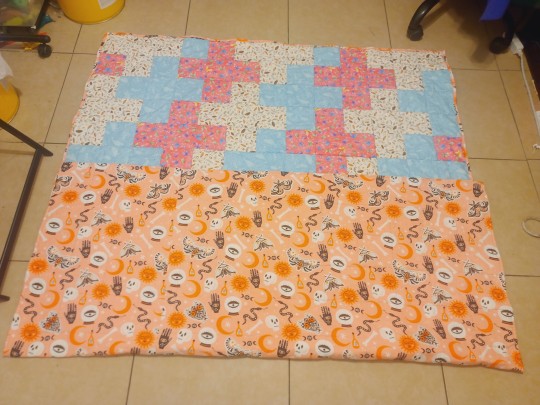
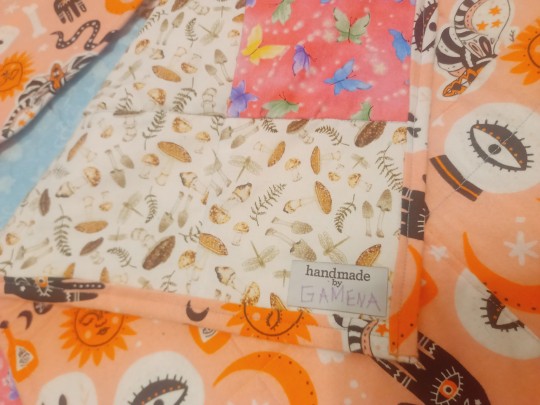
#quilting#sewing#handcrafted#handmade#quilt pattern#quiltblr#handmade quilt#trans flag#trans pride#lgbtq artist#lgbtq#lgbt pride#lgbtq rights#trans rights#trans representation#lgbtq quilt#cotton quilt#witchy#gamena gifts
76 notes
·
View notes
Text
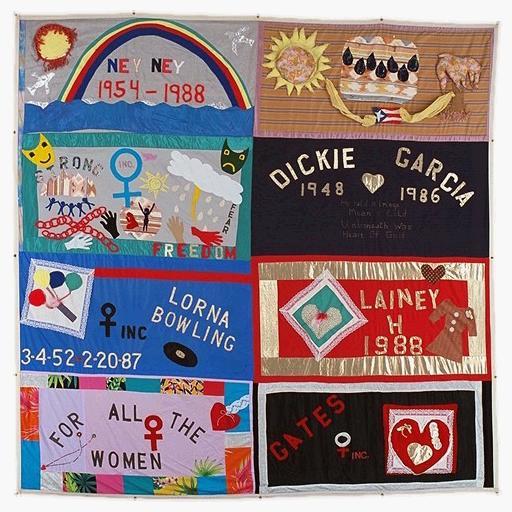


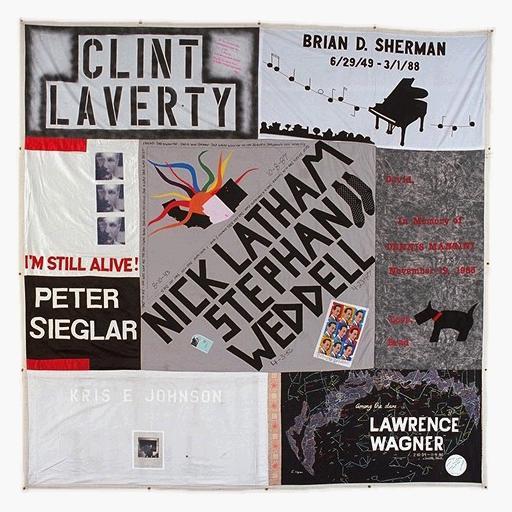


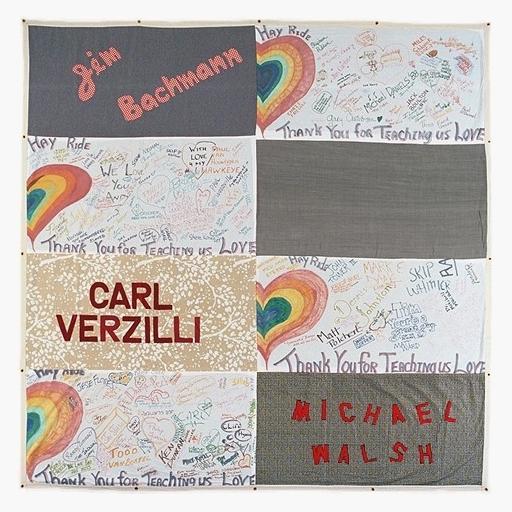
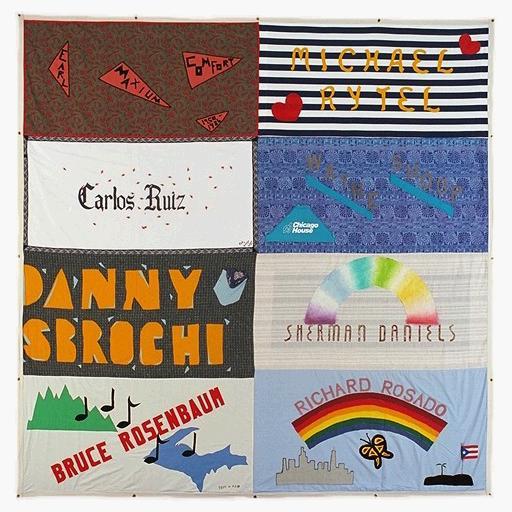
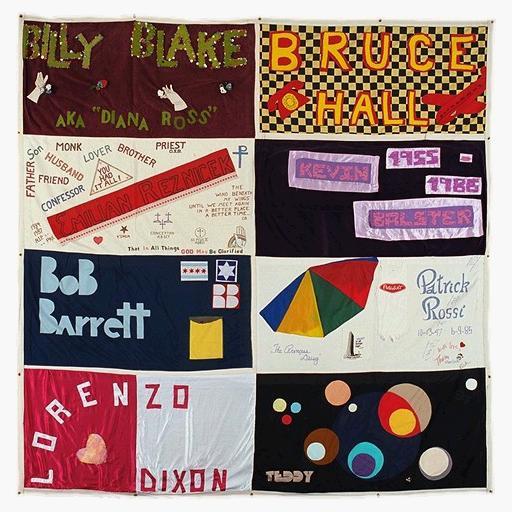
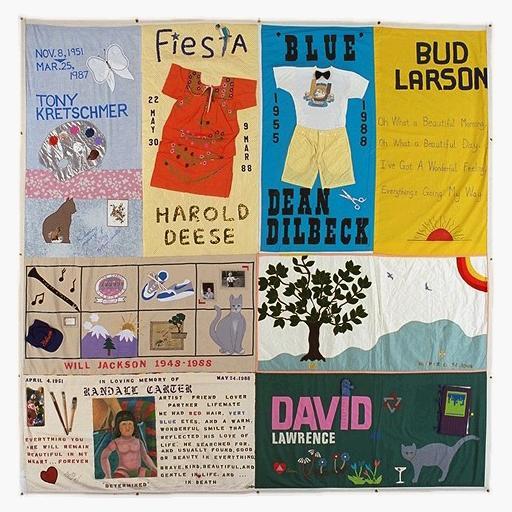
"let love replace fear through you."
AIDS QUILT SERIES | VIEW THE QUILT
#*aq#aids quilt#aids activism#hiv aids#act up fight aids#fight aids#aids#hiv/aids#aids epidemic#lgbtq#lgbtq history#lgbt history#queer history#i see that some folks have found my quilt tag & are reblogging.#& it inspired me to make another post before pride month is out.#thank you to everyone who reblogs one of these posts. i mean that.#thank you for taking a moment to love those who were taken.#anyway it was so hard to choose a tagline for this particular one...#' the face of the world has been changed forever. '#' our hearts will always be together. '#' i'm still alive! '#' for all the women. '#' for david who loved the minnesota prairie. '#' for everyone... love amy. '#& i feel you amy.#for everyone indeed.
426 notes
·
View notes
Text
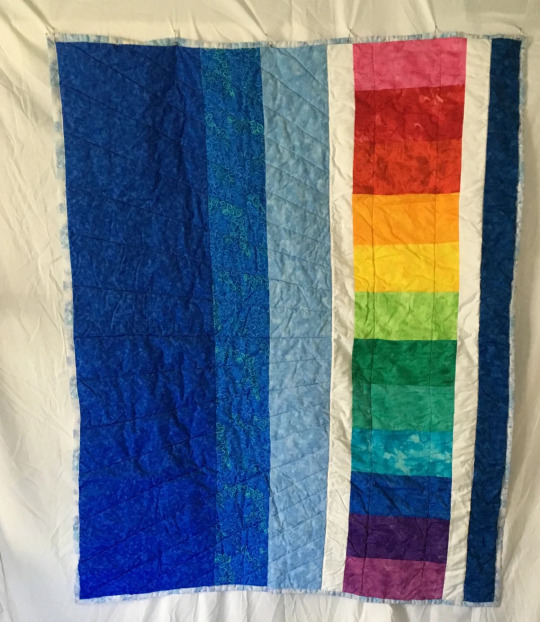
My first quilt! Entirely hand sewn except for the binding. I worked on this in every imaginable situation including during a lockdown from a bomb threat.
I’m also not out to my family so this is acting as a secret pride flag
#art#artist on tumblr#my art#quilt#quiltblr#rainbow#textile crafts#hand sewing#lgbtq#lgbt art#lgbt pride#pride
325 notes
·
View notes
Text
"Queer Universe" quilt by me
194 notes
·
View notes
Text
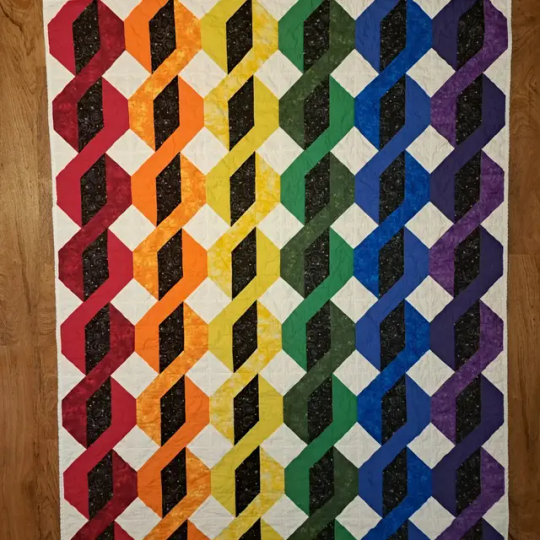
Progress Pride Flag Quilt Block Pattern & Tutorial

Don't you just love the flag of our people? Do you have an inner grandma that years to make stuff? Do you want to combine these two things and make a queer quilt?
Well, I've got you.
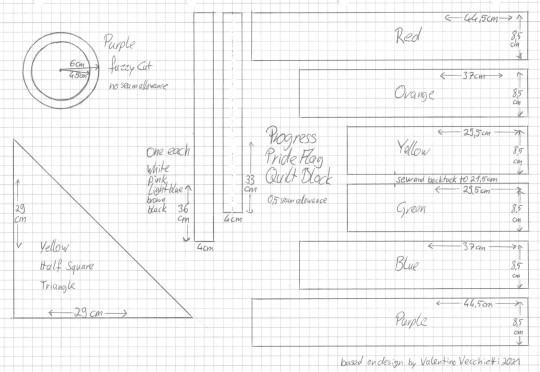
Behold the pattern! And my lack of graphic skills, so I drew it on paper!
Basically it's a bunch of rectangles, one half square triangle and a fuzzy cut circle. I don't know shit about quilting and I was able to come up with it. Why Centimeter, you ask? Because I'm German and that's what I'm familiar with. Why weird measurements and not jelly rolls and layer cakes and stuff? Because I'm German and quilting is not really a thing here.
Onto the tutorial!
You'll need:
A scrap of fabric of red, orange, yellow, green, blue, purple, black, brown, light blue, pink, white each
additional fabric for the border
Cutting mat, quilting ruler, roll cutter
sewing machine
thread
pins
double sided interfacing
iron and ironing board
fabric sheers
compasses
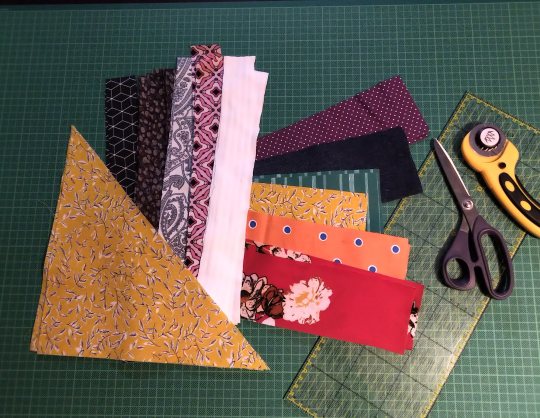
Step 1: Cut everything. Duh. We'll take care of the circle later, don't worry about that now. The half square triangle is exactly what it sounds like. A square and then you cut it diagonally. That's why I didn't give the length of the hypotenuse.
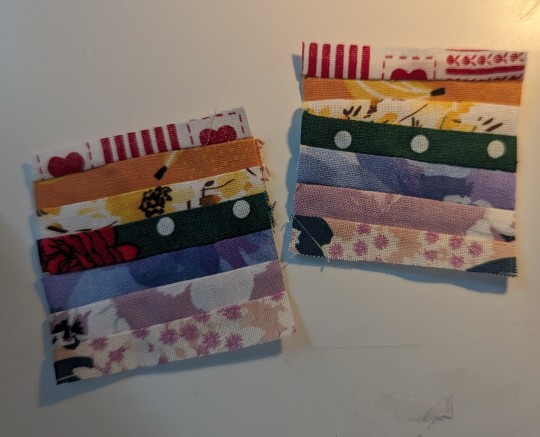
(Note: I'm making two blocks at the same time, that's why there's so much fabric. Also this is a middle of the night project, hence the lighting.)
I'm using all kinds of different fabrics, different weights and drapes, some stretchy, some transparent, so I needed to interface some of them.
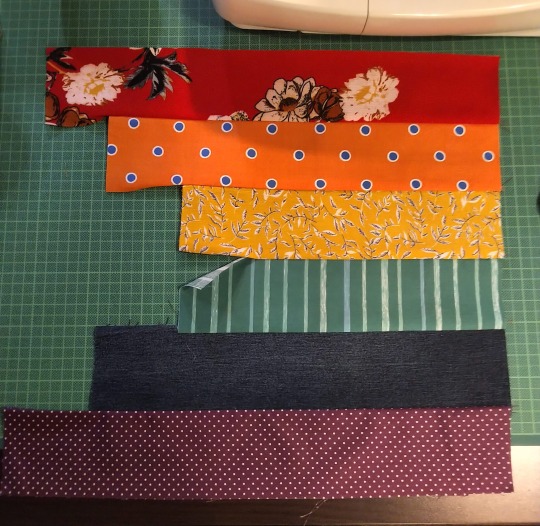
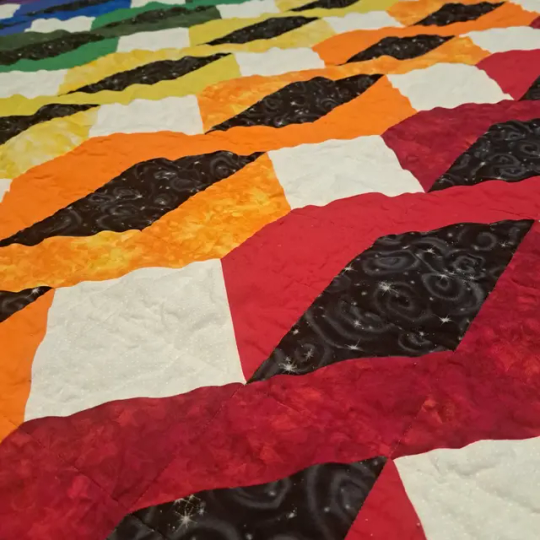
Step 2: Sew the rainbow together. 0,5cm seam allowance on everything, that's exactly the edge of the foot on your machine. Double and triple check that everything is facing the right direction before sewing. The seam of yellow and green does not get sewn fully, only 21,5 cm! That's important later! Also backtack there. Don't forget to iron.
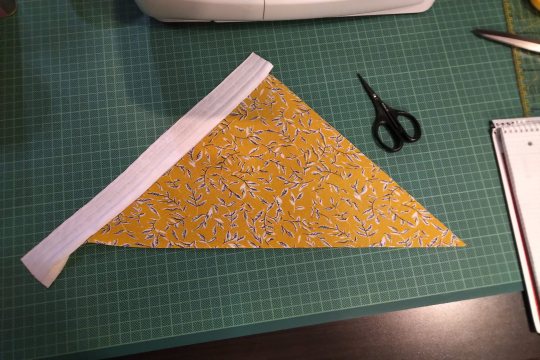
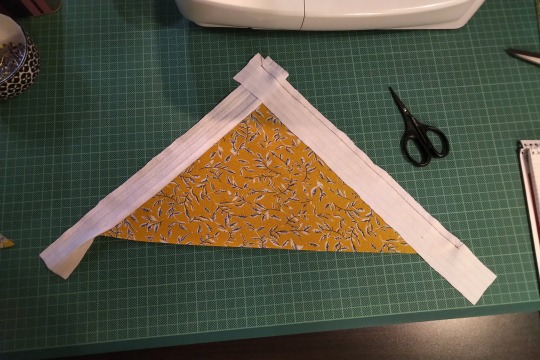
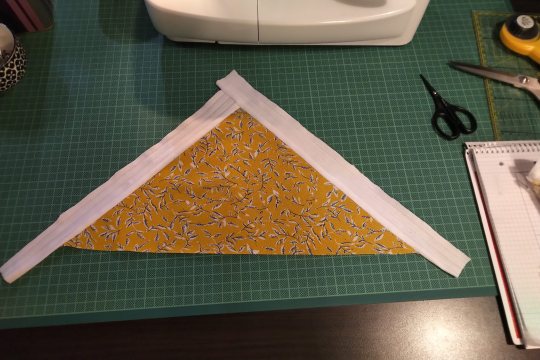
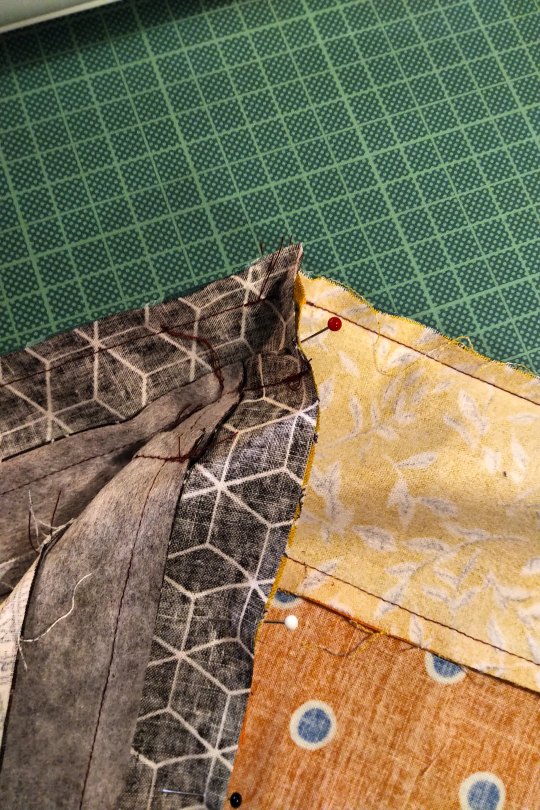
Step 3: Sew the strips to the half square triangle. For this you have to switch between the sewing machine and the ironing board constantly. Attach the shorter strip diretly to one side of the HST, iron it open. The second strip of the same colour gets attatched to the other side of the HST and the first strip. Look at the pictures closely if you're unsure how that works. Also the strips are longer than the triangle. We'll square that up later.
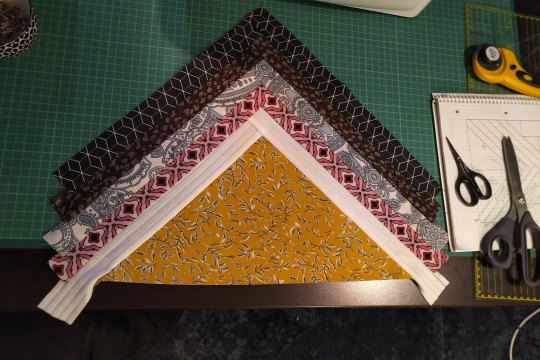
All strips attatched will look like this. See how the two strips meet at the tip!
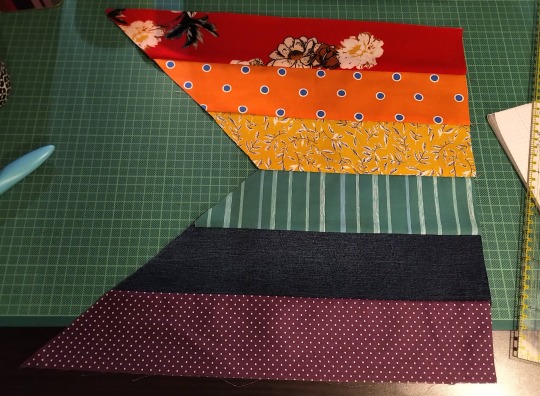
Step 4: Cut the rainbow part to size. The seam between yellow and green is 22cm long. The shorter seam from before and some seam allowance. The outsides of red and purple are 44,5cm long. You will cut a little triangle from every single colour. Do this slowly and carefully. Maybe your fabrics have stretched a bit (mine did). Don't worry, it will be ok.

Step 5: The Y seam, part one. Y seams are tricky, but there's only one for this block. So put your straps part on your rainbow part and line them up so that the tip of the strip part overhangs the seam between yellow and green. Remember that it's not about the edges of the fabric, but where the seam will be. So position the strap part so that the 0,5cm seam will meet the yellow-green seam.
But don't sew all the way! Leave 0,5cm at the tip!
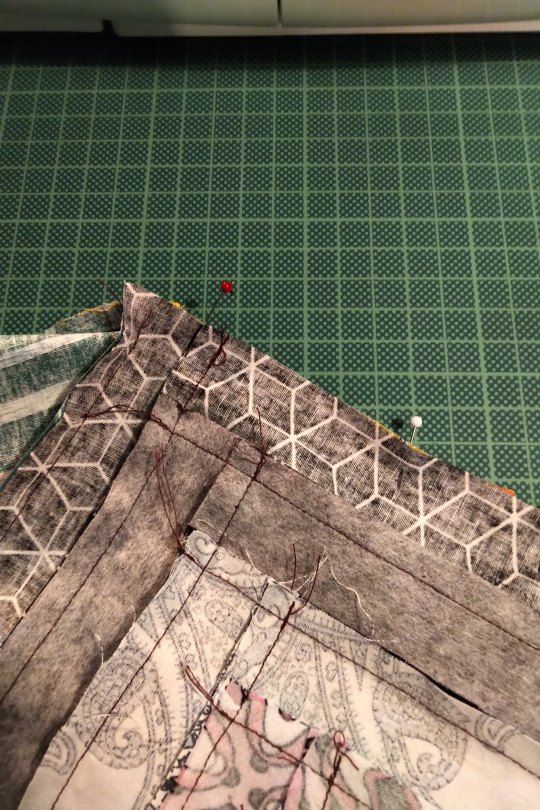
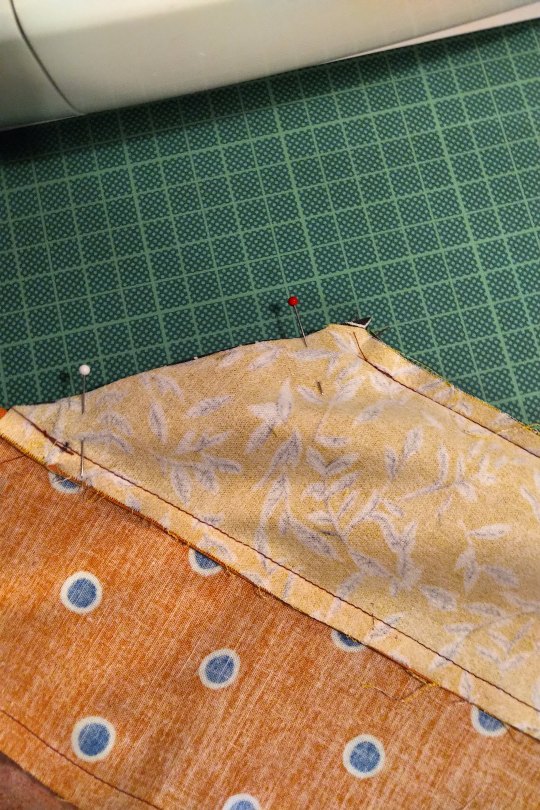
Step 6: The Y seam, part two. Now, fold both the rainbow part and the strips part in half and if you've done the last step correctly, the remaining two edges will allign. Pin and sew.
I can't explain it better than I've done here, I'm sure there are tutorias out there. Good luck!
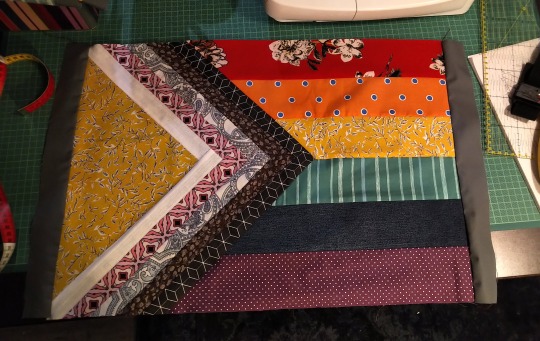
Step 7: Square up. Iron your block to that everything is nice and straight and flat. Then use the fabric edges of the red and purple to cut the remaining ends of the strips. Use the HST to cut the white. Be careful, the long side of the triangle is on the bias and likely stretched a bit.
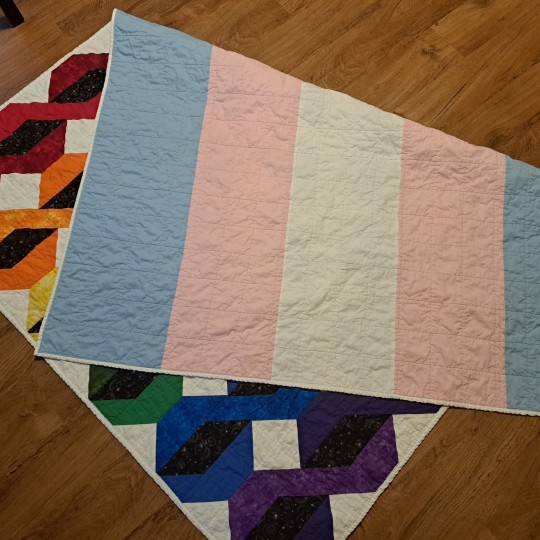
I already added borders here. I'm making a pillow case.
Step 8: Fuzzy cut and raw edge applique. Double sided iron on interfacing is essentially double sided tape. It has two types of glue, one gets activated by 2 seconds of heat, the other by 5 or so (depends on the product). The second side is also covered with a paper that needs to be removed before the second glueing. Read the instructions of the product you are using!
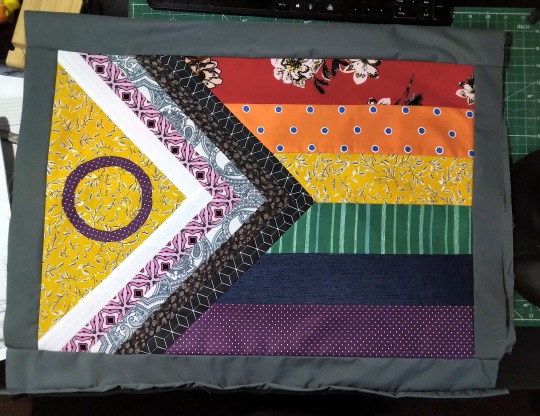
Use your compasses to draw a circle on the protective paper side of the interfacing. Cut it out roughly. Then place it with the rougher side on the backside of your purple fabric and iron for 2 seconds on middle heat. If you've just ironed your fabric before and the ironing board is still hot, wait for it to cool down. Also let the fabric cool down after applying. Then cut out your circle. The interfacing will have stiffened the fabric, so that shouldn't be a problem. Then remove the protective paper, place the circle on the yellow triangle where you want it and iron for 5 seconds. Let cool.
And you're done! The applique at this point is only secured with the interfacing, but it should hold fairly well. The quilting will secure it further.
And that's it. BTW, did you know that this design was made by Valentino Vecchietti for Intersex Equality Rights UK in 2021? Now you do. Happy quilting!
#lgbt+#lgbtq+#lgbtq community#pride flag#progress pride flag#valentino vecchietti#quilting#quilt#quilt block#quilt pattern#quilt tutorial#sewing#sewing machine#sewing tutorial#sewing pattern
114 notes
·
View notes
Text
Mini quilted rainbow patches
49 notes
·
View notes
Text
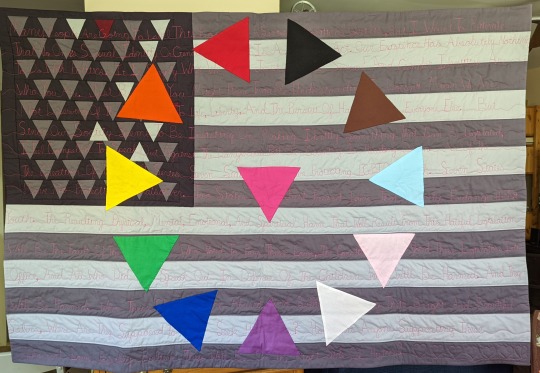
My Existence Is Not Political
This 64″ x 44″ quilt is one of a series of three quilts I’m creating in response to the anti LGBTQ+ legislation happening in the country. As of the creation of this quilt in April 2022, Florida and Texas have enacted laws that will harm LGBTQ+ youth. Politicians in other states are trying to follow suit. California and Colorado currently have the most protections for LGBTQ+ youth in the country.…
View On WordPress
#Andrew Ve Hansen#Art quilt#Boy meets quilt#boymeetsquilt#Brooklyn quilter#civil rights#Contemporary quilt#FMQ#Free-motion quilting#gay pride#LGBTQ+#LGBTQ+ pride#LGBTQ+ rights#Modern quilt#Political quilt#pride#Quilt blog#Quilt blogger#quilting#quilts#Silence equals death#Statement quilt
12 notes
·
View notes
Text

#hiv/aids#hivpositive#health care#discrimination#sex ed#aids#hiv aids#hiv stigma#aids activism#disability aids#sleep aids#band aids#aids crisis#lgbtq history#aidsawareness#aids epidemic#aids quilt#republicans#christianity#religion#catholicism#theology#religious#catholic
101 notes
·
View notes
Text
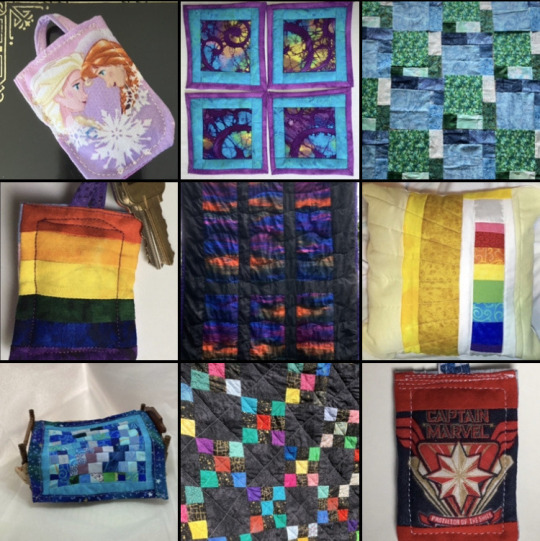
My turn to do a blaze post! And since my cats refused to have their pictures taken, let me share instead a link to my friend's Etsy shop, with beautiful pride quilts, fandom keychains, and other cool stuff!
207 notes
·
View notes
Text
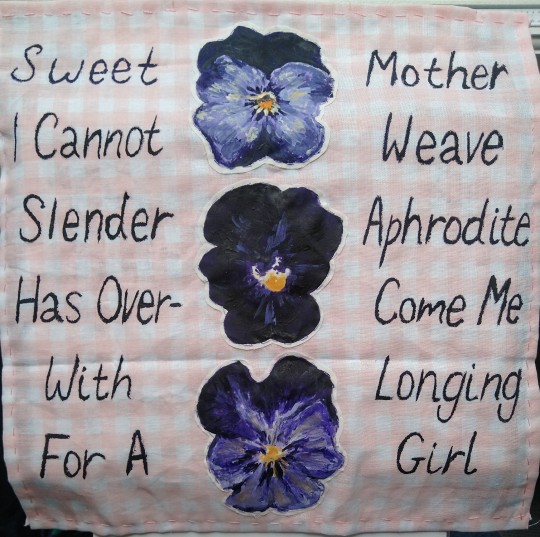
Fabric painted patch I made for a local community queer quilt <33
#sappho#sapphic#violets because lesbian etc etc#fabric paint#textiles#pride#queer#sewing#fabric painting#community quilt#lgbtq#queer art#lgbtq art#gay#lesbian
169 notes
·
View notes
Photo
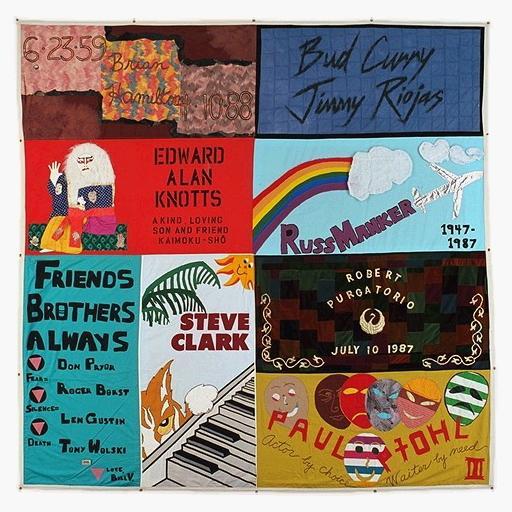
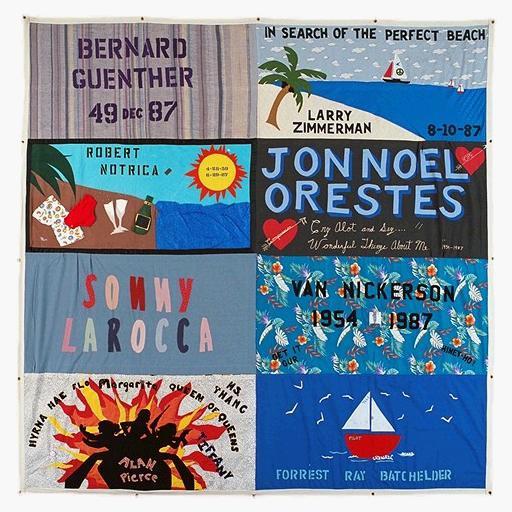
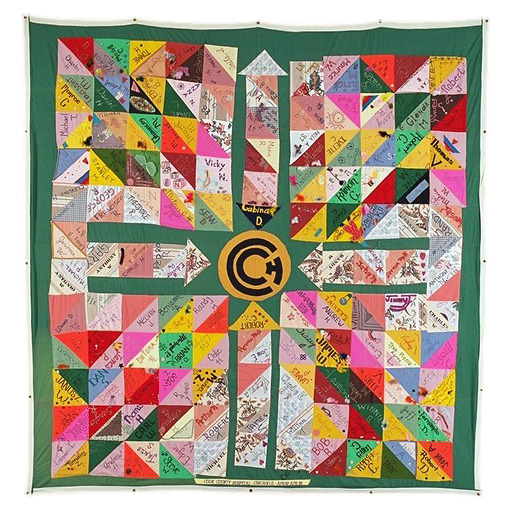

“cry a lot & say wonderful things about me.“
AIDS QUILT SERIES | VIEW THE QUILT
#queer history#lgbt history#AIDS awareness#AIDS quilt#HIV AIDS#AIDS Activism#lgbtq#act up fight aids#*aq#funny how some of these get thousands of notes & others get 1.#but i can't stop posting them.#there will always be more to share.
263 notes
·
View notes
Text
I want to talk about my day yesterday presenting my pride flag bracelet project at school! :D (if you're not interested feel free to scroll by)
So yesterday at school was the day where the students graduating from my school in my program (International Baccalaureate, or IB) have to present their end-of-year project, that they create themselves and set their own criteria and use to learn new skills and gain new experiences and such. I had all year to work on it with the help of my personal project mentor, my old science teacher who helped me set my schedules and organize my stuff. The presentations lasted the whole day with IB students of the other grade levels coming during the day and in the evening, we presented to our parents, some graduates of the program, and the parents of kids who possibly want to join the IB program at our school.
So my project was to make a total of 315 bracelets with the colours of 21 different pride flags (rainbow, gay, lesbian, bisexual, pansexual, polysexual, omnisexual, aromantic, asexual, aroace, abrosexual, trans, nonbinary, genderfluid, genderqueer, agender, bigender, trigender, demiboy, demigirl, and demigender) to sell this summer at the pride parade happening in Montreal. All the money I would make is going to Jag, an lgbtqia+ organization. I also sold some bracelets to students at my school on Valentine's Day and I was offering some during the presentations as well. This was my poster:

I got to stand beside my friends for the presentation, so that was fun. Anyway, here are a few nice things that happened during the day:
One of my friends bought like ten bracelets for herself and her friends, and she'd invited over some more of her friends to see her presentation and they bought some too!
One of her friends had a really nice colourful button-up shirt and I wanted to compliment it but I was too shy, but when they asked to buy an asexual bracelet they complimented me on my shirt and my hair!! So I told them I liked their shirt as well.
A bunch of adults (and some students) said while reading my display "wow, I never knew there were so many flags! I only knew about the rainbow one!" and most of them looked genuinely interested to learn about the different flags and their meanings. A lady also told me "oh my gosh, more people should know this! This is important!"
A young kid, maybe 10-11 years old here with his mom, listened to my presentation and told me it was cool, and asked me if I was lgbtq myself. I said yes, lesbian and asexual, and I pointed at the corresponding flags on my display, and he gave me a thumbs-up and said "Awesome! I support you". (Seriously it was so cute)
I got complimented a lot on how nice the bracelets looked, and how much time it must've taken to make them.
There was also this retired teacher who used to work at this school and who always came back for the project fair, the first openly gay teacher in the school and the former leader of the school's Rainbow Alliance Club, who came by to compliment me on my project, he bought two bracelets and gave me five dollars and told me to have a happy Pride this summer.
And there was this really nice old man who came to see my project, listened really attentively when I explained it, asked me questions about the organization the money was going to, and then took me by the shoulder and said "I think it's wonderful that in this generation, you can do a project like this and present it. Back when I was your age, you couldn't do something like this, and it's just amazing that it exists now. Who are we to judge others, right? Good job on the project." and he called his wife over to show her all the bracelets I'd made and she said they were beautiful.
So anyway I had a really god time even though I was exhausted by the end of the day. It was so nice to have people genuinely interested in my project and the pride flags, and I can't wait to sell them at the Pride Parade this summer! (:
#lgbtqia#lgbtq#oh yeah and for their projects one of my friends redecorated the entryway to their house#another made a quilt with her grandmother#another learned how to draw anatomy#and another fixed her sleeping schedule
2 notes
·
View notes
Text
youtube
Watch the American Climate Leadership Awards 2024 now: https://youtu.be/bWiW4Rp8vF0?feature=shared
The American Climate Leadership Awards 2024 broadcast recording is now available on ecoAmerica's YouTube channel for viewers to be inspired by active climate leaders. Watch to find out which finalist received the $50,000 grand prize! Hosted by Vanessa Hauc and featuring Bill McKibben and Katharine Hayhoe!
#ACLA24#ACLA24Leaders#youtube#youtube video#climate leaders#climate solutions#climate action#climate and environment#climate#climate change#climate and health#climate blog#climate justice#climate news#weather and climate#environmental news#environment#environmental awareness#environment and health#environmental#environmental issues#environmental justice#environment protection#environmental health#Youtube
17K notes
·
View notes
Text
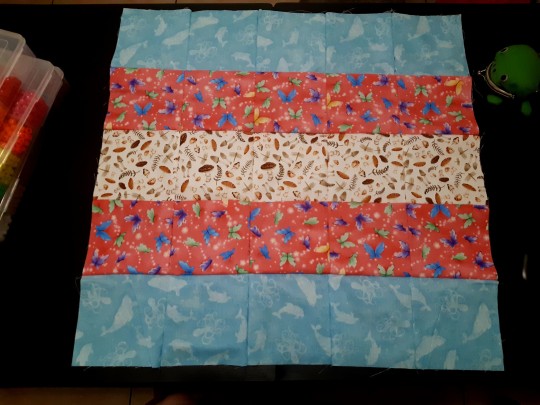
Placemat top I've made from extra bits for my next quilt, I like how it came out. c:
#sewist#sewing#quilt pattern#quilting#quilters#quiltblr#lgbtq#trans pride#trans flag#lgbtq flags#lgbtq artist#sewityourself#unfinished
7 notes
·
View notes
Text
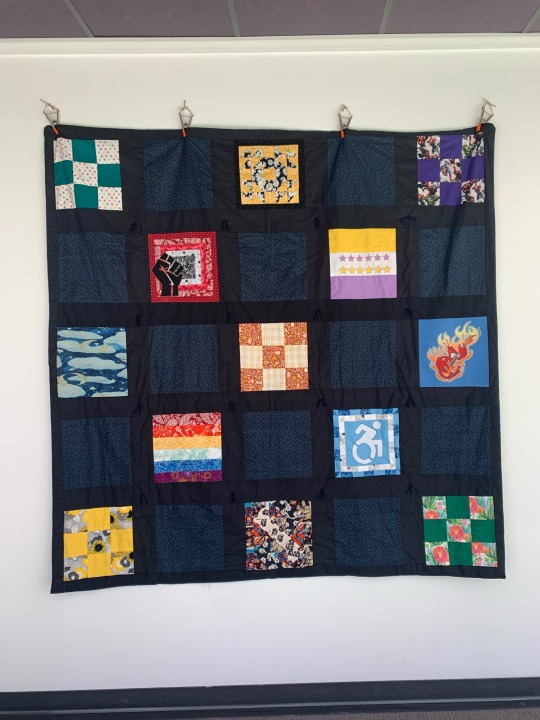
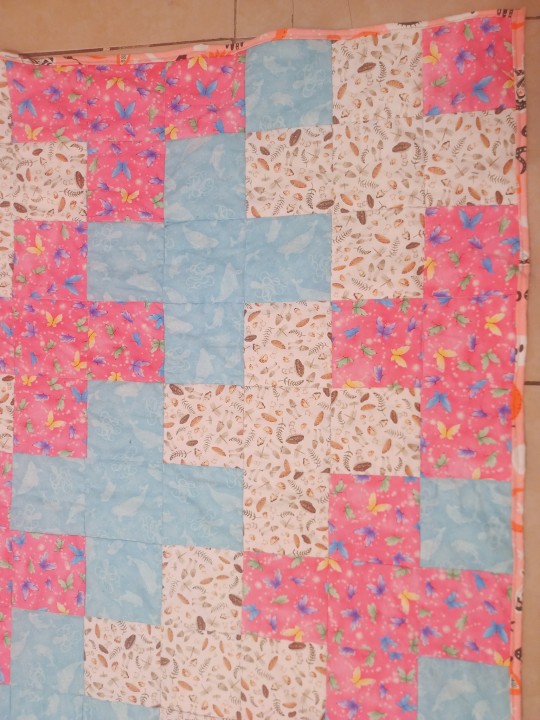
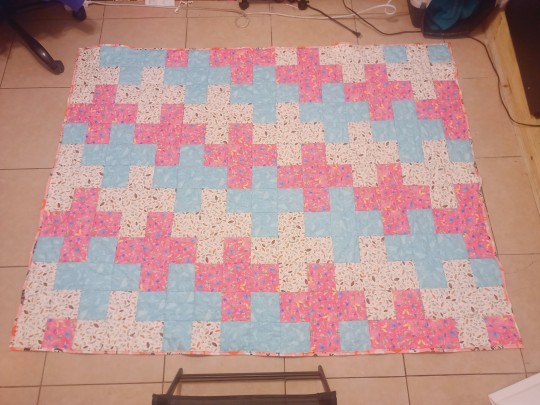
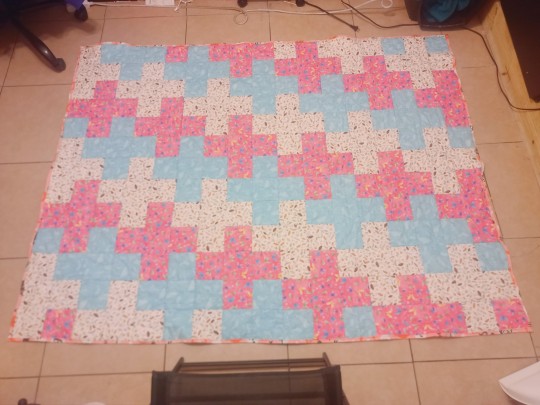
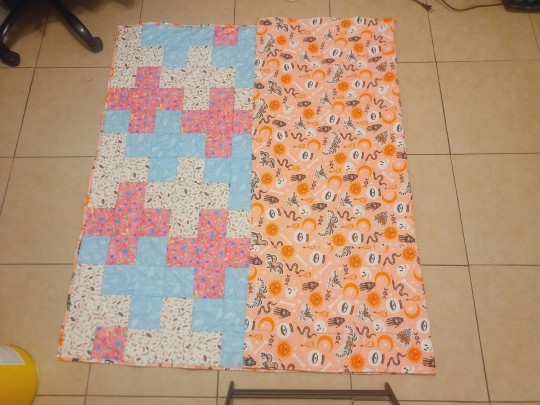
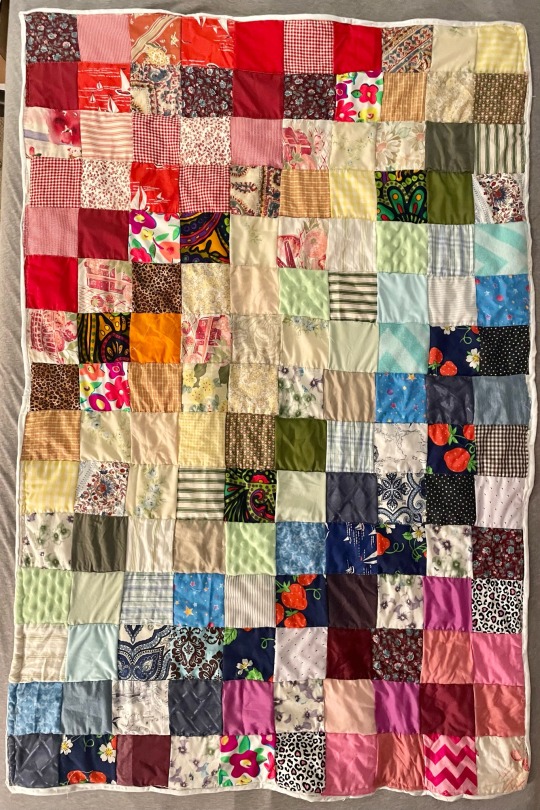
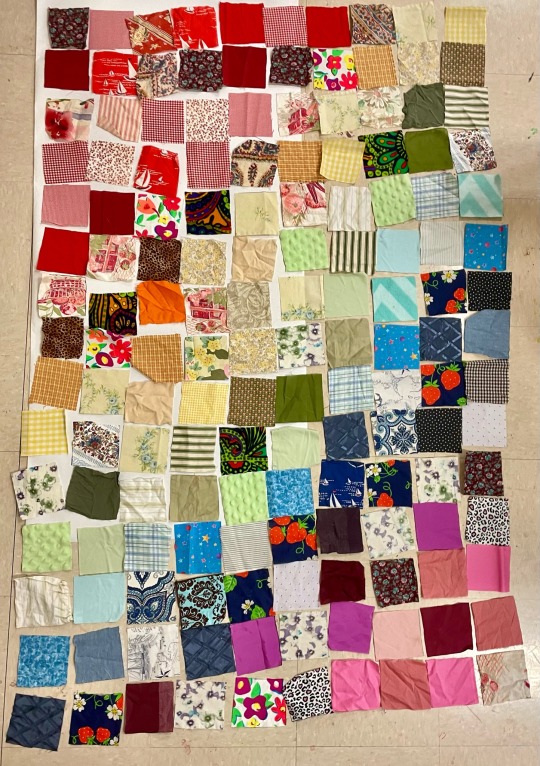
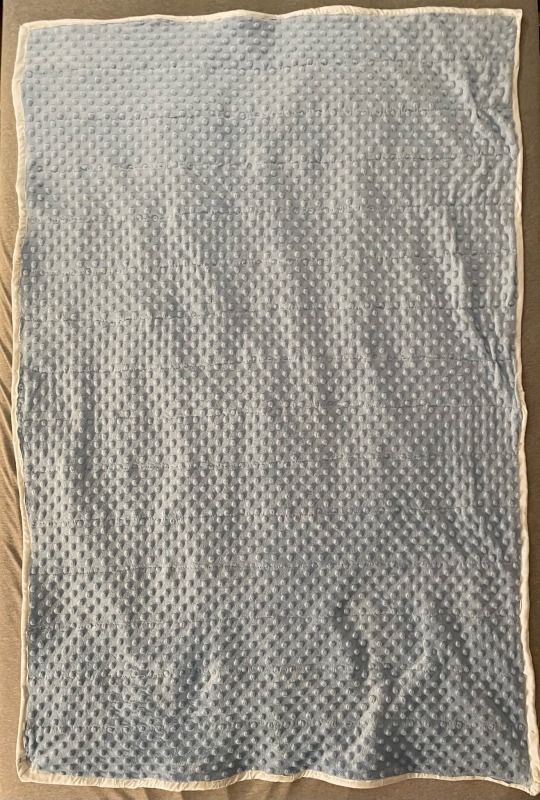
In the state I live in it is a graduation requirement to make a Senior project. So I decided to be different for some reason and made a 7ft by 7ft quilt. This was not at all my original intention at the start I was just gonna make a baby quilt like 3ft by 3ft. But, I was a dumbass and after I started making the blocks I was like I could totally make more, even though I had only 3 months left to finish because I’m a huge procrastinator. It actually worked out though. I ended up sewing on the entire backing the night before only finishing at 1 in the morning because it was due at 7am that following day.
#sewing#lgbtq artist#quilting#embroidery#fiber art#patchwork quilt#crazy quilt#quiltlove#handmade#my design#original work#school project#art project
21 notes
·
View notes
Photo
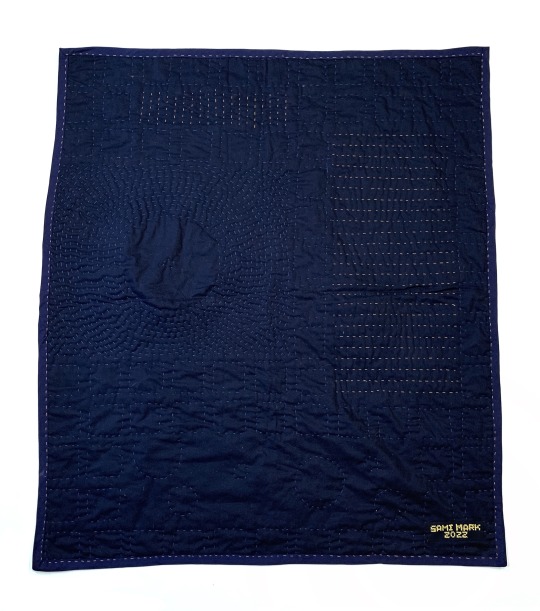
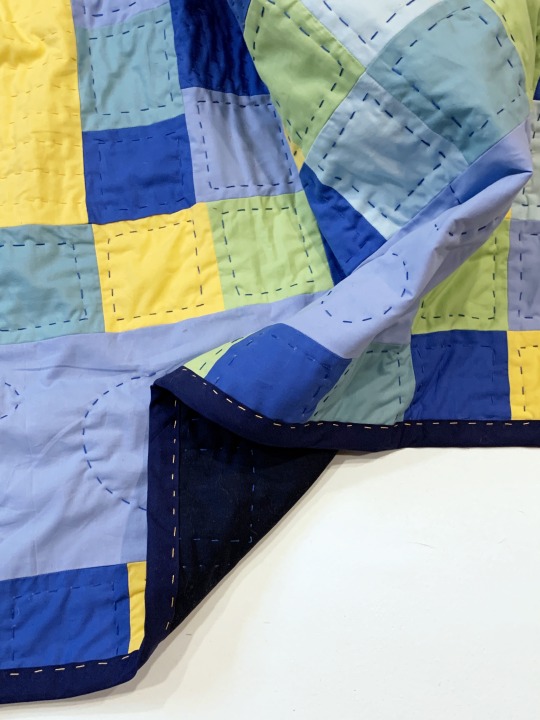
A student at the School of the Art Institute of Chicago, Sami Mark is drawn to the connections made between humans and nature. A love of learning guides their practice, and their pieces interact with the topic of science. New species are created via fibers practices, blurring the lines between biology and art.
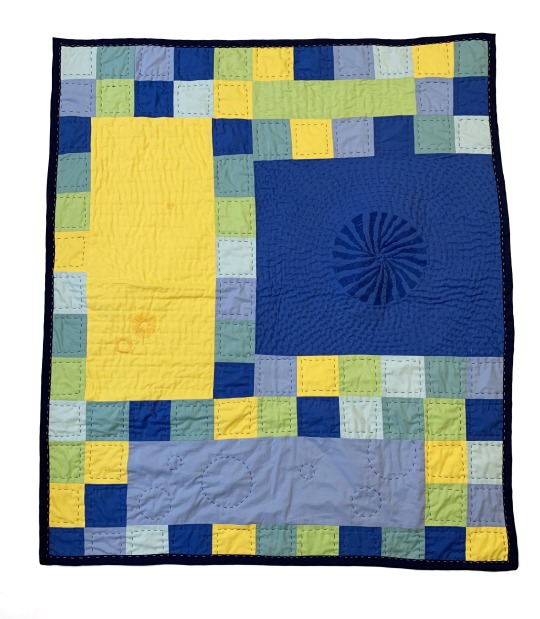
Quilting speaks to Sami as a method of making. They see quilts as wonderful pieces with a double use of being functional objects at the same time. They made this quilt to be shared with a friend on the couch, perhaps while watching a movie. Reflecting their personal interest in marine biology, the hand embroidery on this quilt is inspired by forms found underwater, like coral skeletons or barnacles. They think there’s something sweet about sharing an object that holds meaning to the owner, and that sharing interests and facts with the ones you love makes life wonderful. It’s something they would like to continue with intention in the new year.
Marine Quilt (2022), cotton fabric, cotton batting, crochet thread, and perle cotton thread (machine pieced, hand quilted), 43 x 49 in., available in HYGGE online exhibition here.
HYGGE © Jenny Lam 2023
#sewing#queer artist#lgbt artist#trans artist#blanket#quilt#quilting#textile artist#fiber artist#art#artist#artists on tumblr#lgbtq#queer#emerging artist#cozy#chicago#craft#textile#contemporary art
6 notes
·
View notes
Text
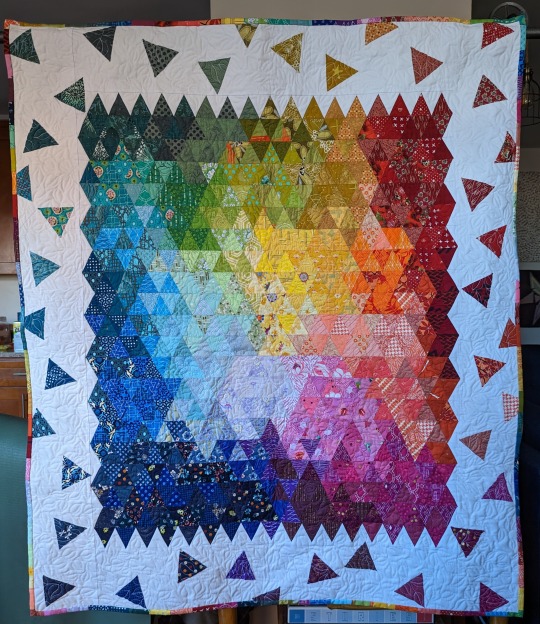
Community Garden
This 53″ x 46″ quilt was made for the 2023 Brooklyn Quilts! show put on by the Brooklyn Quilters Guild. It was completed in February 2023. It is mostly machine pieced with hand-appliqued triangles sewn on the borders. The middle panel is quilted with roses and the borders are quilted with leaves. The binding is a rainbow patchwork made with the same fabrics as the triangles. Over the last year…
View On WordPress
#Andrew Ve Hansen#Art quilt#Boy meets quilt#boymeetsquilt#Brooklyn quilter#Contemporary quilt#FMQ#Free-motion quilting#LGBTQ+#Modern quilt#Quilt blog#Quilt blogger#quilting#quilts#Rainbow quilt
9 notes
·
View notes
Text
youtube
Watch the 2024 American Climate Leadership Awards for High School Students now: https://youtu.be/5C-bb9PoRLc
The recording is now available on ecoAmerica's YouTube channel for viewers to be inspired by student climate leaders! Join Aishah-Nyeta Brown & Jerome Foster II and be inspired by student climate leaders as we recognize the High School Student finalists. Watch now to find out which student received the $25,000 grand prize and top recognition!
#ACLA24#ACLA24HighSchoolStudents#youtube#youtube video#climate leaders#climate solutions#climate action#climate and environment#climate#climate change#climate and health#climate blog#climate justice#climate news#weather and climate#environmental news#environment#environmental awareness#environment and health#environmental#environmental issues#environmental education#environmental justice#environmental protection#environmental health#high school students#high school#youth#youth of america#school
17K notes
·
View notes
Last Seen Blogs

greatwrath
CROOKED COMMANDER.

ashotasice
As hot as ice

me-for-who-i-am
From my heart.
rbcomics
RB Comics Group

archiveoftheodd
Welcome to the Archives