#Bronze Cloth
Text
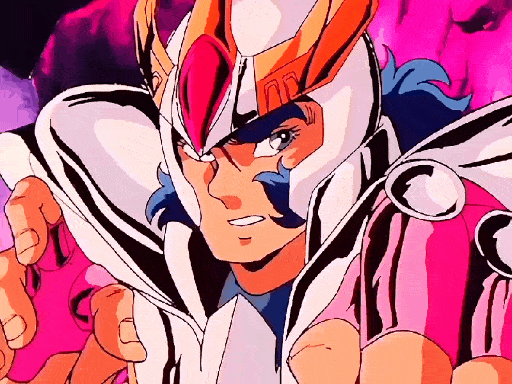
#gif#anime#old anime#retro anime#anime 80s#saint seiya#phoenix ikki#hoyoku tensho#bronze#bronze cloth#fire#80s aesthetic#80s
66 notes
·
View notes
Text

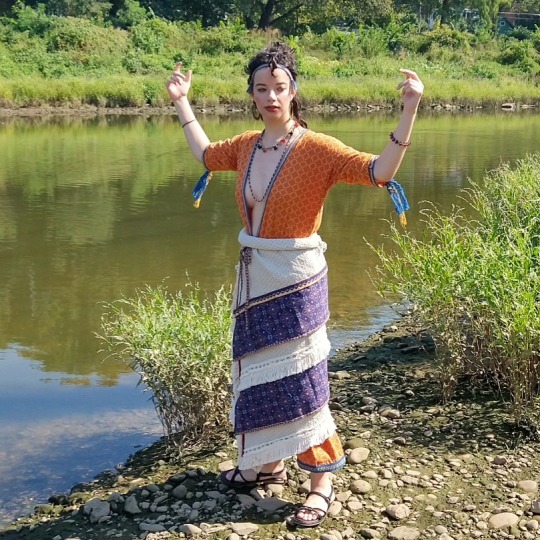

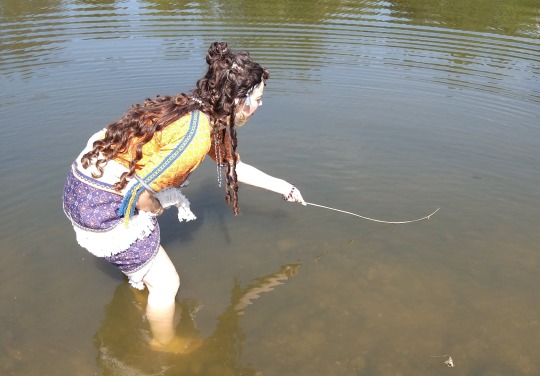
My most recent make is this ancient Minoan ensemble! It consists of a tunic (heanos) worn under a flounced wraparound skirt shaped like a double-bladed axe (labrys). Despite how heavy the linen skirt is, the entire outfit is surprisingly easy to move around in. I even waded into the river to rescue a bee!
Hot Girl Activities
#minoan crete#minoan#ancient greece#greek mythology#historical costuming#bronze age#my costumes#clothing reconstruction#hot girl summer
5K notes
·
View notes
Photo

Louise Bourgeois, Self Portrait. 2007. Bronze with silver nitrate patina;
#louise bourgeois#self-portrait#beast in people clothes#feral things#sculpture#bronze#contemporary art#art
5K notes
·
View notes
Photo

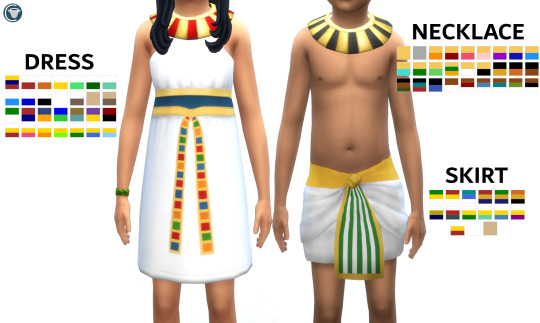
Pyramid Pals: An Egyptian Kids Set
Some CAS stuff for royal Egyptian kiddos. Pick and choose, or download a merged file.
Pyramid Dress
Full body category
28 swatches
Base game compatible
Pyramid Loincloth
Skirt category
15 swatches
Base game compatible
Pyramid Bib Necklace
Necklace category
27 swatches
Base game compatible
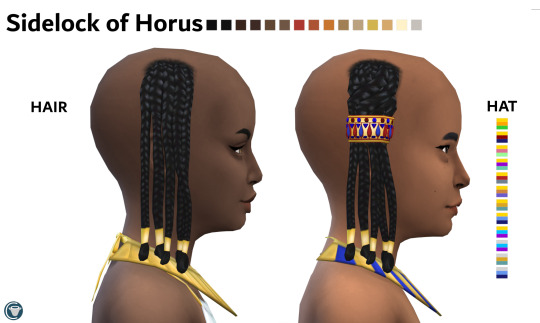
Sidelock of Horus Hair
Hair category
All 15 ea child swatches
Base game compatible
Sidelock of Horus Hat
Hat category
12 swatches (plus all 15 ea child hair swatches)
Base game compatible
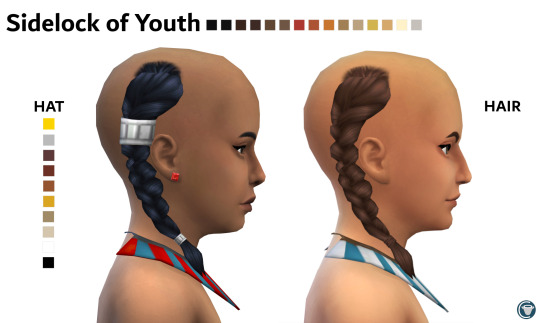
Sidelock of Youth Hair
Hair category
All 15 ea child swatches
Base game compatible
Sidelock of Youth Hat
Hat category
10 swatches (plus all 15 ea child hair swatches)
Base game compatible
PICK AND CHOOSE DOWNLOAD - Dropbox (no ads)
or
MERGED PACKAGE DOWNLOAD - Dropbox (no ads)
#my cc#my cas cc#s4cc#ts4cc#egyptian#ts4 historical cc#ts4 history#ts4 historical#s4 history#s4 historical#s4 historical cc#bronze age#ancient egypt#egypt#ancient egyptian#ancient culture#history#ts4 kids hair#ts4 kids clothes#ts4 kids cc#classical culture#sims 4 cc#sims 4 history#sims 4 historical cc#sims 4 historical#sims 4 historic
148 notes
·
View notes
Text
bon dia 🫶
#ona batlle#lucy bronze#fcb femení#barcelona femeni#barça femeni#240317#arrivals#can't even begin to get into the clothes sharing going on here#l&o#luna
78 notes
·
View notes
Text
their fits are fireeeee
#lucy bronze#ona batlle#fits are fitting#they look so good#l&o#I don’t even know who wears who’s clothes anymore
70 notes
·
View notes
Photo
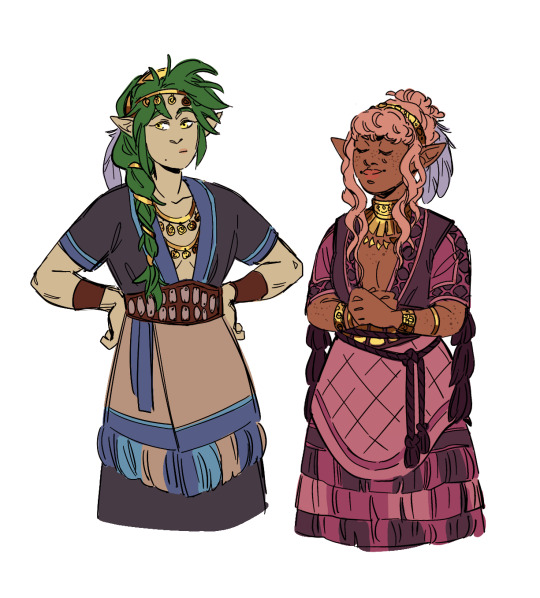
my girls tricky and maewynn
#has an art history minor haver i was like#at a glance i guess a lot of the visual refs we have of bronze age mycenaean clothing are representations of important people or gods#so the average person might be dressed more simply#so i might have to use my imagination just a little#except for with maewynn.#she can wear all that because she's rich#dnd#d&d#dungeons and dragons
424 notes
·
View notes
Text

Sweater weather
91 notes
·
View notes
Text
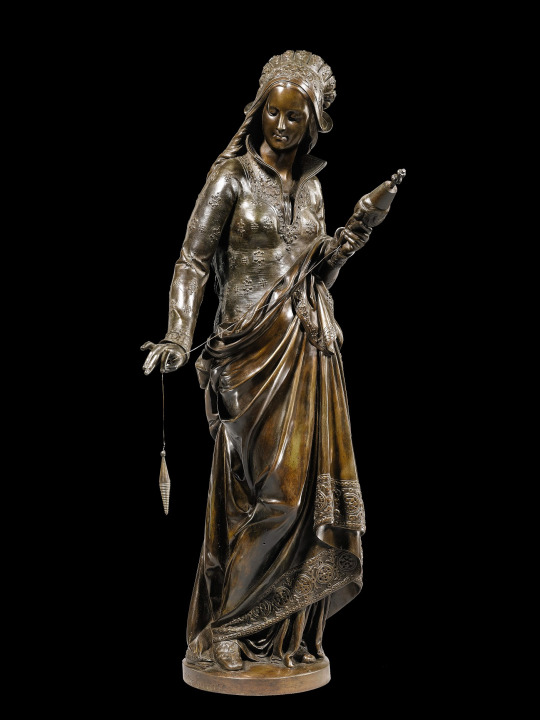
Albert-Ernest Carrier-Belleuse (1824-1887)
"La Fileuse" ("The Spinner")
Bronze
#sculptures#art#artwork#female portrait#portrait of a woman#albert ernest carrier belleuse#bronze sculpture#spinster#spinner#clothing#clothes#drapery#aesthetic#aesthetics#1800s#19th century
347 notes
·
View notes
Text
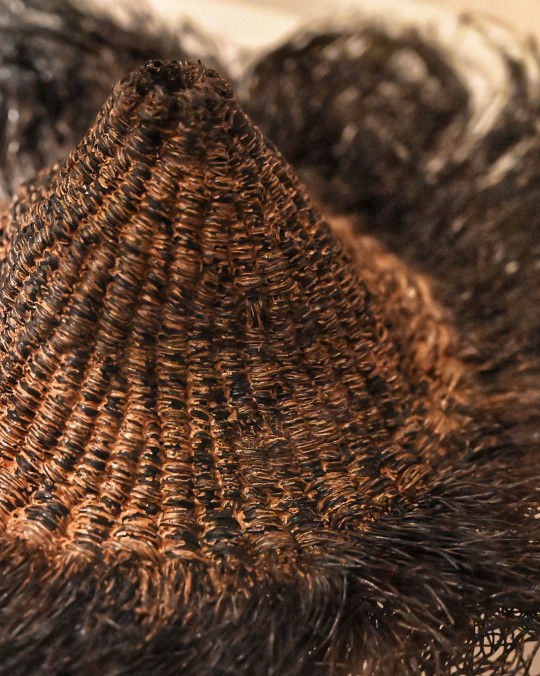
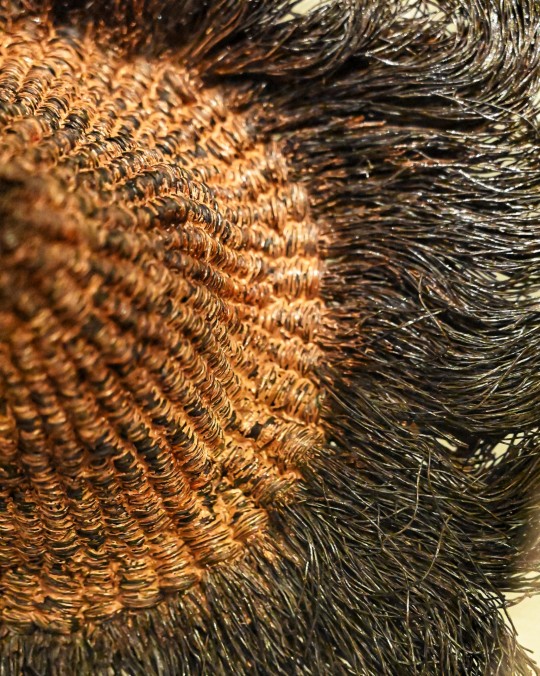

Hat Made From Hair Moss, Newstead, 1st Century CE, The National Museum of Scotland, Edinburgh
#ice age#stone age#bronze age#copper age#iron age#neolithic#mesolithic#calcholithic#paleolithic#prehistoric#prehistory#hat#hair moss#moss#natural materials#ancient culture#ancient living#ancient craft#ancient clothing#costume#archaeology#relic#Scotland
84 notes
·
View notes
Photo


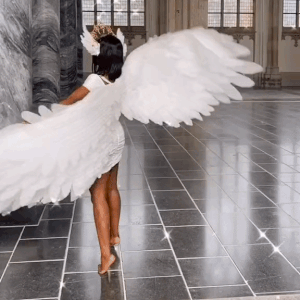

Give or Take
👁️ 😇 👁️ 😇 👁️ 😇 👁️ 😇
#give or take#gumi megpoid#venesection#vocaloid#stim#stimboard#moodboard#my stims#angelcore#angel#wings#cats#animals#clouds#sky#blue#white#bronze#gold#clothing#body stim#fidget#crystals#religious imagery#Architecture#engloid#crown
38 notes
·
View notes
Text

#gif#anime#anime 80s#saint seiya#old anime#retro anime#shun andromeda#bronze saints#bronze cloth#bronze#nebula chain#chain#pink neon#pinkcore#pink#80s aesthetic#80s
81 notes
·
View notes
Text
Minoan Heanos
The distinctive open-front dresses worn by Minoan women are probably even more iconic than the multi-layered kilts. Over time, there's dispute whether the garment is one piece or a separate bodice and skirt, but currently the one-piece theory is in ascendance.

The word heanos is derived from the Linear B logogram *146, wehanos. The wes- prefix, which is the squiggle in the middle, indicates a garment. Bernice Jones believes that this logogram represents the garment worn by Minoan men and women.
Marie-Louise B. Nosch, The Textile Logograms in the Linear B Tablets, pp 133-138
More research and construction below the cut:
The theory that the garment is a full-length tunic is further supported from imagery from the time, like these figures from the c. 1400 BCE Hagia Triada Sarcophagus. This detail from the sarcophagus shows three figures in some kind of procession, 2 women and 1 man. The woman at left wears a tunic with some kind of pelt as a skirt, and the other 2 figures wear tunics without anything over them, showing that they are one continuous, ankle-length garment.

Some of the most important resources for interpreting how the heanos was constructed comes from the two women depicted in the House of the Ladies in Akrotiri, wherein the side seams of the tunic are clearly visible running along the side of the body and under the arm.
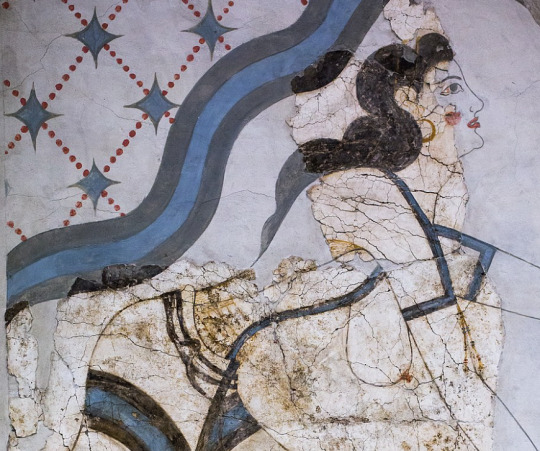
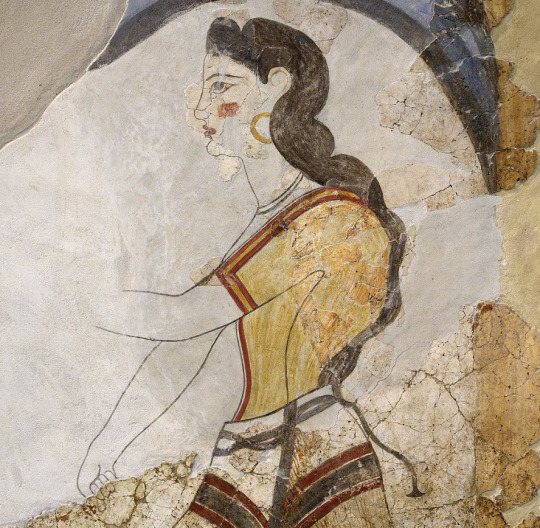
details of figures from the House of the Ladies, Akrotiri, via Wikimedia Commons
advadbsvasb


Diagrams from Bernice Jones' book Ariadne's Threads, p. 82, via Gorgeous Tangents
The heanos itself is made of 3 pieces of fabric: 1 back and 2 fronts. These diagrams show a concave hem like on the labrys-shaped kilt but I went with a straight hem, which is an equally valid option. The end of the sleeves are level with the edge of the hem at the widest point. This would probably be the width selvage-to-selvage on the fabric, being narrower than fabric widths commonly are today. There are 4 seams: the shoulder seam, the two side seams, and a front seam (optional, but recommended if you would prefer not being arrested.) It may be tempting to fold the fabric across the shoulder, so the only sewing is side seams and a neck hole, but this makes a weaker garment overall. I used this as a shortcut in my fitting muslin and it caused tears and weak points at the three points of the front opening.


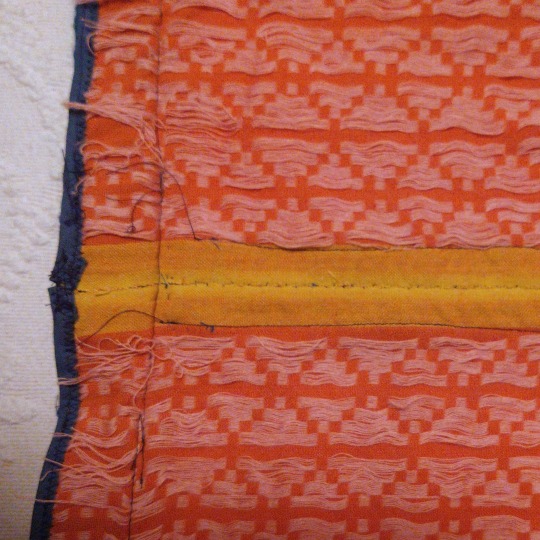
my fabric was a lightweight, moderately loose-woven cotton with a supplementary weave pattern in squares and diamonds. Linen or wool would have been more accurate but also? much harder to find from online quilting stores selling fabric for affordable prices. The main fabric is dark orange and the pattern is made out of pink/lilac threads. This weaving technique resulted in a LOT of long floats (unsecured expenses of thread) on the back--you can see how the wrong side of the fabric is much pinker than the right side. These floats could snag easily if I wasn't careful, so while it made a very effective visual for this tunic, I do not think that this fabric type would be viable for everyday wear. I'll leave it to people who actually know about weaving to ponder what more accurate weaving techniques would be.
Construction
The overall pattern is basically a T-shaped tunic, and the most important measurements are shoulder circumference, shoulder width, bust circumference, and the shoulder-waist length. In addition, you need measurements for the bicep, waist, shoulder-navel length, and hip circumference. After working out the fit with a muslin, I ended up with this pattern, 1 of 4 identical quarters.

Your first impulse may be to make the tunic very close-fitting, since the depictions in frescoes are skin-tight, but since the pattern has no added gusset this is a recipe for Cannot Move Arm. So I gave a very generous curve under the arm, which also made the dress look better when my arms were down, avoiding armpit wrinkles. I continued that ease into about an extra 2 inches added on to my waist measurement and plenty of extra space around my hips so that I could do exciting things like Sit Down.

I sewed the shoulder and side seams using the machine, and felled the raw edges on each side of the seam by hand with a whipstitch. I foided back the front edges of the v-neck instead of cutting them, which was a tip I got from the Gorgeous Tangents blog. This strengthens the neckline and keeps it from stretching, and also means that everything can be readjusted if you have size fluctuations or just want to modify the tunic into something more or less modest.
I whipstitched the front edges together by hand--the contrasting selvage didn't matter because it would be covered up by trim. I ended up cutting the tunic a liiiittle shorter than I wanted, so I finished it with some leftover bias binding instead of hemming it to conserve as much length as possible.
Trim

I custom-ordered the woven tape trim from Long Creek Mercantile. Both are made of wool--the "header band" and the hem trim are 1 1/4" wide and the center-front and cuff trim are 3/8" wide. I observed that most images of the Minoan heanos show trim with two colors at most, in a simple geometric or linear pattern, so I consciously restrained myself from ordering anything more elaborate. The clothing on Minoan frescoes is characterized by strongly contrasting colors, so blue trim was the most obvious, and best-looking option. Orange tunics with blue trim appear multiple time in art like the "Dancing Lady" fresco from Knossos:

Dr. Jones suggests that the band across the shoulder would historically have been a header band--a band of threads woven at the beginning of a project in order to properly space the warp bands (see her diagram at the beginning). That may be a reason why the shoulder trim often depicted under the front or sleeve trim, as shown above. Regardless, the trim almost always coordinates.
I sewed on the shoulder trim by hand, the sleeve and hem trim by machine, and the center-front trim with a combination of both.
Tassels
Many frescoes from Akrotiri and Hagia Triada show the ends of the supposed header band turned into tassels. This embellishment is not universal among heanoi, as you can see from the "Dancing Lady" above, but it does add a fun little something!

(yes, my Lounging Pants are very fashionable)
I turned the excess ends of the shoulder "header band" trim into fringes, knotting the yellow ones into a lattice and turning the blue yarns into tassels. The lattice-tassel appears on a fresco from Hagia Triada:

Reproduction of fragmentary fresco from Room 14 at Hagia Triada, Crete
The saffron gatherers from Akrotiri shown below have clearly displayed fringes at the ends of their sleeves. The one on the left has red fringes that appear knotted or ravelled/unravelled in an undulating pattern, and the one on the right has fringes that may be either beaded with papyrus-shaped leaves or cut into short tassels.

Another option is leaving the fringes loose, as seen in the Akrotiri frescoes from Xeste, room 3:
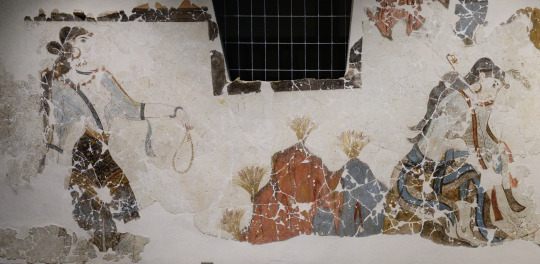
The final garment was super comfy, actually! It's much simpler to create than I thought it would be based on the frescoes, which made it all feel pretty magical when everything came together. I did think it was a little unusual how tailored this garment is, and the potential waste of fabric that comes from a shaped garment, especially compared to how later ancient greek clothing was mainly rectangles. I don't know enough about bronze-age and earlier clothing to have any idea how typical this was, since I'm extremely Not an expert on this subject, but am always open to learning more!
477 notes
·
View notes
Photo
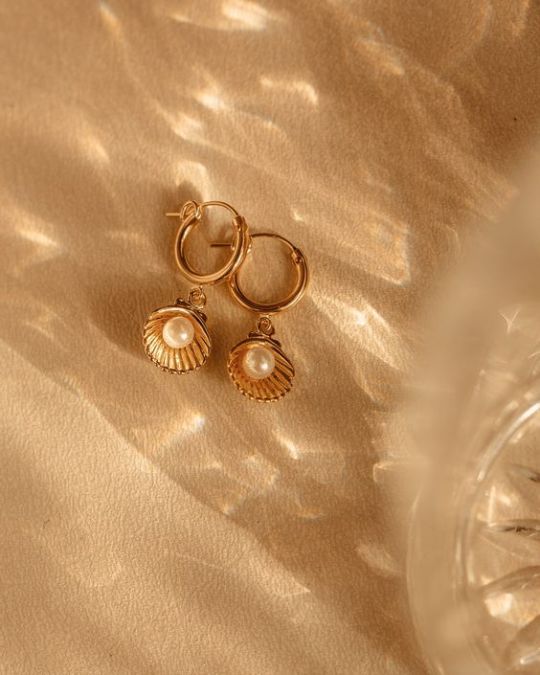
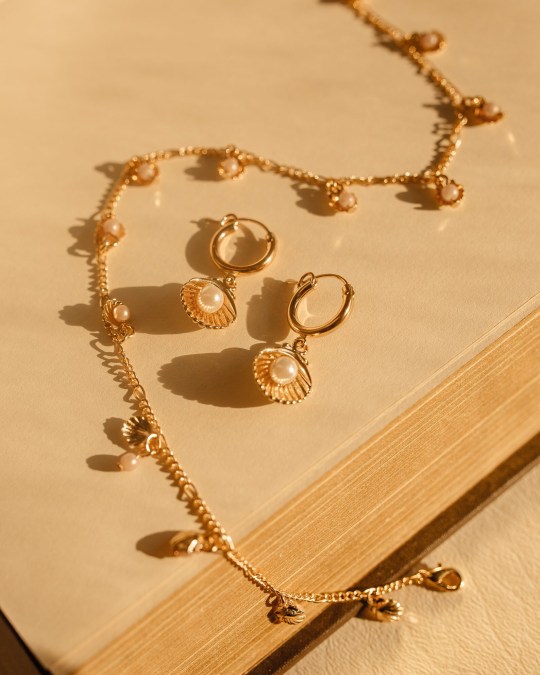
#upl#bronze#bronze color#copper#copper color#gold#gold indie#gold aesthetic#Golden#golden indie#golden aesthetic#clothes#fashion#jewelry#earrings#pearls#pearl earrings
145 notes
·
View notes
Text

Someone wrote this song before, and I could tell you where it's from
#spilled ink#evil lovecore#rose#bronze#pebbles#crystals#OK OK DIRECTORS COMMENTARY#yeah there's not a lot of colored lineart. I got lazy was mental illness got to me#Big thing ig is I gave rose sweet's shoes. bc. Symbolism. Also I was blanking on what to do#they r all wearing red and all the drinks are slightly red themed. bc. rose#Lightsource is also Behind Rose/coming From Rose. Bc Rose is the most important person in their life#I also think this is pre-static. Rose fucking w static kind of messed up their friendgroup a bit#Like tbh I think Rose was not above messing w humans (and pebs) and everyone kind of turned a blind eye bc they r all normal abt rose#but Static was the first guy Rose Lived With and that made is very in their face#also I think this is the first time i've drawn crystals#i KNOW he looks like static. I wanted to give him loser clothes#also in my heart when static first met Crystals they were like 'oh a Real Adult. He must have his shit together'#And kind of subconsciously modeled their appearance off crystal's#Not yet realizing that crystals was flop and everybody hated him#Stares at Crystals. Oh my god. pass on already. Static is around the same age as ur older adopted son. why are you so old#anyways I do think he (crystals) was VERY close to passing on when Sweet kilt him :P#thats all I have to say I think
9 notes
·
View notes
Text
My sister is making fun of the tassel i put on my hat bc it 'makes it look like an old timey nightcap' like bro you are disrespecting the rich human history of putting tassels on things for Style and Fashion ... wtf...
#the fantastic bronze age tasseled belts come to mind#i have to say the more i learn about prehistoric fashion the more i integrate elements into my own clothes just for funsies#they were onto something with all of that
76 notes
·
View notes
Last Seen Blogs

ask-knight-princess
With Bravery And Honor

slushybear89
I'm just an anime and music obsessed guy.

aldrae-blog
DraeDayDreams

shahbijal9382
Untitled

1mechanicalalligator
i'll be clumsy instead