#DIY costumes
Text

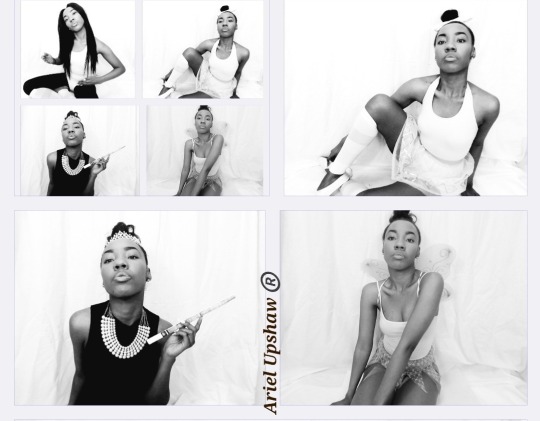
Vlogtober Day 18 - Costumes
[Ariel Upshaw for Legally Blonde Bunny]
🩷🐇
Happy October!!! I made this costume because I love legally blonde. That film inspires me and I loved her bunny costume.
#Ariel #ArielUpshaw #Arielshante
#LegallyBlandeCostume
#HalloweenCostumes #DIYCostumes
#ariel upshaw#ariel shante#black girl magic#lifestyle#model#ariel#black#black girls#beauty#content creators#legally blonde#legally blonde costume#pink costume#famous black girls#bunny costume#diy costume#diy costumes#diy bunny cotume
7 notes
·
View notes
Text
Lucy and Lana may be opposites, but they both fit the organ sound very well (Lucy because she loves scary stuff, Lana because she loves things that are smooth yet gross/cool)
#diy costumes#loud house diy#the loud house#nickelodeon#goth#lucy loud#tomboy#lana loud#organ#synth#woodwinds#dark to light#inside to outside
8 notes
·
View notes
Text
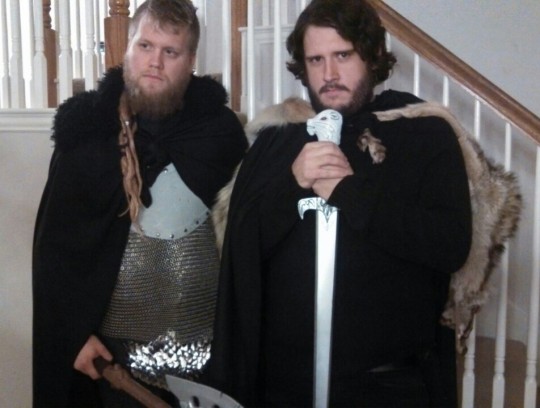
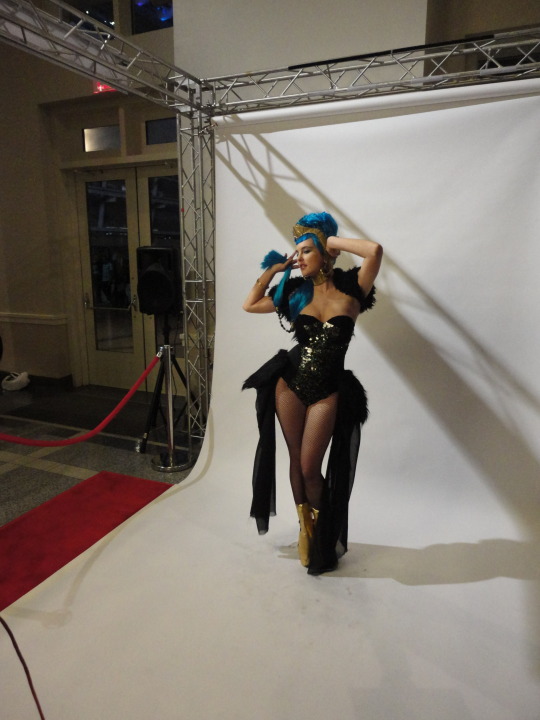
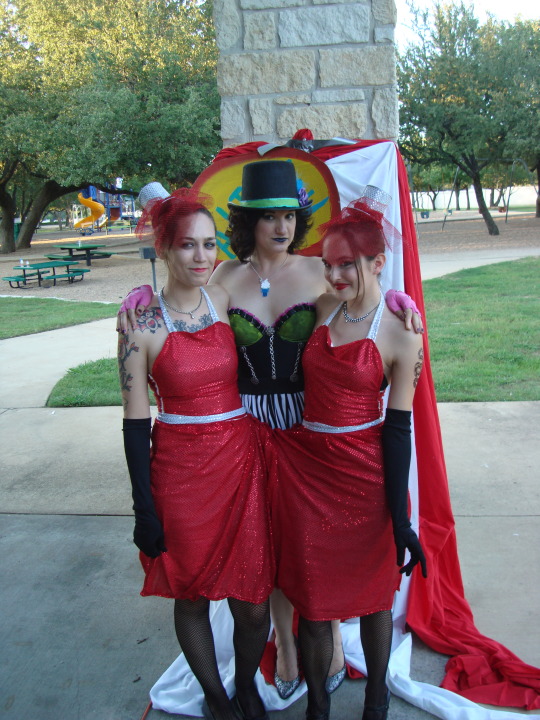
Various Costumes Dump!
I wanted to show you some older, easyish costumes that I threw together over the years! First, I helped two of my favorite people with some Night Watch costumes from Game of Thrones. Most of this was just pieced together, but I did hand made the sword hilt of Long Claw, and some armor.
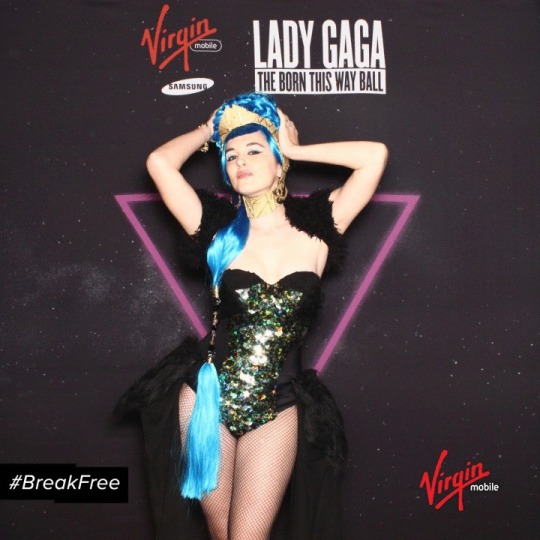
Next, in 2010 I recycled and revamped a couture medusa costume I had made for Halloween, in order to have an original design to wear to the Lady Gaga Born This Way Ball. One of my favorite things to do every few years was design and make an original piece for her shows and feel famous for a night. My favorite part of this costume is the scaled front made of iridescent giant sequin.

Below is a very quick costume made for a Carnival themed birthday party long ago. I love teratology and history, and thought a conjoined twin costume with my sorta-sister was a good idea; I’m not sure I’d make that same decision later in life.

Last, and definitely least, is one of the first costumes I ever made as a kid. I was maybe 15 years old here? I really loved the movie he Fisher King’ growing up, and wanted to make a costume inspired by the Red Knight in it. I don’t look back and cringe; rather I look at it and I’m grateful that in a time when dressing up for Halloween wasn’t cool, and DIY with shit at home was DEFINITELY not cool, that I was a horse-of-a-different-color, and had no qualms going against the grain. It was also a platform to learn that I love crafting and costuming, and helped me create a base of skills early.
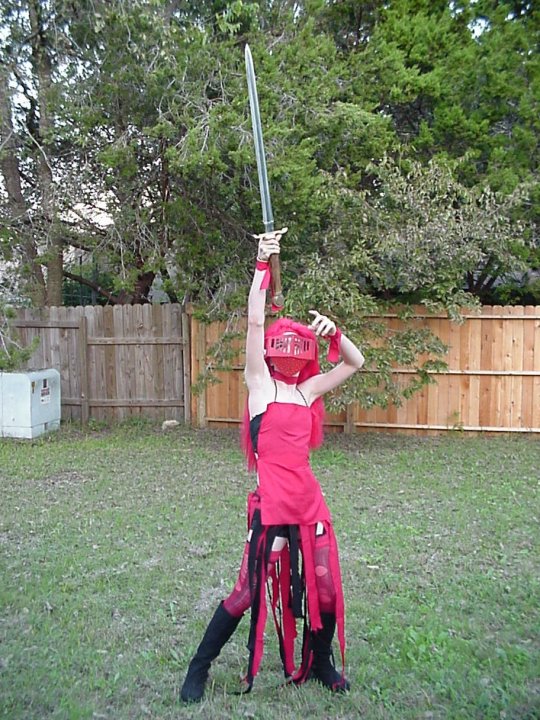
#the fisher king#game of thrones#conjoined twin costume#circus costume#red knight#jon snow#nights watch#a song of ice and fire#game of thrones costumes#long claw#lady gaga#born this way#born this way ball#carnival#circus#circust theme#carnival theme#freak show#freakshow#diy costumes#DIY costuming
0 notes
Video
youtube
Whip up a cozy fleece dress + an awesome yarn wig & step out in some brilliant Belcher style with my step by step Tina & Louise costume DIYs!
(or just make yourself some snuggly loungewear for chilly days!)
#bobs burgers#tina & louise#bobs burgers costumes#diy halloween#diy costumes#diy wig#refashionista sheri#upcycled costumes#diy dress#refashioned costumes#thrift flip
1 note
·
View note
Text
Voodoo Priestess
0 notes
Text

She nailed it
#diy#halloween#spooky#spooky season#spongebon squarepants#costume#goth#dark#darkness#alternative#tv shows#memes#meme#lol#haha#humor#funny
1K notes
·
View notes
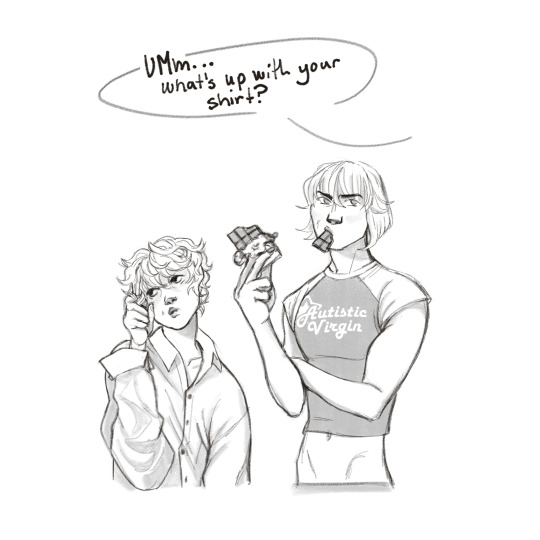
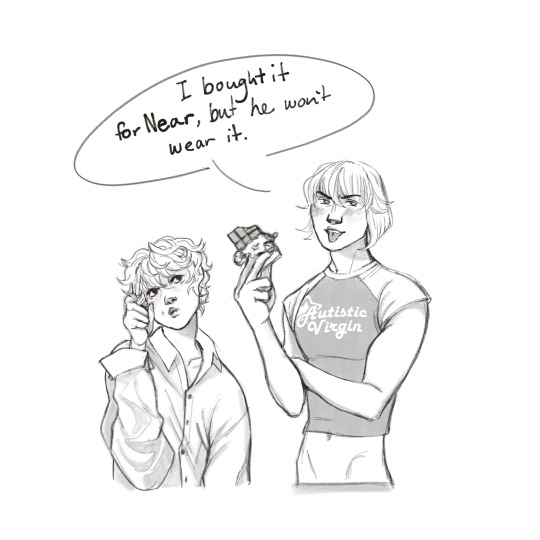
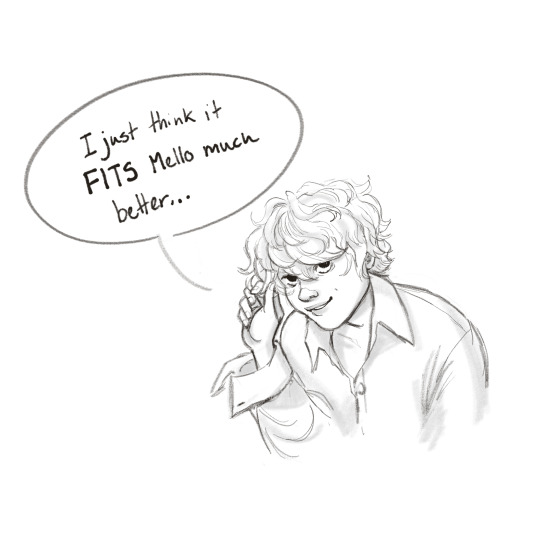
Text
whenever a fanfic says that Mello is wearing a t-shirt I know they probably mean something like this:

but all I can imagine is this or this
Bonus Comic:


Bonus Bonus Shirtless Mello:
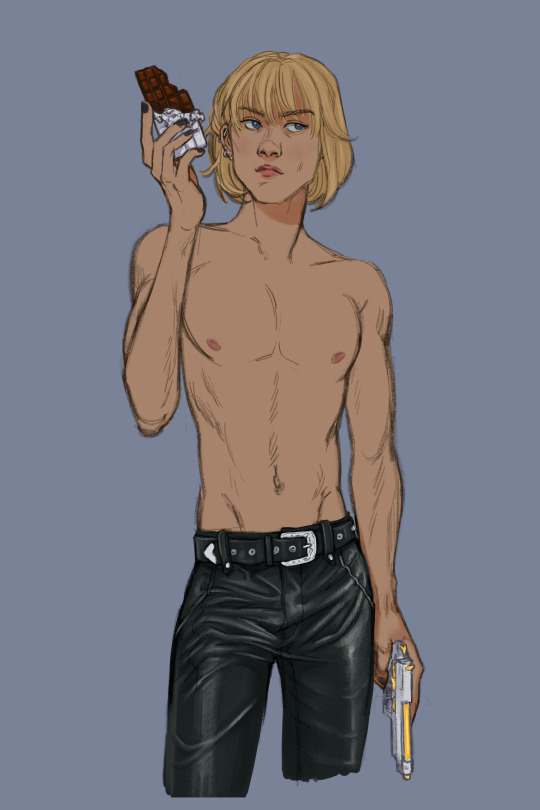
#my art#death note#mello#near#mello death note#near death note#death note brain rot#I can't imagine Mello wearing anything practical#Maybe it's just that I can't turn off my costume designer brain but it my mind he must always be doing the most#also yes the long sleeve shirt is the one he left Wammy's in that he diy-ed to be slutty#Also also Mello is offended by specifically by the implication that he's a virgin#I want to tag this meronia but idk if it counts??? I guess just assume that anytime I draw them together they were kissing moments before#i drew a Near to go with him that also has flat colors with fully rendered pants but this post was already getting too long
1K notes
·
View notes
Text
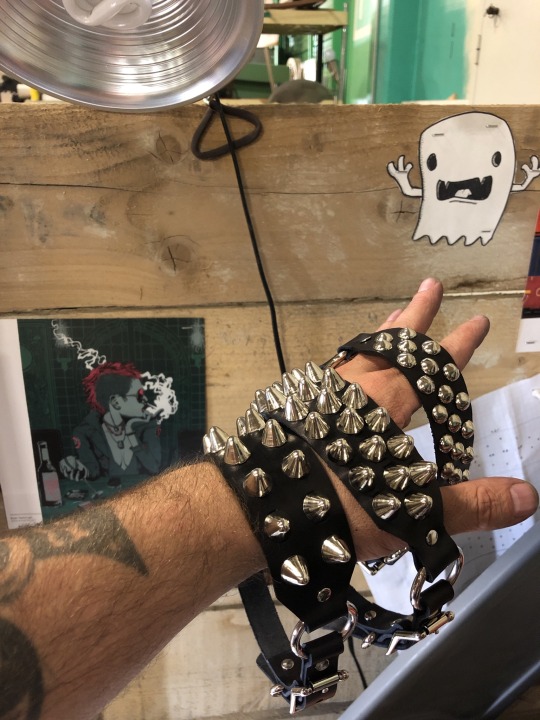
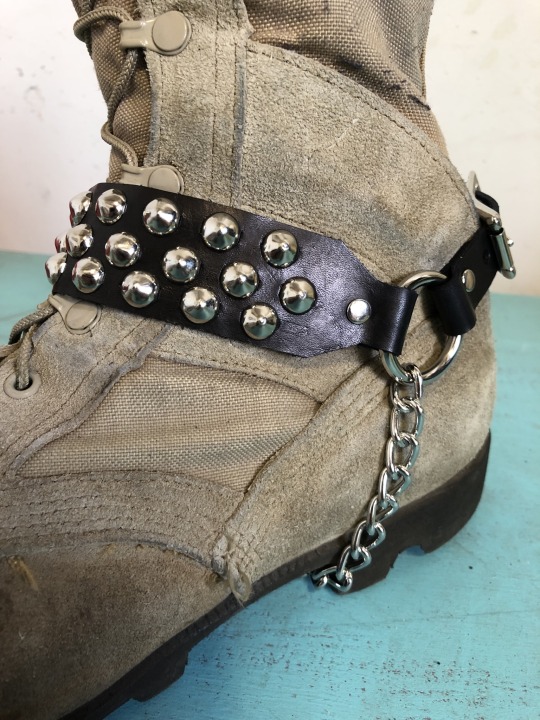
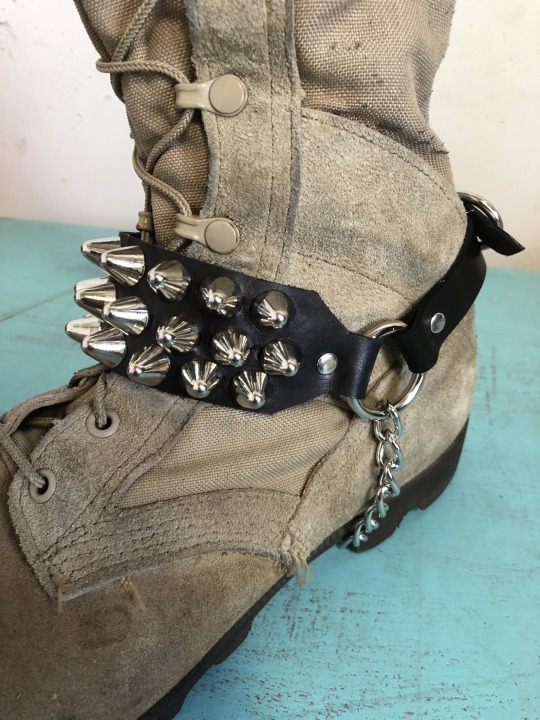

Thus of ould
Leather punk bootstraps c. 2019. Refining the pattern. Aggressively handmade, hand dyed, hand studded
#goffik#punk fashion#diy punk#leathercraft#leatherwork#crafts#handcrafted#handmade#i made it#punkstyle#80s punk#punk rock#punk boots#bootstrap#diy or die#diy craft#diy costume#diy cosplay#cosplay#mad max
462 notes
·
View notes
Text
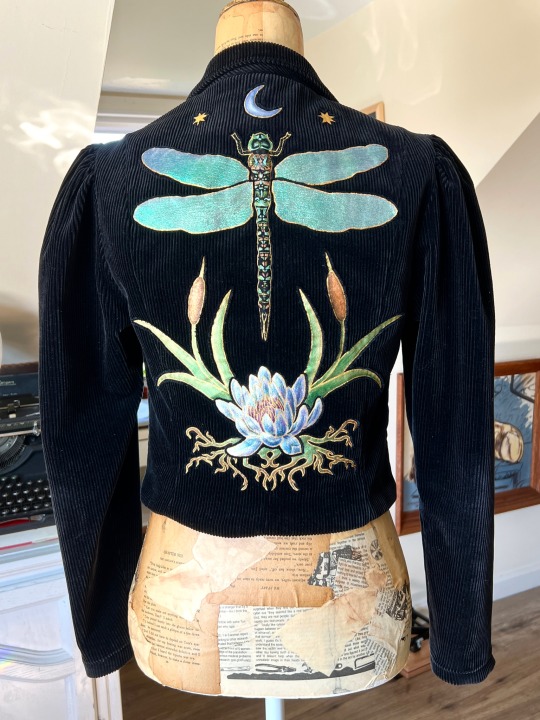
Finished embellishing the back of this jacket! Just need to do the front, then add some crystals for some extra shimmer 🧚🪷💎
#artists on tumblr#fashion#diy#art#painting#embellished garment#costume design#upcycle#fairycore#faeriecore#faerie#cottagecore#dark academia#dragonfly#dragonflies#moon and stars
3K notes
·
View notes
Text
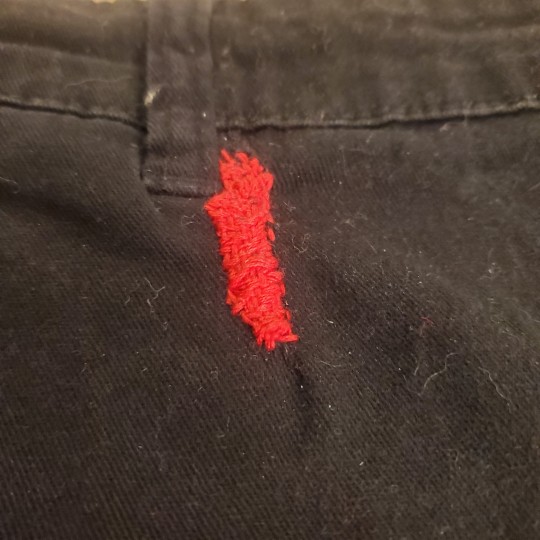

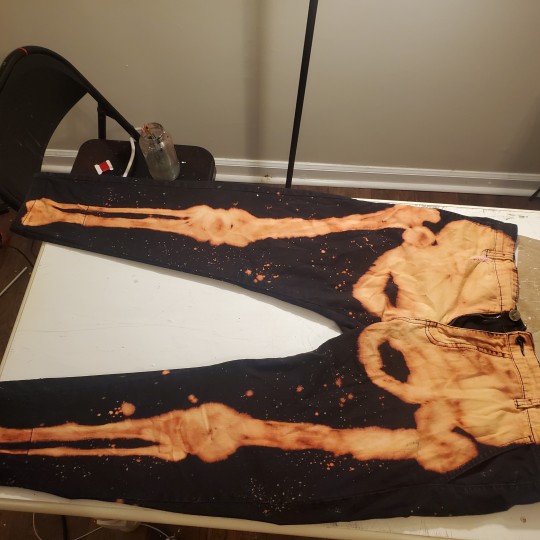

some visible mending on a pair of pants I also bleached to look like skeleton legs :) the first time I've ever done a patch like this.
285 notes
·
View notes
Text
Making a gollum costume for halloween based on a toy
242 notes
·
View notes
Text


🖤🤍Black and White.🖤🤍
[Ariel Upshaw for DIY Halloween costumes] #Halloween2023 #BlackModels #BlackCreators #DIYCostumes #diycrafts #diyprojects #diy #Halloween #HalloweenCostumes #Arielshante #arielupshaw #happyhalloween
#ariel shante#model#ariel upshaw#black girl magic#youtube#black girls#ariel#youtubers#lifestyle#black#diy costume ideas#diy costumes for adults#diy costumes#diy costume
3 notes
·
View notes
Text
2 tomboy styles: Smooth🚨🥁 vs Rough💢🎸
#loud house diy#diy costumes#the loud house#nickelodeon#lynn loud#sporty#athlete#tomboy#drums#electric guitar#organ#synth
2 notes
·
View notes
Text
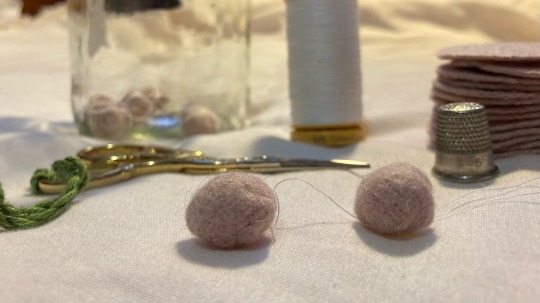
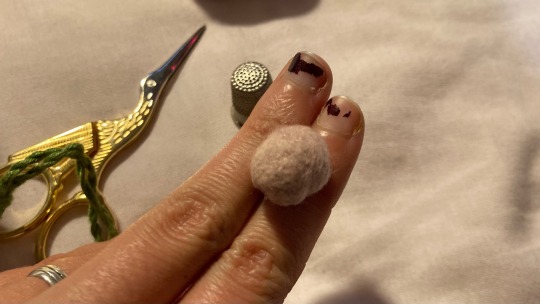
How To Make Medieval Fabric Buttons
You will need:
• fabric (I’m using a medium weight wool)
• a sewing needle
• cotton or silk thread (it MUST be strong)
• a thimble
• dressmakers pins
Using this style of button as a fastening technique was very prevalent in 14th century Europe, on both men’s and women’s clothing. It was used for anything from sleeves and openings on the front of garments, to the iconic liripipe hoods (which is what these are gonna be for!).
They were usually made out of leftover fabric from the same material that was used for the garment they were intended for. As well as using every scrap of material possible, they also save you from having to buy metal buttons, which… aren’t cheap (both now and then).
The trade off is of course having to make them, which can be a painful process (literally - try not to get stabbed by the hedgehog ball at step 4!!). I thoroughly recommend a thimble to push the needle through as you form the ball - this is hard enough without having to pull it through.
Making buttons in my experience is 10% knowledge, 60% spite, and 30% hatred. It is a contest of wills between you (who wants a button) and the fabric (who doesn’t want to be a button). I wish you luck soldier.

To start with, cut a circle out of your fabric. How big will depend on what fabric you use - if it’s linen, you’d cut a larger circle than you would for wool. Mine is about 30mm.
Using a long long thread, bind on and then sew running stitches around the outside, about 5mm from the edge (may vary with fabric).
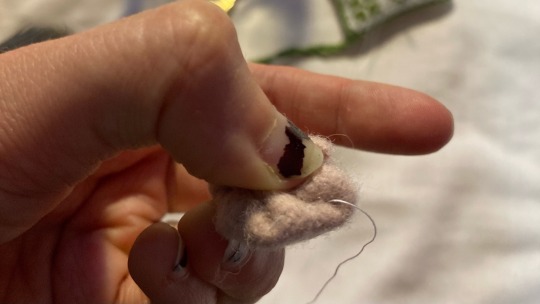
Pull this thread tight like a pouch, and turn the raw edges inwards in one direction. Try and tuck them inside the “bag” section. It will likely be more of a squashed oval at this point than a sphere.

Now, get your dressmakers pins and go absolutely ham. Continue to squish it “inward” (towards where the opening was) as you pin. The button should now resemble a very unfriendly little creature now (good luck with not getting stabbed, it can be a bit of a prick).
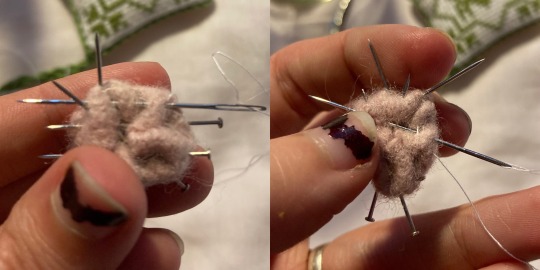
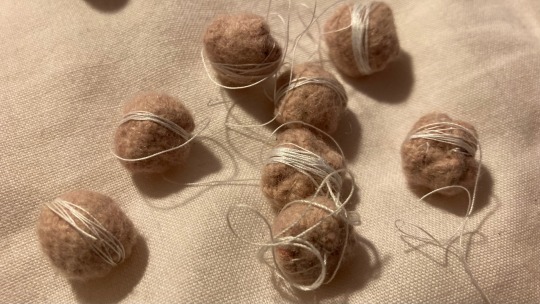
Next, basically use your needle to try and get it to stay in that shape. I usually do a bunch of stitches around the edge of the “back” end, and then spend some time criss-crossing the back. Try and put your needle in close to where it came out, so that you don’t get long pieces of visible thread.
Once you are confident that it will hold A Shape ™ (but also isn’t so stabbed that you can’t refine it further!), remove the pins. Your button will most likely resemble a little tiny messy wool brain at this point, but that’s ok!
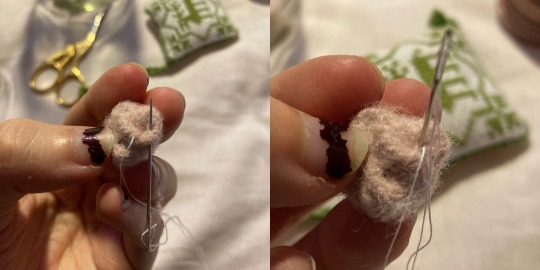
The next step is to use your needle and thread to continue tucking the ball inwards to the centre of where the opening was. Above illustrates how I’ll flip the open part of a fold inward, by coming up through the fold and then levering it downwards so it gets tucked away. You can also just use the thread to pull errant folds inwards. Use the hand holding the button to squash it into form, and then sew it into place.
Once the button is actually a ball shape, crisscross the back of it a bit so that everything is firmly held in place. It should now (all things going well!!) actually be a sphere.

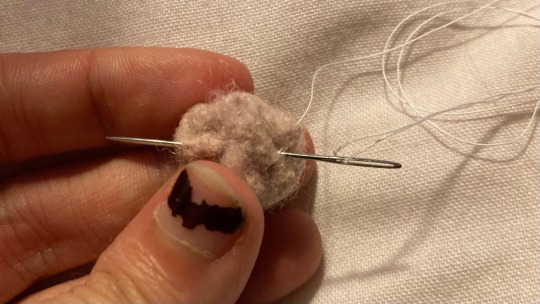
Once you’re happy with the shape and firmness, take your thread to stem out of the centre back. Bind off, and then slide the needle off the thread, leaving the long end. This can then be used to sew the button onto the garment.
The back will still be somewhat messy, but the front should be smooth, and the whole shape roughly spherical. When the button is sewn on using the remainder of the thread, you won’t be able to see the back!
I wrap the remainder of the thread around the finished button so it won’t get tangled, and then pop it in a jar with the rest while it waits to be sewn onto the garment.
Good luck with your crafting! Feel free to ask any questions in the notes, or straight into my inbox :)
#sewing#tutorial#medieval#medieval reenactment#medieval clothing#medieval costume#historical fashion#historical costuming#medievalcore#14th century#buttons#crafting#diy#i’ll be on my merry way now#I have…… sO many of these to do#truly pain torture and misery hours over here
520 notes
·
View notes
Text
Vampire


0 notes
Text
We're doing a workshop for the King County Library System Makerspace! ( Washington State )
This Saturday from 11am-1pm at the Federal Way Library!

We'll be showing Flower Crowns and Horn Sculpting for cats to use in pictures!
#cat cosplay#cats#cosplay#cats in costumes#halloween#Halloween ideas#diy#diy projects#do it yourself#makerspace#king county library makerspace#federal way#aww#cat costume
316 notes
·
View notes
Last Seen Blogs

somedizzywhore1994
glitter cryptid
nuevonormal
mutación

divadinag
Loud And Off Key

lovepreggoslove
Dutchpreggolover

prismatic-artcake
Artsy Fartsy 2.0