#it’s made with recycled acrylic!
Text
Its officially live! Please help me make this a reality! Tons of epic pins to choose from. ❤
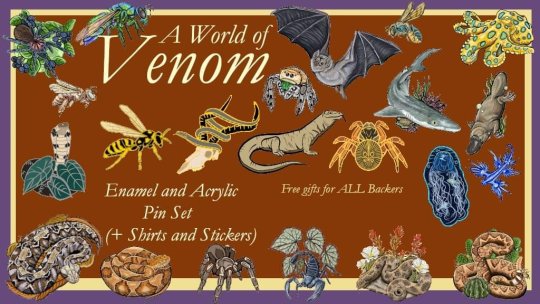
https://www.kickstarter.com/projects/tarantulacb/a-world-of-venom
#nature#art#animal#drawing#artist#colorado#wildlife#exotic#colored pencil#hand made#enamel pins#enamel#acrylic pins#acrylic#recycled materials#komodo#komodo dragon#arachnid#spider#tarantula#blue ring octopus#fish#venom#venomous#hognosesnake#hognose#rattlesnake#copperhead
7 notes
·
View notes
Text
Sometimes, being a little girl felt like being a tiny creature, ravenous for love, who earned it through silently tolerating pain. Created with acrylic paint, glitter, and Swarovski crystals, sealed in epoxy resin on 12"x12" stretched canvas, mounted on a wire.
#crowbar arts#acrylic painting#what was i made for#glitter#resinart#recycled#artwork#artists on tumblr
1 note
·
View note
Note
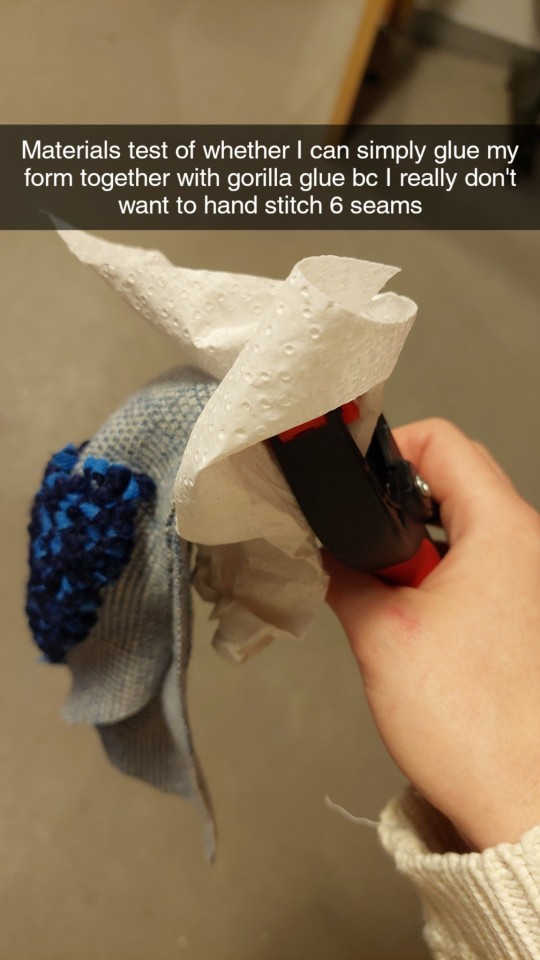
Mr. Fiberglass looks very dashing and extremely gender. May I ask how you made that mask? It looks great and I may want one for myself 👀
Thank you!
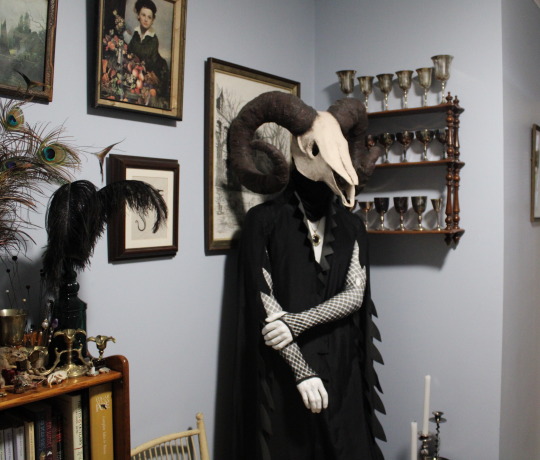
It was 8 or 9 years ago so I don't remember it super well, but it's mostly cardboard and papier mâché. I built the base using cardboard boxes and a lot of masking tape, and you can still see some of the tape and cardboard inside the snout.

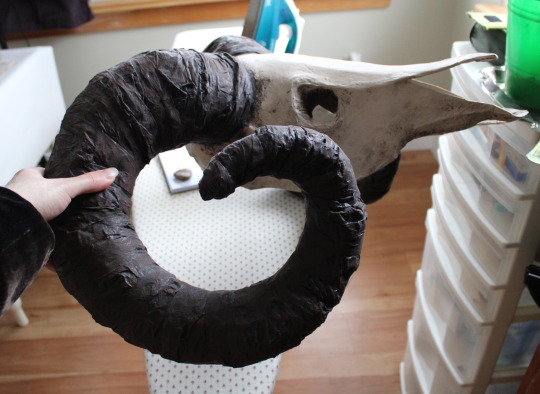
I made the horns by cutting 2 identical spiral shapes out of cardboard, and stretching them like a slinky, which is a much easier way to get them to spiral and be symmetrical than starting out with a straight thing and curving it. I'm pretty sure I bulked them up and got them to stay in that shape by taping lots of wads of crumpled up newspaper to the sides.
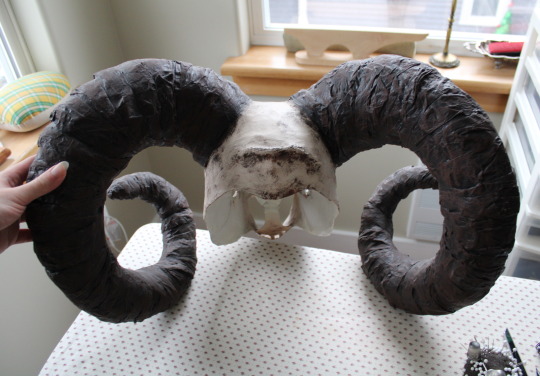
I covered the whole thing in layers of very cheap paper towel and Elmer's art paste, and used that to add a few little ridges and such.
The texture on the horns was made by just wrapping one long continuous strip of paper towel around and around, straight off the roll. (It was the really cheap stuff with no perforations and with obvious flecks of recycled paper in it.)
I have a piece of polyester batting shoved into the top because I didn't quite get it to the same shape as the top my head, and it's a bit uncomfortable.
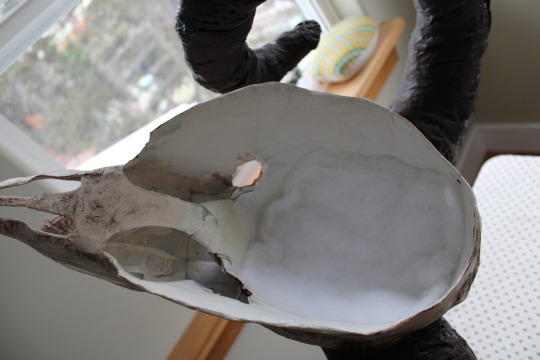
It's also very hard to see in! I looked at photos of real sheep skulls for reference, and I put the eyes further forward to account for my human binocular vision, but they're still really far back and hard to see out of, so you have to look out the nose too.

I seem to remember first painting it with glossy acrylic paint, and then repainting it with matte paints because it just doesn't look as skull-like when shiny. The shading is awful because acrylic paints dry so dang fast, so it might be nice to go back and refine the texture a bit and repaint it again someday, but that's not at all on my priority list right now.
I hope this helps, and that you have fun making one!
429 notes
·
View notes
Text
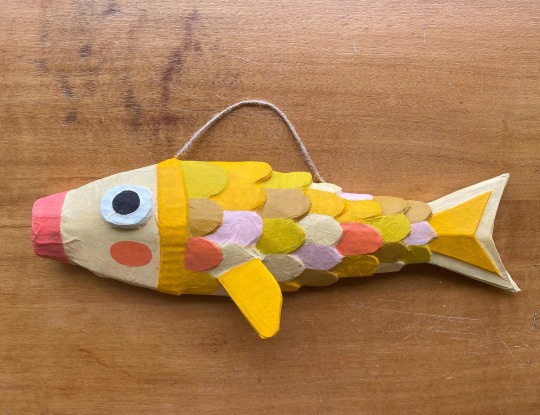
Sweet little koi boi filled to the brim with recycled soft plastics and scraps of cardboard 🙌
I made this trash koi fish to add to my crappy wall of dodgy masks and alters #blessthismess
Created using rubbish, paper mache and acrylics 🐟
#koi#koi fish#wallart#wall art#wall hanging#handmade#paper mache#papier mâché#illustration#art#crafty#crafting#paper craft#acrylics#recycling#trash art#creative#illustrator#painting
365 notes
·
View notes
Text


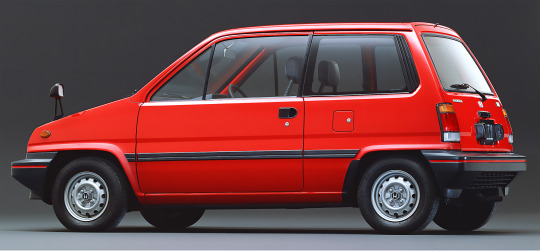
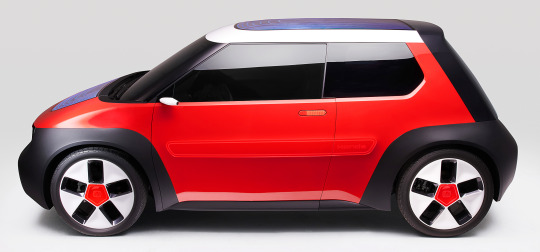

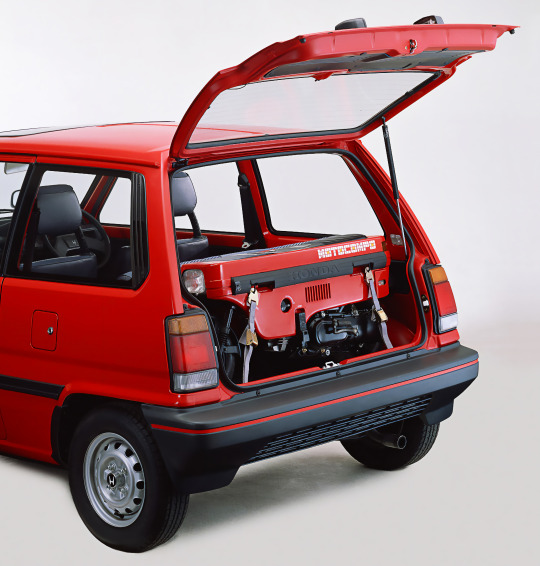
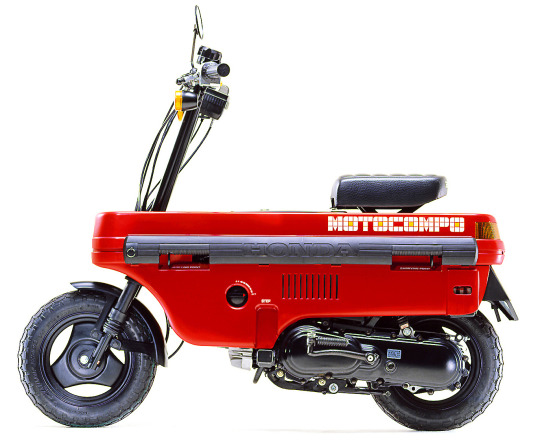
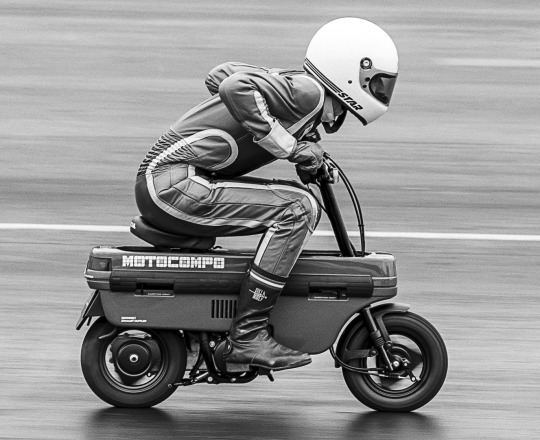

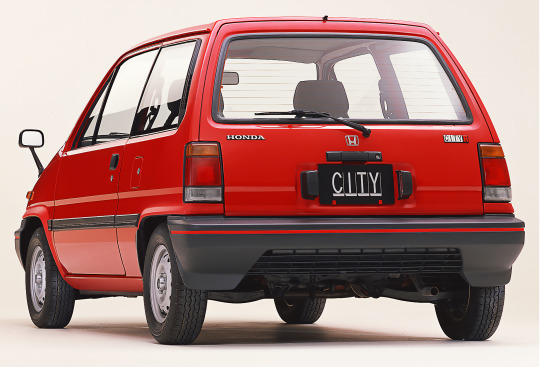
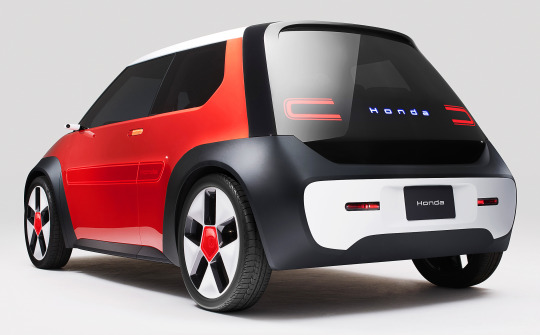
What a difference 42 years makes juxtaposition of Honda City & Honda Motocompo, 1981 and Honda SUSTAINA-C Concept & Honda Pocket Concept, 2023. In the early 1980s Honda introduced the City small hatchback along with the Motocompo, a tiny folding motor cycle that was designed to tuck inside the City's boot. A this year's Japan Mobility Show Honda have presented the SUSTAINA-C Concept, a small electric car made of acrylic resin that is recycled and reused. The Pocket concept is a tiny folding electric bike that fits inside the SUSTAINA's rear hatch. The Motocomp was only on sale for 2 years before it was withdrawn due to lack of demand. No production plans have been announced for either of the 2023 concepts
#Honda#Honda City#Honda Motocompo#2023#1981#Honda SUSTAINA-C#Honda Pocket#concept#prototype#design study#recycled#EV#electric car#electric bike#city car#Japan Mobility Show
285 notes
·
View notes
Text
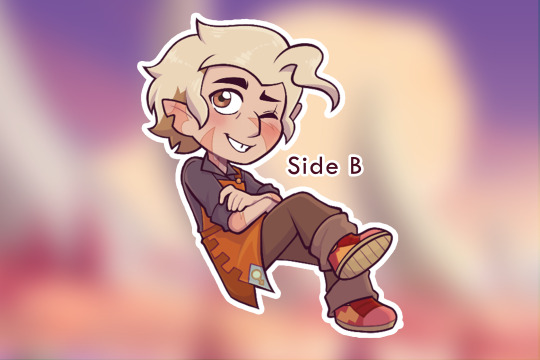
NOW LISTED FOR PRE-ORDER ON ETSY!
Decorate your favorite bag with Hunter!
This will be a 2.5" double-sided, gloss acrylic charm with a golden star clasp. Made with recycled acrylic!
** this will take 1-3 months minimum to process due to limitations on my end. all buyers will receive updates as they come!
FULL RESOLUTION PREVIEWS BELOW:

#the owl house#toh#art#the owl house fanart#artist#toh fanart#fanart#huntlow#hunter noceda#hunter toh#hunter deamonne#hunter clawthorne#hunter wittebane#lumity#keychain#acrylic keychain#preorder#cartoon#anime#lgbtq#the owl house merch#the owl house keychain#fan merch#merch shop#small artist#etsy#art shop#etsy seller#shop small
214 notes
·
View notes
Note
speaking of yarn ive been meaning to ask since ive heard of it elsewhere, is the general quality of yarn you can get going down? ive been looking into fibercraft but ive been told its getting harder and harder to find actual good thread without some sort of plastic in it, especially for a good price. so ive been wondering is this true or was it made out to be a much larger problem than it really is (in your experience)?
i've only been into crochet for a couple of years, so i'm not a Fiber Arts Veteran who can tell you the difference between shopping for supplies now vs 30 years ago! i don't really have anything to compare Current Yarns to.
in my experience, the only thing i can speak on is cost, and it seems like the cost for yarn has probably been going up. animal fibers are certainly more expensive, acrylic yarns are budget-friendly but are synthetic, if that's something you're worried abt.
so i don't think that stuff is Untrue, but i also don't think it's any reason at all to avoid getting into fiber arts, and you can absolutely find yarns made from cotton / wool / bamboo fiber and stuff like that for good prices! it would probably be harder in-person, like in the aisles of a hobby lobby. but i think lion brand and lovecrafts are good sites to browse for yarn/supplies.
it's really not a small-scale problem, someone like moi who's recently gotten into crochet and does it for funsies based on my whims/needs isn't going to really notice, i don't think.
as an aside, if we're talking about crochet specifically, you can really crochet with anything at all- i've been making a tote bag out of plastic grocery bags, lmao. reduce reuse recycle or whatever. people will also use strips of fabric instead of yarn, and that's good for stuff like rugs / bags / baskets, chunkier projects. (though ig you could probably make some clothing if you cut the strips of fabric thin enough.) so as far as accessibility to the craft, there is that!
#or also what the fuck else. paper... wire. ribbon. rope. string. twine.#anyway!! it's really less of a fiber arts conversation and more of a capitalism conversation#which. obv. does not extend Only to fiber arts#just think it has to do with Product Manufacturing as a whole being done cheaper and cheaper#and the state we're in rn where everything gets more expensive every year. but again that's not specific to yarn#sergle answers#crochetposting#edit: i put a link for lovecrafts in there bc lol teehee. and so on and so forth
59 notes
·
View notes
Text
An interesting little trinket I made 🌿
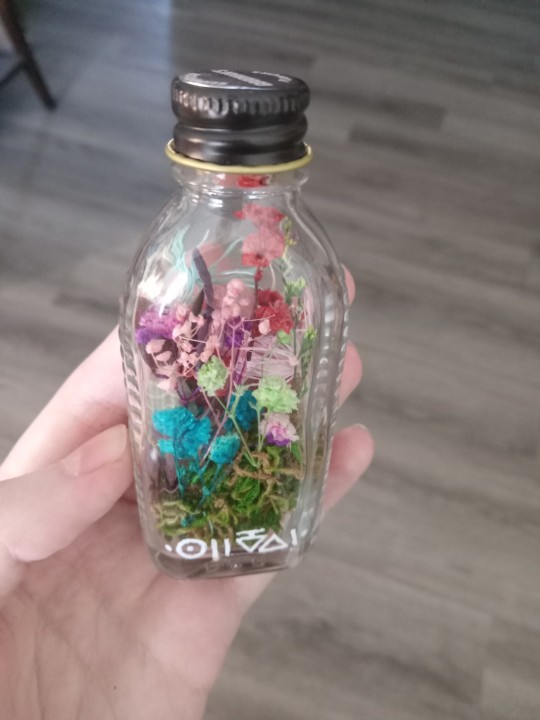
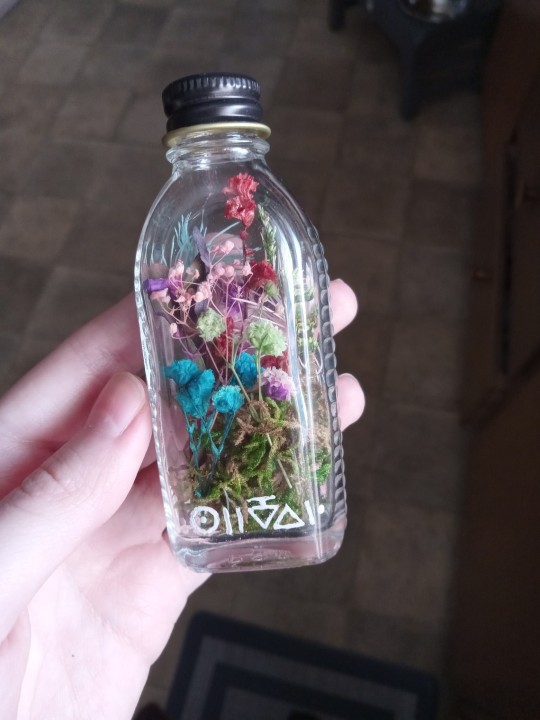
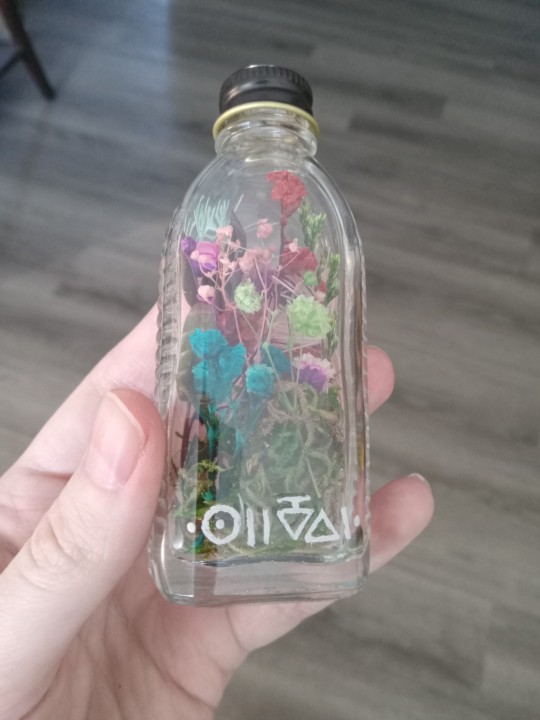
The symbols are painted on with light gray acrylic paint, they don't mean anything I just thought it'd look cool. I recycled the bottle and cleaned it well before filling it
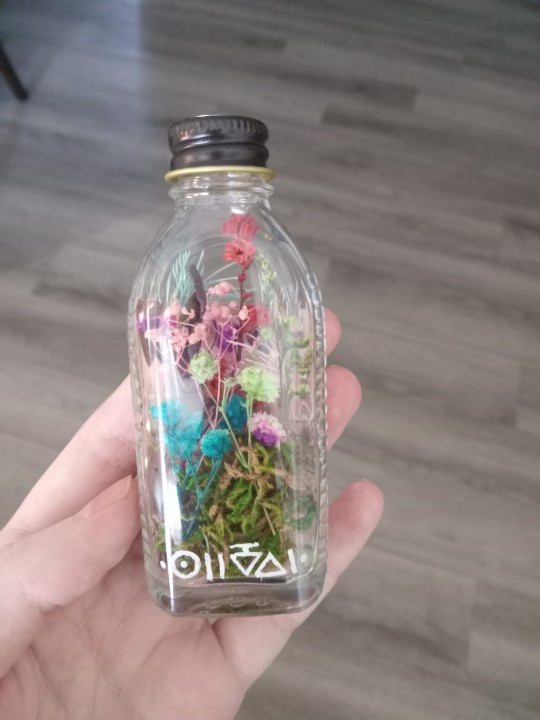
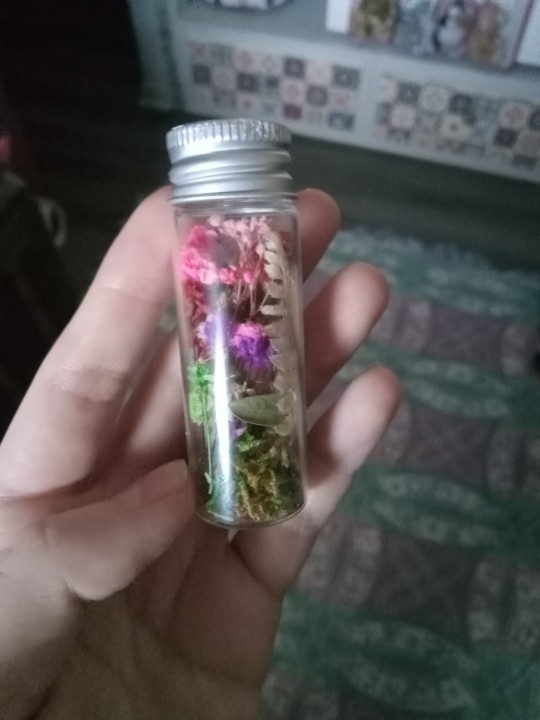
Here's another one, but this time I just used a smaller cylindrical glass vial with a silver cap. No symbols this time, just a spiral on the top of the lid. It looks like a little futuristic terrarium or something. I wanna turn it into a necklace at some point

*****
[Image ID: the first four images are of a small glass liquor bottle with the label removed. The bottle is about 3.5 inches tall and 1.5 imches wide. Inside of it is a variety of very small dried/dyed flowers, mainly pink, blue, purple, red and green flowers on a bed of dried moss at the bottom plus various dried green plant clippings. It looks like a little garden in a bottle. The flowers reach all the way to the top, just under the black metal cap. There are symbols I painted from left to right on the bottom of the bottle over the moss part. The symbols form what looks like a word but it doesn't mean anything. A circle with a dot in the center, two vertical lines, a triangle pointing fown with a small horizontal line along the top, a triangle pointed up, and one more vertical line. The "word" has two small dots on either side of it.
The next two images are of the second bottle I made, a smaller cylindrical bottle with a silver cap. This bottle is about 2.5 inches tall. End ID]
#solarpunk#recycling#solarpunk diy#solarpunk aesthetic#diy#flowers#ecopunk#hopepunk#hatchet makes stuff
44 notes
·
View notes
Text

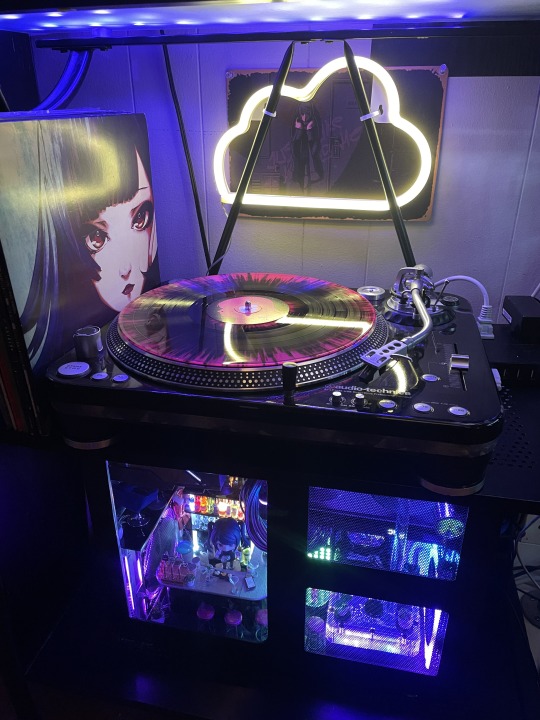


I built a miniature Va11 Hall-A Bar inside of my PC!!
Va11 Hall-A PC Parts & Build list
PC:
CPU : Intel I9 14900k
GPU: Intel Arc A770 16gb
Ram: Corsair Dominator 64gb 5600
Mobo: Maxsun Terminator Z790 D5 wifi
Hard drives M.2: Samsung 990 pro 2tb, Samsung 970 evo plus 1tb, CT 1tb, Adata 500gb
PSU: ROG Thor 850 P2
Cables: Cablemod.com custom shortened and sleeved
Water loop distro : EKWB FLT 120 reservoir + D5 pump
Water loop cpu block: ThermalTake Pacific Mx2 Ultra
Water loop radiators: Alphacool HPE 20 x 2
Water loop hardware: 15 Alphacool, 3 EKWB, 2 Alphacool soft, 2 granzon
Water loop tubes: EKWB Acrylic tube 14mm, Alphacool 13/10 soft
Air Cooling : ThermalTake Toughfan 120mm x 3 + Controller
Air Cooling : Noctua 40mm pwm server fan x 2 (non visible)
Additional RGB Control : Coolermaster controller
Case:
Lian Li PC V600, left side mount, released in 2006, I acquired it in 2015 from PC Recycle in sodo Seattle.
I had to track down a new foot, one had been missing since I acquired the case (ebay)
Mods:These are the case mods I did personally
Cut a hole for the cpu mounts in the Motherboard mount plate as this case was designed for older hardware
Cut two 120mm blowholes and added aluminum covers (Dremel)
Cut Front and rear windows into side panels (Dremel Max)
Moved PSU from vertical placement in the lower right side of the case in front of the CPU to horizontal placement in the top left in old drive bays.
The PSU bracket had to be cut to show the OLED on the side.
Modded the side panel rail slide to accommodate the PSU, I used the original aluminum stand the psu was on, cut in half and epoxied with JB weld.
Changed and moved Power/ Reset switch to the back of the case, shortened and spliced the cable
I cut and bent my own 14mm acrylic tubes (hobby miter, heat gun).
Cut and made two way mirror for the front panel
Plastic "truss" is both functional and aesthetic. It came from a Gunpla accessory kit and has two cables passing through it and it acts as the GPU support. I could only get red and had to paint it.
Notice that some logos are missing/ covered, I dislike having a case as an advertisement. The Rog eye on the PSU is mostly covered but iykyk, most of the word "Intel" on the ARC GPU, Two of the Thermaltake logos on the fan edges, the Paint on the Thermaltake Mx2 Ultra and Maxsun terminator heatsink. (I will eventually cover the visible SSD with a heat sink, cover the fan info on the rear and work a cover for the word "dominator"). the one logo explicitly unchanged is the LianLi case badge, if I think of a perfect replacement, maybe then.
Mod I did not do:
I did NOT shorten and sleeve my own cables, I used cable-mod.com. I am not confident in my ability to do this.
BAR:
"Bar Tiny" Re-ment sets from Japan, 17 sets involved.
I customized the color of the bar and chairs and shortened one table for the mezzanine. The whole bar, minus barback- is on a removable 7 inch piece of black acrylic for cleaning.
Jill Stingray Nendoroid
Jils Cat, it sleeps on the GPU
Jill Stool: Jill is glued to a cute doll stool to see over the bar
Jill Accessories non-Nendoroid: cellphone, purse, coat (ebay)
Dorothy Haze Nendoroid
will be added on release.
Bar Back:I made this myself
Black acrylic sheet, and frosted acrylic rods.
Doll Light power kit: 8 Led lights, 4 incandescent lights
USB Doll light power strip
Other Bar Accessories:
Overhead Hanging farmhouse light
trash, mop, broom, pan, mop bucket,
2 blue fuzzy chairs
Miniature plants
Miniature Microphone
Mini bottle Dom Perignon, an xmas gift from my friend nemo, it's
on the top shelf
Problems and changes:
1. ARGB, pretty pretty pain in the ass. 4 pieces of software........
2. The water loop was changed extensively as hardware came in and space limitations were discovered. The biggest change is that I originally planned to have one radiator on the front of the case, the tubes running over Jills head and to light the tubes as lighting for the bar, to do this the fan would have been in the case proper pushing the whole bar to far into the mobo, it didn't work, so the loop was moved to the top of the case and caused me to have one complex bent tube
Second, I had planned the loop to use one sideport on the distro, but space limitation moved both ports to the top causing the complex fittings setup in that corner.
3. The MOBO, sigh. This has been clearly the most challenging choice I made in this build, I really wanted it to work perfectly too, but I rolled those dice because: Aesthetic+function, the board I wanted (https://en.colorful.cn/en/home/product?mid=84&id=400d19bc-5655-49e1-b391-df00b60935ef) was to great a risk for the cost. This was a silver medal.
I generally dislike the design options I had in the Z790 series of the big board makers (I HATE big logos), especially the full ATX, there was one M that interested me, I should have picked it . This board has potential, but the BIOS is underdeveloped and compatibility has been problematic, I had to do a tricky outdated style BIOS update right from the box, and have had to reset the cmos a couple times. It skips BIOS on general boot and though stable, it will have to be addressed eventually, it doesn't have a proper sleep because of some issue between uefi & legacy. It may end up replaced, which will require a full build teardown.
the Turbo fan built into the board doesn't seem to function
Alos, the two argb connections on the mobo dont work, or I can't get them to recognize anything, necessitating the Coolermaster controller for the PSU and Distro. it is shoved behind the distro along with a Noctua 40mm
#va 11 hall a#va11ha11a#computer#pc#pcgamimg#sukeban#sukeban games#watercolor#watercooled#custompc#pc mods#jill stingray#fanart#cyberpunk art#futuristic#cyberpunk
21 notes
·
View notes
Photo
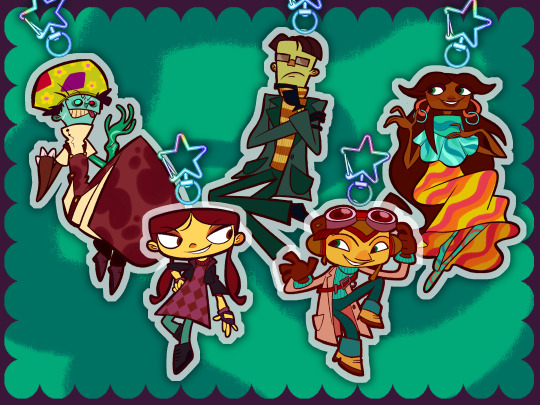


preorders for my Psychonauts 2 keychains are now up in my store!
they’ll be 3″, double sided, made from recycled acrylic and come with an iridescent rainbow star clasp and extra ~brain logo~ charm :3
they’re £12 each or you can get ‘em cheaper as a bundle! tracked international shipping that goes everywhere, too :-)
link in my bio!
🧠⭐ 🧠⭐ 🧠⭐
#psychonauts#razputin aquato#lili zanotto#sasha nein#milla vodelllo#caligosto loboto#raz aquato#dr loboto#doodle raz#psychonauts 2#double fine#THIS IS LOVINGLY MADE FANMERCH!!! if any of the devs see this feel free to reach out if it's not in line with your wishes!!!!!!!!
276 notes
·
View notes
Text

High fashion Ripley for @mothchimeart! SPARKLY!
This made with recycled gift wrap, washi tape, acrylic markers and these super cute moth stickers.
20 notes
·
View notes
Text
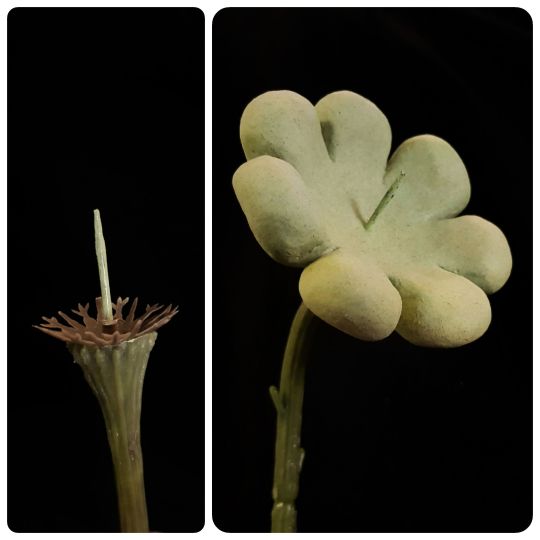
The Making of Strange Flower

Somehow I never showed my process of strange flower's creation. Below are the materials and steps.
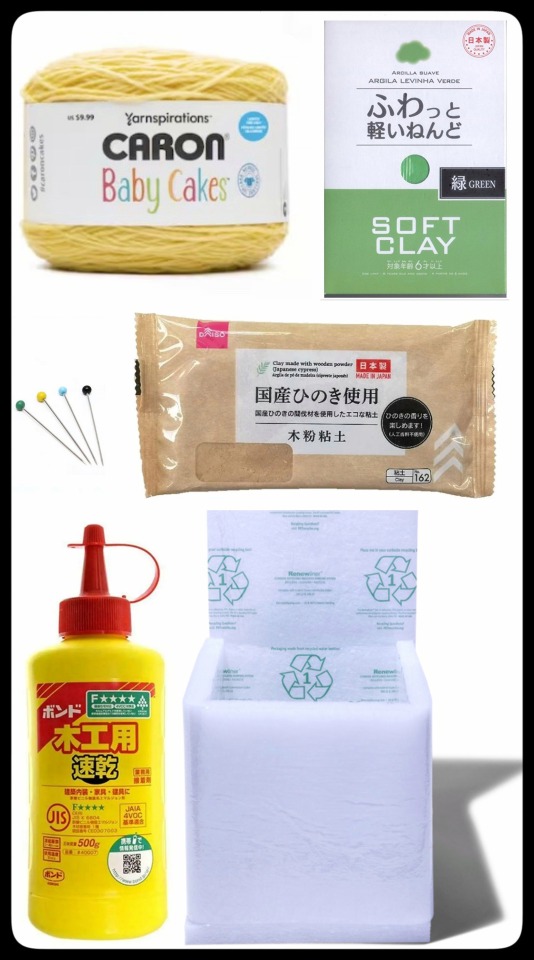
Materials I used:
Yellow wool (mine was yellow yarn that I carded myself with a carding brush / pet brush)
Cheaper white core wool (mine was recycled fluffs from poly batting of my pandemic-era grocery delivery packing liners)
Glass pins for eyes
Air dry clay (mine was green paper clay and wood pulp clay but you can color air dry clay with some acrylic paint)
Wood glue (for water resistance), or PVA glue (if you don’t care for water resistence)
A good stick. I got mine from an old messed up artificial flower.
Felting needles
Felting base foam (I used recycled polyurethane packing foam blocks from my online orders)

To make a strange flower:
Start by felting the base of your flower’s face. You can speed up this process by wet-felting with soapy water mid way. It should end up looking like a concave cookie.
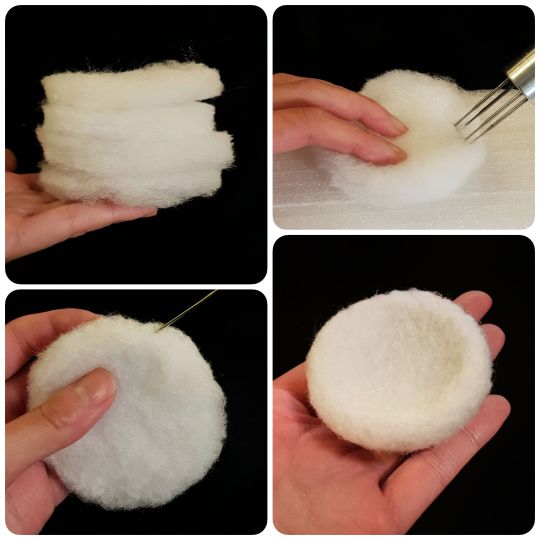
Then start to layer some yellow wool on top of your core wool cookie. Cover all the whites.

Then start to add details like cheeks, chin, and lips. You can test-place your flower’s eyes to better figure out the placement of your flower’s cheeks.
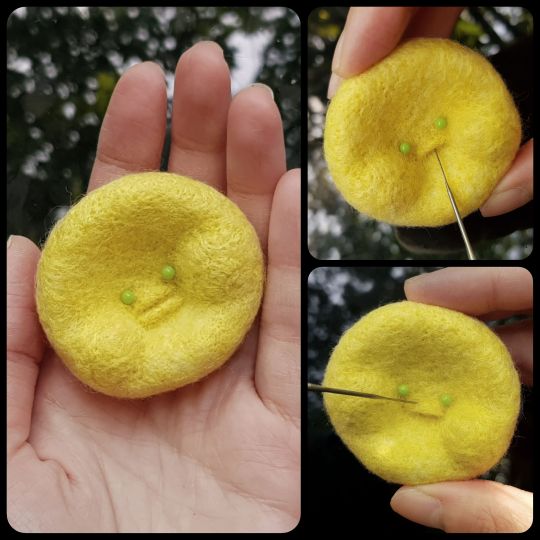
Then cut your glass pins short, bend the pin slightly downward (so it’s long enough to hold its position but won’t stick out the back of your flower’s head), and insert the beady eyes.

Start molding the desired flower petal shapes of your choice. I wanted mine to be plump. So I made it plump. Let it dry a bit. Then I added a water-down layer of wood glue and smooth out my clay petal. Poke a hole at the center of the petal about the size of the artificial stem.
Tip: If you’re also using an artificial flower stem, try to mold the base of your flower petal to fit into the stem head’s shape. Mine was a bit flat and ended up having a big gap and I had to use more glue to fill the void and it took ages to dry. Save any artificial petals you can salvage. Incorporate the ones that work with your strange flower. The rest can be materials for another project someday.
Once completely dry, pin your petals onto your artificial flower stem with some wood glue or PVA glue at its base.
Once the clay petal is dried and secured on the artificial flower stem, carefully poke your flower head on top.

And a strange flower is born! 🌷
#crafts#crafting#cute art#art#arts and crafts#upcycle#fiber art#springtime#flowers#flower#flowercore#bloomcore#tutorial#diy#weird friends#weirdcore#dreamcore#oddities#curio#creechur#fiber crafts#mixed media#sculpture#weird art#kidcore#prop design#puppetry#naturecore#nature art#botanical art
13 notes
·
View notes
Text


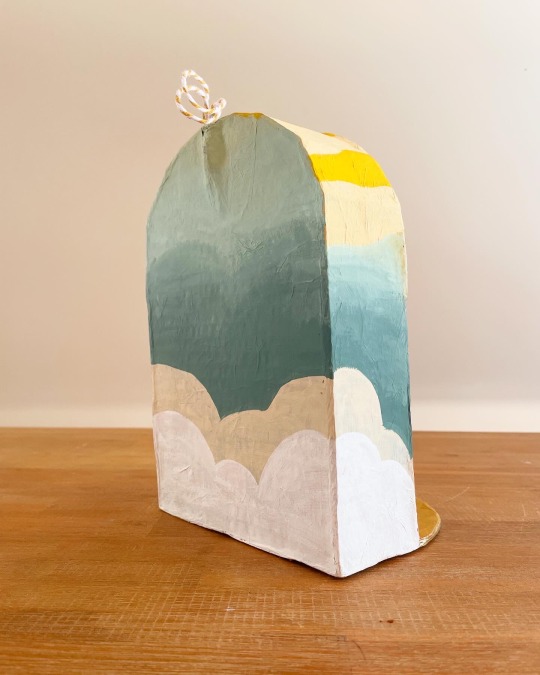
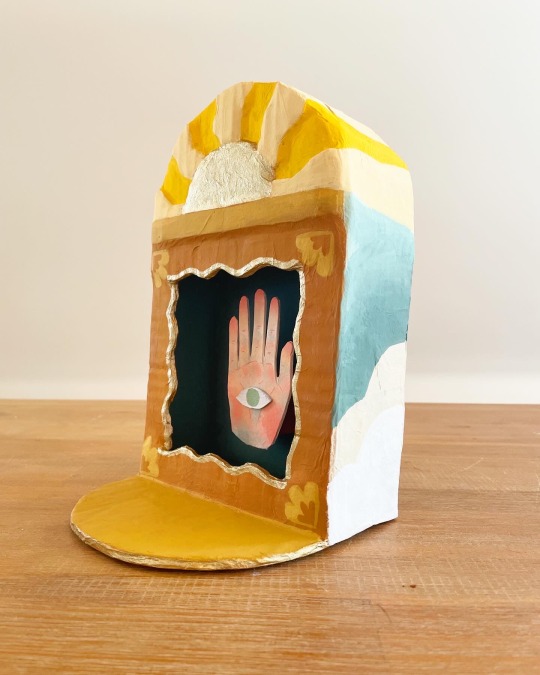
An Alter to the Sun 🌞
Made from recycled trash, papier-mâché and a mix of acrylics and gold oil paint.
#papier mâché#paper mache#paper craft#trash art#recycled art#recycling#reduce reuse recycle#alter#esoteric art#wall art#wall hanging#handmade#hand crafted#acrylic art
38 notes
·
View notes
Text

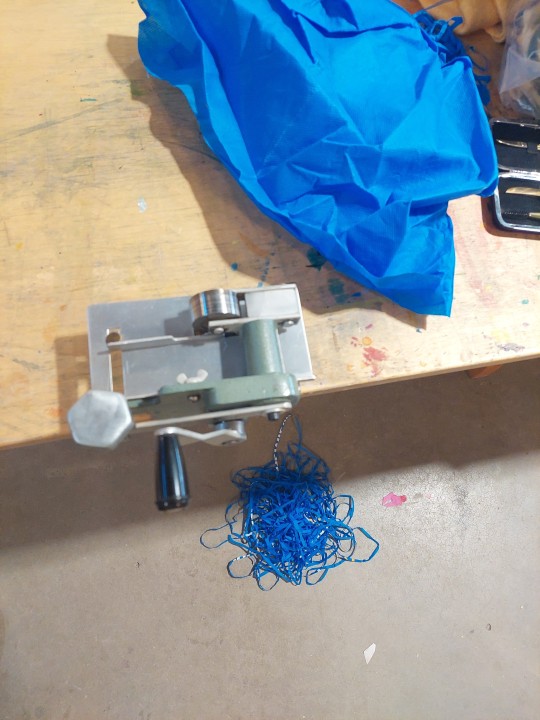
Not yet it's final evolution but finished enough for the requirements of this week's course, I present "And While The Fires Are Burning, Let's Make A Bunch More Gasoline (with apologies to Geoff Berner's Super Subtle Folk Song)" aka my "the oceans are full of plastic and the world is on fire" piece.
Needle punched on wool fabric with strips of reusable Walmart bags (from some of my instacart customers), and blue yarn (75% acrylic 25% wool, originally from Zellers), continents of wet felted wool that was ripped with a seam ripper to pull up the wisps of fire. Wooden safety matches.
Below are some of the challenges of constructing this piece. Cutting the felt open with a steak knife (because I was too lazy to go back to my desk for my scissors/ knew that if I got my scissors I would forget them in the dye kitchen and stress about having lost them in my messy desk). Testing various plastic strips (realizing the project would go faster if I paired the plastic with acrylic yarn). The plastic recycling bag that wrapped around the cutting blade. My pile of cut walmart worms. Using a drop spindle to ply the Walmart worms with the yarn (also showing off the Oxford punch needle the instructor brought in). Figuring out how to assemble the globe (I stapled 5 of the seams and did a ladder stitch to close the final seam. I should have hand stitched all of them but there's no way I could have machine stitched it, especially turning it inside out). And then mapping out the continents onto a spherical surface. That took a fair bit of time and troubleshooting. I made paper templates so I could test proportions before committing to cutting them out of my felt. I tried to add more detail to North America but it ended up quite wonky. Eurasia was a struggle but I ended up piecing it together with smaller sections, which also created mountain ranges.


Future plans: this is my contribution to the interdepartment collaboration on the theme of Nature and the Environment. I could add more handstitching and embellishment to the continents. I would like to refine my matches placement and create charms of oil and gas company logos to hang from the matches (likely using embroidery on water soluble material so they're light and airy).
I think I will abandon my dream of having actual fire on this piece, for safety reasons. However for the exhibition I think it would be fun to freeze ice onto the poles and let it slowly melt, as a sort of performance piece.
#fibre arts#climate change#needle punch#wet felting#sculpture#the oceans are full of plastic and the world is on fire
20 notes
·
View notes
Text
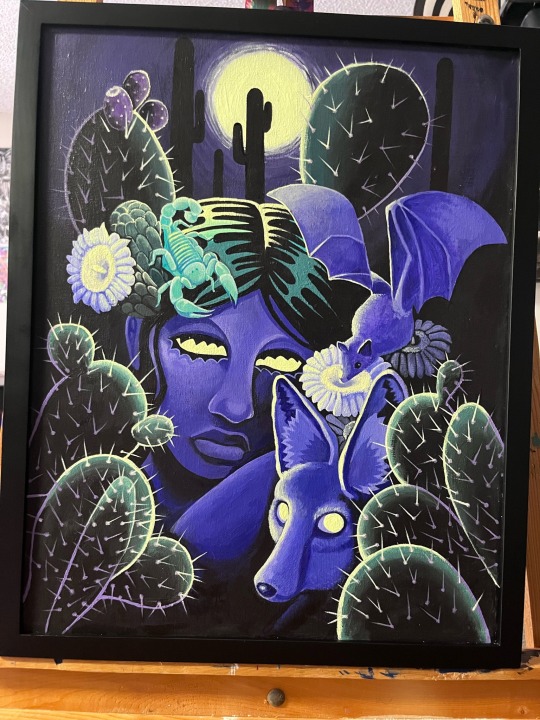

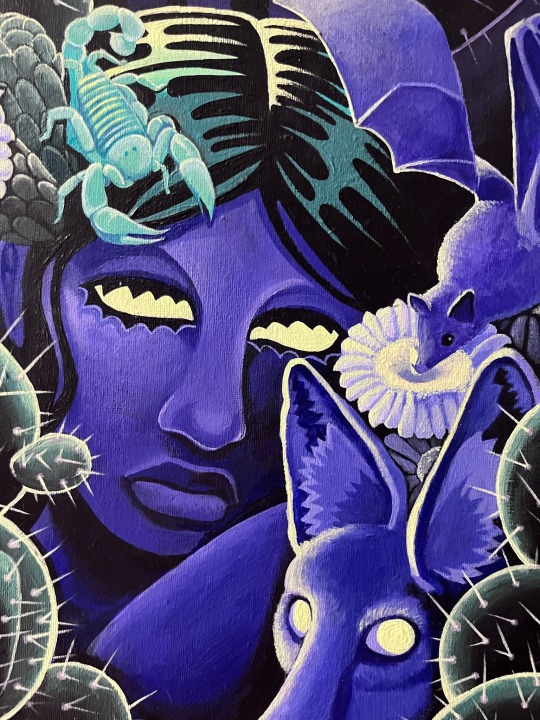
Night in the Sonoran (Acrylic on recycled canvas)
This is the first time I've painted something of this effort level, and the first time I made something specifically for a contest. This was my submission for the Phoenix Airport gallery. The submission theme was "night". The works being displayed will be announced in a month, but either way I feel very accomplished.
#artists on tumblr#painting#original art#traditional art#acrylic painting#night#desert#purple#sonoran desert
45 notes
·
View notes
Text
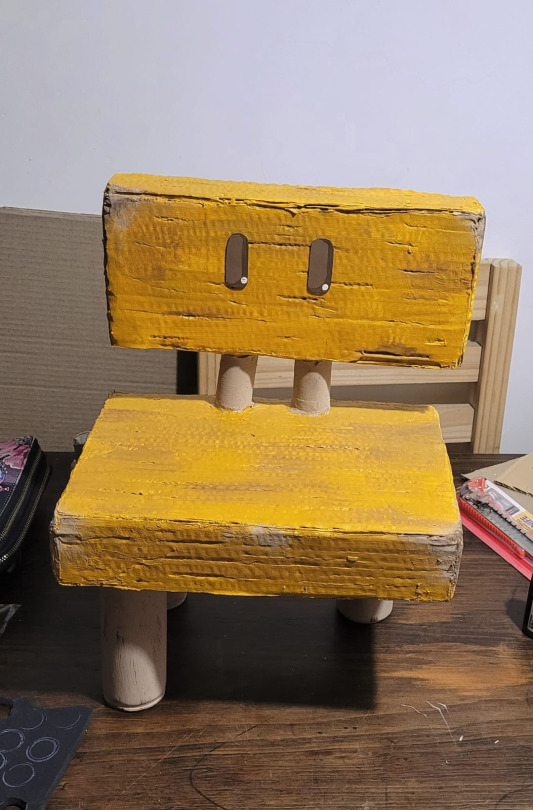
My Suzume cosplay update;
Souta/little chair is ready! 💖🥺
it is not the best thing I ever done, but I honestly love him so much alksjkl. I am proud to say it's done fully out of recycled materials! I didn't spend a single $ for this chair!
The body is made out of cardboard (texturized so that it would kinda look like old wood) and pieces of styrofoam that I had from my old air conditioner's box. For the little things that connect the backrest I used old little plastic droppers from one of the meds I take daily and for the legs, redbull cans! I painted his eyes with acrylic paint and the only thing left to do is the key! (I have to think a good way of diying it, but I think I'm gonna use soft gel and cure it with UV light)
#sashi cosplays:#suzume#suzume no tojimari#suzume cosplay#souta munakata#I'm pleased to say I have a “boyfriend” now 😂#sota suzume#souta suzume
57 notes
·
View notes
Last Seen Blogs