#ao3 tips and tricks
Text
Comments versus Bookmarks on AO3
A few people seemed appreciative of my post about how to use AO3's Marked for Later feature, so I thought I'd follow up with another tip about comments versus bookmarks.
As part of the amazing @justleaveacommentfest I noticed a few people mentioned leaving nice comments in bookmarks, and I thought it might help to have a little info about how comments are different from bookmarks, and why it's better to send a comment if you want to make an author happy or make fandom friends or have an interesting discussion.
Bookmarks *are* viewable by everyone, unless you make them private. If you plan to say anything negative in your bookmark, please make it private. It's not really the flip side, however, that leaving positive statements in your bookmarks will reach the author, though.
Most authors are alerted when they get new comments, either through their dashboard or via email if they choose, or both. Yay! Serotonin boost, and also the ability to reply back and start a conversation! Plus, readers can have great discussions with each *other* in the comments section of a fic! If you're super into a fic you can read comments on the chapter even years later, and sometimes find the author adding additional thoughts or discussing their thought process while writing! It's like DVD extras for fanfic! (Do kids these days know what DVD extras are any more? Damned if I know).
You don't really know, as an author, when someone bookmarks one of your fics. Some authors, particularly when they are feeling low (cough cough) may also look at bookmarks to see if there are nice things there. This would basically just involve clicking on the bookmarks for each of your fics individually to see if there's anything a.) new and b.) nice in them.
This is an act of desperation. It's not really a wise thing to do, as 99% of bookmarks have no comments, or just list the title and author in fear of the fic being deleted some day and not knowing what you're missing. Even worse, if you, as an author, get desperate enough to cruise your bookmarks, you are as likely to see someone say something like "Meh" or "This got boring so I stopped reading at Chapter 5" or "Too many werewolves 3/10" in a werewolf fic than you are to see a nice compliment.
So, if you loved a fic and want to memorialize your love in a bookmark, be an extra super-duper sweetheart and cut and paste that into a comment for the author! Make the AO3 environment enriching for both authors and fellow readers in the comments section, and protect your friendly local author by not providing intermittent positive reinforcement for the negative behavior of scrolling through bookmarks!
I still recommend bookmarking fics. Bookmark those favorite fics you want to come back and read later, or use bookmarks to leave yourself little reminders if they are nice or in private bookmarks if they are not nice. Bookmark good resources, like how to code things in html or how to use AO3 filters most effectively. Find awesome new things to read by looking through the bookmarks of your favorite authors, because if you vibe with someone's writing you may also vibe with their favorite fics to read!
#archive of our own#ao3#fanfiction#authors#writers#readers#bookmarks versus comments#how to ao3#ao3 tips and tricks#ao3 how-tos#ao3 resources
659 notes
·
View notes
Text
AO3 bookmarks are NOT auto-private
I’m making a PSA because so many times now I’ve seen people surprised that ao3 bookmarks aren’t automatically private. Authors and readers can and will see everything you say in the notes, or in the tags, of your bookmarks unless you explicitly tick the box to make them private (as circled in red, bottom left corner below)

I’m absolutely not saying this to have a go at anyone - I’ve had lovely readers, malicious readers, and no-particular-intentions-at-all readers surprised by this.
So, please, if you don’t like a fic and you want to keep a record of that fact (which is valid! not every fic is for every person, and there’s no shame in that of itself), make it a private record. It’s so shoddy to be looking through the bookmarks on your fic and have to see something negative that you can’t do anything about, and it’s so unnecessary when the private function exists.
But, hey, on a brighter note - bookmarks are also a lovely place to look through as an author!! If you write fics, check your bookmarks out, chances are there’ll be something wonderful there that will be that perfect little boost for how you feel about your fic. (Also, if you write for tropes/genres you really like, then if a reader has a bookmark tag, or has been positive about yours in general, then there’s a good chance they have other bookmarks of a similar sort that you might really enjoy reading! It’s often worth going through other people’s bookmarks in that case~)
Thanks for your time, and please reblog to help spread awareness of this mechanic!!
#ao3 literacy#ao3#ao3 bookmarks#fanfic#bookmark#bookmarking fics is NOT private#not automatically at least#please be considerate of authors and other readers#Writing tips#or reading tips I guess?#you get the vibe#not trying to have a go at anyone it's just not something I see talked about enough#and I really want people to be able to optimise their and others' experiences#whilst still being kind#because we write for free not to be slagged off by people who simply weren't the intended audience#and it's not a nice environment then#so just be kind yall#i promise its worth it#ao3 tips and tricks#ao3 mechanics
205 notes
·
View notes
Text
want your favorite author to update but don’t want to be too pushy in their comment section?
here’s 5 things you can do to encourage them:
Reblog their fic link on tumblr (bonus if it’s with tags)
Bookmark the fic with a note about what you’re excited about/love in the fic
Recommend the fic to your friends or local discord channel
Draw art or create other media for the fic (as indicated by the author’s comfort level)
Leave them a comment when re-reading about the parts of the chapter/story that stood out to you the second time
#this isn’t about me#this is just what I think a lot of authors would appreciate#more than the ‘update soon!!!’ comments#fic#fanfic#fanfiction#ao3#archive of our own#writing things#writing#reading things#reading#tips and tricks
32K notes
·
View notes
Text
Words to Use Instead Of...
Beautiful
stunning
gorgeous
breath-taking
lovely
jaw-dropping
pretty
glowing
dazzling
exquisite
angelic
radiant
ravishing
excellent
ideal
sightly
wonderful
elegant
bewitching
captivating
mesmerizing
enthralling
magnetic
impressive
tasteful
charming
desirable
enchanting
Interesting
stricking
unusual
appealing
absorbing
srresting
gripping
riveting
alluring
amusing
exceptional
fascinating
impressive
provocative
prepossessing
exotic
readable
refreshing
entrancing
exceptional
Good
honest
upright
dutiful
enthical
pure
guiltless
lily-white
reputable
righteous
tractable
obedient
incorrupt
respectable
honorable
inculpable
irreprehensible
praiseworthy
well-behaved
uncorrupted
irreproachable
Awesome
wondrous
amazing
out-of-this-world
phenomenal
remarkable
stunning
fascinating
astounding
awe-inspiring
extraordinary
impressive
incredible
mind-blowing
mind-boggling
miraculous
stupendous
Cute
endeaing
adorable
lovable
sweet
lovely
appealing
engaging
delightful
darling charming
enchanting
attractive
bonny
cutesy
adorbs
dear
twee
Shy
modest
sel-effacing
sheepish
timid
way
reserved
unassured
skittish
chary
coy
hesitant
humble
introverted
unsocial
bashful
awkward
apprehensive
If you like my blog, buy me a coffee☕ and find me on instagram! 📸
#writer#writers#creative writing#writing#writing community#writers of tumblr#creative writers#writing inspiration#writeblr#writing tips#writers corner#writers community#poets and writers#writing advice#writing resources#writers on tumblr#writers and poets#helping writers#writing help#writing tips and tricks#how to write#writing life#let's write#resources for writers#references for writers#writers block#ao3 writer#writerscommunity#female writers#writer things
4K notes
·
View notes
Text
A Simple Trick for Fic Writers
Hey, if you're a fic writer and a character speaks in a different language, you don't just have to add the translation in the notes. Use the following HTML coding to add 'text on hover' to the word(s). If the reader is on a computer they can hover over the text to see the translation.
<span title="This is the text in the box!">This is the text that shows in your fic!<;/span>
Here are some examples from a fic on my AO3.
This coding here <span title="a fool, idiot (lit. emptyhead)">Eyn utreekov</span> will show this on hover.

This next example shows that you can add a lot of text. The formatting is the same as above.

PS: When doing this, there may be spacing issues, but you can edit the text through AO3's html or rich text editor. From there you can add italics (like I did), bold, etc, and fix any weird spacing issues. Just be careful not to delete the coding that you worked so hard on 😂
#ao3#archive of our own#guide#tricks and tips#Fic Writers#Fanfiction#Writers#NiteArmor#bo katan x the armorer#The Mandalorian#Star Wars#Haven't seen this floating around so thought I'd share
11K notes
·
View notes
Text
Showing versus Telling
I struggle a lot with "showing and not telling." Here's some exercises and techniques I've tried to practice this from researching different methods that I just conjured up together (please take with a grain of salt, everyone is different, lol.):
Object Observation: Choose an object in your immediate vicinity and describe it without naming what it is. Include details about its texture, color, size, shape, and any other distinctive features. Basically: have someone else to identify it based on your description.
Character Emotions: Write a list of emotions and for each one, write a short scene that shows a character experiencing that emotion without directly stating what the emotion is. i.e., Instead of saying, "Alistair was angry", you could say... "Alistair's fists clenched, his jaw tightened; his face turned red as he stared at the broken amulet on the floor."
Active Verbs: Challenge yourself to rewrite sentences using more active, specific verbs. i.e., "She walked into the room" (telling) could become, "She strutted into the room, her boot heels clicking against the marble floor" (showing).
Sensory Details: Choose a setting, real or fictional, and describe it using all five senses. What can a character see, smell, hear, taste, and touch in this environment, or moment?
Dialogue: Use dialogue to reveal information about your characters and the plot. Instead of telling the reader that a character is upset, show it through what the character says and how they say it.
In-Depth Character Description: Take a character from your story and describe them in detail. Show their personality through their actions, speech, and appearance, rather than direct statements.
Rewrite Telling Sentences: Take a piece of your own writing or a passage from a book and identify the "telling" sentences. Rewrite them in a way that "shows" instead.
Hope this helps! ✍(◔◡◔)
#writing#creative writing#writing tips#writing advice#writing help#writing resources#writing tips and tricks#on writing#writers#ao3 writer#ao3 fanfic#archive of our own#fanfic
3K notes
·
View notes
Text
Build CHARACTERS!
Every time you write a book, you're creating a journey for your reader. Your main characters are the medium through which this journey is carried out. Your readers see the events in the book through your characters' eyes. Thus, it's very important to have characters that feel human, even though they might not be (if you're talking fantasy).
Now, of course, if your writing fantasy and your character is a dragon or some mythical fox, they won't act the way a human would. But that's the best part about making characters, you can give them layers. No matter the circumstance, every character will have a way of responding or reacting to it. That's where your characterisation comes in.
Here are a few things I do to make my characters, well characters:
1. MORAL CODE:
Your characters, regardless the genre, are the immediate connection to your readers. Fantasy or not, they'll be carrying the story. So they need to have a set of values that they follow. When you're affixing a moral code to your characters, first take an example setting. Suppose, you've created a character named A. Let's say A is a man and a detective by profession. Now let the main event of your story be a case of murder. Obviously, there's going to be an investigation. Let your detective (A) find out that the victim, who is a woman, was a sex worker. After the victim's body comes back from a forensic search, let there be signs of sexual assault. Now conventionally, as a detective, A is supposed to jump into action and go above and beyond to find the culprit and bring justice. But here is where you can add a characteristic that isn't conventional. Even though A is a detective, make him look down on sex workers. That would mean that A believes that the victim probably 'asked' for whatever happened to her. Your character needs to have a moral code so that they can ignite some sort of feelings in your readers. This moral code further also revs the whole process of character development. In a nutshell, a moral code is a set of beliefs that your character has which can either be agreeable, or questionable, or both. We call them the white zone (virtuous/agreeable), the black zone (evil/questionable) and the infamous morally grey zone (both).
2. OPPOSING QUALITIES:
This is by far the most interesting advice I have ever received. Opposing qualities are actually simple – it's one quality (that's good) and it's inverse (which is a flaw). What you do here is, you give your characters a good/admirable quality and then you give them flaws based on those specific good traits. Some of these that I have used are:-
helpful :: people-pleaser (you character helps others but at the same time seeks validation from others, thus only helps people who validate them)
confident :: cocky (you're character is confident, but they often come off as cocky in situations requiring humility)
perfectionist :: obsessive (are they a perfectionist or are they just obsessed with having things go their way only?)
supportive :: nosey (sure, they support all their friends, but they also tend to poke their nose into everything which makes them ignore or overlook people's boundaries)
straightforward :: rude (they are straightforward and don't shy away from speaking their mind which is good; however, they end up saying things which could be harsh or hurtful)
reserved :: unfriendly (character can be introverted and reserved too, but sometimes they get away with being outright hostile all in the name of their introvertism)
protective :: possessive/controlling (this is easy to confuse as both parties involve an exceptional amount of care for their loved ones, but ask yourself - are protective and possessive really the same?)
practical :: ignorant (one of my favourites; is your character just level-headed about stuff? or are they just heedless to others' emotions?)
There's so much more you can do with this one! Use as many traits and their inverses as you wish! This tip really helps a lot (speaking with experience)!
3. BACKSTORY:
Probably the most important part of making a character. Everyone has a backstory. You. Me. Most importantly, your character. Backstories as just significant events that alter the mindset of your character. It can range from something minimal to something grave. It could be a cup of coffee or it could be a traumatic experience. The experience could be personal or they could have been an observer; anything works as long as it affects them and hits their weak spot.
The following questions are important to frame a backstory:
• how does your character think?
• what is their moral code? are they in the black zone, the white zone, or the grey zone?
• what are their emotional fears? how do they deal with them?
• what is their level of emotional maturity? do they have any form of issues (trust, attachment, etc)?
• how was their childhood? how were the parents? how were the sibling, the relatives or family friends?
• was their school/college life good? did they have any life-altering experiences?
• what kind of friend circle do they have?
Answering these questions will help you get to know your character even better. Thus, making it easier for you to create your character for your readers.
4. THEIR EMOTIONAL ENVIRONMENT:
Your character has a family, or doesn't. Maybe they're an orphan, or grew up in a foster home. Evaluate what type of effect that may have on your character. Was the foster family abusive thus making your character too shy and timid? Or was life as an orphan so difficult that they learnt to be hyper-independent?
Include their friend circle in this. What type of friends do they have? Are they friends with the good kids? Or the bad kids? Or is it a mixed group? If it's a mixed group, then further focus on how the differences in opinions has an influence on your character. Use your character's emotional surrounding to build their functioning.
If you've come this far, thank you! Do let me know if these tips seem helpful/have helped you!
- Ashlee.
#books#writing prompts#writing ideas#writers#writer#writerblr#fanfiction writer#writers on tumblr#writers on ao3#writers on writing#writerscommunity#fanfics#fanfic#fanfiction#writing#writingtips#writingtricks#writers blog#writing tips#tips and tricks#ao3feed#ao3 fanfic#write#prompts#readers#characters#tropes#writers and poets#fanfic writing#writing fanfic
62 notes
·
View notes
Text
here’s my guide to making typesets! I use Word to make my typesets, Canva for designs, and Adobe to insert the majority of my designs.
this is a ton of info and I tried to make it as readable as possible, but plz let me know if u need any clarification!
Word: always use the app, the online program doesn't have all of the options needed
paper size: US Letter Borderless
then i flip it landscape, do custom borders, and select book fold. I do 1 inch on top and bottom, .75 in inside, and .5 in outside. i leave the gutter option alone and leave it set to 0. You can choose how large you want your signatures to be (sheets in booklet option on the margins page): I normally do 40 page signatures, but if it's a smaller text you'll want to go smaller for stability. after that, you should have a half page to start your typeset!
Inserting your fic:
the next thing you’ll do is insert your fic; on ao3 click entire story, CTRL A to select all, CTRL C to copy it all. Paste it into your document. word automatically detects the headings, and you should be able to see all your chapters on the left side bar (if you can’t see it, click the page numbers on the bottom left to open the tab).
Formatting:
you can do the next few steps in any order, but we’re going to fix the formatting now. you’ll want to CTRL A everything, pick a font and a font size. I normally use georgia and size 10, going smaller or larger depending on the file size.
To have an indent on every line: CTRL A your work to select all, right click the “normal” style, on the home tab. go to the bottom left, open the drop-down menu, and select “paragraph”. next to special, hit first line. i like to do .3, you can do whatever you want. i then like to make sure the space after is set to 0, the line spacing to single, and then hit save. it should automatically adjust your lines to start at whatever indent you picked.
To fix the spacing: go into the layout tab, and go to spacing. There'll be a before and after option: write in 0, then click enter for both of them. Word is a little bit bitchy so you have to force it do things sometimes. after this you can choose if you want single spacing, or 1.5, or whatever you want.
*sometimes, the way the fic was formatted when posted to ao3 means that even after setting the line spacing to zero, there will still be a space in between each line. this is where you have to troubleshoot. you can either go line by line to delete the excess space (yes, for real. and yes, it's just as awful as it sounds) or, sometimes, not every-time but sometimes, you can highlight the chapter text, go into the home tab on top, click the A with the purple eraser to erase all formatting, and then do all the beginning steps again, and it will get rid of the extra space.*
Now that your format is mostly fixed, delete the archive of our own beta, and anything else you don't want. I normally delete everything up to the title of the work, and leave that for creating my copyright page. Remember to do the same for the end of the work!
Page Breaks and Section Breaks:
the next part is the most crucial. it's how we format both the chapters, but also how we format the headings and footer. this was the part that took me the longest to figure out: it's the page breaks and section breaks. page breaks mark the place where one page ends, and another begins. section breaks will create a new section in your document, so you can break the beginning few pages from the rest of your textblock. This will allow you to insert page numbers that start on page one, instead of at the first page of the document.
I like to go the end of the description, and then click on the first chapter. then I'll add a section break. you can find this in the layout tab, click breaks, and then click section break. so now our section 2 starts with chapter one. After this, add a blank page after the description and before your new section, and then click on the first chapter. (adding a blank page allows for smoother formatting later with headers and footers)
I then go to each chapter, delete the authors notes at the start and end of each chapter, and add a page break at the start of each chapter. i like to use the heading tab on the left to click each chapter, so I know I'm actually starting the new page right where I need to, and other formatting won't delete the page break.
when I create a compilation fic, where I have muitlple fics in one typeset, I use section breaks at the starts of each new fic. this will allow the page numbers to continue, but I can then edit each sectio to change the fic title and the authors name. if you're really fancy, you can do this for each chapter title as well, you would just hve to use a section break for each chapter instead of page break. *Remember to click link to previous to turn it off, so you are only editing that section, and not all the other sections. this can be found in the heading and footer tab on the top, which will automatically open when you click on the heading or footer.*
Adding page numbers, authors name, text name:
To add a page number, I click the footer, which automatically opens the header/footer tab on top. Then, I click page numbers, add page numbers. I turn on different odd and even pages, which is also found in the header/footer tab. you'll have to insert page numbers on both an even and odd age to get them to show up once you click that option. Page one should be an odd page, page two should be an even page. I like to put the page numbers on the outside of the page. Then you'll click format page numbers, click "start at" instead of "continue from previous section", and write in 1. now your typeset starts at 1 on chapter one instead of the start of your document! you'll need to go back and delete the numbers that showed up on the first section, but remember to deselect link to previous before you do that! or you'll end up deleting your page numbers again.
to add text on page numbers:
click into the header/footer again. double click directly on the page number, then start typing. You ca highlight the whole thing to change the font, font seize, etc. I normally do the same size as my text, and I'll either do georgia font or garamond font. I google "copy paste line for text" to get that line dividing the page number from whatever text I have next to it.
to add graphics on an entire work:
you can go into the header or footer, go to the insert tab, and insert a picture. Doing it in the header or footer will ensure it's on every single page that shares that header or footer. I have done this in the past, and find it's cute, but it's also tricky because it needs to be small enough to fit inside the header or footer, and won't really be able to interact with the text because it's different on each page, while the graphic will stay in the same position regardless.
Blank Pages:
you want blank pages at the start and end of your textblock: this is what you'll be glueing your end papers to. even more, you'll want to ensure your total page number is both divisible by 4 (each page of paper will have four pages of your text on it, two to each side) and fits into your signature count. If you're working with a 40 page signature, and you have 420 pages, that's fine. You'll end up having the last signature only be 5 regular pages instead of 10, which is plenty enough to sew. you really just want to try and avoid only having one of two pages in that last signature, as that won't be very strong in holding up your end page, or be very stable in sewing on to your book block.
to make sure they're blank, with no page numbers, you'll want to insert a section break on the last page of text. Deselect link to previous, delete the page numbers and you should be all good!
Printing/Saving:
I'm on a mac. I don't know how you would do this on anything but a mac. let that be a warning lmao. but I will CTRL A everything, ensure it's US Letter Borderless, and then hit print. if you don't tell the document it's the right size, it'll be funky when you go to print because of the margins. to insert images, i click save as pdf. it'll save it in the correct order to print for your signatures, and then I upload it into adobe to edit further. that'll have to be a different post bc this is entirely too long already.
If you want to print directly from here, ensure it's printing the right size, flip on short edge, double sided. and you're all done!
#tips and tricks#typesetting guide#i woke up at 630 am with a purpose and shat this out#it might not even be legible#apologies in advance#how to typeset#bookbinding#fanfiction#ao3 fanfic#typesetting#microsoft word#adobe#canva#signature#resource
84 notes
·
View notes
Text
I'm doing a panel on how to write fanfiction 😆
So my town is having a comic con and entertainment expo, like a small version of Chicago's C2E2.
I signed up to do a panel titled "Beyond Canon: Mastering the Art of Fanfiction Writing." My reason behind doing this panel is to get people excited about writing, as I lead our local writing group.
In the panel, I want to touch on the following:
Introduction to Fanfiction: Define what fanfiction is and its significance in popular culture. Discuss its history and evolution.
Understanding Canon: Emphasize the importance of knowing the source material (canon) thoroughly before writing fanfiction. Discuss ways to research and interpret canon material.
Types of Fanfiction: Explore different genres and styles of fanfiction, such as alternate universe (AU), crossover, fluff, angst, and smut. Discuss the unique challenges and opportunities each genre presents.
Respecting Canon vs. Taking Creative Liberties: Discuss the balance between staying true to canon and taking creative liberties in fanfiction. Explore the ethics of altering or expanding upon established elements of the source material.
Feedback and Community Engagement: Discuss the role of feedback and community engagement in the fanfiction writing process. Explore platforms and communities where writers can share their work, receive feedback, and connect with fellow fans.
Legal and Ethical Considerations: Touch upon legal and ethical considerations surrounding fanfiction, such as copyright issues and respecting the rights of original creators.
The Impact of Fanfiction: Reflect on the broader cultural impact of fanfiction, including its role in fostering community, creativity, and literary analysis.
Q&A Session: Open the floor to questions from the audience, allowing attendees to seek clarification, share their own experiences, and engage in discussion.
Throughout the panel, I want to highlight some incredible fanfictions that have transcended their origins and made their mark in mainstream media as books, TV shows, or movies.
If you know of any fanfictions that have been turned into books, TV Shows, or movies please leave them below! If you have any thoughts or insights on what I should cover in specific areas, I'd appreciate your thoughts below! 😊

#ao3 fanfic#fanfiction#fanfic#writers on tumblr#fanfiction writing#ao3 author#ao3 writer#fanfic writing#fanfic writer#ao3fic#ao3#fanfiction writer#fanfics#writer problems#fanfic readers#fanfic writers#writing tips and tricks#writing advice#how to write#writing tips#writing guide#writing help#supernatural fanfic#stranger things fanfic#fanfictionfridays#canon rp#self insert x canon#canon writing#stranger things au#au writing
11 notes
·
View notes
Text
okay so I'm new to ao3 and still figuring it out and I'm probably gonna have lots of questions in the future but first one is
how do people tag a character that has multiple incarnations?
for example, Link from the Legend of Zelda series
would you tag it like "Link (Breath of the Wild)" or "Link (Ocarina of Time)" depending on which version of Link you're writing?
also, how would this work in the case of original fiction and AUs of said original fiction?
6 notes
·
View notes
Text
How to Use "Marked for Later" on AO3
People seem to be unaware of/confused about this, and I know it's a little tricky to find "how to use the site" info on AO3, so here's a little guide.
Log in to your AO3, this won't work if you're a guest I don't think.
When you find a fic you like and open it, at the top there should be a button that says "Mark for Later."

When you click it, it puts the fic on your "Marked for Later list."
3. To find your Marked for Later list, hover over your name and choose "My History."
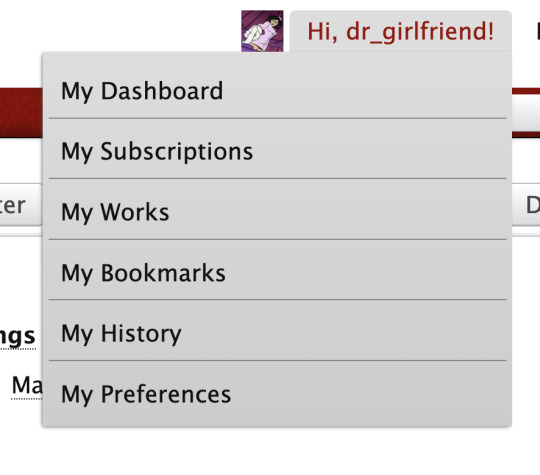
4. The history opens to a default page that is Full History, but next to that button is one that says "Marked for Later." Click on that to view the fics you've marked for later.

5. If you are reading a fic that you've marked for later, once you're done (and have left comments and kudos of course!) you can go back to the top, and where the "Mark for Later" button usually is you will see a button that says "Mark as Read" instead.

Clicking the "Mark as Read" button takes the fic off your Marked for Later list, but if you think you will want to find it again in the future it will still be in your Full History (unless you've deleted that fic from your history or cleared your history altogether, either of which you can do) and you can always make a Bookmark for the fic as well! Remember, authors can and do read bookmarks so be kind or make your bookmark private, and please do not try to add fics to Collections just for your personal tracking purposes.
#fanfiction#authors#readers#ao3#archive of our own#ao3 how-tos#ao3 resources#how to use the marked for later function#marked for later#how to ao3#ao3 tips and tricks
96 notes
·
View notes
Link
Chapters: 2/7
Fandom: No Fandom
Rating: General Audiences
Warnings: No Archive Warnings Apply
Additional Tags: HTML, Meta, Guide, Fanwork Research & Reference Guides, Reference material, tutorial
Summary: Frustrated by the way that AO3 would change or ignore HTML code I inserted, and unable to find an up-to-date, detailed guide, I decided to investigate the functionality of every tag that is permitted by the platform.
I learned a lot, and hopefully you can too!
Planned content:
Chapter 1 - Appearance Tags (tags which format text, and insert lines, etc.)
Chapter 2 - Functionality Tags (tags which do something; e.g. creating links to other pages, hover-over text, insert images, etc.)
Chapter 3 - Layout Tags (tags which affect the placement of the text on the page)
Chapter 4 - Tables (all by themselves because they’re a bit more complicated the other tags)
Chapter 5 - Global Attributes (general elements within tags that work on most tags)
Chapter 6 - Tips and Tricks (stuff I’ve learned about using HTML on AO3 the hard way so you don’t have to)
Chapter 7 - Accessibility (how to help people access your words and images more easily)
#ao3#ao3 html#html#ao3 formatting#guide#tips and tricks#html coding#hypertext markup language#reference material#tutorial#oc
55 notes
·
View notes
Text
your friendly weekly reminder:
ratios don’t mean shit
no fic is too short or too long
you don’t have to do what your commentators want
some of the best fics get 0 comments
some fics get more kudos because they’re in a popular fandom/pairing at a popular time
people will enjoy your fic without commenting and that’s hard sometimes
keep writing ❤️
#ao3#archive of our own#writing#writing things#tips and tricks#reading#reading things#fandom#some thoughts this Friday afternoon
20K notes
·
View notes
Text
So, You are Stuck in Act II.
Analyze the stakes. Ask yourself what the main character will lose if he does not achieve his objective.
Strengthen the adhesive. What is it that bonds the Lead and the opposition together?
Add another level of complication.
Add another subplot. Use this one sparinigly. Subplots must be organic and relate to the main plot.
Push on through the Wall. Sometime, the Act II Problem is merely writer's exhaustion. A temporary loss of confidence.
Take one whole day off from writing.
Try to spend some time at a peaceful location
Spend at least thirty minutes sitting without doing anything.
Do something for pure fun
In the evening, drink a glass of warm milk and fall asleep reading one of your favorite writers.
First thing the next day, write at least three hundred words on your novel.
How To Trim An Overweight Middle
Combine or cut characters.
Absorb a subplot
Trim the dullness. Cut the long descriptions and dialogues lacking tension.
If you like my blog, buy me a coffee! ☕
Reference: <Write Great Fiction: Plot and Structure (techniques and exercises for craftin a plot that grips readers from start to finish)> by James Scott Bell
#writer#writers#creative writing#writing#writing community#writers of tumblr#creative writers#writing inspiration#writeblr#writing tips#writers corner#writers community#poets and writers#writing advice#writing resources#writers on tumblr#writers and poets#helping writers#writing help#writing tips and tricks#how to write#writing life#let's write#resources for writers#references for writers#writer community#writerscommunity#female writers#ao3 writer#writers block
410 notes
·
View notes
Text
I put together a simple guide for some HTML coding to use on AO3. The topics covered are the following;
Text Coding (bigger/smaller lettering, subscript/superscript, bold, and italics)
Headings (6 different header types)
Ways to add Translations, Definitions, and Unique Author Notes (Includes hover over text, Anchor Points, and Footers)
Lists (Numerical and Bullets)
Embedding URLs
Embedding Images
#AO3#Archive of Our Own#HTML#Tips and Tricks#Writing#Fanfiction#Fanfic#Writers#Writer#Fandom#Basic Coding#Guide#Reference#How To#idk what else to tag
456 notes
·
View notes
Text
Got any AO3 tips we can add to our upcoming podcast recording?
Hi all, if you aren't already aware, I co-host a podcast with @sam-is-my-safeword (Karlee) called @idlingintheimpalapodcast. We talk Supernatural, the fanfic it inspires, and whatever tangentially our discussions lead us.
We are preparing to record an AO3 tips and tricks episode this Friday (September 8th). We want to know your AO3 secrets. Whether you are a fanfic reader or writer, please share in replies or send me or the podcast account a message.
It can be ways you sort or filter, things you've learned along the way when it came to posting a story, bookmarks, tagging, whatever.
Also, give us a listen and maybe subscribe or follow? We are always looking for new people to connect with about things we love.
Thanks!
Sandra
16 notes
·
View notes
Last Seen Blogs

taylorwdz
﹫taylor

atlantus
always trying to be good

alicialucas-blog
Feminist Rican Mom

mybeeznest-blog
The Beez Nest

bibliothecaria
Bibliothecaria